|
KIT # |
5505 |
|
PRICE: |
@$35.00 |
|
DECALS: |
Two aircraft |
|
REVIEW : |
Michael Wolf |
|
NOTES: |
` |
|
HISTORY |
Walter and Reimar Horten were pioneers of the tail-less all-wing aircraft, building a succession of beautifully graceful sailplanes with outstanding performance in 1936-40. The sailplanes were followed by examples with two pusher engines. Their practical experience in building flying wing aircraft was at that time unique in the world. In 1943 Walter became interested in constructing a high-speed aircraft of wooden construction. Reports from Lippisch's DFS 194 (later Me-163) tests at Peenemunde convinced him that even wooden aircraft could carry jet or rocket engines. In August 1943 he met Hermann Göring, and the project was approved.
The first prototype Horten IX V1 was built in a glider configuration. It was completed in only six months, and test-flown for the first time in Feb 44 in Göppingen. Parallel to the fight tests of V1, a second prototype was being developed; two turbojets powered the V2. Of mixed construction, it incorporated some improvements: BMW 003 engines were used instead of planned Jumo 004. The large front wheel was fashioned from tail wheel assembly of a He-177 and main landing gear was borrowed from Bf-109G.
 The first flight was made in
Oranienburg on 2 Feb 45, piloted by Erwin Ziller. It reportedly showed very good
handling qualities with only a shade of lateral instability. The second fight
itself was equally successful, but the brake parachute damaged the undercarriage
during landing. Two weeks later, on the third flight a disaster struck. Ziller
took off as before to perform flight tests, when at 800m one of the engines
stopped. The pilot was in control of the situation and pushed the aircraft into
a shallow dive to help re-start the engine. Suddenly at 400 meters, the
undercarriage extended, the aircraft lost speed and went out of control. Erwin
Ziller was killed in the crash, and the prototype completely destroyed.
The first flight was made in
Oranienburg on 2 Feb 45, piloted by Erwin Ziller. It reportedly showed very good
handling qualities with only a shade of lateral instability. The second fight
itself was equally successful, but the brake parachute damaged the undercarriage
during landing. Two weeks later, on the third flight a disaster struck. Ziller
took off as before to perform flight tests, when at 800m one of the engines
stopped. The pilot was in control of the situation and pushed the aircraft into
a shallow dive to help re-start the engine. Suddenly at 400 meters, the
undercarriage extended, the aircraft lost speed and went out of control. Erwin
Ziller was killed in the crash, and the prototype completely destroyed.
Despite of this setback, the project continued with sustained energy. The prototype shop has been moved to Gotha in Friedrichsrode. In Mar 45 work commenced on the third prototype, the Go 229 V3. The V3 was larger than previous prototypes, the shape was modified, and it was meant to be a template for the pre-production series Go-229 A-0 day fighters, of which 20 machines had been ordered. V3 was powered by two Jumo 004C engines, and could carry armament of two MK108 30mm cannon in the wing roots.
Unfortunately for the Luftwaffe, U.S. forces overran the Gotha factory on 14 Apr 1945 and found an almost completed, but not yet flown, V3 there. Four more machines, Go 229 V4, V5, V6 and V7 were in various stages of completion, the V4 and V5 being two-seater prototypes of the projected night-fighter version.
The Americans took the V3 to the US, and it was obviously a great material to study. Amazingly enough, the V3 has been preserved to this day, stored at the National Air and Space Museum's Aircraft Restoration & Storage Facility.
|
THE KIT |
Dragon’s 1/48th kit was shown to me on one of my many trips to the local hobby shop. The proprietors knew my penchant for unusual yet interesting kits and my ability to rapidly dispose of my income. When I opened the box, I was presented with medium gray styrene on multiple sprues, which showed slight flash and a few sink marks. The scribing was acceptable; not as fine as Tamigawa, yet far better than most "short run" kits. The clear parts were bagged separately and there was a fret of etched brass of seatbelt buckles, an IDF loop, the "D rings" for the engine bullets and other goodies. The decals appeared, at first glance, to be acceptable, although the red turned out to be out of register (there is a white underlayment that shows in close up pictures). The "fuselage" (if there is such a thing on a flying wing) is split top and bottom, with the nose section being a separate part … more on that later. The wings are split, upper and lower, port and starboard. The engines consist of left and right hot sections, tail cones and bullets with turbine blades molded on to them. There are also several hoses and fittings that attach to various parts of the turbojets. All in all, the kit includes 105 gray pieces, 6 clear and 15 etched.
|
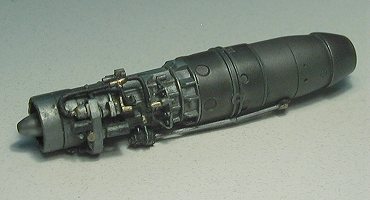
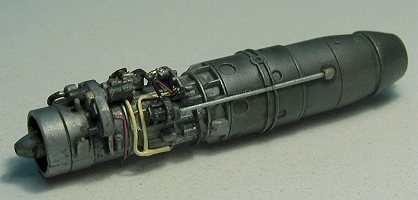
CONSTRUCTION |
Construction began with … SHOCK … the engines and landing gear, versus the standard cockpit assembly steps. Most of the smaller parts were removed from the trees, cleaned up and painted. The engine halves, bullets and tail cones were painted before inserting them into the hot sections. After the hot sections were assembled, seams were cleaned up and the parts sprayed with various shades of ModelMaster metalizer enamels. I found that many of the smaller bits and pieces for the engines to be rather fiddly … and the instructions were not totally clear on placement. Often, I had to study the drawings for the particular step as well as later drawings to get a good idea of exactly how a particular part was aligned. The color callouts, being only for Gunze Sangyo paints, were of little help … to me, anyway. I did not follow the instructions explicitly, for sections such as the landing gear, except for painting, I held until later.
 |
 |
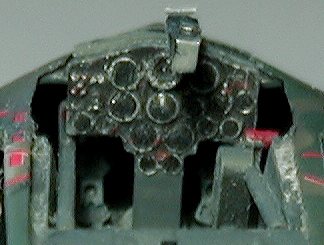 I assembled the cockpit in
sequence but left the seat out until after painting. I built the belts per
instruction … and somehow lost them. Gremlins or something … I’m not sure. I
ended up having to raid a Waldron set, which, I know, is not accurate for
Luftwaffe aircraft, but they look better than nothing. There is a bar that goes
across the top of the instrument panel that I could not get to fit to save my
skin. Before it dried, I test fitted the fuselage halves (top and bottom)
together and the bar was knocked loose. I left it off until after painting. The
instrument panel was painted RLM66 and dry brushed white. Switches and knobs
were picked out with RLM23 (Rot) and the glass dials getting a drop of Future.
I assembled the cockpit in
sequence but left the seat out until after painting. I built the belts per
instruction … and somehow lost them. Gremlins or something … I’m not sure. I
ended up having to raid a Waldron set, which, I know, is not accurate for
Luftwaffe aircraft, but they look better than nothing. There is a bar that goes
across the top of the instrument panel that I could not get to fit to save my
skin. Before it dried, I test fitted the fuselage halves (top and bottom)
together and the bar was knocked loose. I left it off until after painting. The
instrument panel was painted RLM66 and dry brushed white. Switches and knobs
were picked out with RLM23 (Rot) and the glass dials getting a drop of Future.
The instructions would have had me add the engines to the forward nosepiece at this time. Not this kid … I didn’t want to muck them up during painting. I did make sure that I would be able to insert the engines later in the assembly process, so I wasn’t taken by surprise later. I also left off the canopy parts until later as well. The inserts for the wing root were cleaned up and detailed. Too bad that they cannot be seen in the final model; they do add quite a bit of detail to that area. The nosepiece was added, per instructions. It is this one part, more than any other in the kit that gave me problems, all the way through construction and painting. The joint between the upper and lower fuselage pieces with the nosepiece is a butt joint. There is really not enough gluing surface for a strong join. I used Tenax; I tried super glue; I tried every type of glue I had available: the joint split every time I put any pressure on it at all. During sanding, in preparation for painting, I heard a "pop" … one of the lower joints had released. After messing with that several times … I ended up setting the model down for at least 6 months.
 … We now pause for station
identification … OK … I’m ready to tackle that monster again …
… We now pause for station
identification … OK … I’m ready to tackle that monster again …
The kit is engineered so that the wings, removable on the full size aircraft, could be removed at will. I found that the edges were not true enough to do that and still be able to look myself in the mirror (so to speak). My decision was to permanently attach the wings. Using plenty of Tenax in the seam and by substantial pressure during curing, I did manage to get the wings attached at least with equal dihedral, port and starboard. There was a pretty good step above one wing, below the other. Much sanding and re-scribing of lost panel lines (there are very few on this aircraft) followed. I even used a small drill in a pin vise to replace the rivets. I filled the engine area with cotton balls, used white glue to attach the engine covers and masked off the other areas with masking tape in preparation for painting.
|
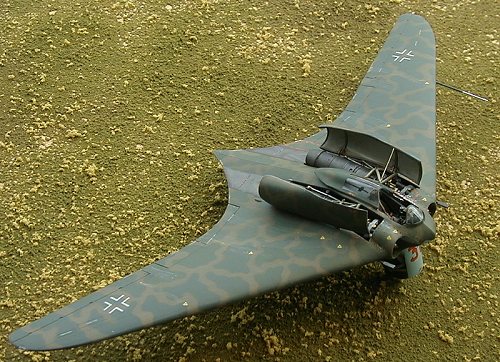
CAMOUFLAGE & MARKINGS |
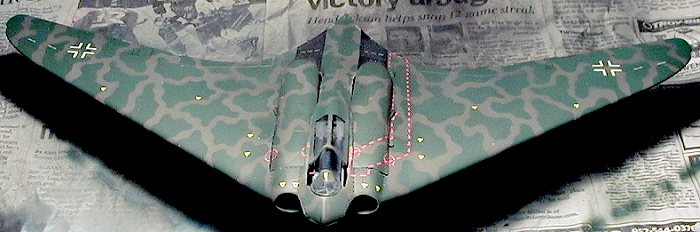
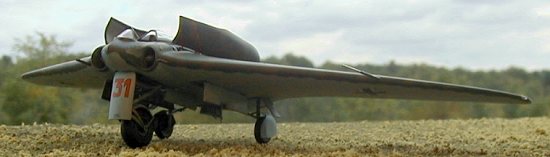 I decided that, since this
aircraft did not see operational service, I was basically free to do as I
wished. Many models of the Ho-229 that I’ve seen have been done in the
traditional "splinter" camouflage. I wanted to do something different. I’ve
always liked the "mirror" style of camouflage done on He-219 Owls … so I thought
that I’d do something similar, albeit with a larger pattern. I shot the
undersides with RLM65 Hellblau (because I really didn’t want to use RLM76
Lichtblau). While that was drying, I taped two pieces of printer paper together
(can’t call it "typewriter paper" anymore) and traced the outline of the model
on it. I then randomly drew patterns, trying to keep a
I decided that, since this
aircraft did not see operational service, I was basically free to do as I
wished. Many models of the Ho-229 that I’ve seen have been done in the
traditional "splinter" camouflage. I wanted to do something different. I’ve
always liked the "mirror" style of camouflage done on He-219 Owls … so I thought
that I’d do something similar, albeit with a larger pattern. I shot the
undersides with RLM65 Hellblau (because I really didn’t want to use RLM76
Lichtblau). While that was drying, I taped two pieces of printer paper together
(can’t call it "typewriter paper" anymore) and traced the outline of the model
on it. I then randomly drew patterns, trying to keep a
 moderately consistent separation between
"splotches" yet remaining as random as possible. It took me two sessions to
remove all of the areas I needed to. Using Parafilm, I masked off the leading
edge underneath the wings and shot the entire upper surface (and that wrapped
around section) with RLM81 (which I found is closer to Olive Drab than Olive
Drab is). When the RLM81 had dried, I started at one wingtip and laid the
pattern directly on the model. Due to the curvature of the wing, the pattern
actually stood off of the model slightly. I had turned down the pressure on my
Paasche VL, not wanting to disturb the pattern too much while painting. I shot
about 4" worth, carefully lifting the pattern, and let that section dry a little
bit. I next matched up the pattern with what I’d just painted and shot the next
section, up to the fuselage centerline. I continued this method until the entire
upper surface was painted. After letting it dry over night, I turned the model
over and shot the pattern across the leading edge, matching to the pattern on
the upper surface. After shooting the final RLM80, I removed the Parafilm from
the lower surfaces.
moderately consistent separation between
"splotches" yet remaining as random as possible. It took me two sessions to
remove all of the areas I needed to. Using Parafilm, I masked off the leading
edge underneath the wings and shot the entire upper surface (and that wrapped
around section) with RLM81 (which I found is closer to Olive Drab than Olive
Drab is). When the RLM81 had dried, I started at one wingtip and laid the
pattern directly on the model. Due to the curvature of the wing, the pattern
actually stood off of the model slightly. I had turned down the pressure on my
Paasche VL, not wanting to disturb the pattern too much while painting. I shot
about 4" worth, carefully lifting the pattern, and let that section dry a little
bit. I next matched up the pattern with what I’d just painted and shot the next
section, up to the fuselage centerline. I continued this method until the entire
upper surface was painted. After letting it dry over night, I turned the model
over and shot the pattern across the leading edge, matching to the pattern on
the upper surface. After shooting the final RLM80, I removed the Parafilm from
the lower surfaces.
I allowed all of the painting to dry overnight before applying a coat of Future in preparation for decals. There are actually few decals for this aircraft, with the majority being "Nicht Standen" (or something like that) around the edges and on the control surfaces. I chose the crosses with the smaller "bars" for the upper surfaces because: (1) I was offered a choice; (2) I like the way they look. After the decals had dried for several hours, I lightly washed off the decal residue and shot another coat of Future for weathering … such as it is. I applied a wash of Poly-S Grimy Black, diluted 25% with water and 25% dishwashing soap. Wiping off with a damp cotton ball left the wash in the control surface lines, although the panel line scribing is so shallow that the wash is barely visible there. Another coat of Future to seal everything up and all of the masking was removed.
|
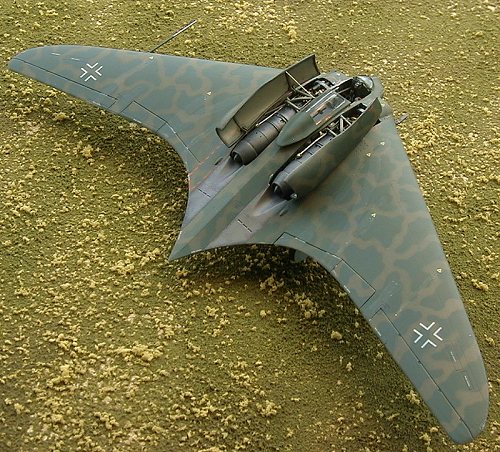
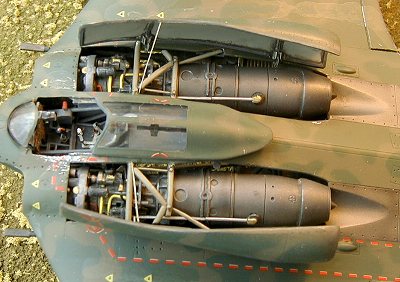
CONSTRUCTION CONTINUES |
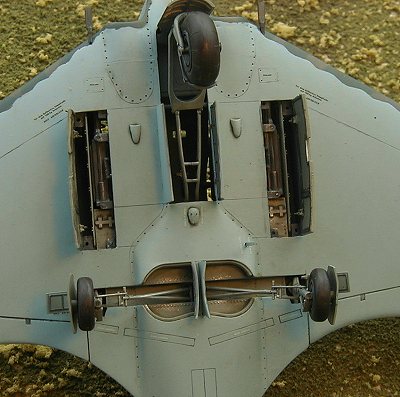 The kit is engineered such
that the builder has the option of either adding structural braces over the
engines OR using the covers. For one thing, the covers do not fit that
well. For another, why hide all of that beautiful detail when you don’t have to?
The decision was made to fabricate interior framing for the covers, as well as
hinges … and display the structural members AND the covers. I made the
interior framing out of thin card strips, attaching a short section at a time
making sure that the section was firm before continuing. Strips longer than
necessary were used for the circumferential pieces to make sure that they fit
snugly into the cover and that they were long enough. When dry, the excess was
trimmed. After all the framing was added and any boo-boos cleaned up, I masked
off the outsides and shot the interior RLM02. When that was dry, the frames were
brushed RLM66 to provide a contrast and a wash added to dirty things up a bit.
The covers for the MK108 cannons underneath the wings received the same
treatment. The hinge attach points are two (very) small PlastiStrut "T" pieces
butted together; the hinges are thin card stock, punched out with a Waldron
punch and die set. Each resulting circle was cut in half and glued between the
attach points. The hinges do not carry the weight of the covers: the covers are
attached directly to the top of the fuselage. But they look good …
The kit is engineered such
that the builder has the option of either adding structural braces over the
engines OR using the covers. For one thing, the covers do not fit that
well. For another, why hide all of that beautiful detail when you don’t have to?
The decision was made to fabricate interior framing for the covers, as well as
hinges … and display the structural members AND the covers. I made the
interior framing out of thin card strips, attaching a short section at a time
making sure that the section was firm before continuing. Strips longer than
necessary were used for the circumferential pieces to make sure that they fit
snugly into the cover and that they were long enough. When dry, the excess was
trimmed. After all the framing was added and any boo-boos cleaned up, I masked
off the outsides and shot the interior RLM02. When that was dry, the frames were
brushed RLM66 to provide a contrast and a wash added to dirty things up a bit.
The covers for the MK108 cannons underneath the wings received the same
treatment. The hinge attach points are two (very) small PlastiStrut "T" pieces
butted together; the hinges are thin card stock, punched out with a Waldron
punch and die set. Each resulting circle was cut in half and glued between the
attach points. The hinges do not carry the weight of the covers: the covers are
attached directly to the top of the fuselage. But they look good …
|
CONCLUSIONS |
Were it not for the problems that I had with the nosepiece constantly separating under any pressure at all, I would have really enjoyed this kit a lot more. Not that I didn’t enjoy it, mind you … it’s just that the frustration factor sometimes got the better of me. Overall, I think this kit can be built to fine standards right out of the box. With little additions here and there, the kit really becomes an eye-grabbing piece. It will definitely add to anyone’s collection, be they Luftwaffe fans or not.
|
REFERENCES |
Copyright ModelingMadness.com. All rights reserved. No reproduction in part or in whole without express permission from the editor.
If you would like your product reviewed fairly and fairly quickly, please contact the editor or see other details in the Note to Contributors.