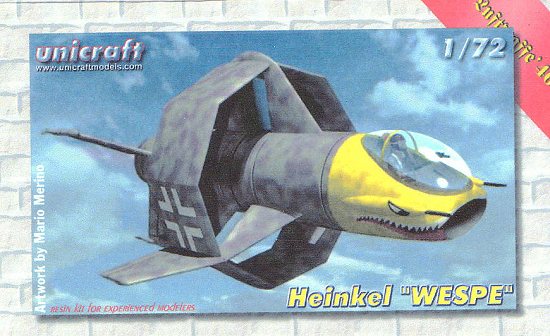
Unicraft 1/72 Heinkel 'Wespe'
|
KIT # |
|
|
PRICE: |
$20.00 |
|
DECALS: |
See Review |
|
REVIEW : |
Allan Wanta |
|
NOTES: |
Resin. Difficulty level: 4 of 5 |
|
HISTORY |
Heinkel designers and dreamers late in 1944 came up with two novel defensive aircraft designs. One was the Lerche and the other a smaller turbo jet powered Wespe VTOL vehicle. Neither design went any further than scratching the designs on paper. As many countries played with the idea of vertical take off aircraft immediately after the war, none was efficient until the introduction of the Harrier in the 1980's. Technology was always catching up with the dreams so it was doubtful the early German designs would have taken flight. The pilot sat upright in this model unlike the aforementioned Lerche, and was armed with two 30mm cannon in the nose.
|
THE KIT |
The kit came in it's usual brightly decorated hand made box, all parts being contained in a thin poly bag segmented into pockets to keep the pieces from becoming lost or damaged. It worked and only a small broken wheel was noticed, easily attached with super glue. Earlier scans of this kit in its first production run show vast improvements in my newer version. Igor at Unicraft has certainly made leaps and bounds to improve the quality of the kits. The pale blue brittle resin is probably the only thing keeping him from going head-to-head with the other resin manufacturers as far as appearance. Certainly the engraving and molds are equal to the best.
The kit includes a nice clear canopy and mold to make others if you need. The only thing lacking is an interior, none is supplied and here is where 'modeling', not just 'assembling', comes in. We often take putting kits together as a given that all is in the box, I prefer to use a bit of imagination as well as glue. So the first thing to do is prep the resin, smooth out some ripples on the surfaces and flat sand all major pieces for that perfect fit.
|
CONSTRUCTION |
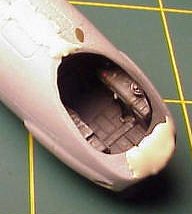
 Meet Mr. Dremel, he's going to be an
important item in this next step. We're going to go and make an interior out of
scrap plastic, old bits from the parts bin, and lots of imagination and fun! Cut
the intake and exhaust open after taping the two fuselage halves together, plan
on putting in a piece of aluminum tubing to represent the engine exhaust. What
luck! I had a scavenged CMK Me-163B interior that fills the void perfectly! The
detail looks great and the seat as well as controls fit with little argument.
This part of modeling is called Kit Bashing.
Meet Mr. Dremel, he's going to be an
important item in this next step. We're going to go and make an interior out of
scrap plastic, old bits from the parts bin, and lots of imagination and fun! Cut
the intake and exhaust open after taping the two fuselage halves together, plan
on putting in a piece of aluminum tubing to represent the engine exhaust. What
luck! I had a scavenged CMK Me-163B interior that fills the void perfectly! The
detail looks great and the seat as well as controls fit with little argument.
This part of modeling is called Kit Bashing.
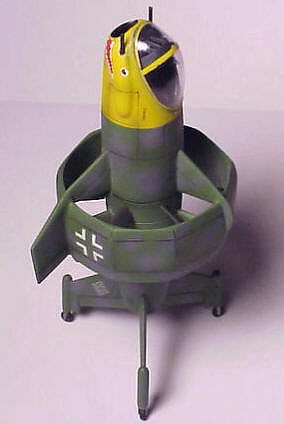
With the interior problem solved the rest of the main fuselage construction
went quickly. One point of concern, and it's probably my mistake; the ducted
wing sits a bit far forward on the support wings. I checked the drawings
supplied and it is a bit too far forward, but installing it in the proper
location leaves a lot to be desired and Bondo will be liberally used. So I left
it cause it looks better, next one I do I'll move it forward and see how I feel
about it. The inner portion of the two piece ducted wing does have its fair
share of bubbles and needed to be filled in, the exterior was perfect and that's
what matters. Since instructions are not super clear, carefully follow the
drawings for placement of the empennage parts, scribed marks locate most of
these members as well as the 6 fan blades. You get 9 blades, as the 3 sprues are
duplicates that include 3 of everything need. Attaching these puppies to the kit
should be done after all painting is done but beware. Because the ducted wing is
not perfectly round, some of these blades will have to be shortened as I found
out, they wouldn't appear oddly sized when the kit is finished.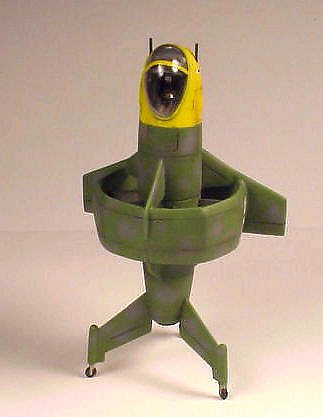
|
PAINT & DECALS |
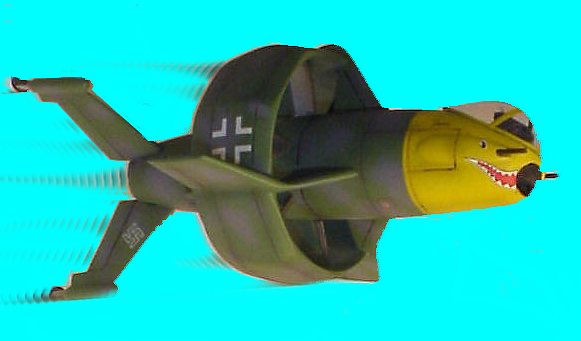
Gosh, the art work by Mario Merino sure looks good and I tried to duplicate it with Xtra-color RLM 83,and 75 in a splotchy pattern, Mr.Color yellow nose and some mean looking tigers mouths made on the Alps printer. No decals are included so we go into the decal library for the appropriate markings.
|
CONCLUSIONS |
Overall I had a great week building this kit, it's small and I had to use some skill to make it but Igor has another winner here, if he could only make them faster! With the exception of the lack of an interior, I'd rate this a 7 out of 10; intermediate modeler skill level need only apply. Many thanks to my purchasing agent (me) and my accountant (wife) for letting me buy this kit, if she only knew.
Copyright ModelingMadness.com. All rights reserved. No reproduction in part or in whole without express permission from the editor.
If you would like your product reviewed fairly and fairly quickly, pleasecontact the editor or see other details in the Note to Contributors.