Unicraft 1/72 Blohm und Voss P.207/2*
|
KIT # |
` |
|
PRICE: |
$30.00 |
|
DECALS: |
See review |
|
REVIEW : |
|
|
NOTES: |
resin |
|
HISTORY |
As with most paper projects scratched by German aviation designers late in 1944, fanciful wings for stemming the allied onslaught were dreamed. This design was for a fighter/ground attack aircraft propelled by a single Jumo or Argus engine behind the cockpit driving a pusher propeller. Although it is an attractive design, no doubt it would have had a protracted development period before actually seeing service.
|
THE KIT |
 I have to have more of these. Resin kits that are exciting
enough to want to build and more importantly, to finish. Igor out in the Ukraine
has been doing Unicraft kits for a while as a means to support his family in
tough economic conditions. This is his latest and best adventure to date.
I have to have more of these. Resin kits that are exciting
enough to want to build and more importantly, to finish. Igor out in the Ukraine
has been doing Unicraft kits for a while as a means to support his family in
tough economic conditions. This is his latest and best adventure to date.
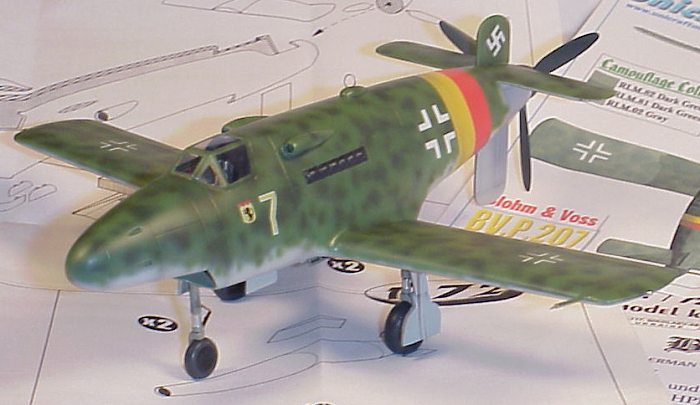
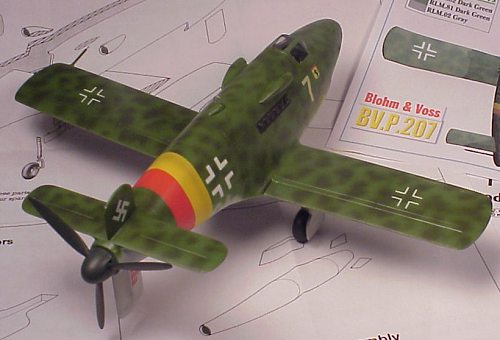
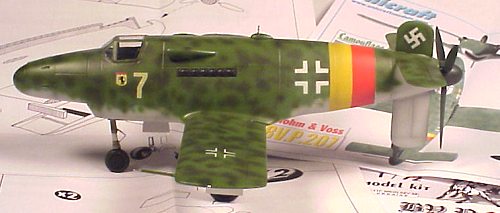
The blue resin is gone! A tan colored resin is the new material of choice and it improves the quality of the parts ten-fold. I found even the older Unicraft kits look and feel better with the new resin, but be warned it is still a rather brittle resin. The BV-207 has fine engraving, smooth surfaces and no pinholes. Gone are the uneven surfaces, looks very much like a Planet Models kit.
|
CONSTRUCTION |
First things first, clean up all parts and test fit as per any resin kit. This didn't entail much work; some sanding on a smooth surface of all the major components was the main task. The two fuselage halves mate up perfectly, but first one has to decide to what extent the cockpit is to detailed. All that is supplied are a seat, control panel, and a control stick. The interior was simply sanded and Dremeled to look like it had sidewalls, some knobs and levers were added for a busy look, and presto! You certainly could super detail the interior as the canopy supplied is so clear as to defy belief, vacuformed of course. Put as much weight as you can forward of the cockpit, just a warning. Not a lot of putty was used in the kit, the most used was in attaching the under side radiator section and wheel wells. But then I think the builder went a little overboard with the sanding. After blending it looked as good as new.
 Care must be observed when placing and gluing the vertical
stabilizers, they have to be 90 degrees to horizontal. The Horizontal piece sits
in a spot just made for it on the aft upper deck. The parts here are straight
and have an even thickness, testament to the mold makers' skill.
Care must be observed when placing and gluing the vertical
stabilizers, they have to be 90 degrees to horizontal. The Horizontal piece sits
in a spot just made for it on the aft upper deck. The parts here are straight
and have an even thickness, testament to the mold makers' skill.
The wings have small mold blocks that sand off quickly, with leading and trailing edges being 90 degrees to parallel it wasn't hard to clean them up. I took the easy method and attached the wings using brass rods as supports. This was to allow for some adjustment prior to final gluing of the dihedral.
Tackling the landing gear was not a problem. What ever Igor has changed allows well-detailed masters to be used for the gear, wheels and gear doors. The doors look to be original masters while the other bits have been artfully reproduced from other companies, sort of like some Czech firms we know and love.
I did find the propellers and spinner to be well done, but they were not used. The spinner seems to be lacking a base plate, as the holes for the propellers are a bit to far forward. Inserting the blades would have caused the spinner to lift away from the fuselage. Perhaps I'll go back, fill in the original holes and re-drill new propeller holes a little further back. Perhaps I will retrofit them to the kit later. The propeller was donated from an Italeri Ju-88 as was the spinner, I admit it doesn't quite match the rest of the profile, but a field modification was the best option. Spinner and prop blades are painted RLM 70, as used for metal blades.
|
PAINT & DECALS |
 Paint it anyway you like, mine is Xtra-color RLM 63/82/83. I
thought the 63 Grey looked better than a 76 blue and was representative of the
great artwork by Tor Pedersen which graces the box top and instruction sheet.
Decals are supplied by Unicraft, a friend using an Alps printer is making most
of them for Unicraft under the art direction of Mr. Shestakov and go on without
a hitch, Solvents react favorably and they snuggled down nicely.
Paint it anyway you like, mine is Xtra-color RLM 63/82/83. I
thought the 63 Grey looked better than a 76 blue and was representative of the
great artwork by Tor Pedersen which graces the box top and instruction sheet.
Decals are supplied by Unicraft, a friend using an Alps printer is making most
of them for Unicraft under the art direction of Mr. Shestakov and go on without
a hitch, Solvents react favorably and they snuggled down nicely.
|
CONCLUSIONS |
The best thing about the kit is the price, a mere $30.00 USD, the unfortunate thing is a long waiting schedule, each being hand made. I have paid much more for much less. It's worth the wait to get one or two of these on order, and do try the other kits, even the older ones are enhanced by the new resin. Decals are certainly a plus as well.
|
Fun-O-Meter |
Satisfaction Rating |
Scale of Difficulty |
|
9 (almost a 10) |
8 |
6 |
Copyright ModelingMadness.com
If you would like your product reviewed fairly and fairly quickly, please contact the editor or see other details in the Note to Contributors.