
Huma 1/72 Ju-287v1
|
KIT # |
5001 |
|
PRICE: |
$29.00 MSRP |
|
DECALS: |
One aircraft |
|
REVIEWER: |
|
|
NOTES: |
Weak, poor fitting landing gear |
|
BACKGROUND |
For a look at what's in the box and a brief history, please visit the preview.
|
CONSTRUCTION |
 Like the typical boring aircraft modeler, I started
construction in the cockpit. Care must be taken with Huma’s signature micro
plastic (my term) detail parts. I find these provide as much detail as photo
etch, but are much easier to work with. The parts consist of cockpit side
panels, rudder pedals, control column, etc. Be careful how strong your glue is
with these parts as they are delicate and might melt. The cockpit was painted
and assembled per instructions. The level of detail is more than adequate for
1/72 scale, and is definitely visible through the greenhouse nose. Super
detailers have plenty of room to upgrade if they so wish. Cockpit instruments
are merely decals. These went on without incident.
Like the typical boring aircraft modeler, I started
construction in the cockpit. Care must be taken with Huma’s signature micro
plastic (my term) detail parts. I find these provide as much detail as photo
etch, but are much easier to work with. The parts consist of cockpit side
panels, rudder pedals, control column, etc. Be careful how strong your glue is
with these parts as they are delicate and might melt. The cockpit was painted
and assembled per instructions. The level of detail is more than adequate for
1/72 scale, and is definitely visible through the greenhouse nose. Super
detailers have plenty of room to upgrade if they so wish. Cockpit instruments
are merely decals. These went on without incident.
The completed cockpit was glued into the fuselage, and the
halves closed (be sure to add your nose weight!). Huma has thoughtfully
provided separate fuel filler parts along the spine to prevent a nasty seam
through the circular recessed panel. Those of you who have built the
Revell-Germany He 177 know what a pain this can be to clean up. The separate
parts fit well and required no filler. The horizontal stabilizer is a one-piece
affair that slides into place in the fuselage. If you take great care about how
you glue this, you should have no glue mess on the part (often a problem with
slide-through construction – at least for me). The wing halves were assembled
with no incident, as were the engine pods. All internal blades, exhaust cones,
etc. were painted on the engines before assembly. The wings were then glues to
the fuselage. The large interlocking tabs fit snugly and prevent misalignment
of the wings (bravo Huma!). The wing joint was so good that no filler was
necessary. Take your time with the installation of the lower front main
gear/access hatch plate, as the fit is a bit finicky. After careful adjustment
and use of slow drying glue, a minimal amount of filling was done to fair this
into the lower fuselage.
Next came the landing gear. As Scott’s review points out, the landing gear legs appear thin and weak. I can verify that they are. The gear was the worst fitting part of the kit. The wheel fairings would not fit around the wheel/leg assembly (both front and read gear) so considerable filling and sanding had to be done. Once completed, the main gear will not line up with the mounting holes on the wings. If you force the supports and legs into the holes on the wing, you will actually distort the shape of the gear leg. In hindsight, I suggest filling the kit holes and making your own that will work with the parts. The completed nose gear is so flimsy that I expect them to break every time I pick up and set down the model.
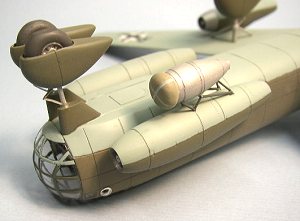
With the landing gear debacle done, I moved on to the RATO
pods. The RATO units went together with no fuss, but that is where it ended.
The micro plastic mounting brackets just do not fit the way they are supposed
to. After hours of bending, gluing, breaking parts and swearing I finally got
all of them to look average. And that was just to glue the brackets to the RATO
units! It took even more time to glue the completed assemblies under the
engines. In all honesty, I would leave these off. The fit and construction of
these detail items really soured my enthusiasm for the kit.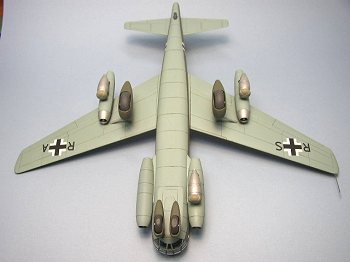
|
CAMOUFLAGE & MARKINGS |
All paints were Model Master Acrylics. This bird is simple. RLM 71 over RLM 65. I masked the demarcation line as the real aircraft had a pretty hard edge between the colors. Initially, I used Future Acrylic Floor Polish for my gloss coat. However, the Future did something strange on the lower left wing. It built up into blobs across most of the lower surface of the wing, and did not dry completely (this was the only area, perhaps mold release agent?). I had to sand this off, which removed the RLM 65 as well. After repainting, I shot it with Model Master Gloss with no trouble. I used all of the kit decals, which reacted fine with Solvaset. I chose to use aftermarket swastikas. A shot of dullcoat, and installation of the rear fuselage camera and the kit was complete.
|
CONCLUSIONS |
 This is another interesting Luftwaffe aircraft. Many
people do not know that the Germans pioneered the forward-swept wing design with
decent results (not bad for 1945!). The core of the kit is easy to assembly,
but beginners will run into trouble with the landing gear and RATO pods. I
recommend this kit to Intermediate modelers who can deal with these construction
issues.
This is another interesting Luftwaffe aircraft. Many
people do not know that the Germans pioneered the forward-swept wing design with
decent results (not bad for 1945!). The core of the kit is easy to assembly,
but beginners will run into trouble with the landing gear and RATO pods. I
recommend this kit to Intermediate modelers who can deal with these construction
issues.
|
REFERENCES |
The Monogram Painting Guide to German Aircraft 1939-1945, Creek and Hitchcock
Warplanes of the Third Reich, William Green
January 2003
Copyright ModelingMadness.com. All rights reserved. No reproduction in part or in whole without express permission from the editor.
If you would like your product reviewed fairly and quickly, please contact the editor or see other details in the Note to Contributors.