Dragon 1/48 Ho-229
| KIT #: | 5505 |
| PRICE: | Around $30 |
| DECALS: | Two options |
| REVIEWER: | Dale Rannals |
| NOTES: | Recently reissued (2005) |
| HISTORY |
The Horten
brothers, Walter and Reimar, were pioneers of the tailless all-wing
aircraft. They built several beautifully graceful sailplanes with
outstanding performance in the late 1930’s. These we’re followed by powered
examples, and they 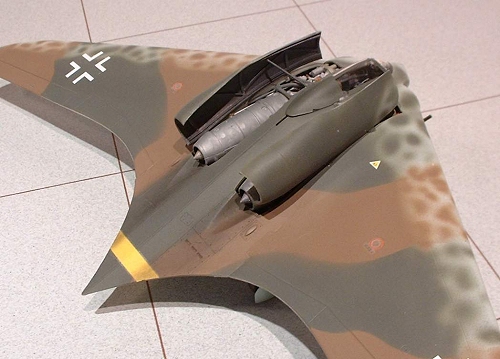 eventually became interested in wooden constructed jet engined aircraft. Goring approved the project in mid 1943, and things
progressed rapidly until the first flight was made in Feb 1945.
eventually became interested in wooden constructed jet engined aircraft. Goring approved the project in mid 1943, and things
progressed rapidly until the first flight was made in Feb 1945.
It was reported to have very good handling qualities, with a bit of lateral instability. The undercarriage was damaged during the otherwise successful second flight, but things met with disaster on the third flight, in which the test pilot was killed, and the prototype completely destroyed.
Despite of this setback the project continued with sustained energy. In March work started on the third prototype, the Ho 229 V3. The V3 was larger than previous prototypes, and it was meant to be a template for the pre-production series Go 229 day fighters. This was powered by two Jumo 004C engines, with an armament of two MK108 30mm cannon in the wing roots.
Too late for the Luftwaffe, though, U.S. forces overran the Gotha factory on the 14th April 1945 and found an almost completed, but not yet flown, V3 there. Several others were in various stages of completion.
For an interesting read, I send thee to this link: http://www.nasm.si.edu/research/aero/aircraft/horton_229.htm
| THE KIT |
Dragon’s Ho-229 comes in a couple of different flavors: This is the day fighter; there is also a nocturnal version out there. My initial finding upon opening the box was a little over 100 pieces of light gray plastic with a very fine pebbly surface. A Dragon Me-262 I bought a few years back also exhibited this texture, so I must assume it is normal for these kits. It does not detract a bit from the precise detail and everything smoothes out with a coat of paint. The clear parts were separately bagged and also included is a fret of PE parts for detailing (like belt buckles – now that just screams fun!)
What I have learned from the Dragon kits I’ve built is they definitely don’t “fall” together. Sometimes the fit isn’t great (this kit being no exception in areas), but with a bit of patience they assemble into great looking kits.
| CONSTRUCTION |
I began by cleaning
up the parts. I try to clean up seam lines and remove flash from smaller
parts while still attached to the sprues. Then I airbrushed the interior
pieces and areas with Model Master RLM-66 enamel. Next on the agenda were
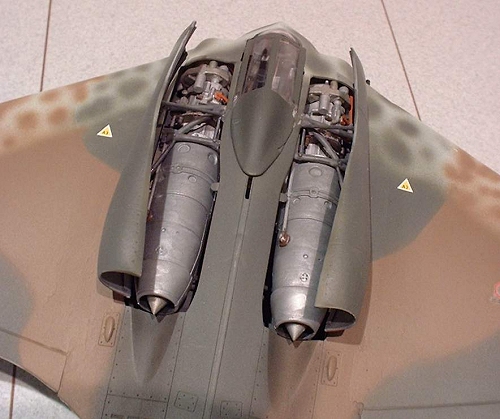
the engines, which are little kits in themselves. The instructions were a
little vague on placement of some of the smaller pieces but I with the help
of Google I think I got them close enough (well, for myself anyway). The
engines were brushed painted with several different shades of Model Master
buffable metalizers. (I read about brushing these on in one of the reviews
and it gives an inter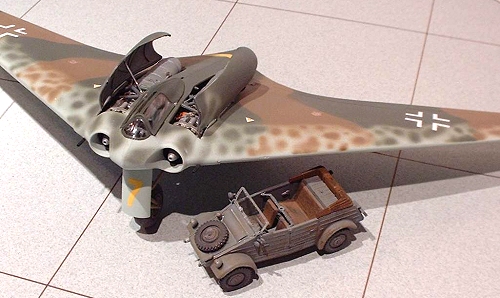 esting
uneven effect.) The instructions would have you install the engines into
the nosepieces and assemble that assembly to the wing. I waited and
installed mine after the model was painted. There are no fit problems
in doing things this way and it’s probably easier anyway.
esting
uneven effect.) The instructions would have you install the engines into
the nosepieces and assemble that assembly to the wing. I waited and
installed mine after the model was painted. There are no fit problems
in doing things this way and it’s probably easier anyway.
The cockpit and landing gear assemblies came next. These go together without major problems, though there are some fiddly parts that just don’t want to cooperate. The pieces were touched up with RLM-66
and the cockpit drybrushed with different shades to pop out some details. The wheels were assembled and painted using a darkened Testors Rubber (small bottle), then drybrushing some browns and grays. I have to admit that of all the models in my display case, these are the only tires I really like. I’ve tried black tires, brown tires, gray tires; they just don’t look right to me. So I’m gonna stick with this technique and continue striving for that perfect tire…..
Anyway, to get back on course, the aircraft is made up of port and starboard wing assemblies and the center fuselage assembly. The kit is designed to allow the removal of the wings but I opted to glue mine on. Each assembly poses no problems but the wing to fuselage fit really is terrible. I tried to assemble so the top wing joint was the lesser of the two evils (nobody sees the bottom of my aircraft in my display case, so I can cheat a bit there.) It still took a bit of putty and a bit more sanding but the end result is acceptable.
Off to the paintshed!
| COLORS & MARKINGS |
 To me, this is the most fun aspect of any “Luft
‘46” kit. The camouflage scheme is pretty much wide open. Using your
imagination along with a dose of common sense (keeping with the normal RLM
colors and general Luftwaffe style), you can come up with interesting
results.
To me, this is the most fun aspect of any “Luft
‘46” kit. The camouflage scheme is pretty much wide open. Using your
imagination along with a dose of common sense (keeping with the normal RLM
colors and general Luftwaffe style), you can come up with interesting
results.
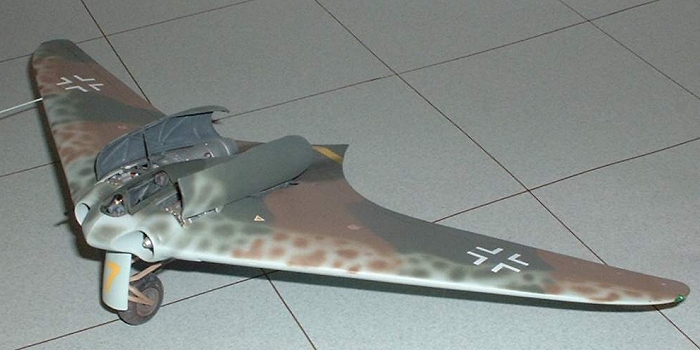
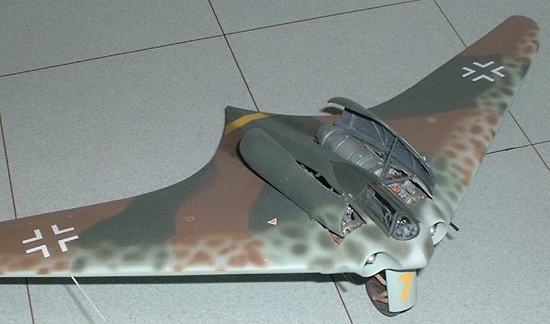
From the start of this project I imagined a leopard spotted front portion blending in with a somewhat normal camouflage pattern as you move aft. I just didn’t know what colors or how to do it.
Inspiration comes in strange forms. One day while I was building this kit, I decided to enter the drudgery of cleaning out all my bottles of airbrush thinned colors left over form previous kits. I dumped the remains of probably half a dozen colors into one jar and proceeded to clean the other jars for re-use. As I was about to pour out the paint from that final jar I stopped. It had mixed into a “RLM whatever-you-have-on-hand brown” which I thought would look good with a green, say RLM82 Dunklegrun
The underside
was easy: RLM65 Hellblau was sprayed on the bottom and I wrapped the color
up around the front and top to about halfway back. I then masked off a
camo 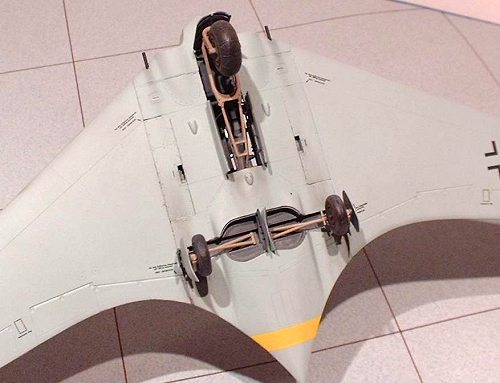 pattern and sprayed the brown mix from the back to about ¾ the way to
the front and feathered the front edge into the Hellblau. From there
forward I mottled the color to the leading edge of the wing. I repeated
the process for the dark green.
pattern and sprayed the brown mix from the back to about ¾ the way to
the front and feathered the front edge into the Hellblau. From there
forward I mottled the color to the leading edge of the wing. I repeated
the process for the dark green.
After shooting the model with Future, I applied decals. The decals are a mix of the kit supplied (which silvered a bit) and crosses from an AMTech Ta-183 kit. After that, I gave it a few coats of Model Master Clear Flat acrylic (95% of my paints are Testors MM enamels, however, I have always liked the clear flat acrylic. Goes on easy and can give a very flat appearance).
I glued on the breakable bits; landing gear, pitot tube, etc., and installed the two cannon (used brass tubing instead of the kit supplied parts) and the canopy.
And she was done. It has many flaws (normal for me), but the one I will point out is that I installed the main landing gear backwards – that is, the oleos should be inboard the tires. Guess I shoulda looked at the instructions a bit closer. Oh well…….
| CONCLUSIONS |
I really enjoyed this kit. It can be a real “Wow, what’s that?” sitting next to Thunderbolts and the like. While I wouldn’t recommend it to a beginner (fit problems, somewhat vague instructions in spots), anyone with a few kits under their belt and some patience can emerge with a interesting chapter of the “what if?”
March 2005
| REFERENCES |
 http://www.warbirdsresourcegroup.org/LRG/ho229.html
http://www.ipmsstockholm.org/magazine/1999/02/stuff_eng_detail_hoix.htm (interesting pics)
http://www.nasm.si.edu/research/aero/aircraft/horton_229.htm
http://tanks45.tripod.com/Jets45/Histories/HoIX/Go-229.htm (interesting pics)
http://www.csd.uwo.ca/~pettypi/elevon/baugher_other/go229.html
If you would like your product reviewed fairly and quickly by a site that has nearly 300,000 visitors a month, please contact me or see other details in the Note to Contributors.