Matchbox 1/72 He-115
| KIT #: | PK-401 |
| PRICE: | $ Long out of production |
| DECALS: | Three options |
| REVIEWER: | Martin Pohl |
| NOTES: | Reboxed by Revell in the late 1990s. |
| HISTORY |
In 1935, the German Reich Air Ministry (Reichsluftfahrtministerium or
RLM) produced a requirement for a twin engined general purpose floatplane,
suitable both for patrol and for anti-shipping strikes with bombs and torpedoes.
Proposals were received
 from both
Heinkel Flugzeugwerke and from Blohm & Voss' aircraft subsidiary, Hamburger
Flugzeugbau, and on 1 November 1935, orders were placed with both Heinkel and
Hamburger Flugzeugbau for three prototypes each of their prospective designs,
the He 115 and the Ha 140.
from both
Heinkel Flugzeugwerke and from Blohm & Voss' aircraft subsidiary, Hamburger
Flugzeugbau, and on 1 November 1935, orders were placed with both Heinkel and
Hamburger Flugzeugbau for three prototypes each of their prospective designs,
the He 115 and the Ha 140.
The first prototype Heinkel flew in August 1937 with testing proving
successful, with the He 115 being selected over the Ha 140 early in 1938,
resulting in an order for an additional prototype and 10 pre-production
aircraft. Meanwhile, the first prototype was used to set a series of
international records for floatplanes over 1,000 km (621 mi) and 2,000 km (1,243
mi) closed circuits at a speed of 328 km/h (204 mph).
Armament varied, but included a 7.92 mm (.312 in) MG 15 machine guns, 20
mm MG 151 cannons, 7.92 mm (.312 in) MG 17 machine guns and 20 mm MG FF cannons.
Other weapons used by He 115 variants include LTF 5 or LTF 6b torpedoes and SD
500 500 kg (1,100 lb) or SC 250 250 kg (550 lb) bombs. Some also carried LMB
| THE KIT |
Pretty
old Matchbox kits – those colored sprues bring back a lot of memories. This
Heinkel is given in three colors. Of course all panel lines a raised lines and
the interior is just a piece of plastic and two figures – but hey, those were
the days in the 80ies.
| CONSTRUCTION |
 Well this
originally was thought to be a small build for a group build on a forum and to
get back the mood of modeling – what should I say – I got my mood back and
decided to do some little extra and so this all happened.
Well this
originally was thought to be a small build for a group build on a forum and to
get back the mood of modeling – what should I say – I got my mood back and
decided to do some little extra and so this all happened.
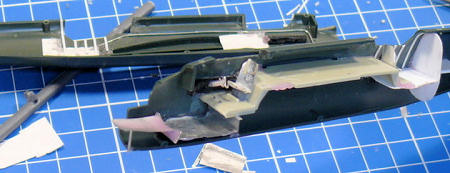
To say it
up front, I did not rescribe it – I was just too lazy – I did overspray all the
raised panel lines with a thin black oil paint mixture. So I build this bird
almost out of the box I only scratched some interior out of some bits and pieces
I had and some aluminum I just bend and cut into shape.
Well for a
kit this old the pieces went together very well I only used some filler at the
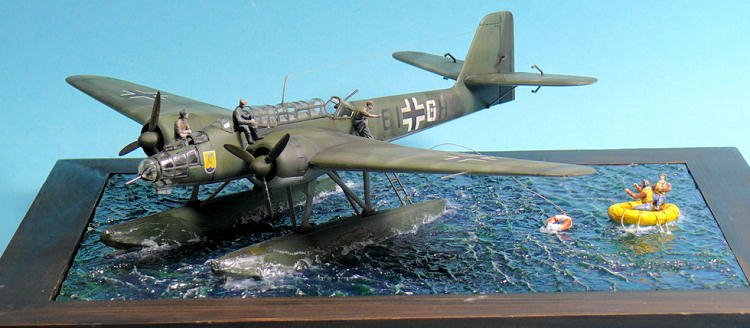
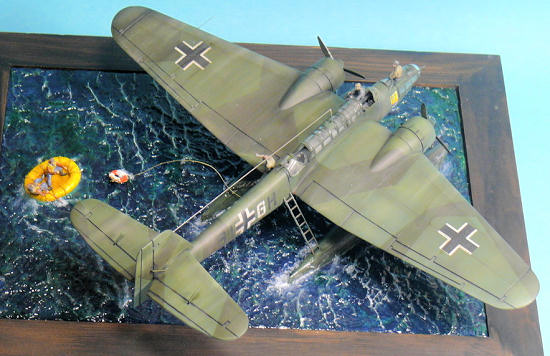
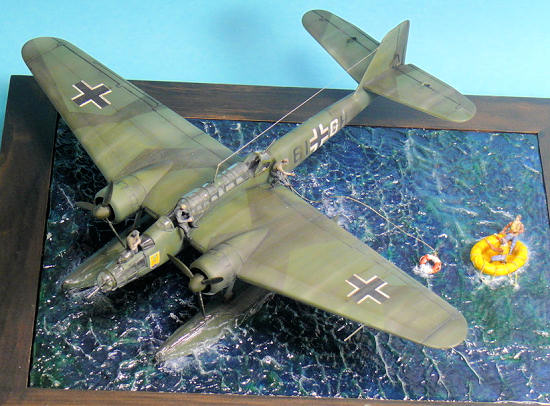
wing attachments. Only the attaching of the swimmers is a bit fiddly.
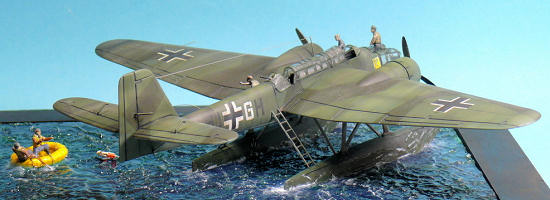
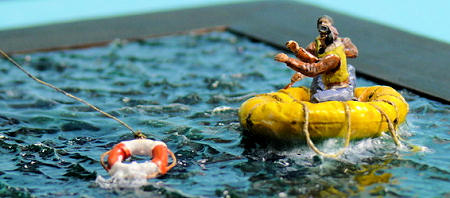
The dinghy
is one of those old Airfix soft plastic dinghies you all know I guess. I just
cut out about 1 cm in the middle to have a smaller one. I also mistreated the
dingy with my rotary tool to have it a bit more used. The rope is just some
sewing thread. The figures in the dinghy consist of parts of the new 1/72 Revel
RAF
 figure
set and some heads from Preiser and some arms from Airfix and Preiser figures.
The rescure ring is a drilled out tire of a F-15 and the rope is just some white
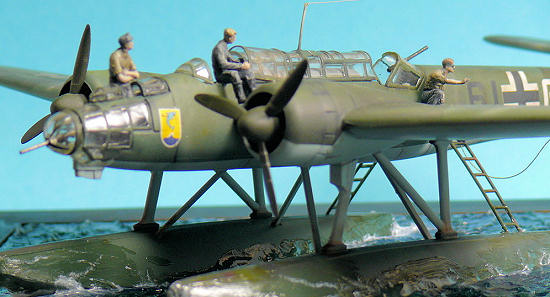
metal cord. The figures on the plane are all from Preiser from different sets.
figure
set and some heads from Preiser and some arms from Airfix and Preiser figures.
The rescure ring is a drilled out tire of a F-15 and the rope is just some white
metal cord. The figures on the plane are all from Preiser from different sets.
The base is a piece of Styrofoam where I cut out some area for the swimmers. The water is made of Lukas Crystal Clear and the frame I found at a flea marked.
| COLORS & MARKINGS |
The
inside of the Heinkel I painted in some mid gray tone and some washing with a
dark gray.
 The
Matchbox kit comes with three decal options and as I wanted to have a Heinkel
115 having taken part in the Battle of Britain, I did choose the I/Kuestenfliegergruppe
706 Aalborg, Denmark May 1940. I normally don’t build any WW2 stuff so I did not
have the exact RLM colors and had to mix them. (The colors would have been RLM
72/73/65. Ed) After the three base tones were on I sprayed a thick overcoat with
future and on went the decals. After that again a coat of future. After that had
dried and as written above I first masked the panel lines and did an overspray
with black oil color. This oil paint I thinned at about 1:100 – I did not
measure it but this comes close I’d say. After this I sprayed some lighter
browns , greens up to almost white to do some post shading. This then was sealed
with Vallejo flat clear (great stuff) and then some pastel work and a last flat
clear coat.
The
Matchbox kit comes with three decal options and as I wanted to have a Heinkel
115 having taken part in the Battle of Britain, I did choose the I/Kuestenfliegergruppe
706 Aalborg, Denmark May 1940. I normally don’t build any WW2 stuff so I did not
have the exact RLM colors and had to mix them. (The colors would have been RLM
72/73/65. Ed) After the three base tones were on I sprayed a thick overcoat with
future and on went the decals. After that again a coat of future. After that had
dried and as written above I first masked the panel lines and did an overspray
with black oil color. This oil paint I thinned at about 1:100 – I did not
measure it but this comes close I’d say. After this I sprayed some lighter
browns , greens up to almost white to do some post shading. This then was sealed
with Vallejo flat clear (great stuff) and then some pastel work and a last flat
clear coat.
The dinghy
I first overcoated with two layers of Createx base, then two layers of Createx
yellow followed and two layers of Future. For the washings I used some wood
paint.
 The figures
all did get a base coat with Revel Aqua Base, on that I painted them with
Vallejo and Life Color acrylics. Then the all did get a overcoat with Future and
then some washing with wood colors again. In the end an overcoat with Vallejo
flat clear.
The figures
all did get a base coat with Revel Aqua Base, on that I painted them with
Vallejo and Life Color acrylics. Then the all did get a overcoat with Future and
then some washing with wood colors again. In the end an overcoat with Vallejo
flat clear.
The base I
first painted with different wall paints wet in wet until I thought it’ll work.
I can’t say much about that as I wasn’t sure how it will look until the Lukas
Chrystal Clear had dried – this was my first attempt doing a water base. The
complete vignette did get three coats of this Chrystal Clear, the first before
setting the plane and the two others when the plane was already in place. The
last thing I did was drybrushing some white to have some water effects.
| CONCLUSIONS |
 It was a
fun project and those old Matchbox kits are just great kits. Just take some bits
and pieces you have laying around and you can build some real nice ones out of
them.
It was a
fun project and those old Matchbox kits are just great kits. Just take some bits
and pieces you have laying around and you can build some real nice ones out of
them.
Last but
not least I want to thank the MM user Dr. Frank for his explanations on how to
do water bases! Thanks a lot!
| REFERENCES |
As always
the internet
Martin Pohl
February 2012
If you would like your product reviewed fairly and fairly quickly, please contact the editor or see other details in the Note to Contributors.