Dragon 1/48 Ju-88G-6 Night Fighter
| KIT #: | 5509 |
| PRICE: | $39.95 MSRP (or so) |
| DECALS: | Two options |
| REVIEWER: | Pierre-Andre' Boillat |
| NOTES: | Includes photo etched parts |
| HISTORY |
First flown in
December 1936, the Junkers 88 “Schnellbomber” would progressively become the
Luftwaffe’s “jack of all trades”, acting as a tactical and torpedo bomber, heavy
fighter, attack plane, tank killer, reconnaissance aircraft and of course as a
night fighter, a role that suited it perfectly: fast enough to intercept the
RAF’s “heavies”, with a long range that allowed it to stay in the air for hours,
big enough to carry comprehensive radar equipment as well as heavy armament,
graced with pleasant handling 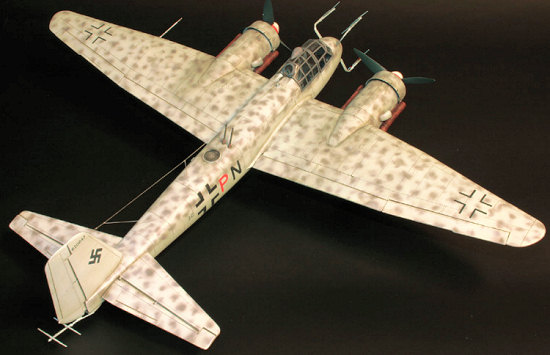 characteristics that made it a very stable gun
platform and a reliable aircraft to fly.
characteristics that made it a very stable gun
platform and a reliable aircraft to fly.
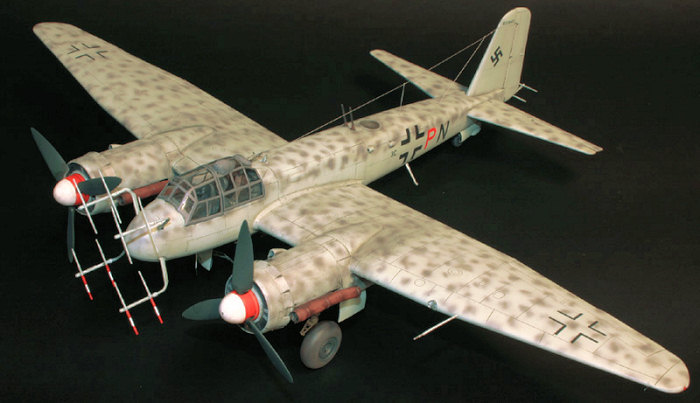
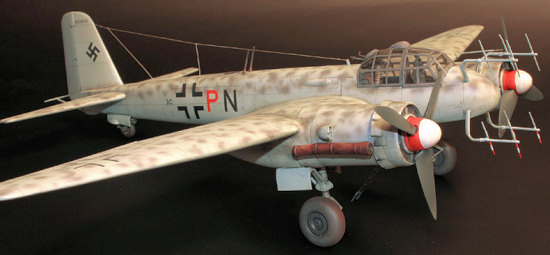
Packing deadly punch with six 20 mm cannons (4 in an under-fuselage pod and 2 “schräge Musik” upwards firing weapons) as well as one 13mm defensive MG, and equipped with the FUG 220 N-2 radar, the G-6 series was the most produced of the lot (around 2’500).
Although the purpose-built He 219 “Uhu” was the better aircraft, the Ju 88G-6 was responsible for destroying more RAF bombers (some shot down over their British airfields on long-range intruder missions) than any other plane in the “Nachtjäger” force.
But it appeared too late in the war (entering production in mid-1944), and its efficiency was quickly reduced by allied electronic counter-measures, daylight strafing raids on the Luftwaffe’s airfields, lack of fuel, the appearance of its most deadly foe, the Mosquito night-fighter, and the general collapse of the Reich. In April 1945, only 350 Ju 88 night fighters were still operational, the rest lying wrecked all over Germany.
| THE KIT |
 Released in 1993,
Dragon’s Ju 88 G-6 isn’t exactly a new kit, though still pretty near
“state-of-the-art”. Having found this one on a neighbouring vendor’s table at a
model show for half its local retail price, I didn’t hesitate much and purchased
this famous night bird. After it had spent a while near the top of my “to-do”
pile, a providential home-computer breakdown left me with enough time on my
hands for a more demanding project. I started to work in the middle of August
07, and added the final touches one month later.
Released in 1993,
Dragon’s Ju 88 G-6 isn’t exactly a new kit, though still pretty near
“state-of-the-art”. Having found this one on a neighbouring vendor’s table at a
model show for half its local retail price, I didn’t hesitate much and purchased
this famous night bird. After it had spent a while near the top of my “to-do”
pile, a providential home-computer breakdown left me with enough time on my
hands for a more demanding project. I started to work in the middle of August
07, and added the final touches one month later.
The sturdy, beautifully-illustrated box contains 7 sprues of light grey, lightly “sanded” plastic (as usual with Dragon), totalling 176 parts (not counting 11 that are not to be used on this version), two sprues of excellent transparent parts, and one small sheet of 16 photo-etched parts. The panel lines are finely engraved and the level of detail (especially in the cockpit) is excellent – only the seat belts are missing, and I’m still wondering why Dragon didn’t include them in the photo-etched fret. The kit contains no figures.
| CONSTRUCTION |
As
this was my very first Dragon build (for some reason, I had always kept mine for
“another time”), and I had heard horror stories about this brand’s poor fit and
awkward engineering, I expected a real struggle. But look: none of this was
true. My only critic is 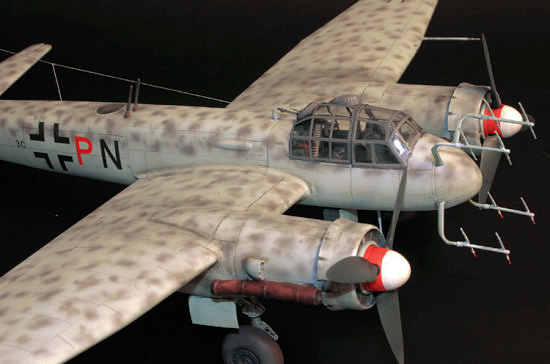 that the instructions sheet is somewhat confusing and
should be clearer on certain details. Watch it carefully, check your references,
and avoid mixing up parts, especially in the engines/landing gears area, where
it’s really crucial to have the right and left parts in their correct location.
that the instructions sheet is somewhat confusing and
should be clearer on certain details. Watch it carefully, check your references,
and avoid mixing up parts, especially in the engines/landing gears area, where
it’s really crucial to have the right and left parts in their correct location.
Of course, as this kit is a part of a whole Ju-88 family, the wings and fuselage are cut to accommodate the bomb bay doors, noses, canopies, gunner positions, vertical tail planes, wingtips and armament gondolas of the different versions. Yet, you don’t have to worry about it too much – the many parts fit together well, and only a standard amount of filling and sanding will be necessary.
Once you have assembled, painted and weathered the cockpit (an important step in the project due to the size and good optical quality of the canopy parts), building the airframe is a pretty straightforward job that requires little time. On the other hand, the engine nacelles are a little trickier. A clever idea of Dragon’s was to design the main landing gear in two parts – internal and external – the latter (the lower halves of the gear legs and the wheels) being installed (unlike the instructions) only after the main assembly, which eliminates the risk of breakage… but back to these engines nacelles:
 Be very careful
when you install them on the wings. I noticed I had them slightly offset after
gluing them in place (by consulting my documentation, not the instructions
sheet, that, as said above, is a little unclear), and had to break them off and
re-glue them, which of course caused and additional filling and sanding session
I could have avoided by looking more carefully. It was my fault (and the plan’s
designer’s) – not the kit’s.
Be very careful
when you install them on the wings. I noticed I had them slightly offset after
gluing them in place (by consulting my documentation, not the instructions
sheet, that, as said above, is a little unclear), and had to break them off and
re-glue them, which of course caused and additional filling and sanding session
I could have avoided by looking more carefully. It was my fault (and the plan’s
designer’s) – not the kit’s.
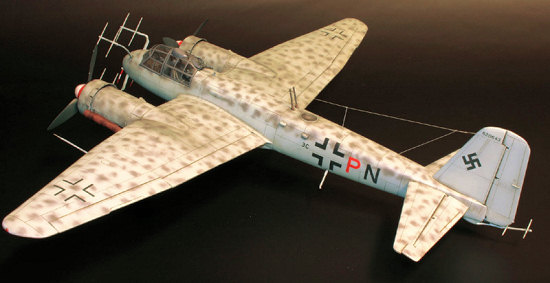
The control surfaces come separate. As all pictures in my documentation showed parked Ju 88s with slightly drooping elevators, I installed them that way.
Once the airframe was assembled, the main seams puttied and sanded, and the panel lines lost in these proceedings re-engraved, I could go to my favourite part: painting. Of course, the many “fiddly bits” such as the extremely fragile radar antennae were left for the end.
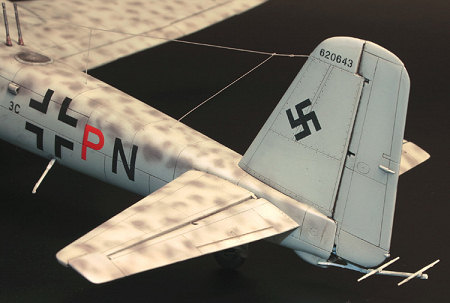
| COLORS & MARKINGS |
Two schemes are
proposed, both in a basic tone of RLM 76 light blue: one aircraft of 5/NJG 4
based in Denmark in 1945 with RLM 63 “grauviolett” mottles and white and re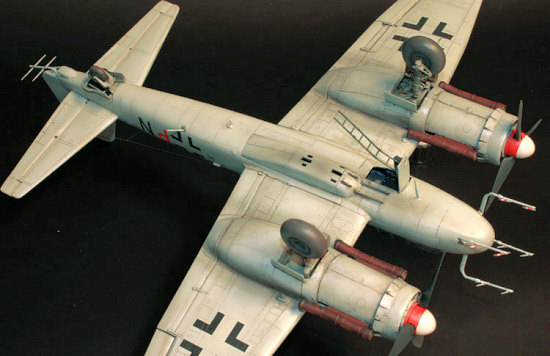 d
spinners, and one of 7/NJG 2 based in Germany in 1944, with green (probably RLM
82) squiggles. As I prefer mottles over squiggles, I chose the first, more
colourful version. But here, we again face some lack of clarity from Dragon’s.
The box art doesn’t fit the instruction’s paint scheme. Here again, a close look
at my documentation seemed to show that the box art is probably right, as many
G-6s sporting that style of scheme had no mottling on the fin. Further, a large
majority of the profiles and colour pictures available show that on these
aircraft, the canopy framing was often painted in the darker colour. Having to
make a decision, I took these two options, hoping that no one will prove me
wrong later…
d
spinners, and one of 7/NJG 2 based in Germany in 1944, with green (probably RLM
82) squiggles. As I prefer mottles over squiggles, I chose the first, more
colourful version. But here, we again face some lack of clarity from Dragon’s.
The box art doesn’t fit the instruction’s paint scheme. Here again, a close look
at my documentation seemed to show that the box art is probably right, as many
G-6s sporting that style of scheme had no mottling on the fin. Further, a large
majority of the profiles and colour pictures available show that on these
aircraft, the canopy framing was often painted in the darker colour. Having to
make a decision, I took these two options, hoping that no one will prove me
wrong later…
The scheme was free-handed with an airbrush, using home-mixed Tamiya acrylics.
Having sealed the paint job with a layer of gloss lacquer, I installed the (few) decals, which went on perfectly with a slight addition of Gunze “Mr. Softer”. As the sheet did not include swastikas, I borrowed a pair in the right size from a 1/32 FW 190 set.
Finally, I added the usual wash of dark brown oil paint that perfectly highlighted the panel lines.
| FINAL CONSTRUCTION |
Generally, this is the moment when a modelling project slowly goes towards its ending. Not the case with this one. In fact, what I thought would take one day took two weekends. Here’s a list of what’s awaiting you:
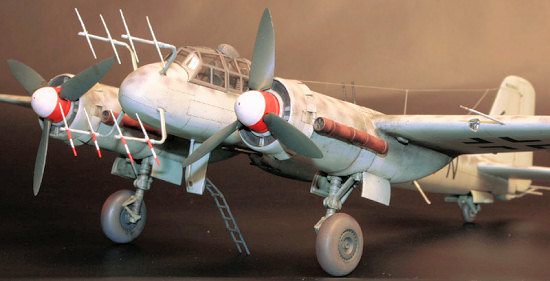
- The exhaust pipes come in two parts (pro pipe), which means you get 4 completed units to putty and sand (they don’t fit very well). Plus, they have little photo-etched grilles at the front.
 -
The landing gears are well detailed, and their
doors come with photo-etched actuators. Given the size and weight of the kit,
it’s a good Dragon thing made the legs very sturdy.
-
The landing gears are well detailed, and their
doors come with photo-etched actuators. Given the size and weight of the kit,
it’s a good Dragon thing made the legs very sturdy.
- The crew entry hatch can be positioned open, with its ladder extended. This looks good, and has the advantage of adding a little more light to see the cockpit’s interior.
- The props come in single blades. I painted them prior to assembly, as well as the two-coloured spinners.
- You have to drill the holes for the “schräge Musik” cannons, and install them in the right position. Same goes for the radio antenna (the G-6 had a retractable one). After doing this (and adding a little wash on these elements, especially in the area around the engines), I sprayed the final coat of matte lacquer.
- The direction finding antenna on the fuselage back (one more fine photo-etched part) is a little tricky to install. I glued it inside the transparent part with a drop of Future. By the way: on many Ju 88 pictures and illustrations, this antenna’s transparent cover seems to be over-painted. I chose to leave it visible, but I may be wrong.
 -
The canopy elements fit very well. The only
difficulty is to install the MG inside the rear part (I did it last, just before
gluing the canopy in place). The weapon has photo-etched sights and an
ammunition belt that has to be twisted so it ends in the cockpit’s ammo box… a
real game of patience. As usual, I made the canopy framing from painted decal
stripes (there are quite a few on this typically german “glass house”).
-
The canopy elements fit very well. The only
difficulty is to install the MG inside the rear part (I did it last, just before
gluing the canopy in place). The weapon has photo-etched sights and an
ammunition belt that has to be twisted so it ends in the cockpit’s ammo box… a
real game of patience. As usual, I made the canopy framing from painted decal
stripes (there are quite a few on this typically german “glass house”).
- Last but not least, I added the many radar antennae (careful when cutting them from the sprue, as they are pretty true to scale and thus extremely thin) – which went on without trouble, except that after doing this, you’re supposed to be very careful when you touch the model. One more thing that wasn’t clear – even in the documentation - was the presence or absence of an antenna wire. After hesitating a bit, I chose to add one (on one of the pictures, an isolator is clearly visible, and the Squadron Signal plans show one).
A few drops of well diluted oils to blend the final parts with the rest of the model, a few exhaust stains and aluminium spots, and the project was up to my expectations.
| CONCLUSIONS |
A very pleasant model that produces an impressive result. However, its big size and many parts, as well as the presence of very small and fragile elements (including the photo-etch) makes this a kit for rather patient and experienced modellers. Not a “weekend project” indeed, but well worth the effort. Highly recommended.
| REFERENCES |
Junkers Ju 88 In Action part II – In Action # 113.
Junkers Ju 88 chasseurs de nuit – Editions Atlas, 1981
October 2007
Copyright ModelingMadness.com. All rights reserved. No reproduction in part or in whole without express permission.
If you would like your product reviewed fairly and quickly, please contact the editor or see other details in the Note to Contributors.