| KIT #: | H-298 |
| PRICE: | 15 French Francs at a show |
| DECALS: | One option |
| REVIEWER: | Pierrel-André Boillat |
| NOTES: | An excellent kit of 1969 vintage - except for all the rivets |
| HISTORY |
Is it still necessary to present the infamous Stuka?
First-blooded in
the last months of the Spanish Civil War, the Ju 87 dive-bomber performed
excellently, providing the nazi regime not only with an effective “flying
artillery”, but also with a terrifying propaganda weapon. During the ensuing
Blitzkrieg campaigns 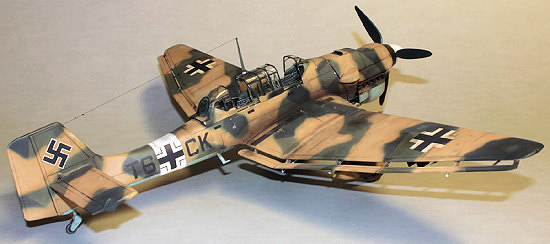 in Poland and France, the Stuka Geschwaders created a
terrible chaos, hammering troop concentrations, cities, roads, bridges and
slaughtering the fleeing civilian populations without mercy, earning their
siren-equipped, sinister-looking machines the reputation of “all-times most
hated aircraft”, a bad name that still lives on today.
in Poland and France, the Stuka Geschwaders created a
terrible chaos, hammering troop concentrations, cities, roads, bridges and
slaughtering the fleeing civilian populations without mercy, earning their
siren-equipped, sinister-looking machines the reputation of “all-times most
hated aircraft”, a bad name that still lives on today.
Soon after, the Battle of Britain proved that Goering’s pet vulture was nothing but a sitting duck without a decent level of german air superiority. Hence, the Stuka was withdrawn to less fighter-filled skies and soldiered on until 1945, again proving itself as one the war’s most efficient anti-shipping aircraft (especially in the Mediterranean and the Black Sea areas), and a potent low-level tank buster (which has been the subject of a few reviews on MM), ending its notorious carreer as a night attacker. The Ju 87 also served with allies of Germany such as Italy, Rumania, Hungary, Bulgaria and Slovakia.
| THE KIT |
After such an introduction, you may ask: “why does this guy spend so much time on a bloody Stuka?”… Well, the answer lies 35 years ago. I was 8 years old, and I badly wanted a plastic plane for my birthday, because my brother (who in my eyes was an old man of 14) was building aircraft kits and I couldn’t imagine anything cooler (I still think so). So, my mother took us to the next town avec hobby shop, and let us pick the object of my desire…
 After staring at
the shelves for a while, my brother (who was reading a cheap paperback issue of
H.U. Rudel’s “Stuka pilot” and was in a Ju 87 craze) suddenly said: “Hey, look
at that *awesome* Stuka with a snake on the fuselage sides!.. Whaooow, you
*must* have that one!”. “Look”, I said, “isn’t it a bit too complicated for
me?”. “That doesn’t matter, I’ll build it for you” was the answer. So, off we
went with the mean-looking dive-bomber and a somewhat worried mom who asked
herself where her boys had taken such warlike tastes.
After staring at
the shelves for a while, my brother (who was reading a cheap paperback issue of
H.U. Rudel’s “Stuka pilot” and was in a Ju 87 craze) suddenly said: “Hey, look
at that *awesome* Stuka with a snake on the fuselage sides!.. Whaooow, you
*must* have that one!”. “Look”, I said, “isn’t it a bit too complicated for
me?”. “That doesn’t matter, I’ll build it for you” was the answer. So, off we
went with the mean-looking dive-bomber and a somewhat worried mom who asked
herself where her boys had taken such warlike tastes.
You could say my brother had all the fun building the kit, but as I asked “have you finished yet?” every 10 minutes, I’d say his pleasure was a little spoiled. Yet, after a few days, I had my Stuka proudly hanging from the ceiling, in a glossy camo of yellowish green with bright green blotches and vivid sky blue undersides (the shop had a large choice of maybe 12 different glossy Humbrol tins) that contrasted with the menacing snake in an almost psychedelic way… O the joys of childhood (and the early 70’s)…
Too many years
later (last November precisely), I was attending my favorite model show in Sion,
Switzerland, carrying a whole bu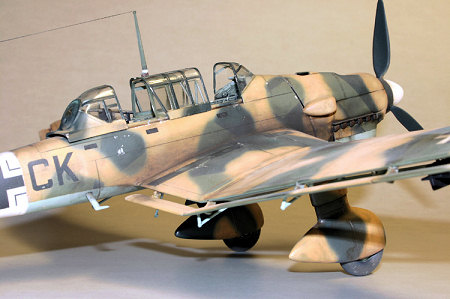 nch of old kits for sale (as usual) and what did
I see on the neighbouring vendor’s table? My childhood’s old Revell Stuka, in
the same box with the white and red desert snake, for the ridiculous price of
CHF 15.00 (which must have been about the same back in ’71).
nch of old kits for sale (as usual) and what did
I see on the neighbouring vendor’s table? My childhood’s old Revell Stuka, in
the same box with the white and red desert snake, for the ridiculous price of
CHF 15.00 (which must have been about the same back in ’71).
Needless to say, I grabbed it at once for purely sentimental reasons. Who would like to actually build such an antique?
Back home, I had a more serious look inside the box, read the instruction leaflet in grey tones with its approximate German translation, and saw that this old thing with 1969 copyright had far greater potential than expected. Not only is the shape pretty accurate, but the cockpit detail is excellent – in fact, much better than any 1/32 vintage Revell kit I ever saw. Having a fixed and spatted undercarriage, the Ju 87 also avoids another weakness of these classic series: the poorly detailed landing gears and wells. As the Christmas vacation was coming near (along with several days I could spend on a larger project), I decided to give it a go.
| CONSTRUCTION |
My
first intention was to build my Stuka “as is”, just to have a nice nostalgic
piece to display. Yet, the more I built, the more I felt this nice model would
deserve a better fate. Unlike Revell’s terrible (and often deserved) “warped and
crude” reputation, the interior, as stated earlier, is far from empty (I’d say
it’s like a decent 1/48 kit of the 2000’s), and the fit is surprisingly good.
Very little 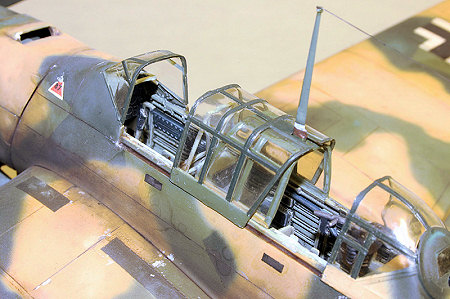 putty was required, and the only details I scratchbuilt were the
seatbelts and two little stripes of sheet styrene to cover the exhaust pipes. An
engine is provided, but as I have a strong distaste for “all open” models and
said engine (as all injected styrene power plants) would require too much effort
to look right, I chose to simply spray it in gun metal and glue the cowlings
shut.
putty was required, and the only details I scratchbuilt were the
seatbelts and two little stripes of sheet styrene to cover the exhaust pipes. An
engine is provided, but as I have a strong distaste for “all open” models and
said engine (as all injected styrene power plants) would require too much effort
to look right, I chose to simply spray it in gun metal and glue the cowlings
shut.
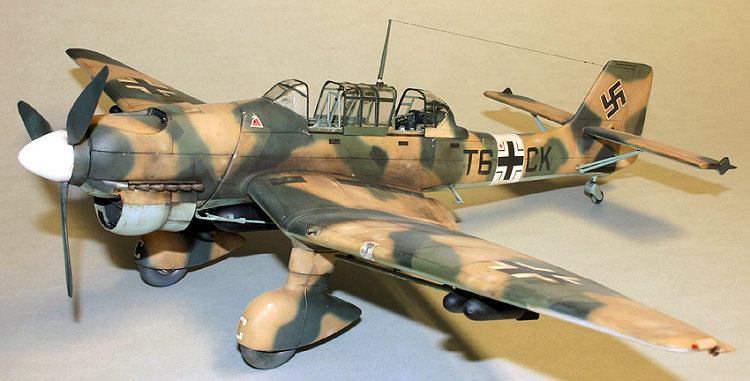
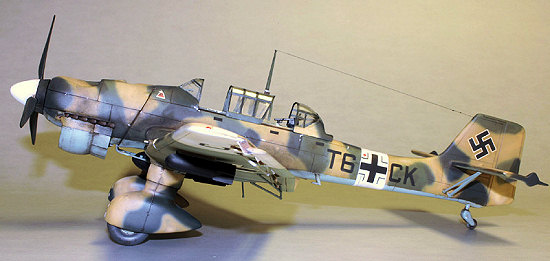
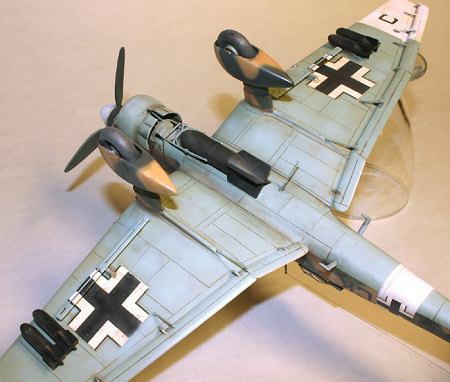
Of course, the big problem is that like most models of its time, the Revell Stuka is covered with myriads of pointy rivets the most fanatical rivet counter couldn’t count, but that hardly appear on a real Stuka, as my documentation showed. So was the fashion in the 70’s, when those damn rivets were an advertising argument (and wanted by the modelling community). Anyway, I would never let these ugly things alone, and took the courageous decision to erase them all and re-engrave the whole plane, except for the landing gear spats and radiator cowling, of which surface detail was realistic enough.
To make these proceedings easier, I chose to build the Stuka in various sub-assemblies (wings, tailplanes, landing gears, fuselage), which were separately wet-sanded smooth (one hour of hard work in the bathing tub) and engraved according to the plans of the 1/48 Hasegawa Ju-87B (the best I had at hand). Fortunately, the Ju 87 is full of almost flat areas that made engraving quite easy.
Then, after the usual coat of primer (RLM 02 in this case) and subsequent corrections (some rivets were still visible), I could go to the painting job, starting with a pre-shading (that as usual disappeared under the different coats of paint… why do I still do this?).
| COLORS & MARKINGS |
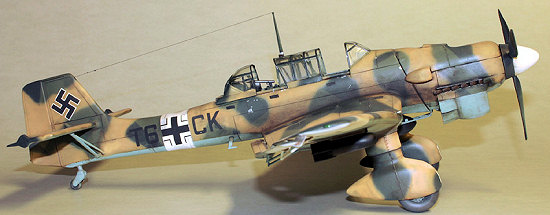
 Although I know
the “desert snake” markings are quite controversial (were they carried by only
one or more planes? – and which one(s)?, for how long?, what colours was the
snake?, was it on one or both sides of the fuselage?, etc.), I decided to stay
with the kit’s decals. First, because I wanted my nostalgic piece, second,
because I had no other decals and third, because Mediterranean Stukas have a
less horrible reputation than their Blitzkrieg counterparts. So, I did as the
Germans did, and, unlike the instructions, applied the standard RLM 70/71/65
disruptive European camo and covered it with large, free-handed zones of sand
colour (it was most probably Italian paint) to create the so-called “blotches”.
This being made, I sealed the paint with a glossy varnish and applied the
decals.
Although I know
the “desert snake” markings are quite controversial (were they carried by only
one or more planes? – and which one(s)?, for how long?, what colours was the
snake?, was it on one or both sides of the fuselage?, etc.), I decided to stay
with the kit’s decals. First, because I wanted my nostalgic piece, second,
because I had no other decals and third, because Mediterranean Stukas have a
less horrible reputation than their Blitzkrieg counterparts. So, I did as the
Germans did, and, unlike the instructions, applied the standard RLM 70/71/65
disruptive European camo and covered it with large, free-handed zones of sand
colour (it was most probably Italian paint) to create the so-called “blotches”.
This being made, I sealed the paint with a glossy varnish and applied the
decals.
Disaster Strikes !
Alas! Alas ! The 1969 decals had dried beyond useability, and my pretty desert snakes shattered to a hundred pieces soon after hitting the water. Only the large underwing crosses could be salvaged. This forced me to improvise. Fortunately, 35 years of modelling have left two drawers full of spare decals I could use. To be honest, I had to stick to the old motto: “if you can’t be accurate, at least be credible”… which would have applied to the snake scheme anyway.
| FINAL ASSEMBLY |
After a first wash of oils, I finally assembled the airframe. As said earlier, the sub-assemblies fit together perfectly, requiring no putty at all. This is maybe due to the Stuka’s very angular shape, which allows clean 90° joints. Then came the “fiddly bits” that couldn’t stand the polishing that follows the washes (the typical Junkers flaps, the bombs, antennas, prop, etc.), after which the
 model
was coated in Model Master matte acrylic varnish (which is extremely matte, as
were the real desert Stukas after a few weeks in the African sun and sand).
model
was coated in Model Master matte acrylic varnish (which is extremely matte, as
were the real desert Stukas after a few weeks in the African sun and sand).
The rest of the time was spent on the different finishing steps, like post-shading, installing the excellent and well-fitting transparencies (the large frames were masked and airbrushed, the small ones covered with strips of painted decal), enhancing the details with a final wash of thinned enamels, adding a few aluminium “scratches” with a toothpick, toning down the whole job with more matte varnish, then finally adding the antenna wire and applying large exhaust stains and other weathering effects with pastel powder.
Voilà. Here you have an impressive Stuka in all its Teutonic glory, the only game in town if you want a 1/32 B model. The re-engraving job has been worth the pain, and has taken away the toy-like impression a rivet-ridden model would leave.
I’ve been lucky. This big chunk of a plane just fits my model cabinet, taking the room of 4 1/48 single-engine fighters. I really should build smaller things.
| CONCLUSIONS |
 Of
course, a few things about this kit show its respectable age (I mean, besides
the rivets). Some cockpit details are a little simplified due to the time’s
injection techniques, the tyres could be better, as well as the exhaust pipes
and bombs, which are a bit basic. The decals were kaputt, and the pilot
“dummies” (I didn’t mention them yet) were good enough for the bin. But oh boy,
this kit gave me hours of modelling fun, and the final result doesn’t look bad
at all, even displayed beneath its younger Hasegawa “D” and “G” brothers of
2006. Oh well. I’ll put the snake on a 1/48 kit.
Of
course, a few things about this kit show its respectable age (I mean, besides
the rivets). Some cockpit details are a little simplified due to the time’s
injection techniques, the tyres could be better, as well as the exhaust pipes
and bombs, which are a bit basic. The decals were kaputt, and the pilot
“dummies” (I didn’t mention them yet) were good enough for the bin. But oh boy,
this kit gave me hours of modelling fun, and the final result doesn’t look bad
at all, even displayed beneath its younger Hasegawa “D” and “G” brothers of
2006. Oh well. I’ll put the snake on a 1/48 kit.
Recommended if you’re not afraid of sanding and own an engraving tool of some sort.
February 2007
| REFERENCES |
Squadron Signal „Ju 87 in Action“
Editions Atlas « Avions d’assaut de la 2ème Guerre Mondiale »
Monogram « Luftwaffe aircraft colours »
Wing Masters Spécial « La bataille du désert » I and II.
Copyright ModelingMadness.com. All rights reserved. No reproduction in part or in whole without express permission.
If you would like your product reviewed fairly and fairly quickly, please contact the editor or see other details in the Note to Contributors.