| KIT #: | 48003 |
| PRICE: | € 11.95 |
| DECALS: | One option |
| REVIEWER: | Sjon van der Heiden |
| NOTES: | Highly detailed |
| HISTORY |
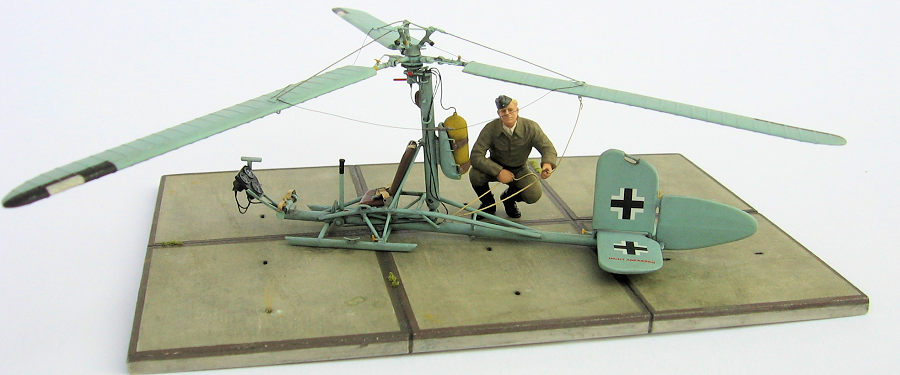
The Fa 330 was an autogyro carried aboard German U-boats which could quickly be assembled and deployed. It was developed to offer a high vantage point while being towed behind a submarine to better spot possible targets. Not surprising, the idea did not catch on. There is only one known instance of a target being destroyed which had been spotted with the help of one of these flying machines.
| THE KIT |
 Ever since I
read about this contraption I wanted to model it. I knew Pavla did one in 1:72.
I even considered obtaining it to use it as a template for a scratch build one
in quarter scale, but thought better of it. More recently I discovered this
version from Fly models. Packed in a much smaller box than its 1:72 counterpart
it also sells at nearly half the price. Thanks to the picture of an assembled
(but unpainted) model on the box, you get a pretty good idea of the kind of
quality you will find inside of it. The plastic is best thought of as
limited-run. You will need to spent some time on cleaning the pieces and this
will definitely not be as easy a build as for instance a Tamiya kit would be.
Alongside the plastic you get 10 perfectly casted resin detail parts and a small
fret containing lots of fiddly bits.
Ever since I
read about this contraption I wanted to model it. I knew Pavla did one in 1:72.
I even considered obtaining it to use it as a template for a scratch build one
in quarter scale, but thought better of it. More recently I discovered this
version from Fly models. Packed in a much smaller box than its 1:72 counterpart
it also sells at nearly half the price. Thanks to the picture of an assembled
(but unpainted) model on the box, you get a pretty good idea of the kind of
quality you will find inside of it. The plastic is best thought of as
limited-run. You will need to spent some time on cleaning the pieces and this
will definitely not be as easy a build as for instance a Tamiya kit would be.
Alongside the plastic you get 10 perfectly casted resin detail parts and a small
fret containing lots of fiddly bits.
| CONSTRUCTION |
The framing is all in injection moulded plastic and is really well done. Some of the smaller pieces though are perhaps a bit over scale and are better replaced with styrene rod. This will also save you lots of time cleaning up those parts. While this kit is highly detailed and very accurate, four tiny pieces of framing are missing. The abundance of information on the internet helped me determine their exact position.
 Extreme
care has to be taken to assemble everything as straight and symmetrical as
possible. My frame ended up a little askew. I remedied this by taping the skids
to a flat surface and putting little drops of liquid cement on the main
attachment points. This softened up the joints and once dry, it could not have
been more straight.
Extreme
care has to be taken to assemble everything as straight and symmetrical as
possible. My frame ended up a little askew. I remedied this by taping the skids
to a flat surface and putting little drops of liquid cement on the main
attachment points. This softened up the joints and once dry, it could not have
been more straight.
During the build I added lots of extra detail, but I only altered two things. The attachment point of the resin instrument panel is completely solid, while in reality this is held in place by an open framing. This was made out Evergreen strip. The other issue is the shape of the control surfaces. They are moulded flat, so I sanded an airfoil into it. And while at it, I altered the rudder, the underside should angle more upwards.
Fly Models even offers you some suggestions on scratch building several cables and rigging. An elaborate scheme is given on the instruction sheet.
| COLORS & MARKINGS |
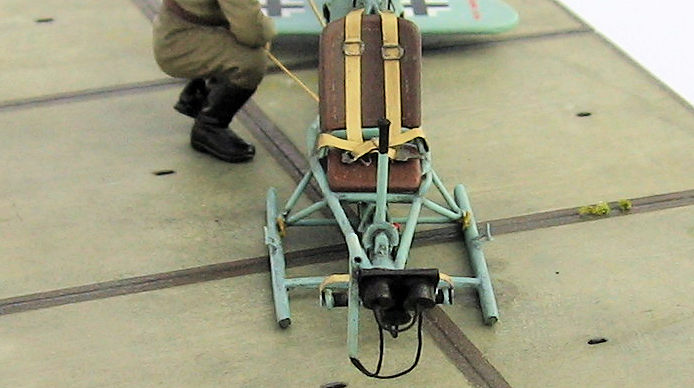 The seat and
rotor assembly were left off until the last moment. Painting was done along the
way with the help of my trusted brushes and Humbrol enamels. All joints were
treated with a dark wash and the entire model was given a drybrush with the
original Humbrol 65 aircraft blue, in order to blend in the wash. On the
original control surfaces you can clearly distinguish the framing underneath the
linen covers. I replicated this by masking the position of the tubes and giving
this the once over with the aforementioned Humbrol 65. Because the surrounding
area is slightly darker due to the wash, this gives a perfect impression of
framing trying to poke through the fabric. All of the details were picked out
with the help of an opti-visor as my spectacles are no longer able to compensate
for my age.
The seat and
rotor assembly were left off until the last moment. Painting was done along the
way with the help of my trusted brushes and Humbrol enamels. All joints were
treated with a dark wash and the entire model was given a drybrush with the
original Humbrol 65 aircraft blue, in order to blend in the wash. On the
original control surfaces you can clearly distinguish the framing underneath the
linen covers. I replicated this by masking the position of the tubes and giving
this the once over with the aforementioned Humbrol 65. Because the surrounding
area is slightly darker due to the wash, this gives a perfect impression of
framing trying to poke through the fabric. All of the details were picked out
with the help of an opti-visor as my spectacles are no longer able to compensate
for my age.
With so little decals to apply, I took a risk and skipped the usual gloss coat. I got away with it as the decals performed brilliantly. I treated them with Micro Set and Sol but I think I could have done without that as well. I did seal the decals with a coat of Testors flat varnish.
| FINAL CONSTRUCTION |
The rotor assembly is extremely flimsy, just as it would have been on the real thing I suppose. The rendition of the ribs on their surface is somewhat overstated but at least it looks very crisp. Detailed as the kit is, injection moulding has its limitations. The universal joints near the hub for instance are nothing more than rounded blobs. Small pieces of copper wire improved the look of things dramatically. Copper wire was also used to make three more T-shaped handles. In reality these would secure the attachment of the rotor blades. T-shapes are provided on the etched fret, but only enough for the ones to be used on the main framing.
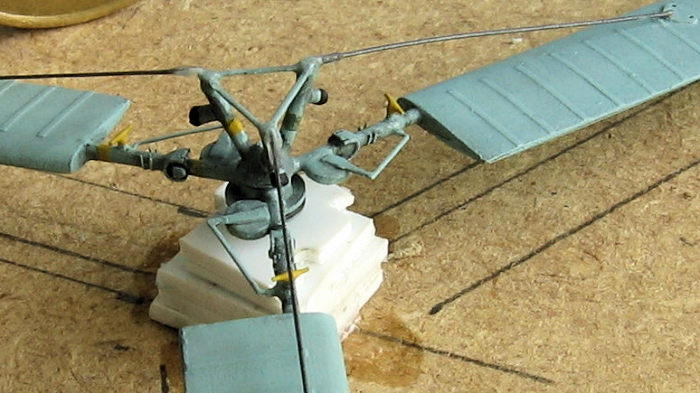 The
rigging running from the hub to the blades was made of stretched sprue as I
figured wire would be too fragile. The wires running from blade to blade are
made of 0.10mm copper wire and getting the sag to look natural took several
attempts.
The
rigging running from the hub to the blades was made of stretched sprue as I
figured wire would be too fragile. The wires running from blade to blade are
made of 0.10mm copper wire and getting the sag to look natural took several
attempts.
Each blade is colour coded… Twice! The tips are coded in a black and white pattern, while the attachment is done in blue, yellow and green (not red, as Fly Models suggests). It seems a bit superfluous to me, but most pictures on the net corroborate Fly Models instructions, so following them seemed like the best thing to do. Besides, you need binoculars to see the tiny coloured stripes anyway.
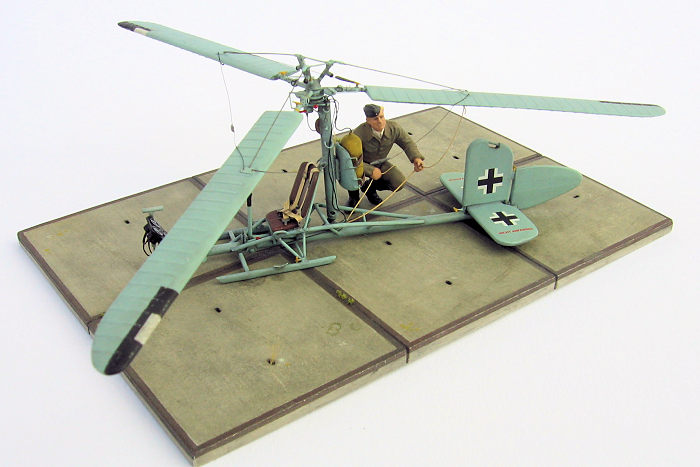
At first I thought to simply place the model on a black pedestal, but in the end I decided that would turn out a bit dull. So I fashioned six concrete “Stelcon” slabs out of Evergreen sheet. They are a 1937 Dutch invention and were exported to more than 30 countries worldwide, so why not Germany? Dry brushing them with several shades of beige and grey gave them the weathered look I was after.
Having a figurine alongside a model is one of the best ways to give a sense of scale, especially with an unusual plane like this. But I wanted him to have something on hands. So I modified an ICM German mechanic to hold a line running from the rotor assembly through an eyelet on the Fa 330 to his other hand. The line is a combination of stretched sprue and lead and copper wire.
| CONCLUSIONS |
This must be the greatest kit I ever build. I’m a real sucker for fiddly bits and I usually get the greatest kick out of the cockpit construction. Since this is basically a cockpit without cowlings I was as happy as a lark. Due to the many small parts this would not be a kit for the beginner but I can recommend this one to everyone with an abundance of patience, and good near eyesight of course.
16 August 2021 Copyright
ModelingMadness.com. All rights reserved. No reproduction in part or in whole
without express permission. If you would like your product reviewed fairly and fairly quickly, please
contact
the editor or see other details in the
Note to
Contributors.