| KIT #: | 2030 |
| PRICE: | $75.00 |
| DECALS: | One option |
| REVIEWER: | Blair Stewart |
| NOTES: | Complex, detailed kit with numerous parts including PE, vinyl tires and metal chain; comprises 4 kits in one. |
| HISTORY |
Vergeltungswaffe 2 (Retribution Weapon 2"), technical name Aggregat 4 (A4), was the world's first long-range guided ballistic missile. The missile, powered by a liquid-propellant rocket engine, was developed during World War II in Germany as a "vengeance weapon". It’s primary purpose was to attack Allied cities in retaliation for the Allied bombings against German cities. The V-2 rocket also became the first artificial object to travel into space by crossing the Kármán line (i.e., the theoretical boundary between the earth’s atmosphere and outer space) with the vertical launch of V-2 MW18014 on 20 June 1944.
 The Meillerwagen (Meiller
vehicle) was a trailer used to transport the V-2 from the “transloading
point” of the Technical Troop Area to the launching point, erect the missile on
the Brennstand (firing stand), and to act as the service
gantry for fueling and launch preparation. Essentially, it was the world’s
first missile Transporter Erector Launcher (TEL), although technically it did
not serve as the launcher once the missile was erected to the firing position.
The Meillerwagen (Meiller
vehicle) was a trailer used to transport the V-2 from the “transloading
point” of the Technical Troop Area to the launching point, erect the missile on
the Brennstand (firing stand), and to act as the service
gantry for fueling and launch preparation. Essentially, it was the world’s
first missile Transporter Erector Launcher (TEL), although technically it did
not serve as the launcher once the missile was erected to the firing position.
The SS100 was a military version of Hanomag’s heavy civilian tractor. Hanomag is most famous for manufacturing over 15,000 Sd.Kfz 251 half-tracks, which came to be known as “Hanomags.”
Research into military use of long-range rockets began when the studies of graduate student Wernher von Braun attracted the attention of the German Army. A series of prototypes culminated in the A-4, which went to war as the V-2. Beginning in September 1944, over 3,000 V-2s were launched by the German Wehrmacht against Allied targets, first London and later Antwerp and Liège. According to a 2011 BBC documentary, the attacks from V-2s resulted in the deaths of an estimated 9,000 civilians and military personnel, and a further 12,000 forced laborers and concentration camp prisoners died as a result of their forced participation in the production of the weapons.
As Germany collapsed, teams from the Allied forces—the United States, the United Kingdom, and the Soviet Union—raced to capture key German manufacturing sites and technology. Wernher von Braun and over 100 key V-2 personnel surrendered to the Americans and many of the original V-2 team ended up working at the Redstone Arsenal. The US also captured enough V-2 hardware to build approximately 80 of the missiles. The Soviets gained possession of the V-2 manufacturing facilities after the war, re-established V-2 production, and moved it to the Soviet Union. (Thanks to Wikipedia for the above information).
| THE KIT |
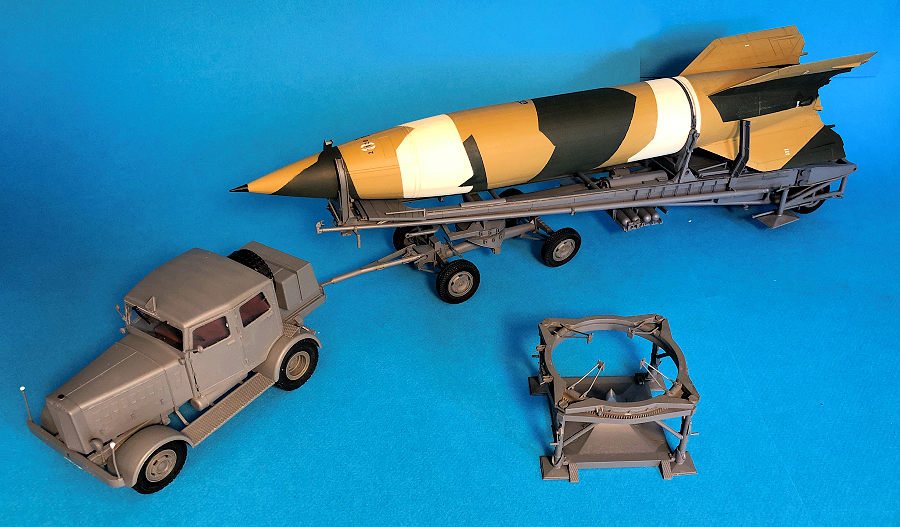
 The kit essentially consists of four separate
kits: the Meillerwagen; the V-2; the launch stand; and the Hanomag SS100. True
to Takom’s approach for its model kits, this one is filled with parts. The
Meilerwagen and V-2 consist of several hundred plastic parts on 9 sprues, 8
vinyl tires, 2 metal chains, one photo etch (PE) set, and a decal sheet. The
V-2’s body consists of four parts that are packaged separately. The Hanomag
SS100 consists of plastic parts on 8 sprues, 7 vinyl tires, one clear plastic
sprue, and a decal sheet. Molding is crisp and there are NUMEROUS small parts.
The kit instructions are well illustrated and somewhat easy to follow (more on
that later).
The kit essentially consists of four separate
kits: the Meillerwagen; the V-2; the launch stand; and the Hanomag SS100. True
to Takom’s approach for its model kits, this one is filled with parts. The
Meilerwagen and V-2 consist of several hundred plastic parts on 9 sprues, 8
vinyl tires, 2 metal chains, one photo etch (PE) set, and a decal sheet. The
V-2’s body consists of four parts that are packaged separately. The Hanomag
SS100 consists of plastic parts on 8 sprues, 7 vinyl tires, one clear plastic
sprue, and a decal sheet. Molding is crisp and there are NUMEROUS small parts.
The kit instructions are well illustrated and somewhat easy to follow (more on
that later).
| CONSTRUCTION |
Before diving into this beast, I decided to watch Andy’s Hobby Headquarters’ YouTube assembly video, and this proved very helpful. After watching the video, I had a fair idea of where the assembly pitfalls were for all three kits, but not all of them, as I would soon discover.
Per the video, I started with the Miellerwagen.
Right off the bat, Step One, primarily the substructure for the trailer itself,
became a fairly time-consuming assembly process. Being careful to align the long
tubular sections of the trailer, I then began adding various equipment and boxes
such as propellant bottles that are carried on the bottom of the trailer. At
Step 6, I began assembling the erector portion of the trailer. Here, alignment
is very critical and a little difficult to maintain as the main steel outside
beams slope inwardly
 towards the front of the erector. After assembling the
erector, I attached it to the trailer, which is accomplished without glue so
that the erector can be moved to the vertical position if desired. Steps 9 thru
15 involve gluing numerous small and fragile parts – such as handrails and pipes
– onto both the trailer and the erector. Step 11 requires the assembly of the
two outriggers that stabilize the missile and erector when it is being raised to
the launch position.
towards the front of the erector. After assembling the
erector, I attached it to the trailer, which is accomplished without glue so
that the erector can be moved to the vertical position if desired. Steps 9 thru
15 involve gluing numerous small and fragile parts – such as handrails and pipes
– onto both the trailer and the erector. Step 11 requires the assembly of the
two outriggers that stabilize the missile and erector when it is being raised to
the launch position.
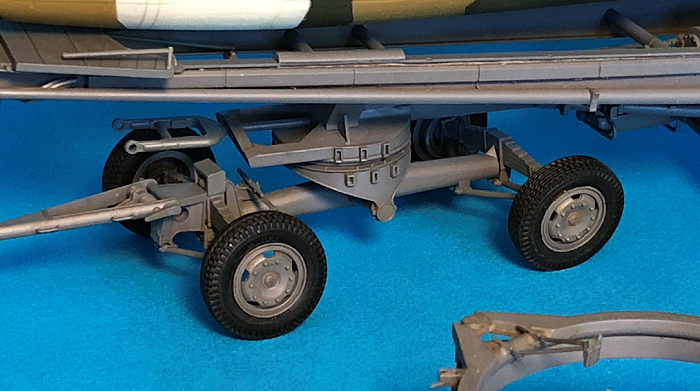
In Step 13, I assembled the trailer’s axles and 8 wheels. I did not glue the wheels to the trailer at this point and left off the tires to make painting easier. By doing this, one can slip both the inside and outside tires over their respective wheels.
In Steps 16-19 I assembled the trailer’s front
steering/towing assembly and did the same thing as before with the assembly’s
four wheels and tires. I then mounted the assembly to the trailer. Steps 21 thru
23 include the addition of the work platforms and various other items to the
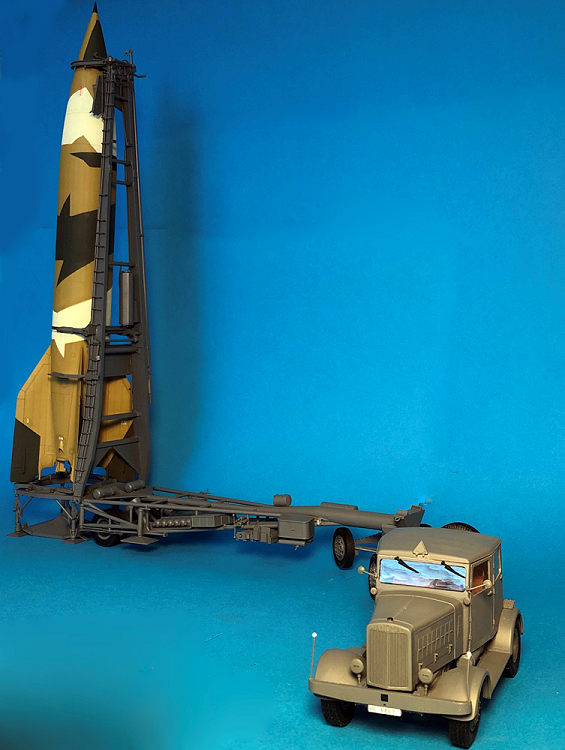
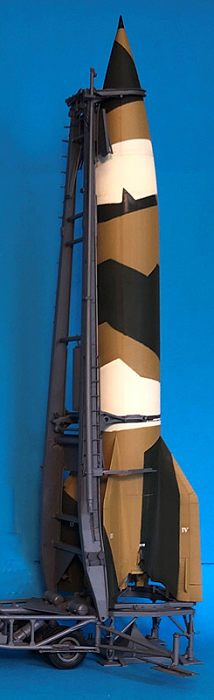
erector. At this point, one must decide if you are building the kit to be in the
firing or traveling position (I chose the traveling position, but assembled
things so that I could put the trailer in the firing position and photograph it
for this article). The
 trailer/erector assembly concludes with a tedious Step
24, which adds 31 U-shaped bars to the right side of the erector (heaven knows
why the Germans felt these were necessary or what their actual function was).
trailer/erector assembly concludes with a tedious Step
24, which adds 31 U-shaped bars to the right side of the erector (heaven knows
why the Germans felt these were necessary or what their actual function was).
I then moved to the V-2, which, compared to the trailer, is a relatively simple assembly of some 24 parts. The missile body aligns very nicely, and the seams are on the natural seams of the real missile. The only place I used filler was where the rocket fins mate to the missile body, and only a thin bead of Perfect Plastic Putty was required here. If you don’t already know about this stuff, it is water-soluble, and you can make a perfect fill along a seam by wetting your finger or a Q-Tip and dragging it along the seam.
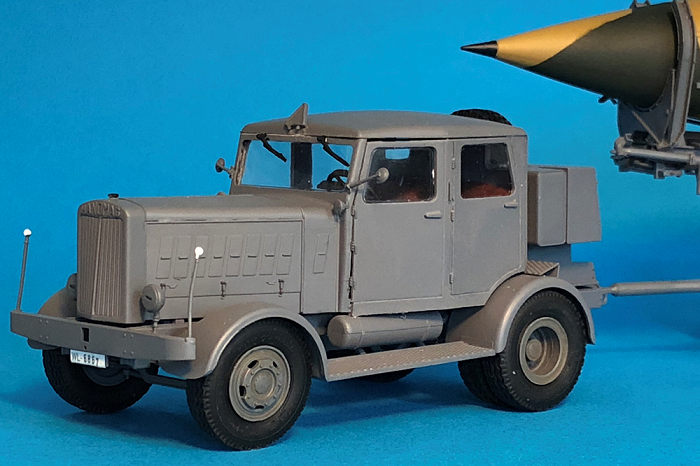
Next, I tackled the SS100 tractor. The tractor has a full engine and running gear, although little of this can be seen unless one opts to leave off the engine access covers. The assembly went fairly smoothly until I got to the cab. Instead of molding the cab as one piece (like most model car kits), Takom chose to have the modeler assemble the cab in multiple pieces and a one-piece top. This presents some alignment problems, and it is difficult to get the entire body assembly to align properly with the frame and the front firewall assembly. But after some coaxing, a few choice words, and some super glue aided by an accelerant, I was finally able to get the body to sit properly on the frame.
 One common problem I experienced with the
trailer and the SS100: after painting and putting the vinyl tires on their wheel
rims, I found that the attaching “stubs” for the wheels on both are very small
and are not sufficient for the weight of the wheel/tire assemblies. After
several failed attempts to glue them on and let them set up overnight, I finally
drilled holes in the ends of the axles and the tires, inserted a section of
paper clip into both, and then used superglue to attach all the wheels. This
proved to be the right solution for this problem.
One common problem I experienced with the
trailer and the SS100: after painting and putting the vinyl tires on their wheel
rims, I found that the attaching “stubs” for the wheels on both are very small
and are not sufficient for the weight of the wheel/tire assemblies. After
several failed attempts to glue them on and let them set up overnight, I finally
drilled holes in the ends of the axles and the tires, inserted a section of
paper clip into both, and then used superglue to attach all the wheels. This
proved to be the right solution for this problem.
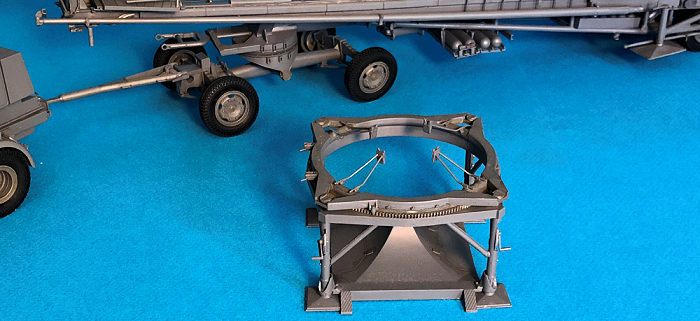
Lastly, I assembled the rather intricate launch stand, which is quite detailed by itself and easily rates as a stand-alone model.
A final construction note: some of the instruction drawings are a little confusing, and on more than one occasion I attached parts in the wrong place or orientation, once again validating the “test-fit before gluing rule” (which, after 66 years of modeling, I have yet to master).
| COLORS & MARKINGS |
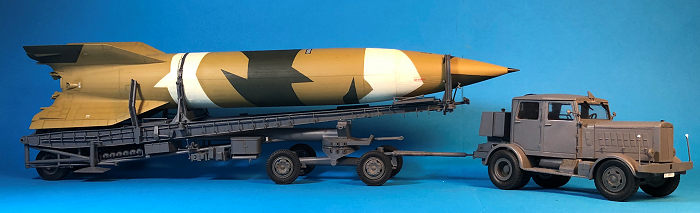
 The instructions offer three color schemes for
the tractor, two for the trailer, and 6 for the missile. I opted for the box
art’s scheme, which has the tractor and trailer in German Gray and the missile
in a “hex pattern” camo scheme. This approach provides a good contrast between
the missile and the trailer/tractor.
The instructions offer three color schemes for
the tractor, two for the trailer, and 6 for the missile. I opted for the box
art’s scheme, which has the tractor and trailer in German Gray and the missile
in a “hex pattern” camo scheme. This approach provides a good contrast between
the missile and the trailer/tractor.
For the tractor and trailer, I opted to shoot both using a rattle can of Rustoleum American Accents Ultra Gray primer, which is somewhat darker than their gray automotive primer (note: although Rustoleum is an enamel paint, it still is somehow rather “hot” when sprayed on plastic, so as always, if you go this route, test the paint on a piece of the kit plastic before hosing down your prized model. Another approach is to mist on a light coat, let it dry, and then continue this process until you have good coverage).
The V-2 camo scheme called for Dunkelgeb (tan), Olive Green, and Creamweiss. For the tan, I used Tamiya XF-60. For the green, I chose Model Master Luftwaffe Green enamel. For Cremeweiss, I used Apple Barrel Vanilla Ice Cream, which is a perfect match for Cremeweiss. You can buy two ounces of this paint at Walmart for 50 cents.
I sprayed the entire missile with the XF-60 tan, then masked off and painted the areas for the Luftwaffe Green. Next, I did the same for the Cremeweiss. This was a somewhat tedious paint job, but I believe it was worth it in the end.
After all the paint was dry, I applied the sparse decals to the tractor and the missile using a dab of Future to settle them onto the model.
| CONCLUSIONS |
Takom creates some intricate plastic kits, and this one is no exception. In fact, it may have more parts than their King Tiger II with full interior, which I had tackled before. At any rate, if you want a somewhat unique subject for your kit collection, and are reasonably experienced with assembling high part count, small part model kits, then I highly recommend this one to you!
7 July 2020
Copyright ModelingMadness.com If you would like your product reviewed fairly and fairly quickly, please
contact the editor or see other details in the
Note to
Contributors. Back to the Main Page
Back to the Review Index Page
Back to the Previews Index Page