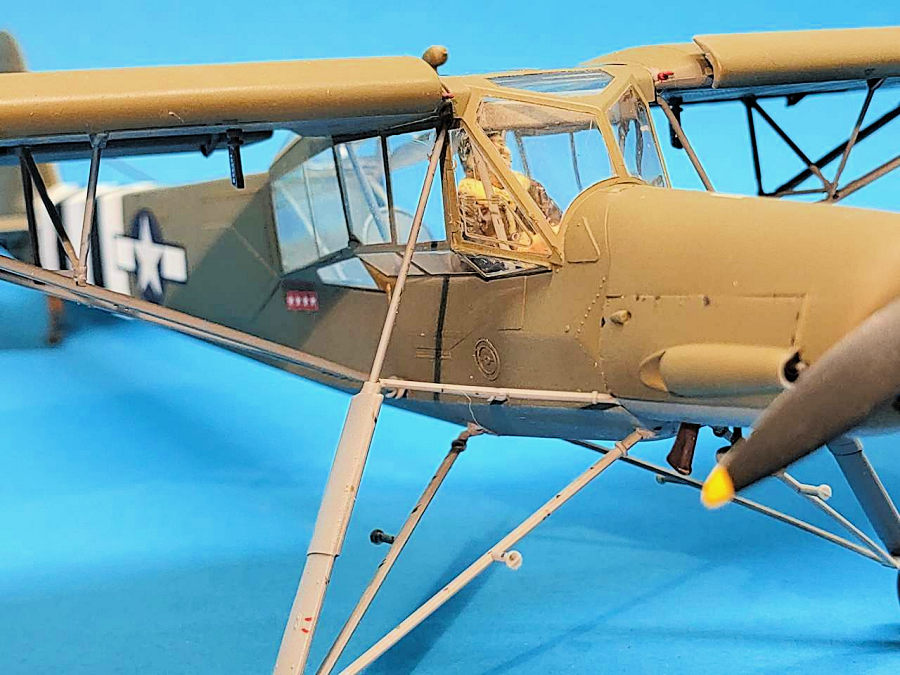
Revell 1/32 Fi-156C Storch
| KIT #: | 04714 |
| PRICE: | $ |
| DECALS: | options |
| REVIEWER: | Frank Spahr |
| NOTES: | Reboxed Hasegawa kit |

| HISTORY |
Kassel, my hometown, developed a quite active aircraft industry between the two world wars. The most notable company was founded in 1930 by renowned pilot Gerhard Fieseler. It was relocated to three sites to the East of the city in 1933, due to the Nazi rearmament. One factory was in Bettenhausen, one in nearby Lohfelden, and the flight tests were performed at Kasselīs then airport in nearby Waldau. Soon more than 5,300 people worked there, producing mainly the legendary Storch VTOL aircraft. During the war, production and workforce swelled. Fieseler licence-built Bf 109, especially the T model which was slated for use on the German aircraft carrier. Moreover, Fw 190 were licence-built in numbers. In 1942, Fieseler was tasked with developing a flying bomb in aircraft shape, the infamous Fi 103 which is better known as V1, or Vergeltungswaffe 1 (Weapon of Retaliation 1). Numerous forced labourers augmented the workforce, under slave-like conditions. The allies flew several heavy attacks against the industrial cluster. The most devastating attack on 22 October, 1943, killed an estimated 10,000 people and wrecked most of the city and a lot of the industrial plants. As the production demands set by the Luftwaffe were not met, Gerhard Fieseler was sacked as head of the company, and a successor appointed. His ruthless methods, including summary execution of forced labourers, increased the output. More bombardments hit the plants and their surrounds, until Kassel was liberated on Easter weekend, 1945. After the war, the allies ordered the dismantling of the Fieseler plants. The airport fell into disuse, and was finally replaced by a new industrial area in 1970. Only some street names remind of it now.
 My
father, born in 1929, grew up on the outskirts of Bettenhausen, and was
fascinated by flying and the nearby aircraft industries. He survived the big air
raid as his shift as air raid observer in the city was switched at the last
minute. He started an apprenticeship in Bettenhausen with their local branch of
Junkers Flugzeugwerke, where instruments for aircraft were manufactured.
So you see I have a personal connection with Fieseler and everything it stands for the stunning aircraft and their being part of the most murderous tyranny my country has ever known.
The Storch (named after the stork, for its long landing gear), was Fieselerīs most iconic design. It was the most capable VTOL aircraft of its time, and given the right wind direction, could take off and land from very, very short runways indeed. Its long landing gear coped with unprepared landing areas. The big greenhouse canopy was designed to ease observation, which was its main task apart from liaison and medevac duties. Fieseler would have liked to continue development of the type, and had a successor lined up. In order not to disturb the production line, no major improvements were incorporated. During the war, the Storch was produced in occupied countries France, Czechoslovakia and Romania.
Quite a number of Storchs are still extant, some airworthy. I have seen one perform at an airshow at Kasselīs new airport in the late 1990s, and it was impressive to see how slow it could fly. One example was suspended from the ceiling of Kasselīs train station for a very long time, deteriorating and covered with pigeon droppings. Meanwhile, it has been restored to flying condition and is being preserved.
| THE KIT |
 This kit,
according to Scalemates, was first issued by Hasegawa in 1978. It has been
previewed on this site. Revell licence-produced it
in 2001, and that was when I bought my example, for the sum of 49.95 DM. Given
the connection with the East of Kassel where my dad came from, I was interested
in building it one day. I had a few looks inside the box, and found the kit
looked very neat and buildable. I wasnīt that sure about the decals, though, as
I had already experienced issues with Revell decals of that era.
More than 20 years of gentle maturing in my modest stash followed.
| CONSTRUCTION |
After retiring, I made a fresh start at modeling. On reviewing my stash, I realized how riddled with dirt and fly droppings the Storchīs box was, and decided to built it. I had recently trashed the model that had been suspended from our hall ceiling for 20 years, and the Storch should be a neat replacement.
I early on decided not to use the kit decals, and I also wanted something without swastikas. Or empty spaces where they should be, as is the law in Germany. On looking through aftermarket offers, I first found the Eduard set of canopy masks, and given the extensive glazing of the type, I just wanted to have them. Small spoiler that was a good decision.
I then found an aftermarket sheet that included a captured aircraft that was used by Gen. Eisenhower himself, in a generic USAAF scheme and invasion stripes. That I would also use.
 Having
obtained the two aftermarket sets, I started building. The obvious starting
point was the large and well visible cockpit, but I could also work on other
subassemblies. Parts fit was generally good, and the sturdy brass inserts for
the main landing gear were much welcomed. Itīs not a small model and there is
some load on that landing gear. I did some cleanup of parts in the cockpit,
removed some ejector pin marks, but did not add detail. I filled the mounting
points for the additional MG magazines.
As the model was meant to hang from a ceiling, I needed to use the pilot, but wouldnīt want the German figure supplied. So I got out the rotary tool, files, filling wax and Apoxie Sculp and tried to convert the figure. It works at a distance.
I checked out various walkaround sites for paint references, even though that is unreliable at best with restored planes. But I never really trust all of Revellīs colour callouts.
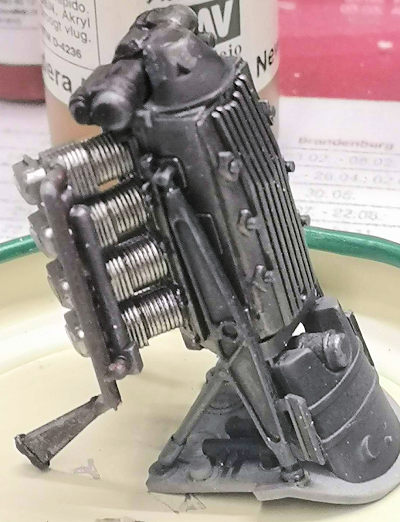
Construction went basically well. The inverted Argus engine gave me some headaches re its orientation, but ended up quite a neat engine model. Sadly, not that much is visible after completion. The instrument panel was neatly molded and looked good after spraying it black and drybrushing it medium grey. Some splotches of paint and clear gloss over the instrument dials helped.
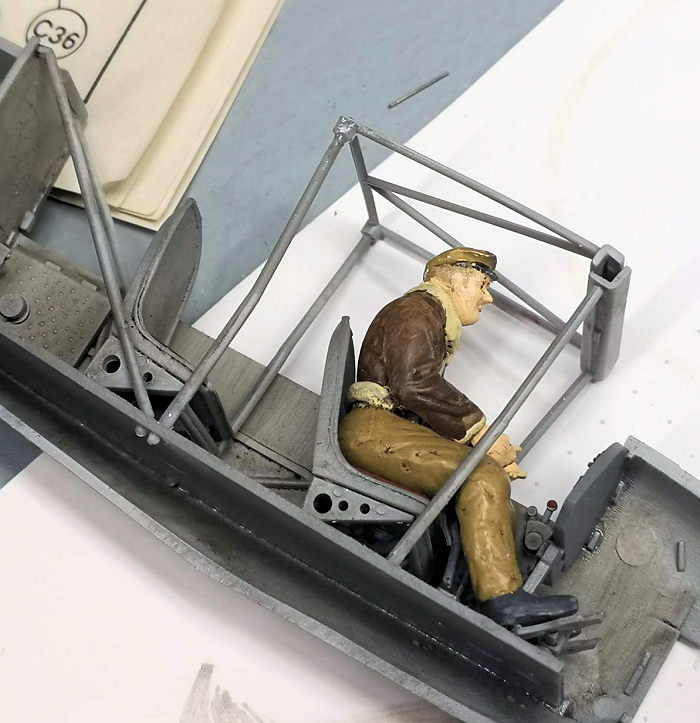 Things
became iffy when I had to mount the pilot on his seat and get the cockpit
assembly inside the fuselage, and I had to resort to pressure and redo some
things. But in the end the fuselage could be closed and filled and sanded. Prior
to adding the engine, I needed to mask the area around the firewall to avoid
overspray into the cockpit.
The canopy masks were extremely helpful, given the extent and the peculiar shapes of the panes. Mounting the canopy was the single most frustrating step of the build, though. The canopy needed to fit the fuselage, but also to the interior framing and still allow mounting the landing gear and the wings. And the lower angles and the starboard door, which are seprate parts. Whilst not being marred or blinded by glue. And preferably without dust or drilling residues becoming trapped inside.
I glued the canopy using PVA glue, and it took quite some while, until I felt I had closed up all the seams and the assembly was orientated halfway decently.
Having prepared all my subassemblies and primed them, it was time for the paint scheme.
| COLORS & MARKINGS |
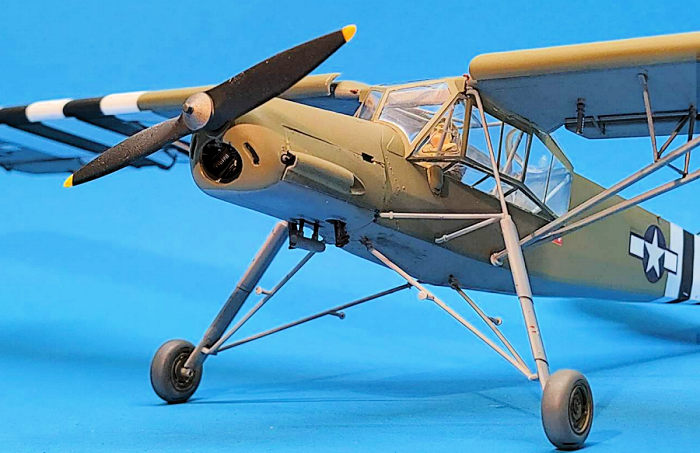
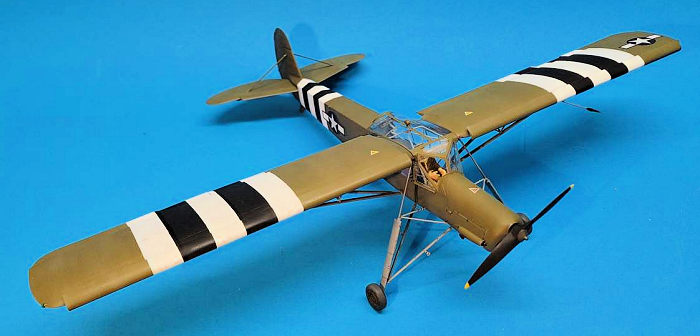
Well, that scheme was basically pretty simple, Olive Drab over Neutral Grey. Plus invasion stripes. I kept the prop as on other allied planes, as in black with yellow tips. All in all, quite some masking was needed. I kept the fuselage, the engine and its covers, the wings and accoutrements separate for ease of handling. I experienced some inexplicable paint liftoff in some areas, and I had to redo parts of the seams, both fairly common occurrences with me. I did some preshading and accentuating to make the large wing areas a bit more credible.
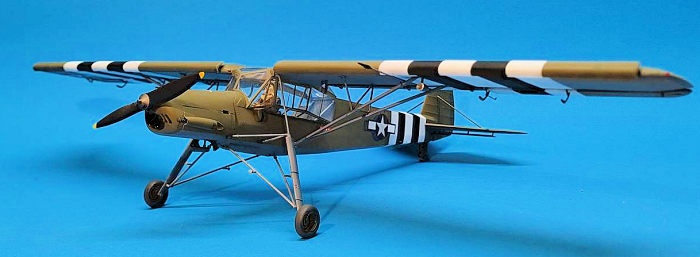 Not
unexpectedly, the invasion stripes proved to be tricky. It wasnīt just that they
had to fit reasonably well over three kit parts (slats, wings and flaps), but
also that I hadnīt got the orientation of some of them not quite right. So quite
some back-and-forthing was involved, until I called that part quits.
Now I needed a good gloss coat prior to decaling. I used Humbrolīs Acrylic Gloss Clear.
That properly cured, I started on the decals. Which was where I hit a nasty snag. The white of the national insignia did not cover perfectly, and where it was applied over the white of the invasion stripes, a difference was visible. So I was forced to mask and repaint this area to get an even look. Which did not work ideally, but with some repairs I found it acceptable. Some generic decals from the Revell sheet were used, and performed better than feared, quite a relief.
| FINAL CONSTRUCTION |
Now was the time to bring things together I started on the landing gear, which did not fit as well as hoped and sent literal shivers through my spine when I had to drill out the area where the brass rod was meant to slide into the transversal bar of the interior framing. It all needed ample glue and curing time, but with the rest of the supports, made quite a sturdy result. I then added the engine and its covers, which did not work ideally, but well enough.
I had oftentimes thought about how to unmask the canopy when the wings and all their bracing had been added. In the end, I decided to flatcoat the model prior to unmasking and adding the wings and bracing later. At this point, I did what limited weathering I felt needed. I reasoned that all effort would have been made to keep the Generalīs plane as neat and tidy as possible, so only some scuffing around the landing gear was added, and a bit of paint liftoff around the engine covers.
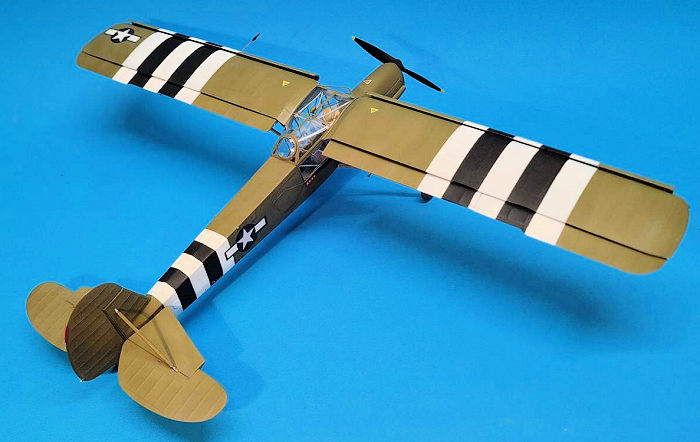 Unmasking
did not exhibit any flaws I would consider fatal, and I was relieved again. Now
I was able to add the wings and the bracing below them. I had assembled the
slats and flaps before adding the wings to the model, and luckily it all held
and worked. The bracing also went on well, and I was quite happy with the end
result.
Until a fellow modeler informed me I had forgot to add two small parts to the wing roots. I had simply overlooked them. They are release handles for the wing fold the Storch had. I had already cleared up the workbench and binned the stuff. So I hurried outside to the dustbin before break of dawn on a Sunday, in my bathrobe, to retrieve the instructions and parts. Which I then duly painted and installed. Then the project was really complete.
| CONCLUSIONS |
I much enjoyed this project on various levels. Itīs about my dad, my hometown, our history, and a really innovative and capable light aircraft that is still seen to fly almost 90 years after it was designed. I enjoy the look of the finished model, and itīs a good addition to my collection.
| REFERENCES |
https://en.wikipedia.org/wiki/Fieseler_Fi_156_Storch
https://en.wikipedia.org/wiki/Fieseler
In German:
https://de.wikipedia.org/wiki/Gerhard-Fieseler-Werke
https://www.fieseler-storch-kassel.de/
25 March 2025
Copyright ModelingMadness.com. All rights
reserved. No reproduction in part or in whole without express permission from
the editor.
If you would like your product reviewed fairly and fairly quickly, please contact the editor or see other details in the
Note to
Contributors. Back to the Main Page
Back to the Review
Index Page
Back to the Previews Index Page