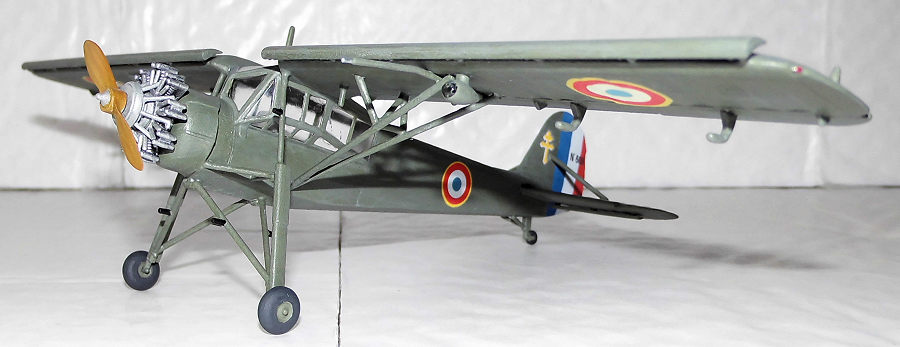
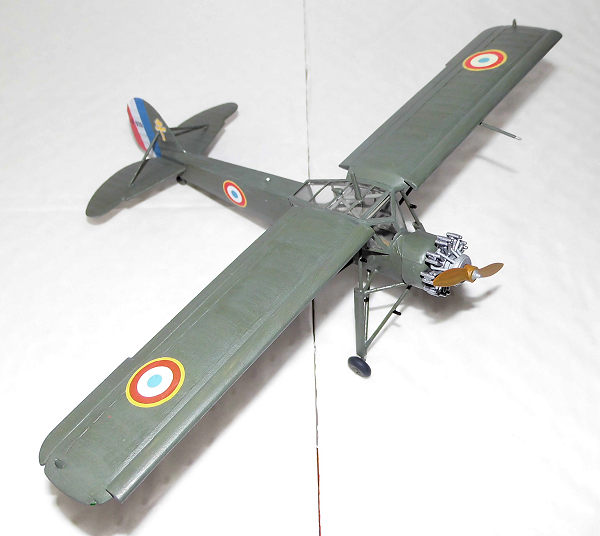
Academy 1/72 MS.502 Criquet
| KIT #: | 1661 |
| PRICE: | 40 DKK |
| DECALS: | Three options |
| REVIEWER: | Nicolai Plesberg |
| NOTES: |
| HISTORY |
The
Fieseler Fi 156 Storch is inevitably connected to France as it was produced
there for the Luftwaffe. That came about as the RLM (Reichluftfahrtsministerium
– the German Reich Air Ministry) utilised spare
 capacity
of aircraft plants in occupied territories. One such plant was the Morane
Saulnier facilities at Puteaux near Paris, which had produced the MS 406
fighter for the Armée de l’Air until the French capitulation in June 1940. A
management team from Fieseler-Flugzeugbau’s plant at Kassel-Bettenhausen
inaugurated the production of the Fi 156C at these very same assembly lines
and the first French-built Störche were delivered in April 1942. 121 were
delivered in all that year to the Luftwaffe. Production of Störche from
Kassel-Bettenhausen and Puteaux ran continuously side by side until the
German production line was run down; not because by decreases in Luftwaffe
demand, on the contrary, but simply because the assignment to Fieseler-Flugzeugbau
of increased production of Fw190s were considered more important (and
furthermore the production of fighter planes was considered so important
that only production lines within the borders of the Reich came into play).
The last German built Störche left the plant in October 1943. The French
line at Puteaux functioned although material shortages and sabotage took its
toll of production output – the Gestapo was brought in to stamp these issues
out! Meanwhile to compensate for the French troubles the surplus jigs and
tools were shipped from Bettenhausen to the Mráz plant at Choceň in
Czechoslovakia, which began deliveries to the Luftwaffe in December of the
same year. Despite the newly set-up assembly line there, the French Puteaux
plant delivered 403 Störche to the Luftwaffe during 1943.
capacity
of aircraft plants in occupied territories. One such plant was the Morane
Saulnier facilities at Puteaux near Paris, which had produced the MS 406
fighter for the Armée de l’Air until the French capitulation in June 1940. A
management team from Fieseler-Flugzeugbau’s plant at Kassel-Bettenhausen
inaugurated the production of the Fi 156C at these very same assembly lines
and the first French-built Störche were delivered in April 1942. 121 were
delivered in all that year to the Luftwaffe. Production of Störche from
Kassel-Bettenhausen and Puteaux ran continuously side by side until the
German production line was run down; not because by decreases in Luftwaffe
demand, on the contrary, but simply because the assignment to Fieseler-Flugzeugbau
of increased production of Fw190s were considered more important (and
furthermore the production of fighter planes was considered so important
that only production lines within the borders of the Reich came into play).
The last German built Störche left the plant in October 1943. The French
line at Puteaux functioned although material shortages and sabotage took its
toll of production output – the Gestapo was brought in to stamp these issues
out! Meanwhile to compensate for the French troubles the surplus jigs and
tools were shipped from Bettenhausen to the Mráz plant at Choceň in
Czechoslovakia, which began deliveries to the Luftwaffe in December of the
same year. Despite the newly set-up assembly line there, the French Puteaux
plant delivered 403 Störche to the Luftwaffe during 1943.
When France was liberated the production of the Storch continued now under
the new designation of MS 500 Criquet (locust). As the supply of Argus
engines ran out the MS 500 airframe was modified to take the Renault 6Q
engine of 233hp. The resulting plane was designated MS 501. Only a few were
actually built as the stock of 6Q engines were not high. An engine that was
available in larger numbers, however, was the Salms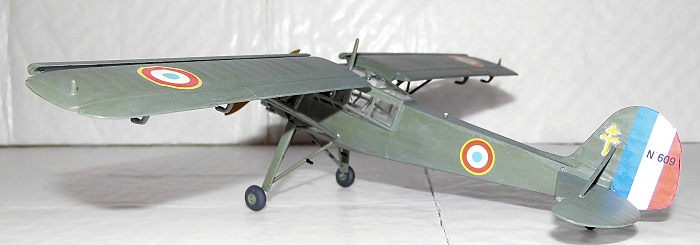 on
9AB nine cylinder radial of 230hp – 10hp less than the original Argus
engine. The Salmson engine worked, however, well and production continued as
the MS 502; a further engine change led to the Jacobs R-755-A2 radial of
304hp – in shape of the MS 505. This engine gave the Criquet an almost
sports like behaviour having the most responsive handling of all Criquet
variants. Production ended in 1965 after 925 of all variants had been build.
The Criquet was used in the colonial wars in Indo-China as well as in North
Africa in such diverse roles as liaison, observation, medevac and artillery
spotting. The Criquet served with the Armée de l’Air until 1970.
on
9AB nine cylinder radial of 230hp – 10hp less than the original Argus
engine. The Salmson engine worked, however, well and production continued as
the MS 502; a further engine change led to the Jacobs R-755-A2 radial of
304hp – in shape of the MS 505. This engine gave the Criquet an almost
sports like behaviour having the most responsive handling of all Criquet
variants. Production ended in 1965 after 925 of all variants had been build.
The Criquet was used in the colonial wars in Indo-China as well as in North
Africa in such diverse roles as liaison, observation, medevac and artillery
spotting. The Criquet served with the Armée de l’Air until 1970.
| THE KIT |
 The Academy
kit of the Fi 156 / MS 500 / 502 appeared, according to the sprues, in 1998 and
consists of four sprues; 59 parts molded in a very light grey plastic on three
sprue trees plus seven parts on the clear sprue tree. It looks “modern” compared
to earlier Fi 156 kits, with engraved and raised detail where appropriate and
nice fabric rendition, virtually no flash apparent and, as usual with Academy
kits, ‘least my experience, an excellent fit. The instructions are clear
although a little vague in some cases; especially with the paint information, as
some of the colors only have a generic name, which really doesn’t give exact
information of the composition. Others are given with RLM numbers, which is
nice. The decal options are for two German Fi 156s and for one French MS 502.
Sure, you could indeed construct a MS 500 out of the kit, but there are no
decals as such included for it, apart from the national insignia! The
registration is perfect with the exception of the French roundels, which have
the blue dot in the middle a little off register (not surprising though).
The Academy
kit of the Fi 156 / MS 500 / 502 appeared, according to the sprues, in 1998 and
consists of four sprues; 59 parts molded in a very light grey plastic on three
sprue trees plus seven parts on the clear sprue tree. It looks “modern” compared
to earlier Fi 156 kits, with engraved and raised detail where appropriate and
nice fabric rendition, virtually no flash apparent and, as usual with Academy
kits, ‘least my experience, an excellent fit. The instructions are clear
although a little vague in some cases; especially with the paint information, as
some of the colors only have a generic name, which really doesn’t give exact
information of the composition. Others are given with RLM numbers, which is
nice. The decal options are for two German Fi 156s and for one French MS 502.
Sure, you could indeed construct a MS 500 out of the kit, but there are no
decals as such included for it, apart from the national insignia! The
registration is perfect with the exception of the French roundels, which have
the blue dot in the middle a little off register (not surprising though).
| CONSTRUCTION |
Construction started by assembling the interior bits as well as gluing the wings
together. The leading edge slats were left off until after painting. However,
the slats for the tail planes were glued in place. The cockpit / interior was
painted RLM 02, but with hind sight it should probably have been some greyish
color to simulate weathered metal, as the French unlikely used German colors on
their airplanes – at least on those produced post WWII. The instrument panel
plus handgrip on the stick went flat black. The seat cushions went khaki. When
set the instrument panel and interior was glued to the right fuselage half and
then the fuselage was joined. The parts constituting the engine were painted
different metallic colors and ass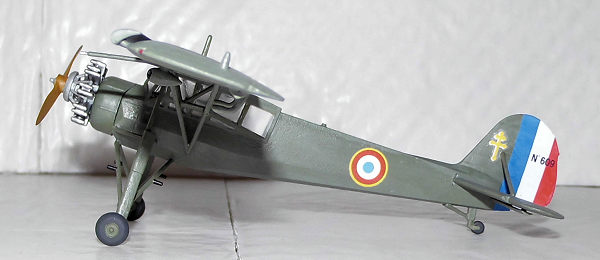 embled
when dry. The engine mount pieces (parts C25 and C30) does not quite fit as
intended to the fuselage, so some adjustment of the mounting tap on C25 and an
additional distance piece of plastic inserted between the fuselage and engine
mount piece C30 so it was raised to be flush with the top of the fuselage as it
should be. The propeller was painted natural wood, as it happened to be a wooden
propeller the Storch / Criquet was equipped with.
embled
when dry. The engine mount pieces (parts C25 and C30) does not quite fit as
intended to the fuselage, so some adjustment of the mounting tap on C25 and an
additional distance piece of plastic inserted between the fuselage and engine
mount piece C30 so it was raised to be flush with the top of the fuselage as it
should be. The propeller was painted natural wood, as it happened to be a wooden
propeller the Storch / Criquet was equipped with.
The fuselage seam was, after sanding, just fine except in a couple of places that needed filler, but it was not much anyway – as was also the case with the wing seams. The engine mount was then glued to the fuselage now fitting as intended. I then worked further on the propeller by adding some laminate stripes in a darker brownish color, I got a pretty convincing laminated wooden propeller – my first attempt by the way. The propeller hub was painted metallic grey. When dry the prop got a coat of transparent orange to finish it off.
I
removed the clear parts, and after cleaning them, carefully gluing them in place
with ordinary plastic glue as my usual approach with clear gloss didn’t work too
well – to slow drying for this! I started by gluing the left side part (D6) on
the top panel (D1) then taking the right sides glass panels (D5, D7 and D3 in
the m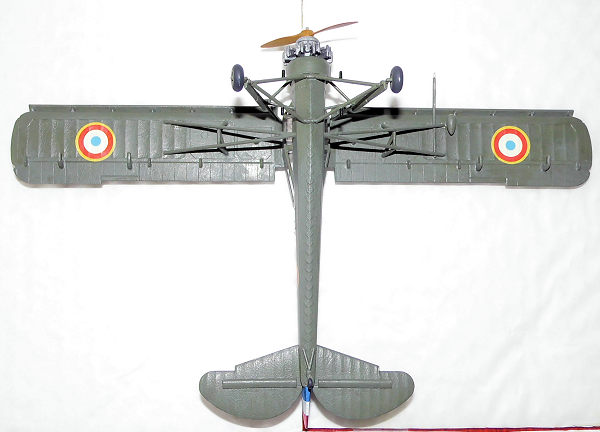 entioned
order) and while the glue still was “wet” I mounted the canopy on the fuselage
to make adjustments and it worked pretty well – no serious misbehaving during
this session occurred. I left the complete canopy to dry thoroughly and I used
the spare time to attach the tail planes together with their bracing struts to
the fuselage. The internal bracing for the canopy (C1) was attached with clear
gloss. As the canopy had set completely it was attached to the fuselage using
ordinary plastic glue. The few gaps that did occur were eliminated using clear
gloss. When canopy had set the wings were glued in place and secured with a
piece of adhesive tape so they kept the set alignment, which by the way is
straight out – 90 degrees out from the fuselage.
entioned
order) and while the glue still was “wet” I mounted the canopy on the fuselage
to make adjustments and it worked pretty well – no serious misbehaving during
this session occurred. I left the complete canopy to dry thoroughly and I used
the spare time to attach the tail planes together with their bracing struts to
the fuselage. The internal bracing for the canopy (C1) was attached with clear
gloss. As the canopy had set completely it was attached to the fuselage using
ordinary plastic glue. The few gaps that did occur were eliminated using clear
gloss. When canopy had set the wings were glued in place and secured with a
piece of adhesive tape so they kept the set alignment, which by the way is
straight out – 90 degrees out from the fuselage.
Before moving on with the wing support struts I painted the canopy frames with the green color, that I’d chosen, Humbrol 86 Light Olive. The wing struts (parts C11 & C12) had to be shortened by two millimetres as they didn’t fit into their locating holes as intended. Some mingling with the holes for the additional supporting struts (parts C4 & C5) was also necessary to get all aligned as intended – the engineering here should have been better, because the visual impact on how the wing support struts sit is pretty important on an aircraft like this! As soon as they sat properly I glued the tail wheel assembly in place. The struts constituting the main gear legs were also added to the model, as were all remaining details. Only the wheels and the engine were missing, but they should be added after painting so the model was cleaned thoroughly before it went to the paint shop.
| COLORS & MARKINGS |
As
mentioned before I had chosen Humbrol 86 Light Olive to paint this plane. The
job took three coats before it covered satisfactorily. Also the wheel hubs and
wing slats were painted this color. Tires went tire black. The gloss coat went
on as soon as the green had set. The decals for the fin came from the kit sheet
and worked admirably even though the tricolored rudder had the “usual” issue
with the edge not really be covered by the decals as they had trouble conforming
to that. I decided to fix it with paint later. The
 roundels,
as mentioned earlier, were off register so I dug into my decal dungeon and found
the remaining part of the decal sheet from my Heller Fi 156, which I had build
as a German plane many years ago. The decals for the MS 500, the French option,
were the exact size and in register! They did work although the carrier film had
yellowed slightly, but nothing to worry about. As soon as the decals had dried I
used suitable blue, white and red colors to touch up the edge of the rudder.
Clear gloss went over the decals and a few forgotten spots to get an even
surface before applying the final flat coat.
roundels,
as mentioned earlier, were off register so I dug into my decal dungeon and found
the remaining part of the decal sheet from my Heller Fi 156, which I had build
as a German plane many years ago. The decals for the MS 500, the French option,
were the exact size and in register! They did work although the carrier film had
yellowed slightly, but nothing to worry about. As soon as the decals had dried I
used suitable blue, white and red colors to touch up the edge of the rudder.
Clear gloss went over the decals and a few forgotten spots to get an even
surface before applying the final flat coat.
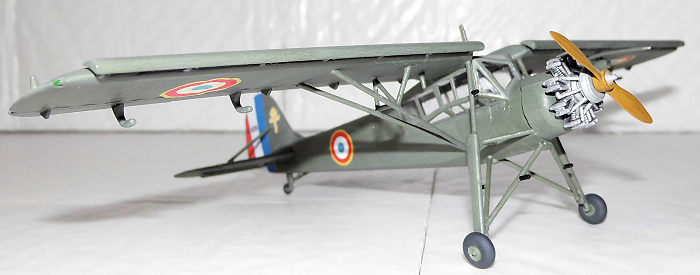
The final steps were the final touch ups, marking of the position lights and, as the biggest issue, to attach the slats to the wings. It went relatively easy, but it is recommended to do some dry runs before committing the glue! The steps / handgrips on the gear struts went flat black and then the wheels were glued in place. The prop went through the engine and secured with the retainer. The last step was to glue the engine to the fuselage and my Academy MS 502 Criquet was finished.
| CONCLUSIONS |
This is a fine kit that goes together well, apart from the wing struts which must be altered to get to fit, as well as the engine mount for the radial engined variant of the Criquet. The only real challenge is to get the wings to fit properly, but a moderate experienced modeler will know how to deal with such an issue. The kit is recommendable to all who wants to have either a Storch or a Criquet in their collection. Aftermarket decals, if in existence, would be a great addition, as a dozen or so air forces operated the Storch / Criquet during or post WWII.
| REFERENCES |
Profile Publications no 228: Fieseler Fi 156 Storch © 1971 Richard P. Bateson
Vietnam: The war in the air by René J. Francillon 1987 Arch Cape Press ISBN 0-517-62976-3
Wikipedia, the Online Encyclopedia
Nicolai Plesberg
3 August 2020
Copyright Modeling Madness.com
If you would like your product reviewed fairly and fairly quickly, please contact the editor or see other details in the Note to Contributors.
Back to the Main Page Back to the Review Index Page Back to the Previews Index Page