Revell 1/72 BV-138C-1
| KIT #: | 04368 |
| PRICE: | Around €20 in 2008 |
| DECALS: | Three options |
| REVIEWER: | Spiros Pendedekas |
| NOTES: | Reboxed Supermodel kit |
| HISTORY |
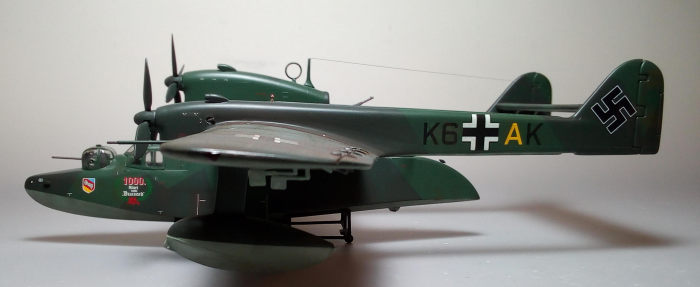
 Nicknamed “Der
Fliegende Holzschuh” (Flying Clog, from the side-view shape of its fuselage, as
well as a play on the title of the Wagner opera “Der Fliegende Hollander”), the
Blohm & Voss BV 138 Seedrache (Sea Dragon) was a World War II German trimotor
flying boat that served as the Luftwaffe's main seaborne long-range maritime
patrol and naval reconnaissance aircraft.
Nicknamed “Der
Fliegende Holzschuh” (Flying Clog, from the side-view shape of its fuselage, as
well as a play on the title of the Wagner opera “Der Fliegende Hollander”), the
Blohm & Voss BV 138 Seedrache (Sea Dragon) was a World War II German trimotor
flying boat that served as the Luftwaffe's main seaborne long-range maritime
patrol and naval reconnaissance aircraft.
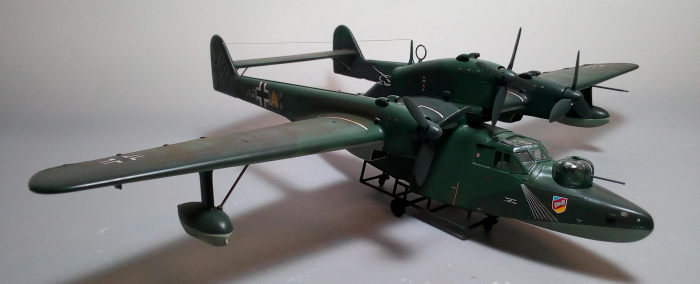
It was unique in appearance and design features, with its twin boom tail unit,
short fuselage, distinct "turn-down" or "beak" at the stern and three 2-stroke
diesel engines, with the middle driving a 4-bladed prop and the wing 3-bladed
ones. Armament consisted of two enclosed, powered gun turrets with single MG
151/20 autocannons and one MG 131 machine gun in open position behind the
central engine. Up to 6 × 50 kg bombs or 4 × 150 kg depth charges could
optionally be loaded under starboard wing root only.
Some examples (designated BV 138 MS) were converted for minesweeping and carried
magnetic field-generating degaussing equipment. The BV 138 was also tested as a
platform utilizing RATOs, for shorter takeoff performance
The type was produced from 1938 to 1943, with a total of 297 built.
| THE KIT |
 This is the
Supermodel kit, originally appeared in 1977. It had been reissued by Supermodel
five times till the late 90s, with a sixth (and final, so far) reissue by Revell
in 2005, which is the version I tackled.
This is the
Supermodel kit, originally appeared in 1977. It had been reissued by Supermodel
five times till the late 90s, with a sixth (and final, so far) reissue by Revell
in 2005, which is the version I tackled.
The kit comes with an attractive boxart in the typical (good looking, but
neither strong nor very practical) Revell side opening box. Inside you find a
sealed bag that contains three large light gray sprues and a smaller clear one.
None of them is individually packed, meaning potential scratches, especially at
the clear one. For a 1977 kit that had been frequently reissued, the molds seem
to hold on quite well, as there are no serious imperfections or mold shifting,
just some flash and a couple of sink marks here and there, which the modeler can
easily take care of.
Quite a few external details are provided, most of them of the raised type (to
the heavy side, might I say). Props look good, as well. An area that is
prominently void of detail is the aft innards of the central engine cowling.
Understandably (for a 1977 era kit) cockpit detail is just adequate, with
control yokes, basic seats and instrument panel (onto which a nice decal is to
be affixed). The two MG 151/20 turrets are acceptably represented, whereas the
MG 131 “opening” looks quite plain. The radio operator’s compartment is
appointed with a seat and a console block, onto which instrument decals are to
be attached, however it will be practically invisible once the fuselage halves
are joined together. Five acceptable crew members are supplied, should the
modeler wish to man the above positions. Finally, a nice looking dolly is
provided, as well as minesweeping gear for the MS version.
Transparencies are on the thick side, but are otherwise well molded, exhibiting
good clarity and having their framing well defined (but on the heavy side).
Instructions are also very good, spreading the build sequence in 37 clear steps.
Since the sprues have no parts numbers molded on, a parts “numbering” diagram is
provided. Total parts count is about 130. Three schemes are represented, with
one of them being the minesweeper version. Decals are great, superbly printed by
Cartograf and contain quite a bit of stenciling as well. No Swastikas are
provided.
| CONSTRUCTION |
I started by installing the 8 side windows from the
inside of the fuselage. Then I assembled the 11-piece cockpit/radio compartment
and trapped it between the two fuselage halves, which were consequently glued
together, accompanied by the two side L-shaped panels. Fit was positive. I did
not install the two turrets and rear gun base, as I had planned to trim their
bases and fit them at end stages, thus avoiding all the tedious pre-painting and
masking that would have been otherwise required. Basic interior color was Hu31
Slate Gray, with black instrument panel, yokes and consoles. Seat belts were
added from masking tape and the nice instrument decal was applied (I did not
apply the equally nice radio operator console decals, as they would be totally
invisible, preferring to save them for possible future use at other projects).
Then it was subassembly time! I assembled the wings, booms and the horizontal
stabilizer, all 3-piece affairs. I then attached the booms onto the wings, which
were consequently attached to the fuselage, with the horizontal stabilizer
trapped between the booms. I was expecting a very challenging fit, but, truth is
that it was more or less manageable, with the very helpful head on view - jig
suggestion provided by the instructions. The underwing mounted radiator inlet
ducts and the middle engine air inlet splitter were attached at this point as
well.
 Other
subassemblies included the 2-piece floats, 3-piece turrets (which had their
mounting lugs shaved off, in order to be able to be inserted after fuselage
assembly – also guns were painted gunmetal), 5-piece propellers (which are
nicely appointed, in order to be able to be fitted at later stages without
sacrificing the “rotatable” option) and, of course, the dolly, a beautiful
12-piece affair.
Other
subassemblies included the 2-piece floats, 3-piece turrets (which had their
mounting lugs shaved off, in order to be able to be inserted after fuselage
assembly – also guns were painted gunmetal), 5-piece propellers (which are
nicely appointed, in order to be able to be fitted at later stages without
sacrificing the “rotatable” option) and, of course, the dolly, a beautiful
12-piece affair.
I then went on and coarse-sanded the basic model, filled the joints requiring
attention (this was especially true at the wings to fuselage and booms joints)
and sanded them smooth. Some "neighboring detail" was lost in the process, but I
deemed the result as “a result I could live with”. I continued by adding
various external “bits and pieces”. Those included the 4 aileron hinges, the 4
underwing characteristic paddle balances, the 4 horizontal stabilizer supporting
struts, the two floats with their supporting struts, the aft hull mini tiller,
the three mooring tiebacks and the six 2-piece top engine air inlets (which had
their holes deepened, in order to look more realistic). The six molded-in petite
engine exhausts were drilled out, as well.
After finally filling and sanding all joined areas that needed attention, I gave
the model a very light 1500 grit sanding. I then masked the fuselage windows
with Maskol, blocked all openings with wet tissue, and took this weirdly
beautiful seaplane to the paint shop!
| COLORS & MARKINGS |
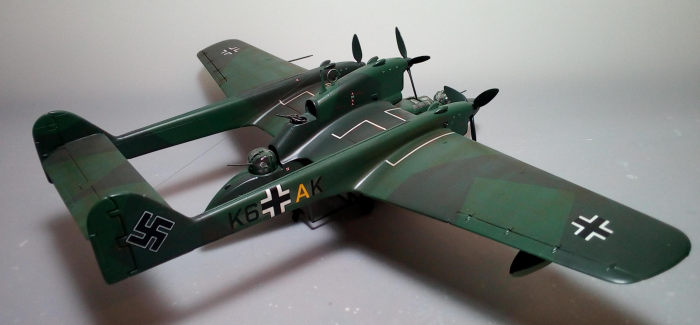
 Since the
model had a lot of delicate stuff hanging underneath, I decided to paint the top
camo first, avoiding the undersides masking (which might result in tearing those
small bits apart upon removal). I thus applied Hu117 (for the RLM73) to all top
and side surfaces, then masked the splinter pattern with masking tape and went
on to apply the RLM72, for which I used Hu149. Props and dolly received the same
RLM72. After masking all top camo, I applied the underside light blue (Hu65),
then removed all masking and coated the model with Future, in preparation for
decaling.
Since the
model had a lot of delicate stuff hanging underneath, I decided to paint the top
camo first, avoiding the undersides masking (which might result in tearing those
small bits apart upon removal). I thus applied Hu117 (for the RLM73) to all top
and side surfaces, then masked the splinter pattern with masking tape and went
on to apply the RLM72, for which I used Hu149. Props and dolly received the same
RLM72. After masking all top camo, I applied the underside light blue (Hu65),
then removed all masking and coated the model with Future, in preparation for
decaling.
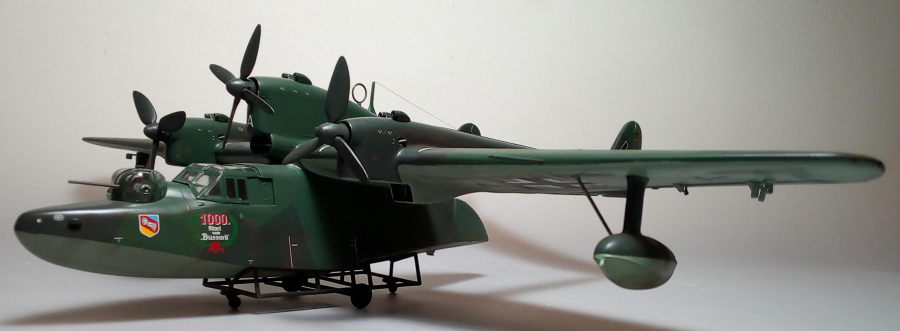
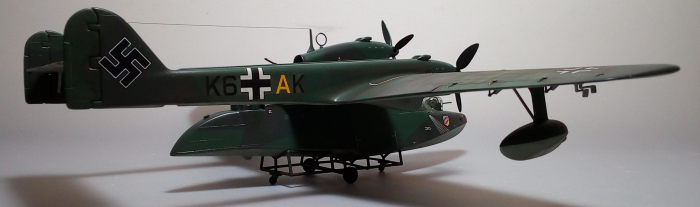
I used the kit decals, in order to represent
W.Nr.13803 10158, 2./KüFl.Gr.406, “K6+AK” machine, in service from special
catapult launching ships in the Norwegian Coast. This machine carried a special
emblem at the port fuselage, celebrating the 1000th launch from the Catapult
Vessel “Bussard” (SP 21), which took place sometime in 1944. As expected, decals
behaved excellently. After studying reference net pics, I searched my decal
dungeon and applied two swastikas of suitable size and style onto the rear fins.
A coat of Future sealed all decals.
Regarding weathering, I applied quite a bit of engine staining (those 2-stroke
diesels would have definitely been very smoky!), oil-grease leaking and general
dirtying, using black and dark brown dry pastels. The dolly acquired some rusty
looks with pastels of suitable color. I then gave the model and the dolly its
final almost matt finish (no chance of glossy surfaces at those salty
environments whatsoever…).
| FINAL CONSTRUCTION |
The framings of the canopy and turrets were
carefully hand painted with a 10/0 brush. Canopy was then attached in position
with tiny amounts of styrene glue. Fit left some gaps, which were “faired” with
white glue. The turrets were simply affixed in position, with fit being just
tight enough, holding them gently but positively into place. The MG131 was
finally attached in position onto its base.
 I attached
the two antennas on top (one loop, one mast). Only one antenna wire seemed to be
run from the antenna mast, to the starboard fin: this was represented with
stretched sprue.
I attached
the two antennas on top (one loop, one mast). Only one antenna wire seemed to be
run from the antenna mast, to the starboard fin: this was represented with
stretched sprue.
Three bombs (with their pylons molded on) are provided, in order to be attached
at the starboard underwing side. Since (by personal preference) I do not usually
hang bombs under my models, but love adding pylons, I detached the pylons from
the bombs and went on enhancing their looks by judicious filing and tiny bits of
stretched sprue added. I then painted them gunmetal and attached them in
position.
Blobs of red and green clear paint were accordingly affixed at the wingtips, in
order to represent the navigation lights. The model was then placed onto the
dolly and was called done!
| CONCLUSIONS |
With the other BV 138 kits being the hard to find
1/144 Miniwings and the even harder to find MPM 1/48 (both resins), this kit not
only is still the only game in town in 1/72, but also the only “mainstream” kit
of this iconic seaplane in general!
That said, though definitely an oldie, I might I say that this kit is kind of a
goodie, with correct general shape, adequate external and internal detailing
(apart from the rear gunners aft engine area) and, in the case of the Revell
reissue, excellent decals, which add up a lot to the final looks. Putting it
together is not too complicated. Fit, although not the best, is manageable. Due
to the high number of parts and fit issues, it should be tackled by modelers who
have at least a couple of flying boats under their belt.
With the last reboxing done by Revell in 2005, this kit is not among the easiest
or the cheapest to find nowadays (as of 2021). Not aware of any new tool
release, I would not be surprised to see this kit reissued by someone in the
non-distant future.
If you are not a novice modeler and happen to own one, you might consider
building it. The resulting model will definitely be very imposing, definitely an
eye catcher in your showcase.
Happy modeling!
14 December 2021
Copyright ModelingMadness.com. All rights reserved. No reproduction in part or in whole without express permission.
If you would like your product reviewed fairly and fairly quickly, please contact the editor or see other details in the Note to Contributors.