Italeri 1/48 Hs-123
| KIT #: | 2632 |
| PRICE: | €20 |
| DECALS: | Five options |
| REVIEWER: | Spiros Pendedekas |
| NOTES: | Reboxed ESCI kit |
| HISTORY |
Soon after Hitler's rise to power, Henschel started designing aircraft. One of the first was the Hs 123, aimed to meet the 1933 dive bomber requirements for the reborn Luftwaffe. The prototype performed its maiden flight on 1 April 1935. It featured a wide, "smooth" engine cowling, with all subsequent Hs 123 wearing the distinctive tightly fitting cowling that included 18 fairings covering the engine valves.
Its biplane wings were of a "sesquiplane" configuration, whereby the lower wings were significantly smaller than the top wings. The design did away with bracing wires and, although the plane looked slightly outdated with its single faired interplane struts and cantilever main landing gear legs, it did feature an all-metal construction, clean lines and demonstrated superior maneuverability.
 Since it
was intended to replace the Heinkel He 50 reconnaissance and dive bomber
biplane, as well as to act as a "stop-gap" measure until the Junkers Ju 87
became available, its production was limited and, apart from the improved Hs
123B, no upgrades were considered. The type was flown by the Luftwaffe
during the Spanish Civil War, where it proved to be a success, and in the
early to midpoint of World War II, where it still proved to be very useful.
Since it
was intended to replace the Heinkel He 50 reconnaissance and dive bomber
biplane, as well as to act as a "stop-gap" measure until the Junkers Ju 87
became available, its production was limited and, apart from the improved Hs
123B, no upgrades were considered. The type was flown by the Luftwaffe
during the Spanish Civil War, where it proved to be a success, and in the
early to midpoint of World War II, where it still proved to be very useful.
In service on the Eastern Front, it gradually underwent field modifications, including removal of the main wheel spats, fitting of additional armor and extra equipment, as well as mounting extra machine guns and even cannons in under-wing housings. Its rugged, fixed undercarriage and the invulnerable air cooled engine were much appreciated, the open cockpit during the severe Russian winter not that much!
As the already small number of operational planes dwindled, aircraft had been salvaged from training schools and even derelict dumps all over Germany to replace losses. By 1945, the remaining serviceable machines were reassigned to secondary duties such as supply dropping and glider towing.
The greatest tribute to the type’s usefulness came in January 1943 when Generaloberst Wolfram von Richthofen, then commander-in-chief of Luftflotte 4, asked whether production of the Hs 123 could be restarted, since it performed well in a theater where mud, snow, rain and ice took a heavy toll on the serviceability of more advanced aircraft. However, the Henschel factory had already dismantled all tools and jigs in 1940.
Seeing service during a period where exact role of army supporting aircraft was still formulated, the Hs 123 was perhaps the first dedicated attack aircraft design intended to fulfill the close air support role in the niche between the tactical bomber and the dive bomber. The type clearly showed that a slow but rugged and reliable aircraft could be effective in ground attack. Despite its antiquated appearance, it proved useful in every battlefield in which it fought.
Sadly, no Hs 123s are known to have survived.
| THE KIT |
 This is the
well-known 1977 Esci mold of this important plane. The same kit with unchanged
molds and only different decals has been reissued another 11 times ever since,
recently by Italeri and in the past by Tamiya, Amtech and Revell, with the
AMtech reboxing beefed up with some nice resin casts. Though outdated and, since
2017, superseded by the supreme GasPatch offering, it still is a solid, if not
par on the simplistic side, kit.
This is the
well-known 1977 Esci mold of this important plane. The same kit with unchanged
molds and only different decals has been reissued another 11 times ever since,
recently by Italeri and in the past by Tamiya, Amtech and Revell, with the
AMtech reboxing beefed up with some nice resin casts. Though outdated and, since
2017, superseded by the supreme GasPatch offering, it still is a solid, if not
par on the simplistic side, kit.
My specific copy was the Italeri 2004 edition and a more extensive preview can
be found here.
The kit had been residing in my stash (Shelf of Doom) for a good 15 years, only
to be dragged out and built upon a fellow modeler’s idea to drag his (even
older) copy out and go for a more or less simultaneous build!
| CONSTRUCTION |
I started by putting together the cockpit tub, which consisted of a floor with molded on rudder pedals, a flat instrument panel, reasonably detailed sidewalls, a plain rear bulkhead, a stick (of which its column is, wrongly, straight - it should exhibit a not too pronounced but still noticeable “S”-shape profile) and a simplistic and somehow crude seat. Basic cockpit color was Hu31 (for the RLM02), with black levers, stick grip and molded on “boxes”. The instrument decal was applied onto the instrument panel, which afterwards continued to look simplistic (truth be told, it was not extremely busy looking in reality anyway). I could not resist and added with a fine brush a few red and yellow “switches” all-around.
 The seat was
thinned down by judicious sanding and received some means of rear supporting
framing from pieces of stretched sprue, so the aft seat area would not look too
void through the open cockpit. Seat belts were added from masking tape. The
stick column was brutally bent by hand to a more or less “S” shape to match the
real looks and a tiny piece of stretched sprue was attached at the stick bottom,
going backwards, to represent the elevators’ actuating rod. The quite prominent
oxygen device that was located at the starboard cockpit wall was scratch built
from styrene pieces: it had its bottle painted blue, with silver perforated
cover.
The seat was
thinned down by judicious sanding and received some means of rear supporting
framing from pieces of stretched sprue, so the aft seat area would not look too
void through the open cockpit. Seat belts were added from masking tape. The
stick column was brutally bent by hand to a more or less “S” shape to match the
real looks and a tiny piece of stretched sprue was attached at the stick bottom,
going backwards, to represent the elevators’ actuating rod. The quite prominent
oxygen device that was located at the starboard cockpit wall was scratch built
from styrene pieces: it had its bottle painted blue, with silver perforated
cover.
The cockpit was subsequently trapped between the fuselage halves, followed by
attachment of the front gun cover (the guns are molded on - would be better if
they were separately provided). The gun barrels had their openings carefully
drilled out. The headrest fairing was also attached (a heads-up here: some early
versions did not feature this fairing and headrest, so attention must be paid to
the specific version built). The side entry hatches were secured in closed
position, not only to preserve the fuselage lines, but also to deem the spartan
cockpit less visible.
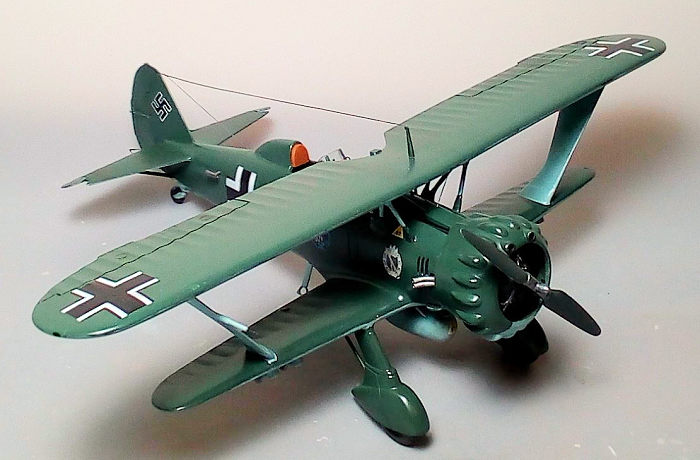
The 2-piece lower wing was assembled and attached, whereas the also 2-piece top
wing was assembled and left aside. The single piece horizontal stabilizers were
installed, as well. I then attached the two massive interplane struts, followed
by the six smaller struts, molded as two triplets, which secure the top wing’s
middle section to the fuselage. Before glue curing, I flipped the model over,
letting all struts rest onto the top wing and spend some “quality” time aligning
them at the correct angles, hoping they would touch the underside of the top
wing at exactly where they were supposed to. A problem immediately emerged, as
the outer big struts were longer than they should, preventing the mid section
struts from touching the wing. This was not an unknown problem to me as I had
read our Editor’s review of
his Amtech kit (which, as said above, used the same plastic molds), an excellent
build , where this issue had been pointed out, so I was kind of prepared! The
solution was to simply file down both struts equally, implementing a trial and
error process and keep on filing till all struts touched their attachment
points.
The quite good looking engine was assembled. Many
(probably most) examples featured a tube that started from the top cylinder,
going downwards and “disappearing” between the cylinders at the left hand side,
so I decided to replicate it with a piece of stretched sprue, accordingly
routed. The engine was painted black, then heavily dry brushed with silver, with
the crankcase painted medium gray. Upon drying, the complete engine was trapped
between the two cowling halves (front/rear). The cowling halves joint line
crossed right in the middle of all 18 valve fairings,
 meaning a
good amount of time was spent in filling and sanding (and leaving me wondering
why the cowling was not molded as an upper and a lower half, instead of a fore
and aft, making the modeler’s life way easier). The lower air inlet was finally
attached. Cowling innards were RLM02.
meaning a
good amount of time was spent in filling and sanding (and leaving me wondering
why the cowling was not molded as an upper and a lower half, instead of a fore
and aft, making the modeler’s life way easier). The lower air inlet was finally
attached. Cowling innards were RLM02.
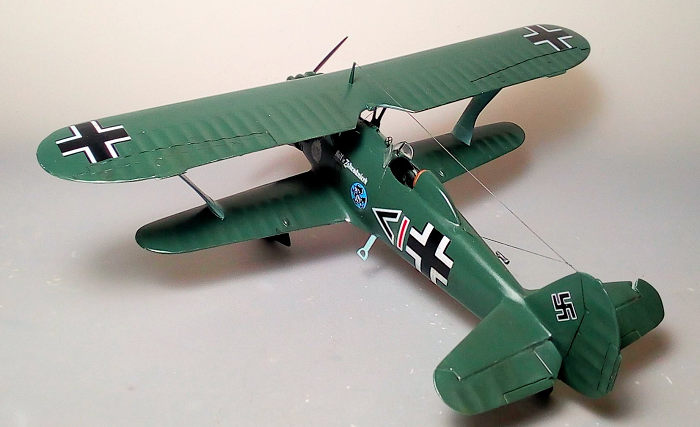
The distinctive drop tank was next assembled. Though correct in general shape,
its central attachment points were oversimplified and its braces too rectangular
and off-scale. After cutting the bracing wires off, I filled and sanded the drop
tank smooth, then attached new thinner wires made of stretched sprue. Stretched
sprue was also used to beef up the tank’s central attachment area.
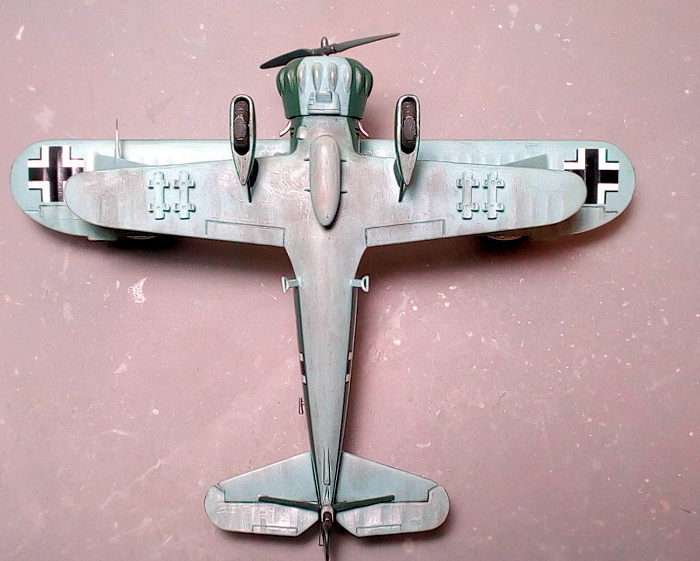
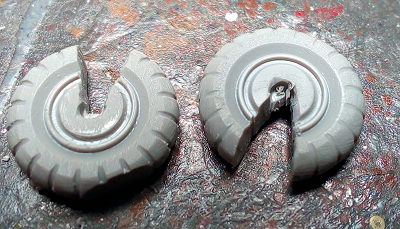
The wheel spats were next assembled and attached. The wheels were not trapped in
between, but were left off to be attached at ending phases. The four bomb pylons
were thinned down for more “scale” looks and were attached under the wing.
Having decided not to hang any bombs, I “pinned “ the pylons attachment points
with my micro drill, to add some interest to the otherwise plain pylons looks.
I chose to detach the elevators from the horizontal stabilizers and pose them
“drooped”, in order to breathe some extra life. For this, I patiently ran the
back side of my #11 knife through the well defined hinge lines and carefully
detached the elevators, with all emerging rough edges cleaned afterwards.
The whole model was then filled and sanded smooth, with some extra work required
around the mid-struts attachment points. Upon feeling that the looks were
passable, the engine and cockpit were blanked with a combination of wet tissue
and masking tape and, after temporarily mounting the engine in position, the
model headed to the paint shop!
| COLORS & MARKINGS |
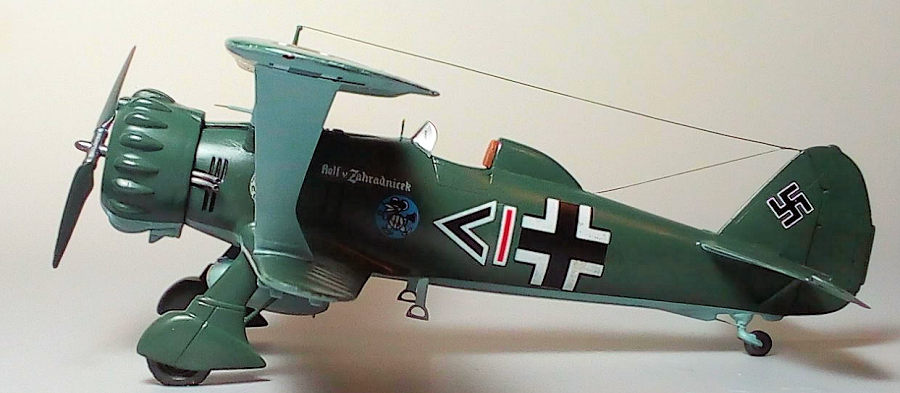
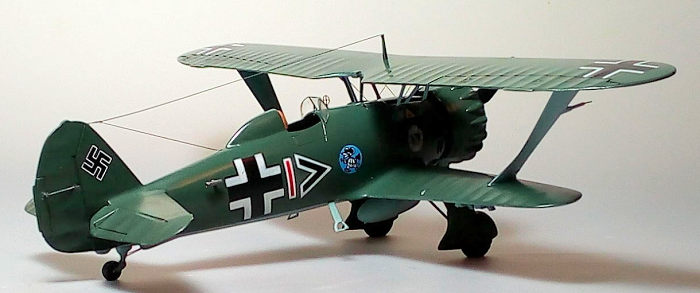 I chose to
represent a 5/Sch.G1 example, seemingly Commanding Officer’s machine, as it
stood in Russia during 1941. The machine wore the standard Dunkelgrün over
Hellblau camo. For this, I first gave all topsides and the complete spats a coat
of Hu30 Dark Green, then masked it off and gave all undersides (including all
struts) a coat of Hu65 Light Blue. Upon drying, I gave the whole model a coat of
Future and proceeded to decaling.
I chose to
represent a 5/Sch.G1 example, seemingly Commanding Officer’s machine, as it
stood in Russia during 1941. The machine wore the standard Dunkelgrün over
Hellblau camo. For this, I first gave all topsides and the complete spats a coat
of Hu30 Dark Green, then masked it off and gave all undersides (including all
struts) a coat of Hu65 Light Blue. Upon drying, I gave the whole model a coat of
Future and proceeded to decaling.
The Zanchetti Buccinasco decals, once again, proved their quality, behaving very
well, no comments whatsoever. Since no Swastikas were supplied, I used suitably
sized and styled ones from my spares. A coat of Future sealed all decals.
| FINAL CONSTRUCTION |
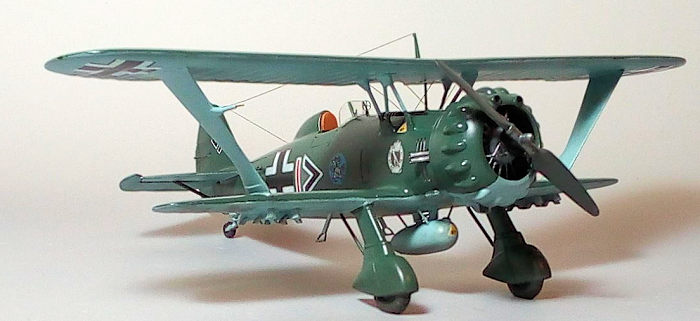
 one
piece prop was painted RLM70 black green, had its hub area heavily dry
brushed with silver and attached in position. The quite simple rigging was
then applied, basically four pieces of stretched sprue inserted and secured
to the pre-drilled holes.
one
piece prop was painted RLM70 black green, had its hub area heavily dry
brushed with silver and attached in position. The quite simple rigging was
then applied, basically four pieces of stretched sprue inserted and secured
to the pre-drilled holes.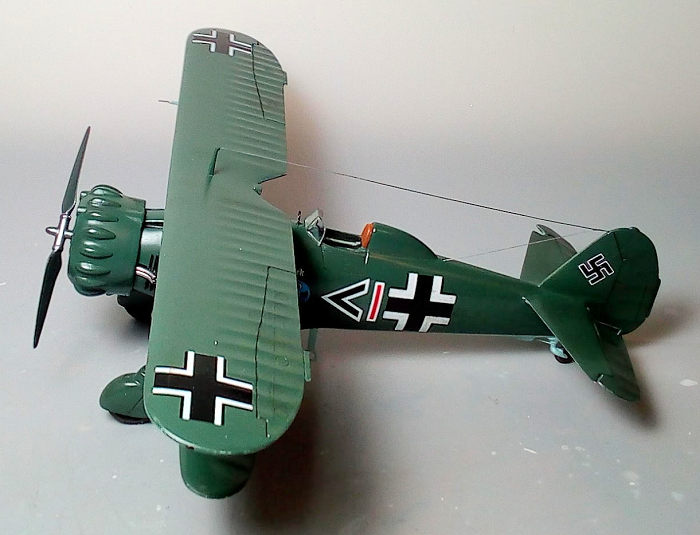 Onto
weathering, a light black wash was applied at all hinge lines, followed by
dark brown and black dry pastels applied at areas where engine staining, mud
or dirt could accumulate. The prop blades’ leading edges were lightly
silver-dry brushed at the tips. A coat of satin finish gave the bird its
final sheen.
Onto
weathering, a light black wash was applied at all hinge lines, followed by
dark brown and black dry pastels applied at areas where engine staining, mud
or dirt could accumulate. The prop blades’ leading edges were lightly
silver-dry brushed at the tips. A coat of satin finish gave the bird its
final sheen.| CONCLUSIONS |
Your other option for a quarter scale Hs 123 is the superlative
GasPatch offering. GasPatch came in 2017 with a wonderful new tool kit of the
type and has reissued it another two times, practically covering all versions of
the iconic plane. These kits look superbly researched and extremely detailed,
relying on styrene and PE. Though not looking to be among the simplest of
builds, I am aware that they build straightforwardly and can be tackled by any
modeler with even small experience in biplanes. They are sensibly priced for
what they offer and are the definitive way to go if you want the best 1/48 Hs
123.
The Esci/Italeri is a classic, old school, yet solid kit of the distinctively
looking biplane. General shape looks good, while detailing ranges from average
(cockpit) to good (fabric representation). Smaller parts themselves could be
more delicately molded, but what you get is to be expected from the 1977 kit
origins. Fit, while at places challenging (the central struts attachment points
to the fuselage spring into mind), is generally manageable, making his kit a
good choice for first biplane model, where, even out of the box, a fine result
can emerge.
Some really nice resin and PE aftermarket do exist, which will enhance and/or
improve key areas of the kit. Of course adding their cost to the cost of the
base kit might result in reaching, or even succeeding the GasPatch kit price,
which is something to be taken into consideration. On the other hand, if you
already have the base kit or find one at a good price, it might not be a bad
idea to invest on some of the aftermarket.
The kit is regularly reboxed by Italeri with nice decals and at fair prices for
what the kit has to offer. I had a great time building it and I can recommend it
with the above considerations taken into account, It would be nice to see more
of this not too difficult kit built, resulting in great representations of this
iconic machine.
6 September 2022
Copyright ModelingMadness.com. All rights reserved. No reproduction in part or in whole without express permission.
If you would like your product reviewed fairly and fairly quickly, please contact the editor or see other details in the Note to Contributors.
Back to the Main Page Back to the Review Index Page Back to the Previews Index Page