Italeri 1/48 Hs-123
| KIT #: | 2632 |
| PRICE: | $25.00 |
| DECALS: | Five Options |
| REVIEWER: | Dave Cummings |
| NOTES: | ESCI tooling |
| HISTORY |
The Henschel Hs 123 was a single-seat dive bomber
and close-support attack aircraft flown by the Luftwaffe during the Spanish
Civil War and the early to midpoint years of World War II. Although an
obsolete design by WWII, it proved to be robust, durable and effective
especially in severe conditions. It continued to see front-line service
until 1944, only to be withdrawn due to a lack of serviceable airframes and
spare parts. The aircraft was designed to meet the 1933 dive bomber
requirements for the reborn Luftwaffe. Ernst Udet flew the prototype in May
1935 and service delivery began in 1936. Although they looked outdated the
type featured rugge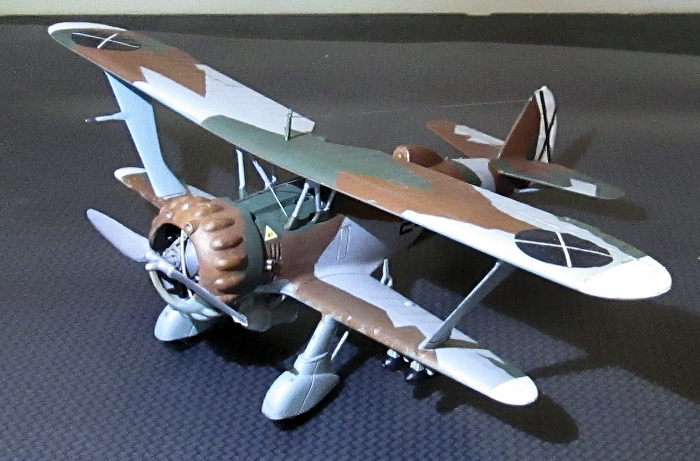 d
construction with all-metal fuselage, clean lines, and superior
maneuverability. Instead of dive brakes, the propeller would be put in
reverse pitch to slow its descent. The main weapon load was four SC50 (110
lb) bombs carried on wing racks along with an SC250 (550 lb) bomb mounted on
a "crutch" beneath the fuselage. However, the Hs 123 was short legged, and
the usual configuration was to install an auxiliary fuel "drop" tank at this
station. Two 7.92 mm MG 17 machine guns were mounted in the nose
synchronized to fire through the propeller arc. The Hs 123 proved capable of
pulling out of "near-vertical" dives and it was ordered into production
powered by the 880 hp BMW 132Dc engine. The Hs 123 was intended to act as a
"stop-gap" measure until the Ju-87 became available. As such, production was
limited to 250 aircraft.
d
construction with all-metal fuselage, clean lines, and superior
maneuverability. Instead of dive brakes, the propeller would be put in
reverse pitch to slow its descent. The main weapon load was four SC50 (110
lb) bombs carried on wing racks along with an SC250 (550 lb) bomb mounted on
a "crutch" beneath the fuselage. However, the Hs 123 was short legged, and
the usual configuration was to install an auxiliary fuel "drop" tank at this
station. Two 7.92 mm MG 17 machine guns were mounted in the nose
synchronized to fire through the propeller arc. The Hs 123 proved capable of
pulling out of "near-vertical" dives and it was ordered into production
powered by the 880 hp BMW 132Dc engine. The Hs 123 was intended to act as a
"stop-gap" measure until the Ju-87 became available. As such, production was
limited to 250 aircraft.
Spanish Civil War service: At the request of Oberst (later Generalfeldmarschall) Wolfram von Richthofen, chief of staff of the Legion Condor, five Hs 123 A-1s were deployed to Spain in 1937. They proved to be somewhat of a failure in the bomber role, hampered by their small bomb capacity and short range. Instead, the Hs 123s based in Seville were used for close ground support, a role in which their range was not such a detriment, and where the ability to accurately place munitions close to friendly forces was more important than carrying a large load. The combat evaluation of the Hs 123 demonstrated a remarkable resiliency in close-support missions, proving able to absorb a great deal of punishment including direct hits on the airframe and engine. The Nationalists in Spain were suitably impressed with the Hs 123 under battle conditions, purchasing the entire evaluation flight and ordering an additional 11 aircraft to equip Gruppo 24. The Spanish Hs 123s were known as "Angelito" (little angel) an indication of the reverence owed them by troops on the ground.
| THE KIT |
 This is a
70s era kit having raised panel lines and is somewhat clunky in places. But it
goes together well, and I think captures the overall “look” of this unique
biplane. Fit is OK but check your filler supply. Decals are for five aircraft:
three of SG-1in Russia 1941, one Balkans participant, and one France 1940 bird
in the pre-war 3-tone splinter cammo. The cockpit is sparse, but being a 30s era
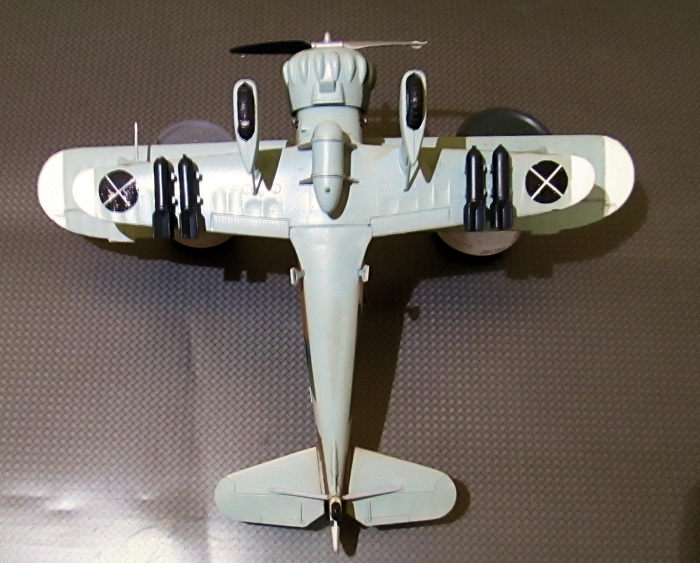
biplane, I don’t imagine it was very busy on the real thing. For external stores
there are 4 bombs under the wings and a center line drop tank which I understand
was the standard load out. Instructions are on a large foldout sheet. It’s a
pretty basic kit requiring only six construction steps which are well presented.
Most of the sheet is taken up with very nice b&w five-view painting and decal
guides for the five options.
This is a
70s era kit having raised panel lines and is somewhat clunky in places. But it
goes together well, and I think captures the overall “look” of this unique
biplane. Fit is OK but check your filler supply. Decals are for five aircraft:
three of SG-1in Russia 1941, one Balkans participant, and one France 1940 bird
in the pre-war 3-tone splinter cammo. The cockpit is sparse, but being a 30s era
biplane, I don’t imagine it was very busy on the real thing. For external stores
there are 4 bombs under the wings and a center line drop tank which I understand
was the standard load out. Instructions are on a large foldout sheet. It’s a
pretty basic kit requiring only six construction steps which are well presented.
Most of the sheet is taken up with very nice b&w five-view painting and decal
guides for the five options.
| CONSTRUCTION |
 If one
takes this build seriously then much needs done for detailing and correcting
things like way too thick bomb crutch and stuff. For me it was just a fun build
of an interesting subject, and I built it as is out of the box. The cockpit is
constructed as a completed tub with sidewalls to be trapped between the fuselage
halves. I painted the interior RLM 02. There is a nice instrument panel decal. I
added some decal seatbelts from my stash. The fuselage seam required some filler
and sanding. The three-piece lower wings were glued in place and the wing bomb
racks attached. Tailplanes w/struts, headrest, tailwheel, and landing gear spats
were attached (wheel can be popped in later). The strut arrangement comprises
just 4 parts making this a pretty easy task as far as biplanes go. Struts were
glued to the lower wing and fuselage. Then the model placed upside down on the
upper wing to align everything while the glue sets. Next the quite nice engine
was assembled and painted. So, when assembling most kits there is usually that
“something” that creates an issue. With this kit it is the cowling which is in
two parts, a front and rear section. You place the engine inside, then glue on
the front half. The problem is the glue seam cuts across all those cowling
bumps. Filling and sanding this seam is an exercise in patience. Pretty basic.
Some more filler here and there, final sanding, and its ready to paint. I packed
the engine and cockpit openings with moistened tissue.
If one
takes this build seriously then much needs done for detailing and correcting
things like way too thick bomb crutch and stuff. For me it was just a fun build
of an interesting subject, and I built it as is out of the box. The cockpit is
constructed as a completed tub with sidewalls to be trapped between the fuselage
halves. I painted the interior RLM 02. There is a nice instrument panel decal. I
added some decal seatbelts from my stash. The fuselage seam required some filler
and sanding. The three-piece lower wings were glued in place and the wing bomb
racks attached. Tailplanes w/struts, headrest, tailwheel, and landing gear spats
were attached (wheel can be popped in later). The strut arrangement comprises
just 4 parts making this a pretty easy task as far as biplanes go. Struts were
glued to the lower wing and fuselage. Then the model placed upside down on the
upper wing to align everything while the glue sets. Next the quite nice engine
was assembled and painted. So, when assembling most kits there is usually that
“something” that creates an issue. With this kit it is the cowling which is in
two parts, a front and rear section. You place the engine inside, then glue on
the front half. The problem is the glue seam cuts across all those cowling
bumps. Filling and sanding this seam is an exercise in patience. Pretty basic.
Some more filler here and there, final sanding, and its ready to paint. I packed
the engine and cockpit openings with moistened tissue.
| COLORS & MARKINGS |
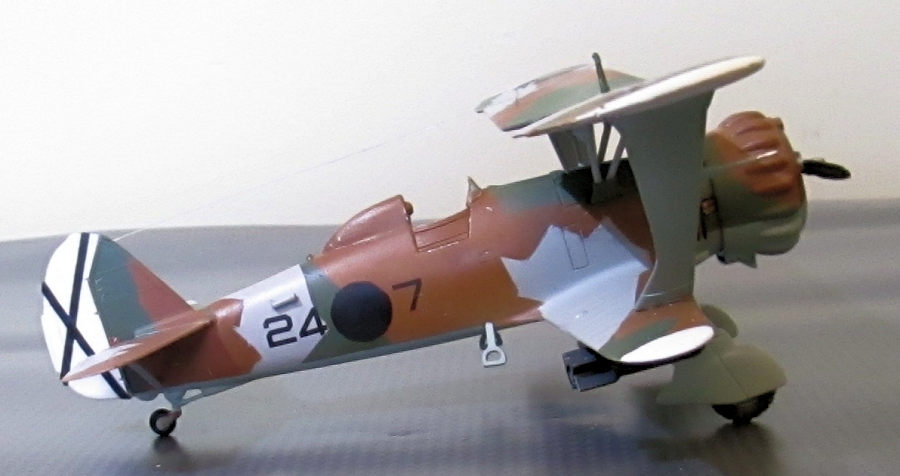
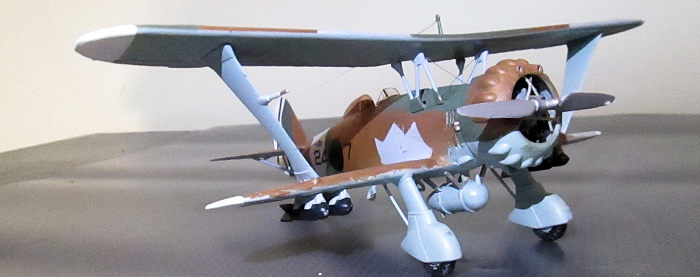
I had decided to do this one as a Spanish Civil War
veteran in the German pre-war 3-tone splinter scheme of RLM-61 Dunkelbraun, 63
Lichtgrau, 72 Grun with 65 Hellblau undersides. I used my dwindling supple of
Model Master paints for this. First the rudder and wing tips were painted white
then masked when dry. Next the underside blue was sprayed. Then the demarcation
line was masked with Tamiya tape and the light gray sprayed on the uppers. Now
comes the fun part of masking the
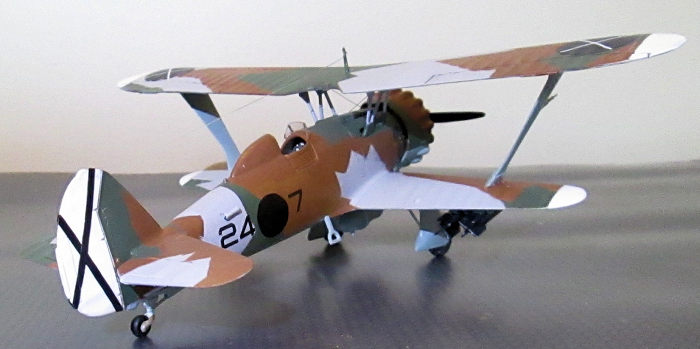 splinter
scheme for the green. When dry peel that off and mask for the brown. It was then
given a gloss clearcoat for decaling.
splinter
scheme for the green. When dry peel that off and mask for the brown. It was then
given a gloss clearcoat for decaling.
I scrounged around in the big box of stuff for decals. I had some black decal sheet I traced circles on the back and cut out the roundels. Some individual white striping was used for the crosses. Black stripe decal made up the rudder cross and I found some suitable numbers. That done I applied a black wash to hinge lines and cooling louvers. I didn’t do any weathering on this one (how about just received from the factory?) Then finished with a coat of clear flat.
One thing modelers can appreciate about this biplane design is there is no interplane rigging. I popped the painted wheels into the spats. The external stores were assembled, painted and attached. The little windshield was painted and attached. The only rigging is some cross bracing on the cabanes, and I used some wire for this. The top wing was glued in place with no problem. I ran a piece of monofilament antenna wire from tail to wing antenna post. Lastly the prop was pressed into place.
| CONCLUSIONS |
If you are serious about an accurate detailed Hs-123 for your collection you may want to look at a more modern kit. Like I said old and clunky (like me). But the finished product is pretty accurate in shape and dimension and still represents the type well. The simple strut design and lack of rigging wires makes this a good choice for those wishing to try their first biplane. It can also be had for reasonable prices when you find one. It looks pretty good in my little Spanish Civil War collection and I’m happy with mine.
| REFERENCES |
The Encyclopedia of Aircraft of WWII, Paul Eden, Aerospace Publishing Ltd 2004.
Wikipedia for the history section.
23 October 2023 Copyright ModelingMadness.com. All rights reserved. No
reproduction in part or in whole without express permission from the editor.
If you would like your product reviewed fairly and fairly quickly, please
contact the editor or see other details in the
Note to
Contributors.