| KIT #: | 3875 |
| PRICE: | 151$ |
| DECALS: | Two options |
| REVIEWER: | Francisco Santoro |
| NOTES: | 2019 tooling. Poor fit between the nacelles and the wing. Wheel wells need to be sanded down to get the wings to fit to the fuselage. |
| HISTORY |
 From
the Tamiya 262 instructions: "Development of the Me 262, the first practical use
jet-powered fighter in the world, started in 1939. On July 18th 1942, Me 262V-3
made its first flight with two Junkers Jumo 004 jet engines. After prototypes
featuring nose housed landing gear and improved Jumo 004B engines, the first
production model of the Me 262 was completed. Capable of 870km/h top speed, the
Me 262 featured an 18,5° receding wings. With Allied bombing raids on the German
homeland rapidly intensifying, the Luftwaffe proposed the hastened deployment of
the revolutionay jet as a fighter/interceptor. However, Hitler issued strict
contrary orders prioritizing the the deployment of the Me 262A-2a figher/bomber
version. Despite these orders, a few A-1as assigned to Me 262 test/training
units (Ekdo 262) were deployed to intercept and successfully shoot down Allied
Mosquitos and Spitfires. On September 1944, the first practical unit was
organised and on November 4th, full scale production of the Me 262A-1a was
allowed at last. Me 262A-1a fighters were assigned to units such as JG 7 (organised
based on Ekdo 262) and KG (J) 54 (re-organised from bomber unit to fighter
unit). On April 1945, just before the end of WW2, Lieutenant General Adolf
Galland organised an elite unit of ace pilots named JV 44. Although the
Luftwaffe was on its last wings, ace flown Me 262s packed with deadly armament
of 4x30mm MK 108 cannons, as well as Wgr 21 and R4M rockets, continued to
threaten Allied aircraft until the end of the war."
From
the Tamiya 262 instructions: "Development of the Me 262, the first practical use
jet-powered fighter in the world, started in 1939. On July 18th 1942, Me 262V-3
made its first flight with two Junkers Jumo 004 jet engines. After prototypes
featuring nose housed landing gear and improved Jumo 004B engines, the first
production model of the Me 262 was completed. Capable of 870km/h top speed, the
Me 262 featured an 18,5° receding wings. With Allied bombing raids on the German
homeland rapidly intensifying, the Luftwaffe proposed the hastened deployment of
the revolutionay jet as a fighter/interceptor. However, Hitler issued strict
contrary orders prioritizing the the deployment of the Me 262A-2a figher/bomber
version. Despite these orders, a few A-1as assigned to Me 262 test/training
units (Ekdo 262) were deployed to intercept and successfully shoot down Allied
Mosquitos and Spitfires. On September 1944, the first practical unit was
organised and on November 4th, full scale production of the Me 262A-1a was
allowed at last. Me 262A-1a fighters were assigned to units such as JG 7 (organised
based on Ekdo 262) and KG (J) 54 (re-organised from bomber unit to fighter
unit). On April 1945, just before the end of WW2, Lieutenant General Adolf
Galland organised an elite unit of ace pilots named JV 44. Although the
Luftwaffe was on its last wings, ace flown Me 262s packed with deadly armament
of 4x30mm MK 108 cannons, as well as Wgr 21 and R4M rockets, continued to
threaten Allied aircraft until the end of the war."
| THE KIT |
 Do you
ever buy a kit and be super interested in building it, only to find out during
the build that several parts don't fit at all where they're supposed to go? This
was the case with this kit. Several people told me I was building the old tool
1:32 Me 262 from Revell, but I had to correct them, stating this was the new
tool 262.
Do you
ever buy a kit and be super interested in building it, only to find out during
the build that several parts don't fit at all where they're supposed to go? This
was the case with this kit. Several people told me I was building the old tool
1:32 Me 262 from Revell, but I had to correct them, stating this was the new
tool 262.
The kit comes inside the new grey box from Revell. Instructions have 28 pages in a glossy format, much welcomed than what Revell offered a couple of years ago. There're 11 light grey sprues and 2 clear ones. The plastic is soft, so be careful when sanding. Some parts had a bit of flash. Revell provides a full cockpit, and engines that can be displayed open.
There're two decal options. The first one is Me 262A-1a "White 4" wknr 130017 from Kommando Nowotny with R4M underwing rockets. This option is painted in RLM 81/82/76. The second option is Me 262A-2a 9K+BK (wknr 170122) from KG 51 "Edelweiss." This one is painted in RLM 81/82/76 with RLM 70 squiggles over the fuselage and wings.
With this build, at least for me, it was inevitable to compare the Revell kit to the Trumpeter 1:32 Me 262 I had built some years ago. Let's see how the newest 262 in the market fares.
| CONSTRUCTION |
As it happens on most of aircraft builds, I
started working first on the cockpit parts. Inner parts were painted RLM 66, and
the outer ones in Aluminium. I painted the instrument panel RLM 66 with black
gauges, the control stick was painted RLM 66 with a brown base and black grip,
while the side console was painted black with white dials. The pilot's seat was
also painted RLM 66 with brown for the cushion. Revell includes the option for
the rockets or bombs panel to be installed to the instrument panel, which needs
a hole to be opened for that. Once I had finished building the cockpit, I
started working on the wheel wells. Revell provides several parts which build
into a very 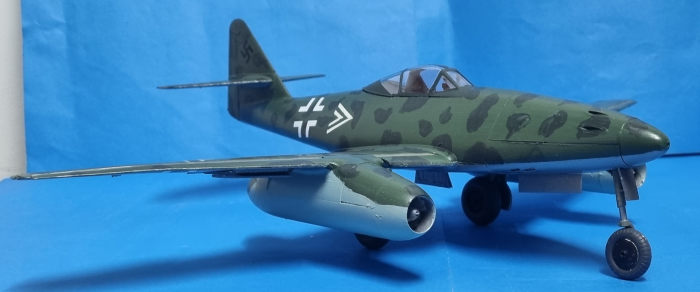 detail
assemble, both for the main gear and nose gear. These parts were painted steel.
It is at this time that you can add the cannons, but I was told they wouldn't
let me close the nose, so I left them out. While working on the nose, make sure
to add piece C80 (the cannon barrel holder). This part is crucial to achieve a
nose without a step, which happened to me (I glued it later after removing the
cannon covers, and managed to remove the step). Before gluing the cockpit and
cannon bay to the fuselage, I epoxied two 40 gramme weights in the firewalls of
each assembly to get a nose sitter. After the glue was dry, I glued the cannon
bay/nose gear well to the fuselage. I then glued the other fuselage half and
taped both of them together. The cockpit was then glued from below the fuselage.
detail
assemble, both for the main gear and nose gear. These parts were painted steel.
It is at this time that you can add the cannons, but I was told they wouldn't
let me close the nose, so I left them out. While working on the nose, make sure
to add piece C80 (the cannon barrel holder). This part is crucial to achieve a
nose without a step, which happened to me (I glued it later after removing the
cannon covers, and managed to remove the step). Before gluing the cockpit and
cannon bay to the fuselage, I epoxied two 40 gramme weights in the firewalls of
each assembly to get a nose sitter. After the glue was dry, I glued the cannon
bay/nose gear well to the fuselage. I then glued the other fuselage half and
taped both of them together. The cockpit was then glued from below the fuselage.
While the fuselage was curing, I started working on the wings. Instead of providing a full length wing like Trumpeter does, Revell gives you a three piece lower wing with two upper wings. Before gluing the upper wings you have to glue the wheel wells (which I built earlier in the assembly process). The wells have a sloppy fit, so make sure to tape and align them correctly. Meanwhile, I checked out the flaps and slats. Whereas Trumpeter provide the flaps with guides for the extended position, Revell gives you flaps in the retracted position. The simple solution is to remove the guides of the Revell flaps and glue each of them in the extended position. Easy. The slats are give extended in both the Trumpeter and Revell kit, but the latter provides the slat rails molded into the wing. I glued each flap separately in the extended position, the slats following suit.
 After
installing the lift surfaces, I thought I'd give the engines a go. I didn't want
to add the entire engine, so I just glued the rear and front faces to each
nacelle. After that, I attempted to glue both engines to the wings. There were
huge gaps on each engine. Some were caused because the engine didn't follow the
lower wing curvature, and the other gaps were caused due to the engine cover not
being large enough to reach the lower part of the engine. The leading trailing
edge of the engine also had gaps. Out came the CA, and after a couple of
applications and sanding with a coarse sanding paper first and then with a finer
one, I had two engines without visible gaps. They were glued to the wings. The
Trumpeter kit is much more modeller friendly and doesn't have these gaps.
After
installing the lift surfaces, I thought I'd give the engines a go. I didn't want
to add the entire engine, so I just glued the rear and front faces to each
nacelle. After that, I attempted to glue both engines to the wings. There were
huge gaps on each engine. Some were caused because the engine didn't follow the
lower wing curvature, and the other gaps were caused due to the engine cover not
being large enough to reach the lower part of the engine. The leading trailing
edge of the engine also had gaps. Out came the CA, and after a couple of
applications and sanding with a coarse sanding paper first and then with a finer
one, I had two engines without visible gaps. They were glued to the wings. The
Trumpeter kit is much more modeller friendly and doesn't have these gaps.
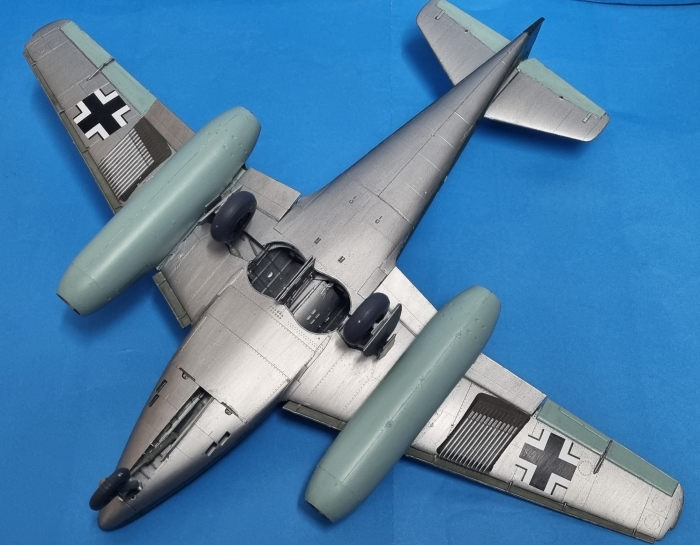
Now it was time to join the wings to the fuselage. As much as I tried, when one side would have a good join, the other wouldn't close. In the end, I discovered that the wheel wells were too tall and weren't allowing the wings to properly fit under the cockpit floor. So out came the metal file and the sanding. After some passes, I got a good fit, and the wings were glued. After that I glued the rudder and horizontal stabilizers into place.
To speed up the building process, I built up the landing gear (painted in RLM 02) and wheels (hubs in matt black with tyres in RLM 66). I also painted the gear doors in steel on the outside and inside.
| COLORS & MARKINGS |
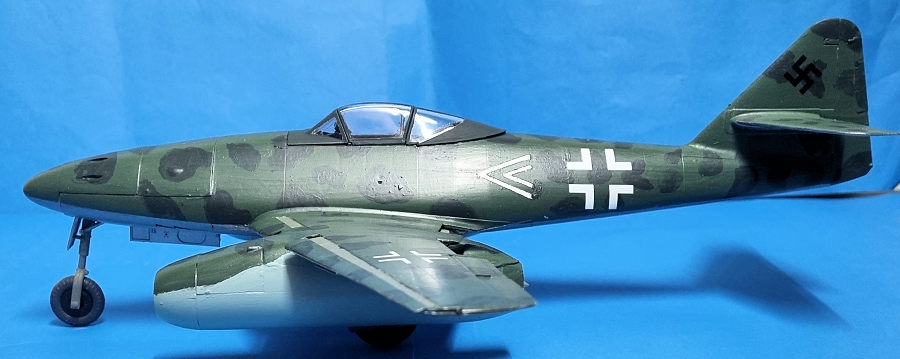
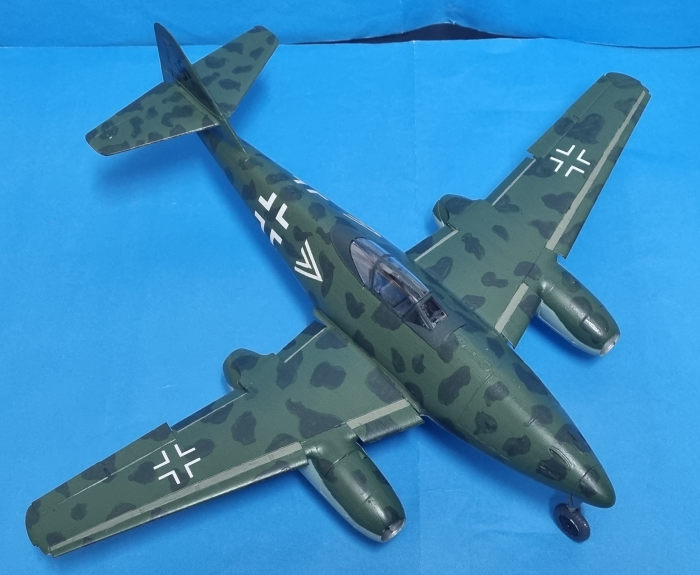
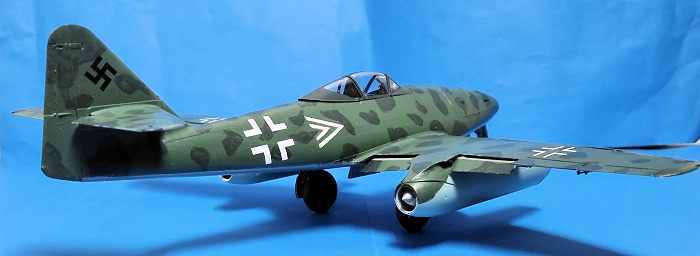 I wasn't
going to do any of the box schemes. Instead, I decided to paint the Me 262 as
one of Adolf Galland's aircraft. There're two known aircraft atribuited to
Galland. One is White 3 and the other White Double Chevron, both in service with
JV 44. I didn't find photos of either aircraft, but stumbled upon a profile from
Eagle Cals for White Double Chevron, so I chose this one. I first painted the
white where the chevrons would go, which was then masked. The colour scheme
consisted of RLM 82/83 upper sides with aluminium lower sides and RLM 76 control
surfaces. I used for this task RLM 71 and 70 for the upper surfaces (because
they look similar to the later RLM colours), steel for the undersides, and RLM
76 for the controls. Once that was done, I unmasked the chevrons, happy to see
little bleeding had ocurred between the several RLM 71 coats I had applied. I
then glossed the aircraft and applied the decals. The matt varnish was then
applied.
I wasn't
going to do any of the box schemes. Instead, I decided to paint the Me 262 as
one of Adolf Galland's aircraft. There're two known aircraft atribuited to
Galland. One is White 3 and the other White Double Chevron, both in service with
JV 44. I didn't find photos of either aircraft, but stumbled upon a profile from
Eagle Cals for White Double Chevron, so I chose this one. I first painted the
white where the chevrons would go, which was then masked. The colour scheme
consisted of RLM 82/83 upper sides with aluminium lower sides and RLM 76 control
surfaces. I used for this task RLM 71 and 70 for the upper surfaces (because
they look similar to the later RLM colours), steel for the undersides, and RLM
76 for the controls. Once that was done, I unmasked the chevrons, happy to see
little bleeding had ocurred between the several RLM 71 coats I had applied. I
then glossed the aircraft and applied the decals. The matt varnish was then
applied.
I glued the landing gear, wheels and gear doors and let them set. Then I turned the model upside down and glued the clear parts. The underwing R4M rockets were also glued.
| CONCLUSIONS |
Despite of the build issues I had, I'm happy to finally have a large scale Me 262 in my shelf. Would I choose the Trumpter kit over this one if I were to build another one? Yes, since it offers a better building experience and comes with both metal and plastic landing gear. However, now that I know the difficult areas of this kit, I would give it a try again.
| REFERENCES |
Tamiya's Me 262A-1a instructions.
Revell colours used: 39 Dark Green (RLM 71), 40 Black Green (RLM 70), 49 Light Blue (RLM 76), 91 Steel (lower surfaces), 45 Matt Olive Green (RLM 02), 78 Tank Grey (RLM 66).
Francisco Santoro
4 January 2023
Copyright ModelingMadness.com. All rights reserved. No reproduction in part or in whole without express permission from the editor.
If you would like your product reviewed fairly and fairly quickly, please contact the editor or see other details in the Note to Contributors.