ProModeler 1/48 Bf-110G-4
| KIT #: | 5933 |
| PRICE: | $42.00 |
| DECALS: | Two options |
| REVIEWER: | Francisco Santoro |
| NOTES: | Xtradecal and Print Scale decals |
| HISTORY |
 From instructions: "The evolution of the Bf 110 line was to
continue in 1941 with the introduction of the Me 210, a result of the
development of the original design coupled with combat experience. Major
ongoing problems with the prototypes and unspectacular results in combat
halted production of the Me 210 at under 300. The role of the heavy
fighter and fighter-bomber for the Luftwaffe would need to continue to
be served by the Bf 110, calling for a list of changes and
modifications. The installation of the newly developed DB 605 engines
allowed for the development of the stronger and aerodinamically refined
G version, represented in combat by the G-2 and G-4. Although the G-2
variant found its role especially as a heavy day defender, the domain of
the G-4 was that of the night fighter... Generally, there was no great
use for single engined developments, although there were successful
evolutions of the Bf 109 and Fw 190 in this role. The bulk of that duty
was carried out by twin engine types whose original role was that of
heavy day fighter or, more likely, as bombers, such as the Bf 110, Ju
88, Ju 188, He 219, Me 262 and others. The Bf 110G-4 was the most
prolific of all of them. The required equipment for the G-4 was an on
board radar system, mainly the FuG 202, FuG 220, FuG 212, and FuG 218.
Part of the basic armament was often the installation of 30mm MK 108
cannon in the nose, and 20mm Schräge Musik cannon used when the target
was above and slightly ahead of the attacking fighter."
From instructions: "The evolution of the Bf 110 line was to
continue in 1941 with the introduction of the Me 210, a result of the
development of the original design coupled with combat experience. Major
ongoing problems with the prototypes and unspectacular results in combat
halted production of the Me 210 at under 300. The role of the heavy
fighter and fighter-bomber for the Luftwaffe would need to continue to
be served by the Bf 110, calling for a list of changes and
modifications. The installation of the newly developed DB 605 engines
allowed for the development of the stronger and aerodinamically refined
G version, represented in combat by the G-2 and G-4. Although the G-2
variant found its role especially as a heavy day defender, the domain of
the G-4 was that of the night fighter... Generally, there was no great
use for single engined developments, although there were successful
evolutions of the Bf 109 and Fw 190 in this role. The bulk of that duty
was carried out by twin engine types whose original role was that of
heavy day fighter or, more likely, as bombers, such as the Bf 110, Ju
88, Ju 188, He 219, Me 262 and others. The Bf 110G-4 was the most
prolific of all of them. The required equipment for the G-4 was an on
board radar system, mainly the FuG 202, FuG 220, FuG 212, and FuG 218.
Part of the basic armament was often the installation of 30mm MK 108
cannon in the nose, and 20mm Schräge Musik cannon used when the target
was above and slightly ahead of the attacking fighter."
| THE KIT |
 This kit was a must have for me, since I wanted to build it as Heinz
Wolfgang Schnaufer's aircraft. The parts come molded in light grey and clear
plastic, with some hints of flash on some parts. Instructions come in the
shape of a booklet with black and white images drawings, plus black and
white photos of the real aircraft.
This kit was a must have for me, since I wanted to build it as Heinz
Wolfgang Schnaufer's aircraft. The parts come molded in light grey and clear
plastic, with some hints of flash on some parts. Instructions come in the
shape of a booklet with black and white images drawings, plus black and
white photos of the real aircraft.
My kit came with two decal options, which were C9+EV and 2Z+NU. However, none of these options were of any use to me, since I had bought at Hannants a set of Print Scale decals for Bf 110 nightfighters (which included Schnaufer's plane), and two sets of Xtradecals sheets for WW2 German heavy fighter insiginia.
| CONSTRUCTION |
 I began construction by painting all
the cockpit pieces in RLM 66 (Revell 78). While these parts were drying, I
glued the wings together, but I opened the holes for the underwing fuel
tanks prior to gluing the wing halves together. When the paint of the
cockpit walls had dried, I painted several details in flat black. Once the
details were dry, I glued the cockpit walls to the cockpit floor, and waited
for the glue to set. After the glue had dry, I glued the cockpit to one of
the fuselage halves, and then enclosed it with the other fuselage half.
After closing the fuselage halves, I glued the wings to it, together with
the horizontal stabilizer and rudders.
I began construction by painting all
the cockpit pieces in RLM 66 (Revell 78). While these parts were drying, I
glued the wings together, but I opened the holes for the underwing fuel
tanks prior to gluing the wing halves together. When the paint of the
cockpit walls had dried, I painted several details in flat black. Once the
details were dry, I glued the cockpit walls to the cockpit floor, and waited
for the glue to set. After the glue had dry, I glued the cockpit to one of
the fuselage halves, and then enclosed it with the other fuselage half.
After closing the fuselage halves, I glued the wings to it, together with
the horizontal stabilizer and rudders.
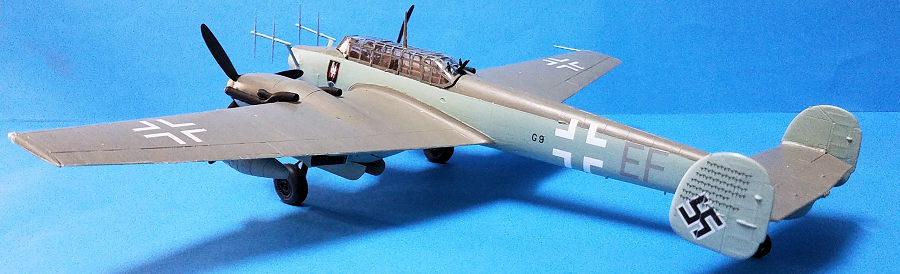
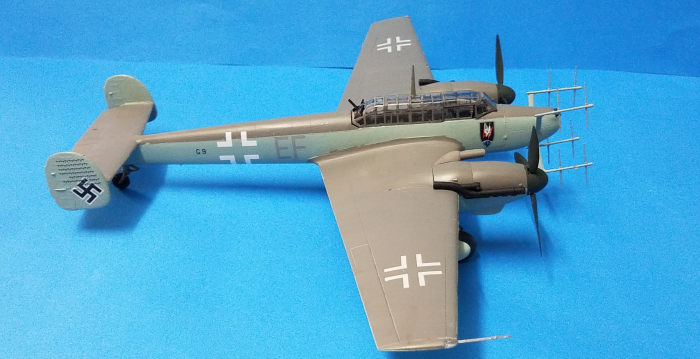
| COLORS & MARKINGS |
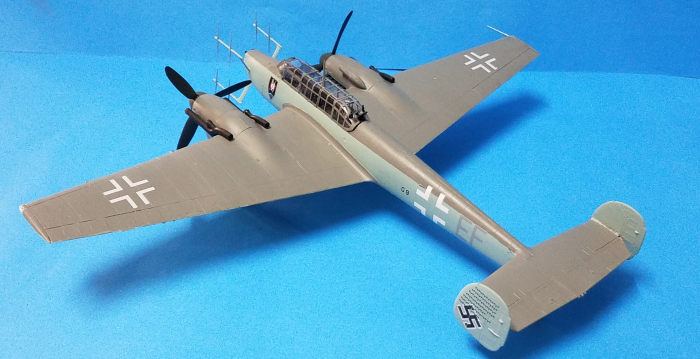 I wanted to paint this plane with the
scheme of the highest scoring German nightfighter pilot, Heinz Wolfgang
Schnaufer. The camouflage consisted of an RLM 75 topside with RLM 76
undersides. I bought Print Scale's 48105 decal sheet for this task.
I wanted to paint this plane with the
scheme of the highest scoring German nightfighter pilot, Heinz Wolfgang
Schnaufer. The camouflage consisted of an RLM 75 topside with RLM 76
undersides. I bought Print Scale's 48105 decal sheet for this task.
The upper sides were first painted with RLM 75 (Revell 47 Mouse Grey), and then the undersides were painted with Revell 49 Light Blue. After the paint had hardened, I gloss coated the entire plane in order to prepare the surface for the decals. I tried first the Swastikas (come in two halves), and placed them easily on the rudders. After that, I decalled the entire plane. Once the decals were set, I applied to coats of Microsol and let them dry. Once the decals were dry I matt coated the entire plane with Revell's matt varnish.
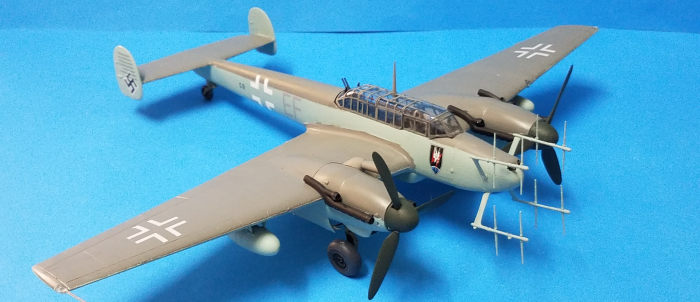
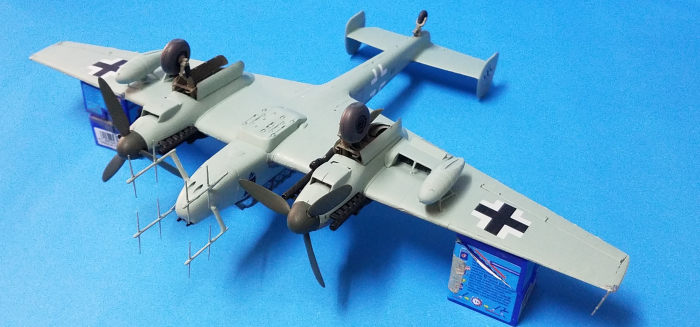
| FINAL CONSTRUCTION |
This step required me to install the propellers (painted in RLM 70), the landing gear, the clear parts and the radar antennas. The landing gear was a bit fidly to install, since the instructions aren't very clear of how to attach the parts. The radar antennas were easier to install, a bit of superglue, 10 seconds holding the piece, and it held itself in place. The wheels of the aircraft were glued together and painted with black hubs and panzer grey tyres. The clear parts were singlehandedly the most time consuming parts, but I painted them all in the end.
| CONCLUSIONS |
Don't drop your Revell/Monogram 110s just yet, just because the Eduard kit is available. The Revell kit is still a good choice ot the Eduard kit, since it doesn't have the fit issues the latter has.
18 June 2021
Copyright ModelingMadness.com. All rights reserved. No reproduction in part or in whole without express permission.
If you would like your product reviewed fairly and fairly quickly, please contact the editor or see other details in the Note to Contributors.