Dragon 1/32 Bf-110D-3
| KIT #: | 3206 |
| PRICE: | 200$ |
| DECALS: | Four options |
| REVIEWER: | Francisco Santoro |
| NOTES: |
| HISTORY |
 The Bf 110
is one of those aircraft in the German Luftwaffe that was supposed to provide
ground attack capabilities and be also able to fend for itself in case of
dogfights. Though too late to see combat in the Spanish Civil War, the 110 saw
action over the skies of Poland and the West during the early phase of the
Blitzkrieg. However, during the Battle of Britain, the aircraft met a superior
foe, the Royal Air Force and their Hurricanes and Spitfires. The Bf 110 was then
shot down in numbers while it was escorting German bombers over the island,
their poor maneuverability and weak defensive armament proving to be insuficient
for the aircraft. The 110 was then retired from escort duties and changed to the
ground attack role in SKG 210. However, later during the war, the 110 was
pressed into service as a night fighter, a role to which it was perfectly suited
due to its heavy firepower and ability to carry a radar operator. In the
nightfighting role, the Bf 110 flew until the end of the conflict, making
several of its pilots aces.
The Bf 110
is one of those aircraft in the German Luftwaffe that was supposed to provide
ground attack capabilities and be also able to fend for itself in case of
dogfights. Though too late to see combat in the Spanish Civil War, the 110 saw
action over the skies of Poland and the West during the early phase of the
Blitzkrieg. However, during the Battle of Britain, the aircraft met a superior
foe, the Royal Air Force and their Hurricanes and Spitfires. The Bf 110 was then
shot down in numbers while it was escorting German bombers over the island,
their poor maneuverability and weak defensive armament proving to be insuficient
for the aircraft. The 110 was then retired from escort duties and changed to the
ground attack role in SKG 210. However, later during the war, the 110 was
pressed into service as a night fighter, a role to which it was perfectly suited
due to its heavy firepower and ability to carry a radar operator. In the
nightfighting role, the Bf 110 flew until the end of the conflict, making
several of its pilots aces.
| THE KIT |
 16 light
grey sprues, two clear sprues, over 400 plastic parts, a metallic wire and some
photoetch make Dragon's effort on the Bf 110 in 1:32 a daunting project for
those who only build small 1:48 fighters (such as myself). The parts are molded
in hard light grey plastic that don't have any flash, a huge plus for something
of this size. The downside is that the sprue attachment points on the wings go
into the parts. The clear parts are really well done, and Dragon provides the
option of placing the windows open or closed. The kit also comes with two
complete engines that can be exhibited for those who wish to superdetail the kit
(if you wish to close the cowlings, you only need the engine face and the
support arms. I'll get back to the engines further down the build).
16 light
grey sprues, two clear sprues, over 400 plastic parts, a metallic wire and some
photoetch make Dragon's effort on the Bf 110 in 1:32 a daunting project for
those who only build small 1:48 fighters (such as myself). The parts are molded
in hard light grey plastic that don't have any flash, a huge plus for something
of this size. The downside is that the sprue attachment points on the wings go
into the parts. The clear parts are really well done, and Dragon provides the
option of placing the windows open or closed. The kit also comes with two
complete engines that can be exhibited for those who wish to superdetail the kit
(if you wish to close the cowlings, you only need the engine face and the
support arms. I'll get back to the engines further down the build).
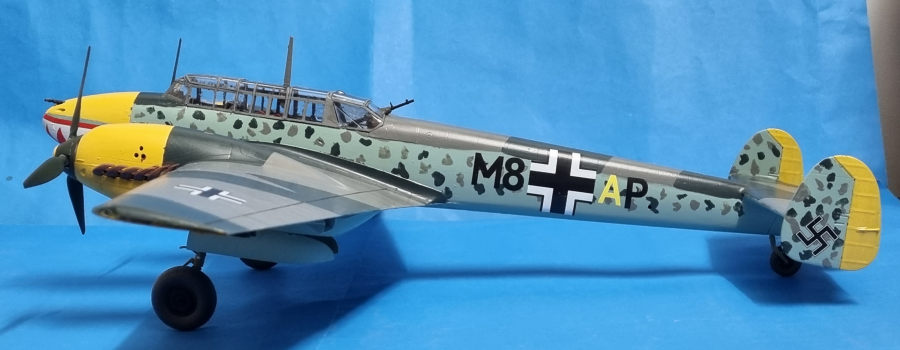
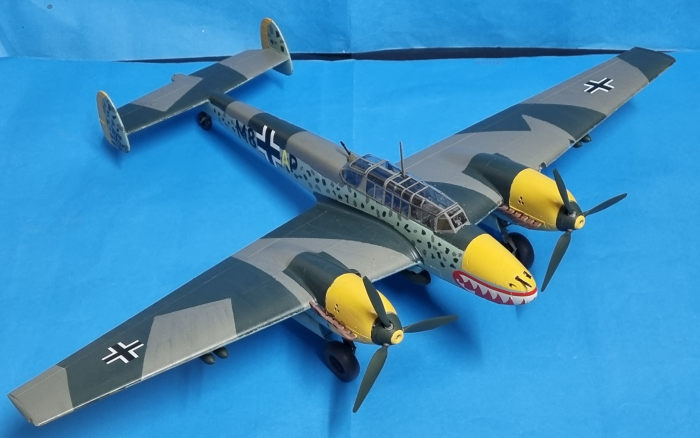
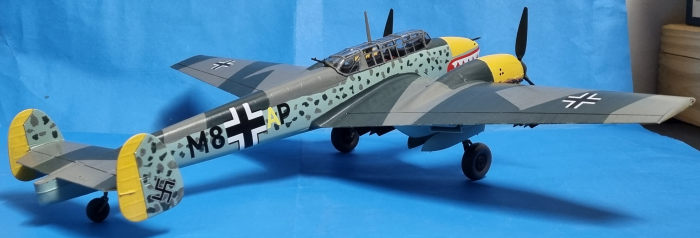
There're four decal options: All in RLM 74/75/76 except for an Iraki plane in RLM 79/76. The aircraft are 3U+NT, 3U+OT, M8+AP (the one I chose), and the Iraki one without ID except for the country's insignia. The decals are printed by Cartograf.
| CONSTRUCTION |
This build wouldn't have been possible without the help from Tom Cleaver, Frank Reynolds, and the Revell instructions for the reboxed 1:32 Dragon kit. Thanks to them I was able to get into the build without major issues.
I
began the assembly by first painting the propellers. The blades and hubs were
painted RLM 70. The prop cones were painted RLM 70 too with yellow. The cockpit
parts were then painted in RLM 66. The guns and ammo drums were painted black.
The instrument panel was detailed by painting the instruments black. I then
assembled the cannons and their base. This was then glued to the underside of
the cockpit. Then the rear gunner's seat was assembled. I had to check the
Revell instructions to see how I should build this area, because the
instructions Dragon provides are a tad confusing. Once the gunner's seat was
done, I followed Cleaver's advice and glued the cockpit sidewalls to each
fuselage half, and then glued the cockpit floor to one of the halves. Once it w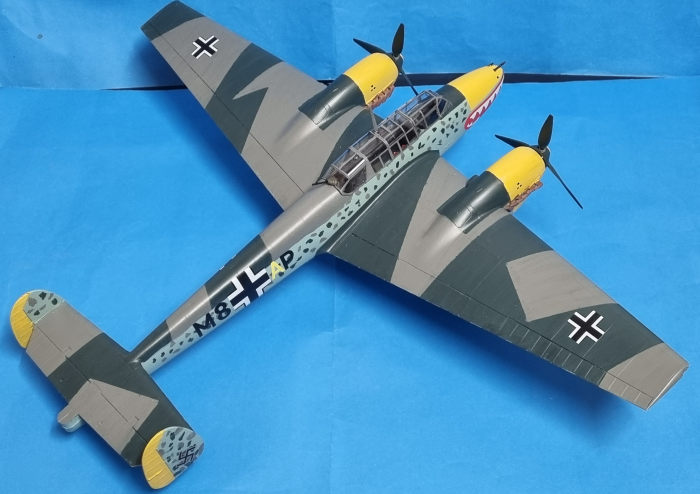 as
dry, I glued the other fuselage half and taped them together. I put that aside
and began work on the nose guns. I only glued the machineguns (without painting)
and glued that assembly to the nose. It was at this time that I painted the
wheels and landing gear to speed up the build process (because as we all know,
wheels and other small parts make the project drag on for too long). Back to the
fuselage, I glued the hefty wingspar and the nose to the fuselage, and then I
added the fuselage's lower side where the SC 250 bombs would go. Meanwhile, I
sidetracked a bit to build the main landing gear. These don't have a very strong
connection, as I found that when one of the struts got free from the glue's bond
when trying to place them inside the gear wells.
as
dry, I glued the other fuselage half and taped them together. I put that aside
and began work on the nose guns. I only glued the machineguns (without painting)
and glued that assembly to the nose. It was at this time that I painted the
wheels and landing gear to speed up the build process (because as we all know,
wheels and other small parts make the project drag on for too long). Back to the
fuselage, I glued the hefty wingspar and the nose to the fuselage, and then I
added the fuselage's lower side where the SC 250 bombs would go. Meanwhile, I
sidetracked a bit to build the main landing gear. These don't have a very strong
connection, as I found that when one of the struts got free from the glue's bond
when trying to place them inside the gear wells.
The engines deserve their own part of the article. Dragon provides two complete units in hope that the modeller will leave them open. Since I wanted to close them, I built up the basic engine and glued them to their firewalls. It was at this time that I tried to put together the exhausts. Dragon provides eight (four used and four spares), which is a very good decision because they're very fragile (I broke two just by trying to remove them from the sprues). The instructions aren't very clear on how they should be glued, so I ended up gluing the four of them pointing downwards, which is incorrect. The outer exhausts should point up, while the inner ones should point down. I then glued the engine panels and left them to dry.
Back to the more entertaining part of the build, I reached for the wings to build them up. The wheel wells and other smaller parts were painted RLM 02. It was at this time that I opened the holes for the SC50 bombs that go on the external bomb racks (M8+AP didn't carry the long range fuel tanks). The main issue with the wings is that the sprue nubs go into the parts, so you must be careful to avoid slashing part of the wing. I also assembled the radiator and glued them to the wings. I then left the wings aside and worked on the empennage, which was then glued to the rear of the fuselage. After that, I glued the wings to the fuselage, taping them to make sure nothing moved while the airframe was drying.
| COLORS & MARKINGS |
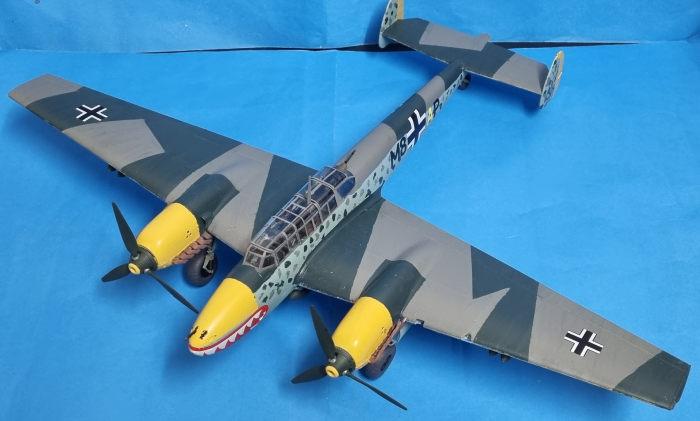 The chosen
aircraft was M8+AP, a Bf 110E (Dragon didn't do their research) of 6/ZG76 in
Greece. Something that I stopped doing was to start painting before checking for
references online. I found a profile from Eduard's Bf 110E that had M8+AP as an
option, and they showed a very different camouflage pattern to what Dragon
offered. With my research done, I first primed the areas that were to be yellow
(upper nose, engine panels, wingtips and rudders) in light grey, and then
applied several coats of yellow to get some opacity. After that, I painted the
camouflage. RLM 75 came first and was applied in an uneven manner. Then those
areas were masked and RLM 74 was painted. RLM 76 came next. Painting took a
single day thanks to the quick drying time Revell's acrylic range. Once the
paint had fully cured, I glossed the aircraft and applied the decals. I started
by placing the sharkmouths on the nose, and then placed the other ones. To make
the sharkmouths conform to the nose, I used Mr. Mark Softer, which worked
wonders and made those decals conform very well. I then left the decals to set
overnight, and applied the matt coat the next day.
The chosen
aircraft was M8+AP, a Bf 110E (Dragon didn't do their research) of 6/ZG76 in
Greece. Something that I stopped doing was to start painting before checking for
references online. I found a profile from Eduard's Bf 110E that had M8+AP as an
option, and they showed a very different camouflage pattern to what Dragon
offered. With my research done, I first primed the areas that were to be yellow
(upper nose, engine panels, wingtips and rudders) in light grey, and then
applied several coats of yellow to get some opacity. After that, I painted the
camouflage. RLM 75 came first and was applied in an uneven manner. Then those
areas were masked and RLM 74 was painted. RLM 76 came next. Painting took a
single day thanks to the quick drying time Revell's acrylic range. Once the
paint had fully cured, I glossed the aircraft and applied the decals. I started
by placing the sharkmouths on the nose, and then placed the other ones. To make
the sharkmouths conform to the nose, I used Mr. Mark Softer, which worked
wonders and made those decals conform very well. I then left the decals to set
overnight, and applied the matt coat the next day.
| FINAL CONSTRUCTION |
 This is
where everything slows down, but it's also the most important part of any build.
I first glued the landing gear struts. Once of them had to be epoxied because my
regular glue wasn't strong enough to hold a part that had separated from the
main landing gear. Once the epoxy had gone off, I glued the wheels in place. The
bombs and propellers were also added at this time. I then turned the model
upside down and placed it on its landing gear. The rear gun was glued in place,
together with the gunsight. The clear parts came next. The pilot's windows had
to be sanded down to make them fit in the closed position. These were glued in
place with white glue. I then painted the nose machineguns black, and with that,
the kit was complete.
This is
where everything slows down, but it's also the most important part of any build.
I first glued the landing gear struts. Once of them had to be epoxied because my
regular glue wasn't strong enough to hold a part that had separated from the
main landing gear. Once the epoxy had gone off, I glued the wheels in place. The
bombs and propellers were also added at this time. I then turned the model
upside down and placed it on its landing gear. The rear gun was glued in place,
together with the gunsight. The clear parts came next. The pilot's windows had
to be sanded down to make them fit in the closed position. These were glued in
place with white glue. I then painted the nose machineguns black, and with that,
the kit was complete.
| CONCLUSIONS |
Are Dragon's big scale 110s worth building? If you have the patience to paint hundreds of small parts to make way for an impressive model, then I say yes, it's worth it. Just mind how the exhausts should go and you'll have a nice model on your shelf (which reminds me, I need to get more shelves, I've run out of display space !). Would I build another Dragon 110 in 32nd scale? Absolutely, but this time it'll be the Revell rebox with decals for the Battle of France and a Wespen Geschwader in the Eastern Front (I choose the BoF one, I don't have many RLM 70/71/65 aircraft in my collection).
| REFERENCES |
History section came from what I recall from my memory.
Paints used were: Revell 78 Tank Grey (RLM 66), Revell 45 Light Olive (RLM 02), Revell 69 Granite Grey (RLM 74), Revell 47 Mouse Grey (RLM 75), Revell 15 Yellow (RLM 04), Revell 49 Light Blue (RLM 76), Revell 40 Black Green (RLM 70).
Copyright ModelingMadness.com. All rights reserved. No
reproduction in part and in whole without express permission. If you would like your product reviewed fairly and fairly quickly, please
contact
the editor or see other details in the
Note to
Contributors.