| KIT #: | 23-72317 |
| PRICE: | $39.00 |
| DECALS: | Six options |
| REVIEWER: | Ryan Grosswiler |
| NOTES: | 3D printed resin, injected clear parts, masks |
| HISTORY |
It must have looked so good on paper. Possibly the war's most remarkable airborne weapon for its sheer audacity, the Me-163 Komet remains unique in being the only rocket-powered aircraft ever placed into full production and operational service. With Allied intelligence aware of its development, its arrival was awaited with some anxiety by both the RAF and USAAF. In the end, however, the pressures of war forced its premature introduction into combat and in practical service proved as much a danger to its own operator than the intended enemy.
The aircraft was not, however, one of the Nazi "desperation weapons", but only the underdeveloped result of an otherwise careful eight-year program. It all began in 1936 with the creation of a series of liquid-fueled rocket motors under the direction of Dr. Hellmuth Walter, who advocated the use of bipropellant fuels, where ignition would be achieved by the volatile combination of two special liquids. An aircraft powered by his first RI-203 motor, the Heinkel 176, was flown in 1939, though this prototype was such a dismal failure (flight of only 50 seconds, speeds less than 200 knots) that the entire future of a rocket-powered aircraft was placed in doubt.
 His
powerplant concepts were then merged with the tailless airframe designs of Dr.
Alexander Lippisch, who had in the event been examining rocket propulsion
already. Increasingly annoyed by the interference of DFS and Heinkel, and their
clumsy associated bureaucracy, Walter ceased working with Heinkel, joined forces
with Lippisch, incorporating the RI-203 into Lippisch's DFS-194 which had been
designed for a small reciprocating engine but was now modified (despite its
wooden construction) to take Walter's rocket. When finally flown in the summer
of 1940, the DFS-194 exceeded projected level velocity by 80%, the aircraft
being clocked at nearly double its design speed.
His
powerplant concepts were then merged with the tailless airframe designs of Dr.
Alexander Lippisch, who had in the event been examining rocket propulsion
already. Increasingly annoyed by the interference of DFS and Heinkel, and their
clumsy associated bureaucracy, Walter ceased working with Heinkel, joined forces
with Lippisch, incorporating the RI-203 into Lippisch's DFS-194 which had been
designed for a small reciprocating engine but was now modified (despite its
wooden construction) to take Walter's rocket. When finally flown in the summer
of 1940, the DFS-194 exceeded projected level velocity by 80%, the aircraft
being clocked at nearly double its design speed.
Luftwaffe interest was immediately revived, and as the program had been moved to Augsburg and brought under the supervision of Messerschmitt, the next development was the Me-163A. Still just a developmental design, this was used to refine the aircraft's handling and performance, as a vague concept of a point-defense interceptor was gradually being evolved. Initial problems with aileron flutter were resolved, and by autumn of 1941 Mach .82 had achieved and with it, the effects of compressibility as the aircraft nudged into the transonic range and all the little 'surprises' that pop up at those speeds. The wing was redesigned with greater sweep and less washout at the tips, and leading-edge slots incorporated, which made the aircraft both controllable throughout this unprecedented performance envelope and impossible to spin. As Walter was now developing his new HWK 109-509 motor, the fuselage volume was increased to provide fuel for a calculated 13 minutes' powered flight and ammunition bays for a pair of MK108 30mm cannon located in the wing roots. A new skid structure was incorporated under the expanded fuselage, and as these changes now comprised essentially a complete redesign, the new airframe was designated Me-163B.
Very often, however, a great theory and formula for an aircraft is spoilt by a single element, and that element is usually the powerplant. Here is where the otherwise efficient and on-track developmental program went awry. The Me-163B prototype was rolled out in the spring of 1942 and began glide tests, proving to have exceptional handling around all axes, and even started cannon-firing trials. An initial run of 70 airframes began to roll off the Augsburg line. However, in the meantime, Walter's new motor had not completed a successful bench test and would not be cleared for flight until well over a year later, and even then only as a highly experimental unit. More embarrassingly, the unproven method of throttling the thrust did not work well in practice and resulted in a fuel consumption rate nearly double of that calculated, meaning that the already brief powered endurance of the new interceptor was cut to about six minutes!
By now it was the end of 1943, and the potential for enemy bombardment from above had transformed from a theoretical threat into a very practical and real one, so operational development was nonetheless pressed. A few final tweaks were required, not the least of which was the development of a shock-absorbing seat as two pilots had been badly injured in heavy landings and a special asbestos-PVC flight suit, as the highly-corrosive fuel had caused another even more unfortunate pilot, sprayed by the substance from ruptured fuel lines, to be literally dissolved in his seat.
 Now dubbed "Komet" the
interceptor finally entered combat in late spring of 1944. The rest of this
story is pretty well-known; sources vary on specifics and details but somewhere
around 12-18 kills were achieved by the interceptor against Allied bombers with
a like number of Komets lost. In practice, the fighter's high approach speed
combined with the cannon's relatively slow muzzle energy meant that the pilot
had about a 2-3 second window to get a burst in before he overshot the target. A
possibly better weapon pairing was tested in the form of the SG 500 Jägerfaust,
a vertically-firing rocket battery installed in the wings which was actually
used to down (or damage) a Lancaster near the end of the war, but that was as
far as things got.
Now dubbed "Komet" the
interceptor finally entered combat in late spring of 1944. The rest of this
story is pretty well-known; sources vary on specifics and details but somewhere
around 12-18 kills were achieved by the interceptor against Allied bombers with
a like number of Komets lost. In practice, the fighter's high approach speed
combined with the cannon's relatively slow muzzle energy meant that the pilot
had about a 2-3 second window to get a burst in before he overshot the target. A
possibly better weapon pairing was tested in the form of the SG 500 Jägerfaust,
a vertically-firing rocket battery installed in the wings which was actually
used to down (or damage) a Lancaster near the end of the war, but that was as
far as things got.
The program's ultimate manifestation, the Me-263, might have achieved what its creators originally sought as it finally incorporated a proper landing gear setup and a new motor which got around the throttling problem by incorporating a second smaller "cruise" combustion chamber, meaning that the main one could simply be turned off and on as needed for climb performance, achieving the +/- 13 minutes originally specified. However, while the motor was bench-run and the first prototype glide tested, the two were never merged for powered flight.
Both the Soviets and Americans would explore the basic concept postwar with various rocket and mixed-propulsion fighter prototypes of their own, finding the idea basically a dead-end. In retrospect, it's all too easy to write off the Komet for its inflexible operation, general volatility, or—obviously—the cause it served. The reality is that underneath all that, the base aircraft was an absolutely magnificent design resulting from a long period of careful development, achieving not only a high degree of aerodynamic refinement in an age before transonic dynamics were well understood, but that rarest of things, a tailless design free of vice. How many of you out there wouldn't risk bodily intactitude for a chance to point the nose of this machine skyward and experience that 18,000 feet-per-minute climb?
| THE KIT |
There have been at least half a dozen Me-163 kits in 1/72 over the decades, with modelers leaning towards the Heller and Academy products, depending on one's preference for finely raised or more heavy recessed panel lines. This newest kit has been out about a year as of this writing, and I think mine's a 'second edition': from photos online of the first release there are visible changes in tooling of the main parts and simplified packaging.
Compared to any injected representation of the Komet, this kit is an entirely different creature, almost like an artifact from another dimension. As I opened the box and began going through the contents, I found myself rapidly running out of superlatives. Greek company GasPatch—mostly known for their line of fine accessories with a Great War focus, has passed their stage of 1/48 injection-molded inter-war subjects and used this acquired expertise with fine 3D printing to bring us this, their first 1/72 offering.
 Beneath the
full-color instruction booklet one is greeted by lots of 3D-printed resin
sprues, each in its own little custom-cut cavity in a black foam rubber box
insert. There are over 70 parts, each printed to such a high degree of
resolution that there are no visible layering lines "wood grain" common to the
process. The fineness of some of the smaller parts in the cockpit goes well
beyond that of photoetch, and in three dimensions to boot! All exterior surfaces
are smooth enough for a natural-metal finish if one chose.
Beneath the
full-color instruction booklet one is greeted by lots of 3D-printed resin
sprues, each in its own little custom-cut cavity in a black foam rubber box
insert. There are over 70 parts, each printed to such a high degree of
resolution that there are no visible layering lines "wood grain" common to the
process. The fineness of some of the smaller parts in the cockpit goes well
beyond that of photoetch, and in three dimensions to boot! All exterior surfaces
are smooth enough for a natural-metal finish if one chose.
Main components (fuselage halves, wings top-and-bottom) are each in two parts and quite thin, presented on the predictable printed "kelp forest" which not only stabilizes them but takes up 1/3 of the box volume. Smaller parts are formed on less intimidating and similarly disposable structures—33 of them! There's a little clear injected sprue for the canopy, armor glass, and a dorsal fuselage part with the rear-view quarter-panels molded integrally. Canopy is crystal clear and free of optical distortion. A nice set of decals depicting six options is enclosed with an inside-and-out set of canopy masks and clear film for the interior windows (one on each side of the pilot's head), rounding out the kit contents.
All of this is enclosed in a colorful and very sturdy flip-top box. In order to harm this kit's contents, you'd pretty much have to drive over it with a motor vehicle.
| CONSTRUCTION |
Clean off your workbench for this one. Set up for this build in the following three ways: (1) slide a fresh blade into your X-Acto knife, (2) set up good lighting and magnification. Unless you have a pair of laboratory-grade microscopes instead of eyes, get a good desk-mounted magnifier; I ended up doing all the work on the cockpit below mine. Finally, (3) use a slow-setting two-part industrial grade epoxy adhesive (such as J&B Weld) for most construction. I dislike working with cyanoacrylate adhesives with all their severities and this provides a much more forgiving alternative.
The outstanding instruction booklet (the best I've ever seen) answers all questions before you even ask them. However, because I like doing my painting as much at a time as possible, I chose to break up the construction steps in the following way: the cockpit and fuselage accessories were assembled per steps 1-6 in the instructions, but the cockpit bulkhead and tub were left disassembled from each other and the interior windows on either side of the pilot's head were left off at this time (here is my only criticism of the kit's engineering: a better approach would have been to mold the entire bulkhead in clear: those teeny-weeny windows are a real problem to cut out and place!) Note that Part 15A is somehow missed in the instructions but shown in place in the painting guide in Step 8. Exceptionally fine tubing in the cockpit is surprisingly resilient but a bit springy; you just need to control these forces lest one goes shooting off into the abyss of your workspace (it's like assembling your M-1 Garand!). All interior joints were then masked.
 Make that interior
stand out! Near-black RLM 66 threatens to swallow all the light coming into that
beautiful but teeny cockpit, so I resolved this in the following way: all
interior components were airbrushed with a semi-gloss black enamel, allowed to
dry for about twenty minutes, and then given a very light coat of Testor's Flat
Sky Blue shot from what would be "above" in the finished interior. This gave
both 1) the correct bluish hue to the very dark gray and 2) forced dramatic
highlights and shadows to appear. A fine wash and dry-brush followed and the
detail by now really popped out. Detail painting was then completed;
all--ALL--this work being done under that desk magnifier/light of mine. If
you're wondering if decal #65 compass face is visible on the compass body (No.9)
from behind through the armor glass (A3) on the finished model...yes, it is, and
it looks pretty cool!
Make that interior
stand out! Near-black RLM 66 threatens to swallow all the light coming into that
beautiful but teeny cockpit, so I resolved this in the following way: all
interior components were airbrushed with a semi-gloss black enamel, allowed to
dry for about twenty minutes, and then given a very light coat of Testor's Flat
Sky Blue shot from what would be "above" in the finished interior. This gave
both 1) the correct bluish hue to the very dark gray and 2) forced dramatic
highlights and shadows to appear. A fine wash and dry-brush followed and the
detail by now really popped out. Detail painting was then completed;
all--ALL--this work being done under that desk magnifier/light of mine. If
you're wondering if decal #65 compass face is visible on the compass body (No.9)
from behind through the armor glass (A3) on the finished model...yes, it is, and
it looks pretty cool!
General assembly is really straightforward and fit is extremely precise. Use thin cyanoacrylate to join the wing halves: any increase in the wing thickness will cause them to not fit when you go to join them to the fuselage at the root. The parts also require quite a bit of work to remove all the little 'nubbins' which connect them to their sprue bases; take your time and dry-fit a few times here. The canopy and gun access panels fit equally well open or closed: mine were tack-glued in the latter position for painting and popped off to be posed open when this was done.
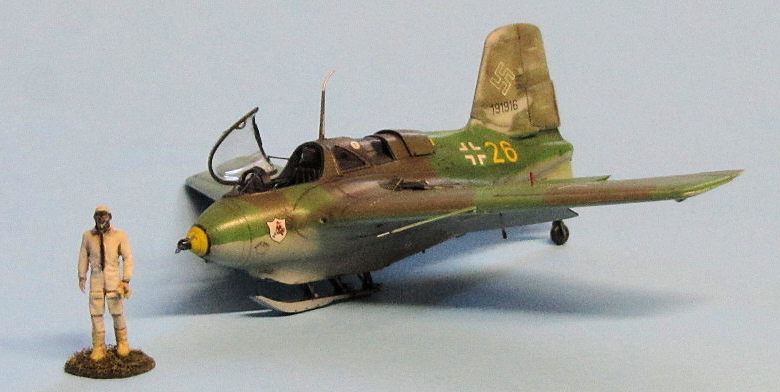
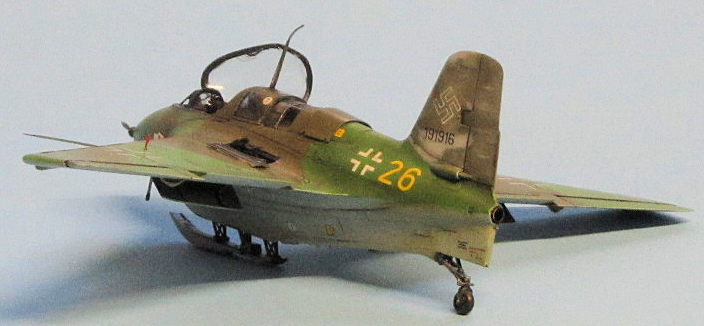
While the kit includes an excellent launch dolly, I delayed assembling and painting it. Then, the more I looked at the almost-finished model on its skid and tilted to one side, the more I liked the look of it like that. You seldom see models of the Me-163 depicted post-flight like this. I acquired GasPatch's own 3D-printed pilot figure, mounted him on a base, and painted him up to stand alongside. He's a bit tall for a German likely given this assignment—six scale feet—but that serves to emphasize the small dimensions of the Komet alongside.
| COLORS & MARKINGS |
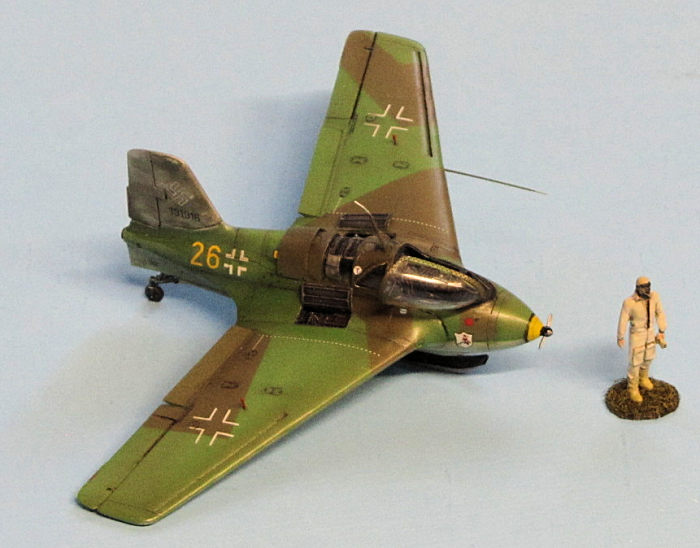
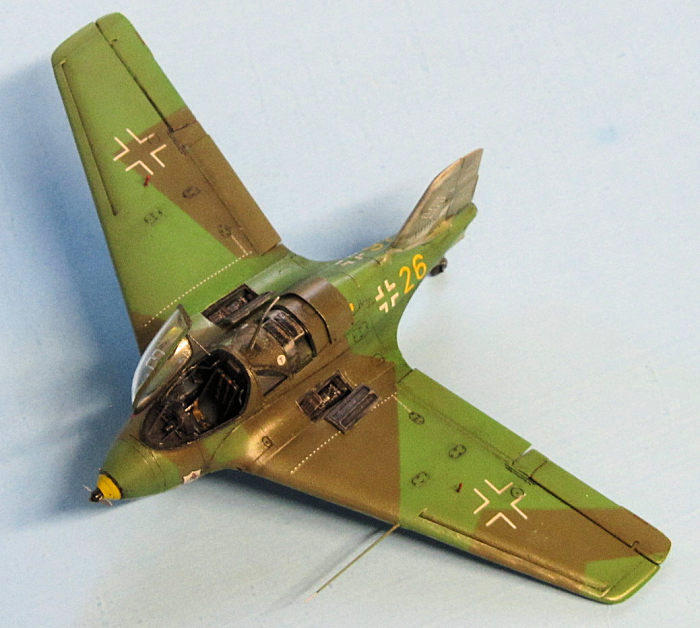
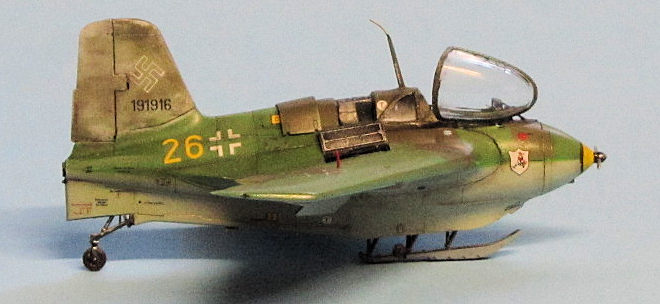
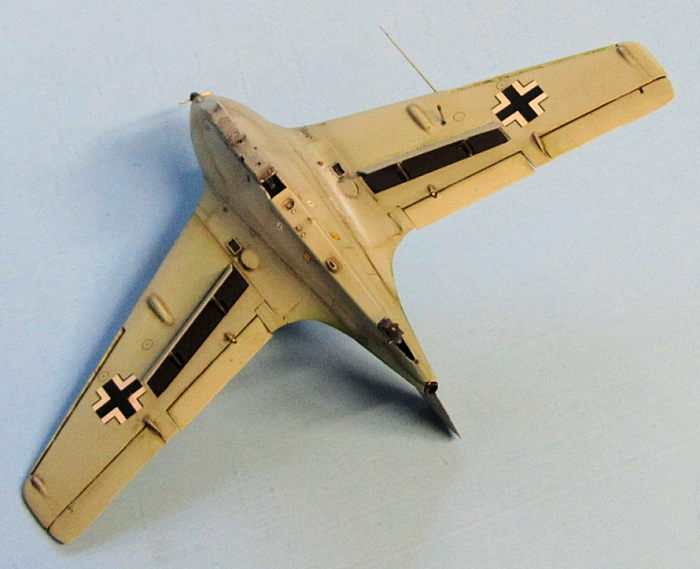
Selecting "Yellow 26" as preserved today in Canada, I primed the model, masked, and airbrushed the RLM 76/81/82 scheme. A gloss coat followed to shield this for decaling and weathering processes. Here a problem cropped up: wartime images of the Me-163 show that the Balkankreuze style and placement varied, especially on the wings. Sometimes they were 'swept' to align with the wing leading edge, or a mean angle between that of the leading and trailing edges. Sometimes it was simply at a right angle to the fuselage centerline. Both two-tone and single-color marking styles were evidenced.
 Yellow 26 was
photographed from a rear quartering view around 1970 in its original colors
before being "blessed" with a repaint,
and the photograph clearly shows the white skeletal style of marking. No
such is included in the decal sheet. Not finding a usable decal of this size
in the decal dungeon, nor wanting to fork over $20 for an aftermarket sheet
for just these two images, I instead turned to a little skill-building and
masked and sprayed them instead. Using MRP-004 Basic White and about thirty
minutes of very careful cutting and masking, paying special attention not
only to proportion and alignment but line thickness as well, I had the job
done in under an hour. I think it looks okay for a first timer’s work...and
it looks so much better than a decal!
Yellow 26 was
photographed from a rear quartering view around 1970 in its original colors
before being "blessed" with a repaint,
and the photograph clearly shows the white skeletal style of marking. No
such is included in the decal sheet. Not finding a usable decal of this size
in the decal dungeon, nor wanting to fork over $20 for an aftermarket sheet
for just these two images, I instead turned to a little skill-building and
masked and sprayed them instead. Using MRP-004 Basic White and about thirty
minutes of very careful cutting and masking, paying special attention not
only to proportion and alignment but line thickness as well, I had the job
done in under an hour. I think it looks okay for a first timer’s work...and
it looks so much better than a decal!
The decals used for the remaining images were all superb, responding well to both Micro Set and Sol. However, the both styles should be included for the price of the kit. Also, the swastikas for the tail are split and the wrong size. This is my sole criticism of the kit. A very light wash and equally light highlighting was applied, reflecting the short clocked flight times typical of a frontline Komet, and it was all locked under semigloss clear. A very enjoyable project was now complete.
| CONCLUSIONS |
 A 1/72 model that
thinks its 1/32! The Greeks, having gifted us the cherished foundations of
democratic civilization, return 2500 years later to expand our modeling
horizons. If you set yourself up with good lighting, magnification, and an
industrial slow-setting adhesive, this is a relaxing and enormously
satisfying build. A truly magical and innovative little kit. I'll get it on
its dolly at some point.
A 1/72 model that
thinks its 1/32! The Greeks, having gifted us the cherished foundations of
democratic civilization, return 2500 years later to expand our modeling
horizons. If you set yourself up with good lighting, magnification, and an
industrial slow-setting adhesive, this is a relaxing and enormously
satisfying build. A truly magical and innovative little kit. I'll get it on
its dolly at some point.
In short, this is the finest and most detailed 1/72 model I have ever experienced. If you don’t mind working in such miniature dimensions, go on—treat yourself!
| REFERENCES |
Plenty out there, plus surviving examples of the aircraft all over the world. I found the following book gave me everything I needed. But it’s sure gotten expensive.
Ranson and Cammann. Me-163 Rocket Interceptor. Crecy Publishing, 2022. ISBN# 978-1906537579
14 October 2025 Copyright
ModelingMadness.com. All rights reserved. No reproduction in part or in whole
without express permission. If you would like your product reviewed fairly and fairly quickly, please
contact
the editor or see other details in the
Note to
Contributors.