Mauve 1/48 Bf-110G-4
| KIT #: | 64780 |
| PRICE: |
$140.00 'used' |
| DECALS: | Three options |
| REVIEWER: | Pablo Calcaterra |
| NOTES: |
A tribute to Arty Lobsinger RCAF |
| HISTORY |
There’s not much to add that most of you don’t know about Schnaufer, being the top scoring night fighter ever with 121 kills in only 164 sorties. Where I want to focus a bit is on his multiple kills during February 20/21 and 21/22 1945 and the involvement of 463 (RAAF) Sqn.
 It is a
very well-known story that Schnaufer shot down two Lancasters during the early
hours of February 20/21st and then taking off during the following night (21st
to the 22nd) he shot down another 7 between 20:44 and 21:03 (some sources add
another Lancaster more he had not claimed to reach a grand total of 9 (10) in a
single day… I am wondering if his actual number of kills should be 122??
It is a
very well-known story that Schnaufer shot down two Lancasters during the early
hours of February 20/21st and then taking off during the following night (21st
to the 22nd) he shot down another 7 between 20:44 and 21:03 (some sources add
another Lancaster more he had not claimed to reach a grand total of 9 (10) in a
single day… I am wondering if his actual number of kills should be 122??
Canadian F/Sgt Art Lobsinger (RCAF) was tail gunner in Lancaster JO-X PD203. Having joined the squadron in November 1944 he completed 19 missions before being invalidated due to the harsh conditions flying so high so cold and with little air during several missions.
F/Lt Martin who went on to complete 23 missions before the end of the war was the captain in Arty’s plane. They flew during the early hours of February 21st during the 8-plane contribution of 463 Sqn to an attack on Gravenhorst. Schnaufer was marauding in the area and shot down two planes but none from the Australian squadron. When an attack to the same target took place during the night of the same day F/Lt Martin’s crew did not take part on this 2nd mission of the day. Two out of the twelve planes sent by 463 did not return: those flown by their Squadron Leader Wing Commander William A Forbes DSO DFC and the one piloted by W/O Hederson. It is assumed that Schnaufer was the pilot who shot them both down. Somewhere I read that after easily shooting down the 7th plane Schnaufer just decided he had done enough killing and for a day and decided to return to his base claiming that the British bombers were up there just waiting to be shot down offering no resistance.
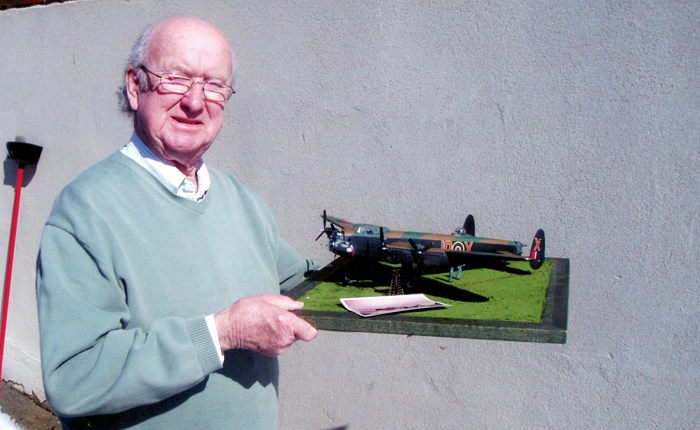
 Our friend
Kelly Breen built F/Lt’s Lancaster JO-X in 1/48 using the Tamiya kit and
presented it to Arty in a great diorama based on a picture of the actual plane
(it was on the news here in Ontario several years ago)
Our friend
Kelly Breen built F/Lt’s Lancaster JO-X in 1/48 using the Tamiya kit and
presented it to Arty in a great diorama based on a picture of the actual plane
(it was on the news here in Ontario several years ago)
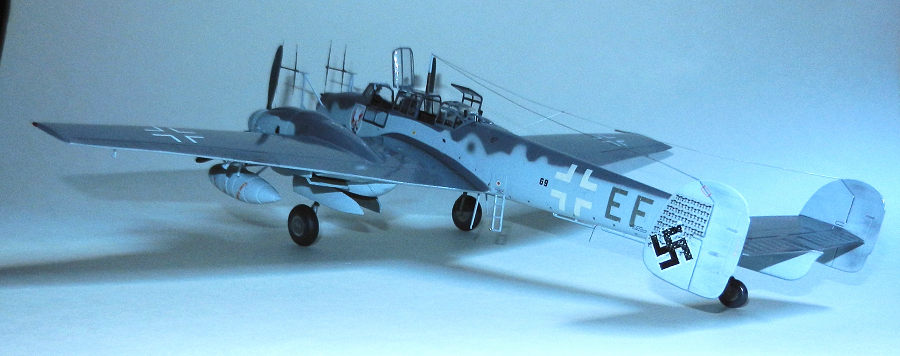
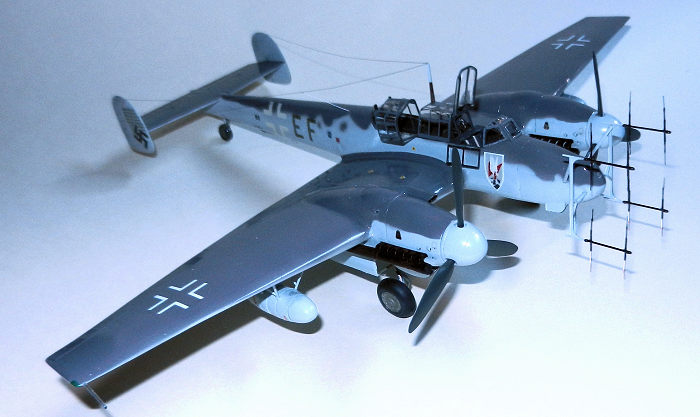
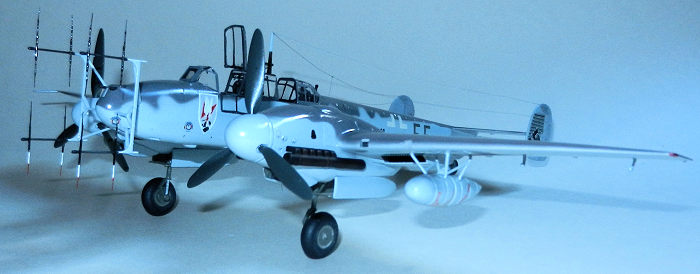
The German’s ace favourite Bf110 G-4 was G9+EF and brought it from NJG1 to NJG4 when he became the leader of this unit. On March 30 1945 during the transfer from Gutersloh to Wunstorf and while being flown by a different crew EF was shot down by an US fighter. Only one of the 3 Luftwaffe members survived the crash. The plane was marked with Schnaufer’s 121 kills.
Pictures of EF show that the plane was highly polished to increase the speed and to be able to catch up the British bombers as the Bf110 had a marginal speed advantage due to the increased weight of the radar associated antennas and ancillary equipment. EF also had the Ebersparcher exhaust covers to streamline the plane and gain speed. Towards the end of the war he decided to eliminate the rear firing guns leaving the front armament and the Schrage Musik guns on the back of cockpit. These were used for his preferred method of attack: from below the unsuspecting bomber.
| THE KIT |
My kit was manufactured in 1992 (purchased in 1994 and only built in 2021). Mauve’s Bf110 G-4 was the only game in town to build a night fighter in 1/48 at the time.
The plastic parts were the old Fujimi kit with no
detail in the wheel bays but it also now had several new sprues to help make the
conversion to the G version. These included rear canopy (in clear), the engine
covers, enlarged vertical tail surfaces, G version nose, main part of the
antenna masts, propeller hubs.
 Because the
sprues had to be repeated to have enough antenna masts and supports you end up
with several parts that went to the spares: a G nose, a couple of vertical
surfaces and engine covers on top of the original parts for the C and D versions
(including propeller hub, propellers, nose, vertical surfaces, rear canopy, tail
wheel).
Because the
sprues had to be repeated to have enough antenna masts and supports you end up
with several parts that went to the spares: a G nose, a couple of vertical
surfaces and engine covers on top of the original parts for the C and D versions
(including propeller hub, propellers, nose, vertical surfaces, rear canopy, tail
wheel).
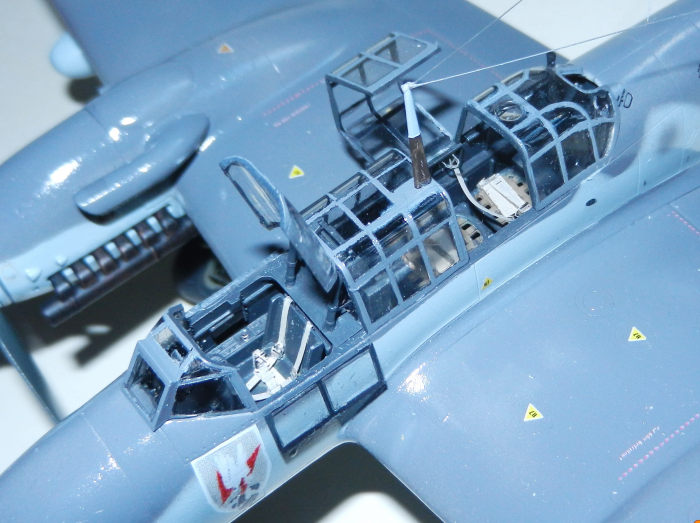
But this was not enough for the conversion and Mauve supplies you with all the interior parts in white metal including also the propellers for the G version and the “bumps” on top of the engine covers plus an exquisite twin machine gun for the rear gunner and the pilot’s gunsight.
Not only that but several PE frets give you all the petit details for the cockpit, gunsight for the twin rear guns, dials, seatbelts and part of the radar antennas among others. To top it up Mauve also gives you metal tubing of different diameters for the main armament and the radar antennas which makes it more accurate to scale that for instance those made in plastic like Promodeller’s.
There are excellent decals for 3 versions and instructions are in Japanese only with a small booklet with pictures of the type (also in Japanese) that can be used as references for the builds. From my point of view and knowing that the Eduard kit is superior Mauve’s is worth every penny due to the nature of the details and different materials offered in the kit.
| CONSTRUCTION |
Before tackling the kit I painfully (almost a full afternoon) translated the instructions and booklet from Japanese into English using an online translator that required scanning all the pages first. And the translation into English was literal with no grammatical correction. So it was like reading something written by Tarzan. I had to try to make sense out of it but I’d say I succeeded in making it in around 80% of the text. As the white metal parts have a somehow grainy surface I first sanded them to give them a smooth look.
 All the
interior parts were primed with Vallejo Light Grey Primer and then painted
according to the instructions. There were absolutely no painful points and
everything “clicks” properly.
All the
interior parts were primed with Vallejo Light Grey Primer and then painted
according to the instructions. There were absolutely no painful points and
everything “clicks” properly.
The nose for the G version is not an exact match for the rest of the fuselage and some sanding and a bit of putty were required. Present in the kit but not in the instructions is a small fairing under the nose (looking backwards). I also had to scratchbuild a rectangular panel under the fuselage between the wings that has 2 rectangles (I am assuming to eject the spent gun cartridges?)
I assembled the wings and added the engine covers (not a good fit requiring putty) leaving the fantastic PE radiator screens and with the radiator fairing made of white metal to be glued later after painting the model. The two white metal “bumps” on the engine covers were glued with cyano (gel) and a bit of putty was needed to improve the union and deliver a smooth transition.
I matched the wings to the fuselage (some putty required in the undersurfaces) and then added the horizontal tail planes (a large gap is present on the spine that required more putty). Finally with the vertical tail surfaces in place the main body was ready for the paint job.
When I realized that the exhausts in Mauve are not
the correct type I was faced with 3 options: ignore, buy a correction set or
modify the white metal and scratchbuild them. Being cheap as I am the last is
the path I took. I cut the “offending” curved parts, sanded the stubs remaining.
But still I did not have the correct length needed for the exhaust covers.
Roaming thru the spares box I found the resin ones from th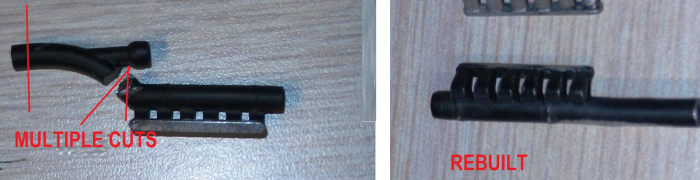 e
Hampden kit I built a couple of years ago. Diameter was perfect! So I cut out
the porcupine areas and added these in between the main white metal and the end
of it. It was a tedious job that required putty, sanding, cyano (that sometimes
did not withstand the sanding and had to start all over again…). But I
prevailed! See pictures.
e
Hampden kit I built a couple of years ago. Diameter was perfect! So I cut out
the porcupine areas and added these in between the main white metal and the end
of it. It was a tedious job that required putty, sanding, cyano (that sometimes
did not withstand the sanding and had to start all over again…). But I
prevailed! See pictures.
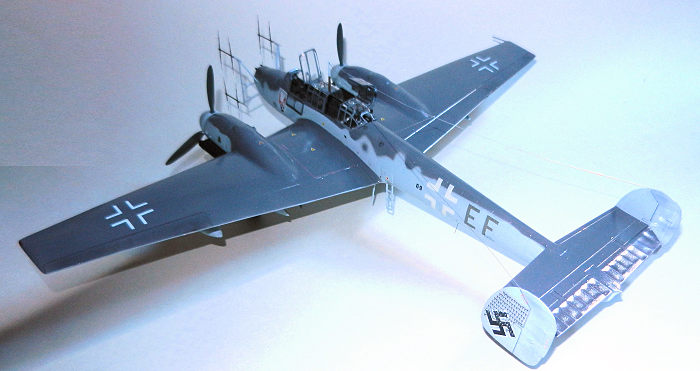
The kit does not have the Schrage Musik guns so I scratchbuilt them. For this I had to drill a couple of little holes in the rear canopy thru the clear part. In order to also be able to see the nice interior of the kit I carefully cut open the access hatch for the two rear cockpit members.
The tubes to make the antennas are very soft and if I was cutting too fast or applying too much pressure that side would somehow collapse and the other tube would not slide in. After a lot of careful measuring and cutting the two wider tubes were matched but the much thinner tips (made of long and very thin metal) would not slide into the smallest of the tubes. Thus I cut the length needed and glued it with cyano. This made the attachment much more fragile. After painting it in black I dipped them in Future for a bit more of extra strength (if that is possible…).
I attached the landing gear and the tail wheel (this one also in white metal). The canopy was painstakingly masked. Foam was used to protect the interior of the cockpit and the wheel wells during painting.
| COLORS & MARKINGS |
Having decided to go for Schnaufer’s plane I found several pictures of EF being pushed into a hangar. These I used as reference and discarded a considerable amount of incorrect information out there regarding the colour scheme. Cutting Edge’s set is the only one that has a proper depiction of the plane and very much matches those pictures that are available on the net. I’d say 95% of profiles on the net and other instructions are incorrect.
I primed the plane again with Vallejo’s Grey and then painted the undersurfaces with their RLM76. Using the pictures I found on line I created a template for the RLM75 demarcation area and the top was given a light coat of Vallejo. Propellers were painted RLM71.
 I had
used some Qtips dirtied with sanded black pastels to dirty the moveable
surfaces and the areas close to the guns. A fine black pencil was used to
highlight the moveable surfaces. A nice couple coats of Future left the
surface ready for decaling.
I had
used some Qtips dirtied with sanded black pastels to dirty the moveable
surfaces and the areas close to the guns. A fine black pencil was used to
highlight the moveable surfaces. A nice couple coats of Future left the
surface ready for decaling.
After removing the masks the canopy parts were dipped in Future, placed on tissue and left to dry overnight. First time I do this after reading it multiple times and the results are great!
For the decals, I went the home-made and cheap (but time consuming) route here. Mauve does not give you Schanufer’s option. Using pictures from the net I created the unique markings for the tail: printed in white decal paper was the swastika with the superimposed kills and in clear decal paper I printed all the other kills around the swastika.
I scanned the E from the Mauve’s sheet and trimmed the lower horizontal part to create an F. To ensure that colour was consistent and then printed my own EF.
The NJG4 badge took considerably more work: I scanned the kit’s NGJ1 badge and playing with PowerPoint I was able to eliminate the black background and create a similar grey colour as the plane’s. Trust me. It took lots of hours to crop, remove backgrounds, put them back, play with the colour, correct the now “erased” lightning…All to save around $35 in decals.
Stencils and all other came from the kit. I added some stencils missing in Mauve’s sheet along with the triangular “ports” (?) on the sides of the engine covers (x4). Another coat of Future sealed the decals.
| FINAL CONSTRUCTION |
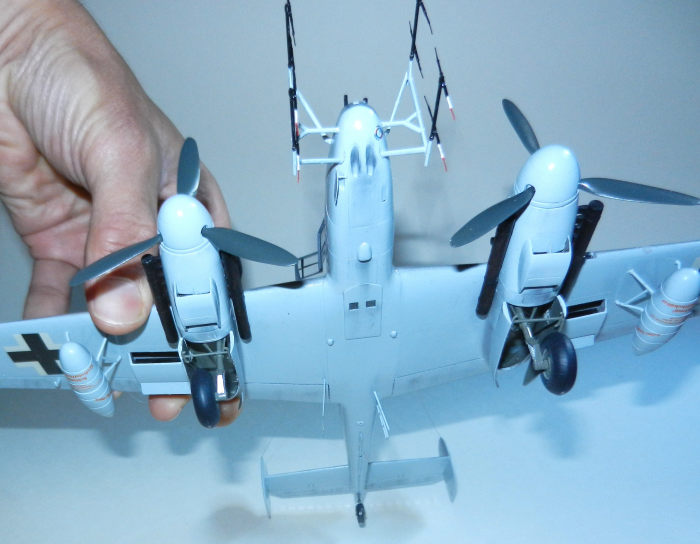
I started to add the details on the undersides from the center of the plane moving out. These included very nice PE antennas, wheels, landing gear doors, ladder, the radiator housings mentioned above and all the other bits you know. The fuel tanks under the wings came from the spares as the ones supplied by Mauve (Fujimi) are undersized.
Flipping the plane after the wheels had properly dried I continued with all the items in the cockpit (radar, Schrage Musik which was really tough to align and put thru the canopy as it was scratchbuilt), gunsight with a piece of clear plastic to represent the reflector portion, windshield with PE handles and rear mirror, different portions of the canopy. Radio antenna was glued with the base painted in MM Acryl wood.
 I
attached the exhausts that include some beautifully detailed screens for the
front end. I drybrushed ModelMaster Rust on the black painted exhausts.
I
attached the exhausts that include some beautifully detailed screens for the
front end. I drybrushed ModelMaster Rust on the black painted exhausts.
After gluing the two guns on top of the nose I added the propellers, propeller hubs. I did not add the beautiful twin gun to the support because it would not have been historically correct for the late version with all the kill marks.
The next complicated part was attaching the antennas. The plastic parts need to be aligned carefully and in fact the ones that instructions call for as lower bracings are too long pushing the antennas outwards in an odd angle. As there are repeated parts (as explained above) I was able to take two extra shorter braces and delivered a much better aligned array.
Navigation lights on the wingtips were painted with my usual method of a silver base followed by Clear Red and Clear Green (ModelMaster Acryl)
With that I had considered the plane done until I showed some pictures to my friend Fabian Vera of Condor Decals and he asked me why I had not added the wiring for the radio…then a couple of nights later I took the plane from the shelf and using brass thing rods painted in silver I added the wiring (extra work dedicated to you Fabian!)
| CONCLUSIONS |
Mauve’s is still very nice kit. If you like multimedia kits and a challenge this could be one to get. It is still available thru eBay. At times it was going for more than $100 but now, with the Eduard kit out there, I have seen it for $50-70…less than half of what I originally paid. I still don’t regret it. I had lots of fun and I really like the finished result.
Dedicated to Arty and his brave young friends. Thanks for the inspiration Kelly!
Pablo Calcaterra Copyright ModelingMadness.com. All rights reserved. No
reproduction in part or in whole without express permission. If you would like your product reviewed fairly and fairly quickly, please contact the editor or see other details in the
Note to
Contributors.