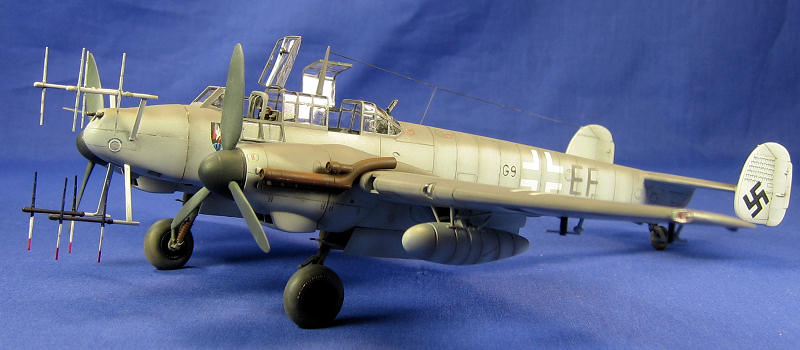
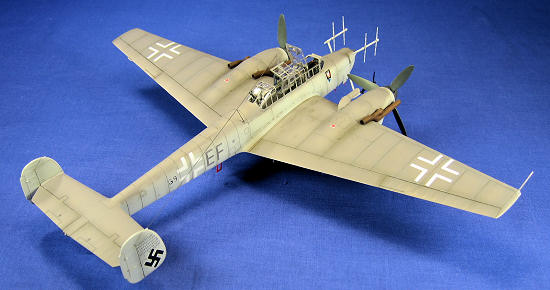
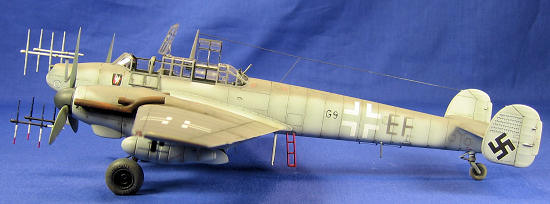
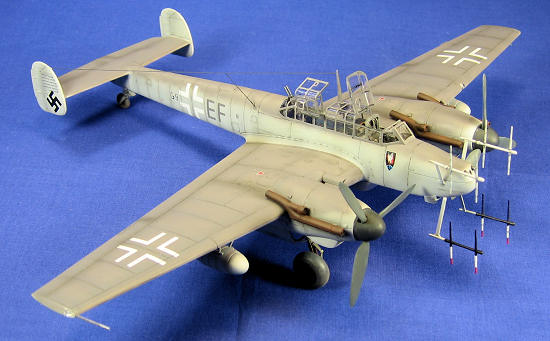
ProModeler 1/48 Bf-110G-4
| KIT: | Hasegawa 1/32 Bf-109G-10 (type 110) |
| KIT #: | 5933 |
| PRICE: | Kit long OOP. Can be found for @ $30.00 |
| DECALS: | Two options |
| REVIEWER: | Scott Lyle |
| NOTES: | Peddinghaus Decals #1291 used. |
| HISTORY |
 A
few years ago I built the Pro Modeler Bf 110G-4 and finished it as one of Willi
Herget’s fighters. When Eduard
announced their new line of Bf 110s promising a higher level of detail and
accuracy, my mouth began to water.
I had been reading about the exploits of Heinz-Wolfgang Schnaufer and decided
that my collection wouldn’t be right without one of his machines.
Figuring any new Bf 110G-4 kit would have markings for one of Schnaufer’s
fighters, I waited. When it arrived
recently with no Schnaufer decals in the mix, I decided to order a set of
Peddinghaus Decals and repaint my old Pro Modeler fighter.
Of course fate will no doubt intervene and the moment I put my newly
re-finished G-4 in the case, Eduard will announce a new version complete with
Schnaufer markings!
A
few years ago I built the Pro Modeler Bf 110G-4 and finished it as one of Willi
Herget’s fighters. When Eduard
announced their new line of Bf 110s promising a higher level of detail and
accuracy, my mouth began to water.
I had been reading about the exploits of Heinz-Wolfgang Schnaufer and decided
that my collection wouldn’t be right without one of his machines.
Figuring any new Bf 110G-4 kit would have markings for one of Schnaufer’s
fighters, I waited. When it arrived
recently with no Schnaufer decals in the mix, I decided to order a set of
Peddinghaus Decals and repaint my old Pro Modeler fighter.
Of course fate will no doubt intervene and the moment I put my newly
re-finished G-4 in the case, Eduard will announce a new version complete with
Schnaufer markings!
| THE KIT |
 While it’s certainly true that I could have
built the new Eduard kit and applied the Peddinghaus decals to get my Schnaufer
machine, the truth is that I just wasn’t ready to part with my Pro Modeler model
so soon. Having built it just a
couple of years ago, I remember it being a very pleasant and rapid build with
excellent detail inside the cockpit, finely recessed lines, and nicely detailed
landing gear and gear bays. That
the engine nacelle shapes have some accuracy issues is well-chronicled, but it’s
not something that bothered me a great deal.
In short, it’s a very nice modern kit, and it was hard for me to justify
scrapping it and spending another $50-60 or so dollars on a new one.
While it’s certainly true that I could have
built the new Eduard kit and applied the Peddinghaus decals to get my Schnaufer
machine, the truth is that I just wasn’t ready to part with my Pro Modeler model
so soon. Having built it just a
couple of years ago, I remember it being a very pleasant and rapid build with
excellent detail inside the cockpit, finely recessed lines, and nicely detailed
landing gear and gear bays. That
the engine nacelle shapes have some accuracy issues is well-chronicled, but it’s
not something that bothered me a great deal.
In short, it’s a very nice modern kit, and it was hard for me to justify
scrapping it and spending another $50-60 or so dollars on a new one.
| CONSTRUCTION |
Construction started with the cockpit as usual,
and since the real thing was designed for three crewmembers, it’s a fairly large
and detailed part of the model. The
instructions strangely tell you to paint all of the interior surfaces black, but
I sprayed everything Testors Acrylic RLM 66 Dark Gray before picking out the
various details by hand. Photo-etch
seat belts from an Eduard color photo-etch set were added to the three seats,
and some paint chipping was done with a Silver Berol pencil to make
 the interior
look a little more weathered. The
rather sinister looking Shrage Musik
guns were installed at this point and then whole cockpit deck was installed in
the fuselage halves, which closed up nicely with very little seam work needed.
the interior
look a little more weathered. The
rather sinister looking Shrage Musik
guns were installed at this point and then whole cockpit deck was installed in
the fuselage halves, which closed up nicely with very little seam work needed.
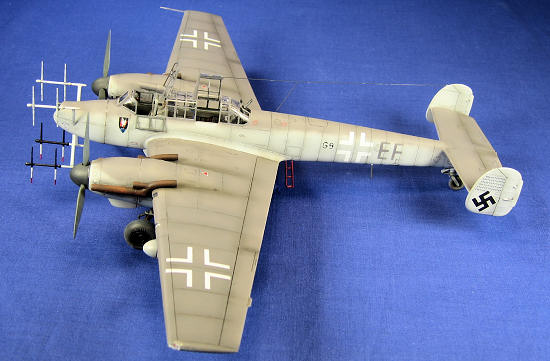
Next up were the engine nacelle assemblies, which sandwich an engine
radiator panel between two halves before being fitted to the wings.
Holes must be drilled in the lower wing halves for the drop tanks, and
once that is done the wing halves are glued together.
Similar to the fuselage, the kit engineering was excellent with only
minor attention need to the seams.
The fit of the engine nacelles to the wings was a bit trickier however and
needed some attention. Similarly
the fit of the wing assembly to the fuselage resulted in a gap that was closed
with gap filling CA glue.
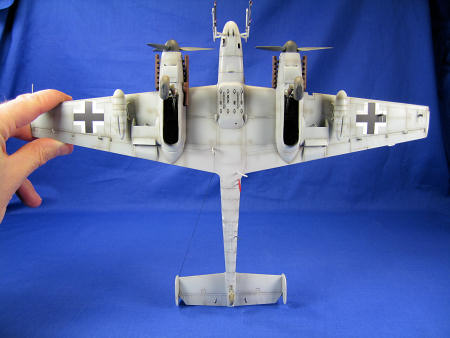
The assembly of the tail plane was next, and that was where one flaw in
the kit was revealed. When the tail
plane was test-fitted to the fuselage, it sat a noticeable angle.
A fair amount of sanding and seam work was needed to make it more level.
At this point the airframe was basically complete, and normally this is where I would say that I attached the canopy sections that weren’t going to be posed open, left off the fragile pointy things like the landing gear, exhausts, props, pitot tubes and antennae, and headed for the spray booth. But since this was a “do-over job”, I actually removed the open canopy sections, props and exhausts in preparation for the upcoming painting.
| COLORS & MARKINGS |
Since the paint scheme I was going to apply was
similar to what already existed on the model, I really just had to repaint and
re-decal the upper surfaces. I
masked off the canopy sections, landing gear and gear doors, and then sprayed a
primer coat of Mr.
 Surfacer 1200 over the existing paint on the upper surfaces.
The panel lines were next pre-shaded with Testors Acrylic Black, and then
Testors RLM 76 Light Gray Blue was sprayed on the fuselage sides.
Once that was dry I sprayed Testors RLM 75 Violet Gray on the tops of the
wings, engine nacelles, tail plane top, and just the upper spine of the
fuselage, coming down far enough to completely cover the canopy sections.
A coat of Future created the gloss finish needed for decaling.
Surfacer 1200 over the existing paint on the upper surfaces.
The panel lines were next pre-shaded with Testors Acrylic Black, and then
Testors RLM 76 Light Gray Blue was sprayed on the fuselage sides.
Once that was dry I sprayed Testors RLM 75 Violet Gray on the tops of the
wings, engine nacelles, tail plane top, and just the upper spine of the
fuselage, coming down far enough to completely cover the canopy sections.
A coat of Future created the gloss finish needed for decaling.
The Peddinghaus decals worked well with Walthers Solvaset, and once they
were set I airbrushed a coat of Future over the whole model again to seal them.
I then followed my usual weathering
procedure. I applied a wash of
50/50 Lamp Black/Raw Umber oil paint to all of the recessed panel lines,
followed by a coat of Testors Lacquer Flat Finish over the whole model, and then
a very thin 50/50 mix of Tamiya Black/Red Brown sprayed over the panel lines,
exhaust areas, and behind the machine guns.
| FINAL CONSTRUCTION |
 The painting basically finished it was time to reattach all of the items
I removed. The exhausts, painted in
Raw Umber and drybrushed to look a little rusty, were reattached first.
The props came next, followed by the canopy sections, with their masking
removed.
The painting basically finished it was time to reattach all of the items
I removed. The exhausts, painted in
Raw Umber and drybrushed to look a little rusty, were reattached first.
The props came next, followed by the canopy sections, with their masking
removed.
Next I added some paint chips around the nose, cockpit, and wing roots using a Silver Berol pencil. My final weathering step was to apply some dirt-colored pastels on the tires and tail wheel to replicate some dust and dirt. I painted the wingtip lights and the model was done.
| CONCLUSIONS |
The Bf 110 soldiered on through the war long after it was supposed to be replaced and by the end, covered with aerials, guns, and exhaust dampers it looked every bit the aged airframe that been forced to carry things it was never meant to carry. The Pro Modeler kit does an excellent job of capturing this, and even though the kit has essentially been made obsolete by Eduard’s new offerings, it’s still a very good kit. If you have one in your stash, I wouldn’t throw it away.
| REFERENCES |
 -
Osprey Publications, Aircraft of the Aces #20, “German Night Fighter
Aces of World War 2”
-
Osprey Publications, Aircraft of the Aces #20, “German Night Fighter
Aces of World War 2”
-
Squadron/Signal Publications, Aircraft in Action #30, “Messerschmitt Bf 110
Zerstorer in Action”
- Squadron/Signal Publications, Walk Around #24, “Messerschmitt Bf 110G”
February 2010
Copyright ModelingMadness.com
If you would like your product reviewed fairly and quickly, please contact the editor or see other details in the Note to Contributors.