ProModeler 1/48 Do-217K
|
KIT # |
4557 |
|
PRICE: |
$26.50 |
|
DECALS: |
See review |
|
REVIEWER: |
|
|
NOTES: |
Koster KAE 32 conversion: $37.95 |
|
HISTORY |
The success of the original DO-17 series led Dornier in 1937 to undertake a project to develop a heavier, long range version range of the airframe to meet an RLM requirement. The subsequent prototypes were designated as heavy bombers and were designed to accept both radial and inline engines in standard power-pods. One unusual additional requirement from the RLM stipulated that the airframe had to be structurally suitable for the high stress and loads associated with high-angle dive bombing.
 These prototypes were flight tested in various
configurations one of which, the DO-217 V9, incorporated a completely new
glasshouse nose and was powered by BMW801 MA radial engines. After being
further modified to support mass production, this version emerged from Dornier
in late 1940 as the DO-217E-1. Combat testing established many shortcomings
in the aircraft not the least of which were the need for additional defensive
armament and armor protection for the crew. Many variants followed during the
period from 1941-42, including several that were specially adapted for night
fighting and night bombing.
These prototypes were flight tested in various
configurations one of which, the DO-217 V9, incorporated a completely new
glasshouse nose and was powered by BMW801 MA radial engines. After being
further modified to support mass production, this version emerged from Dornier
in late 1940 as the DO-217E-1. Combat testing established many shortcomings
in the aircraft not the least of which were the need for additional defensive
armament and armor protection for the crew. Many variants followed during the
period from 1941-42, including several that were specially adapted for night
fighting and night bombing.
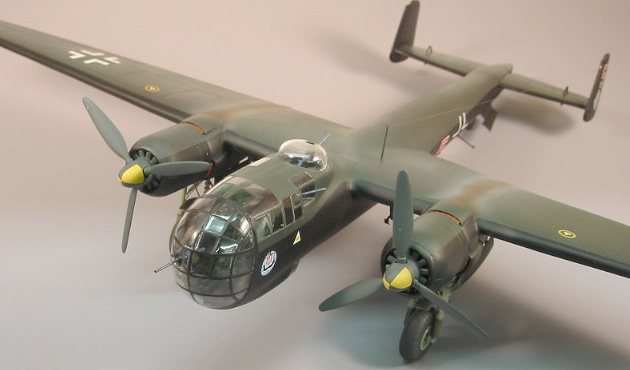
Crews generally viewed the DO-217’s sluggish performance and handling unfavorably (due mainly to substantial additional weight of arms and armor), leading Dornier to redesign the basic night bomber version to accept higher power BMW 801D engines rated for 1700hp at takeoff. The newly modified night bomber was later further adapted specifically to carry the new Fritz X stand-off missile and was designated DO-217k-2. The Fritz carriers had long range fuel tanks installed in the forward bomb bay and were easily identified by their distinctive extended outer wing panels and bulbous glasshouse nose. These heavily modified descendants of the original DO-217 were operated by II-III./KG100 who launched their first attack with the Fritz missiles on August 29, 1943.
|
THE KIT |
Pro-Modeler’s DO-217E kit has been reviewed previously and is in itself an excellent basis for a beautiful, well detailed model. But, never being one to be satisfied with OOB builds, I sought out an interesting conversion and came across Bill Koster’s magnificent K-2/M-11 conversion set. The conversion includes a three piece clear acetate vac-formed replacement nose; vac-formed outer wing extensions; resin, white metal and vac cockpit details; 3 piece vac nacelles for the DB603A powered M version, four blade resin props for the M; a single vac and resin Fritz X missile; and a nicely printed decal sheet with covering two aircraft.
|
CONSTRUCTION |
 I began the project by cutting away the forward nose
section from the Pro-Modeler kit following the instructions provided by Koster.
Following the PM instructions, the upper and lower fuselage/center wing
sections were assembled and the vertical stabilizers were added to this
subassembly. Then, the 2 vertical sides of the glass house nose were
carefully cut from the acetate sheet. I had to find a way to join these
sections using a method that would provide a strong joint without marring
visibility into the cockpit area.
I began the project by cutting away the forward nose
section from the Pro-Modeler kit following the instructions provided by Koster.
Following the PM instructions, the upper and lower fuselage/center wing
sections were assembled and the vertical stabilizers were added to this
subassembly. Then, the 2 vertical sides of the glass house nose were
carefully cut from the acetate sheet. I had to find a way to join these
sections using a method that would provide a strong joint without marring
visibility into the cockpit area.
After considering various options, I cut thin 3m strips of lead foil and attached these to one side of the join to reinforce for the otherwise fragile butt joint. Next, the interior framing of the clear forward fuselage half-sections were hand painted in dark gray and when dry, the two sections were joined using ACC. Dry-fitting established that the nicely detailed cockpit elements could be installed after the new forward fuselage was joined to the rear fuselage/center wing sub-assembly provided that the nose cap was left off until later. Again, ACC was used to join the forward fuselage to the airframe and the joint was carefully blended with several thin coats of Squadron putty, wet sanding and re-scribing of several damaged panel lines.
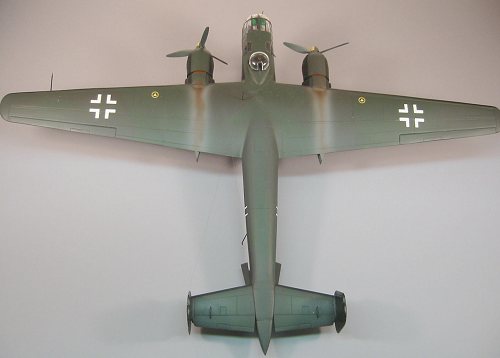
 Attention now turned to the wing extensions. The
carrier sheets were sprayed with gray primer to facilitate the normal sanding
down process associated with Vac-formed kit construction. After being cut
from the carrier sheets, the upper and lower wing sections were assembled with
liquid glue and the joints lightly sanded to produce a smooth set of wing
extensions. At this point I realized that the wing extensions lacked strength
and decided to gently fill the sub-assemblies with insulating foam sprayed
from an aerosol can (be careful not to overfill or the wings will be destroyed
by expansion of the foam!).
Attention now turned to the wing extensions. The
carrier sheets were sprayed with gray primer to facilitate the normal sanding
down process associated with Vac-formed kit construction. After being cut
from the carrier sheets, the upper and lower wing sections were assembled with
liquid glue and the joints lightly sanded to produce a smooth set of wing
extensions. At this point I realized that the wing extensions lacked strength
and decided to gently fill the sub-assemblies with insulating foam sprayed
from an aerosol can (be careful not to overfill or the wings will be destroyed
by expansion of the foam!).
Next, the outer wings were glued to in the fuselage/inner wing assembly, taking care to align the wing outer panels, and again the joints were finished with light putty coats followed by wet sanding.
The cockpit was assembled and painted following the instructions in the Koster kit. It was just possible to slide the finished cockpit into the forward fuselage with a bit of 12 finger engineering. After painting the interior framing dark gray, the nose cap was installed again using minute drops of ACC.
Since I had elected to build the K-2 version using the radial engines, the remainder of the kit was finished following the Pro-Modeler instructions.
|
CAMOUFLAGE & MARKINGS |
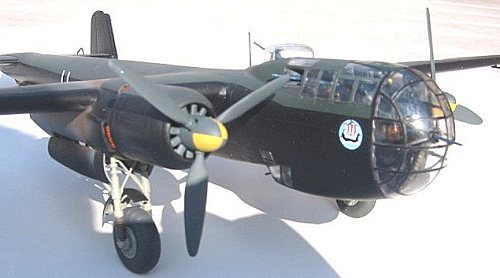
 The kit was painted with Model Master Enamels using a
Pasche double action airbrush. Upper surfaces were finished in the splinter
scheme of 70/71 while the underside was finished in RLM22 black. After basic
color coats, the model was sprayed with Tamiya clear in preparation for
application of the decals. The applied markings are for an example flown by
III/KG 100 in summer 1943. Once the decals had settled down and were
thoroughly dry, a final flat finish was applied. To simulate the heavy
exhaust staining characteristic of the BMW engines, streaks of red-brown and
light gray were applied to the wings.
The kit was painted with Model Master Enamels using a
Pasche double action airbrush. Upper surfaces were finished in the splinter
scheme of 70/71 while the underside was finished in RLM22 black. After basic
color coats, the model was sprayed with Tamiya clear in preparation for
application of the decals. The applied markings are for an example flown by
III/KG 100 in summer 1943. Once the decals had settled down and were
thoroughly dry, a final flat finish was applied. To simulate the heavy
exhaust staining characteristic of the BMW engines, streaks of red-brown and
light gray were applied to the wings.
|
CONCLUSIONS |
This was an interesting and challenging project that was made all the more enjoyable by the need to invest time researching the subject. Patience is needed while cutting, dry-fitting and assembling the new nose and wing components. Due to the multi-media presentation of the conversion, I can recommend this project to experienced modelers who have some experience with assembly of vac-formed kits. The end result is an interesting and pleasing model that looks great on the shelf next to my DO-17, JU-88A-4 and HE-111.
|
REFERENCES |
Warplanes of the Third Reich, William Green, Galahad Books, pp 143-154
April 2003
Copyright ModelingMadness.com. All rights reserved.
If you would like your product reviewed fairly and quickly, please contact the editor or see other details in the Note to Contributors.