| KIT #: | 117 |
| PRICE: | 13.50 Euros at the local shop |
| DECALS: | Two options |
| REVIEWER: | Jeroen Koen |
| NOTES: | 2000 re-release. Aéronavale decals from Bilek No.927 boxing used. |
| HISTORY |
Grenville Davies has already written a very good part on the development history of this machine, so allow me to point to his review of the 1/48 Dragon kit:
http://modelingmadness.com/reviews/axis/luft/gren188.htm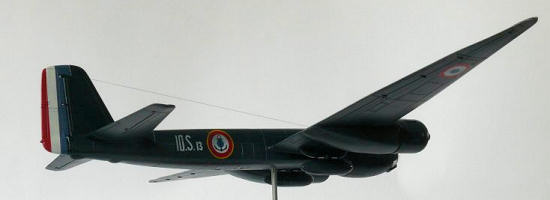 While
the 188 was definitely an improvement over the 88, it was only so by a small
margin. The main shortcomings of the Ju88, the inadequate defensive guns and
small bomb bay, were not addressed. The similarities with the Ju88G meant that
performance was also nearly identical. The issues of the small bomb bay and
defensive armament were not addressed until the development of the Ju388,
which had a decent tail gun and a bigger bomb bay. Up to then, larger
bombs had to be carried externally, seriously degrading performance.
While
the 188 was definitely an improvement over the 88, it was only so by a small
margin. The main shortcomings of the Ju88, the inadequate defensive guns and
small bomb bay, were not addressed. The similarities with the Ju88G meant that
performance was also nearly identical. The issues of the small bomb bay and
defensive armament were not addressed until the development of the Ju388,
which had a decent tail gun and a bigger bomb bay. Up to then, larger
bombs had to be carried externally, seriously degrading performance.
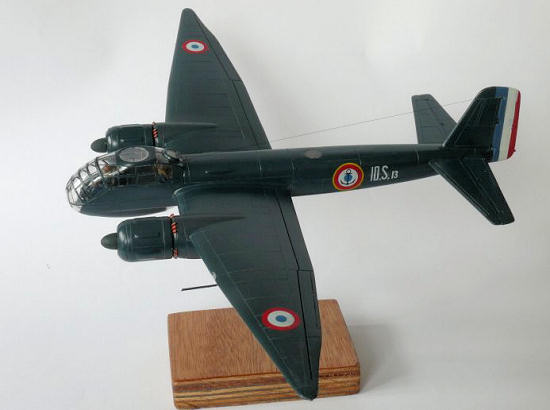
Ju188s were mainly distributed among normal Ju88 units, where they could be used for missions where the better performance would be useful, such as pathfinding/target marking and reconnaissance. Post-war, the French Navy operated about 30 of these, allegedly they were all E and F versions with BMW engines.
| THE KIT |
One of only two 1/72 Ju188 kits available, the other being by Matchbox, this
is a real classic in a new box. It's featured on the cover of a 1974 Italeri
catalogue, so should be at least that old? As such, it has a spartan cockpit,
raised panel lines (and very few of them) and very plain wheel bays. While not
entirely accurate, most noticeably the wing attachment on the fuselage (too
high), 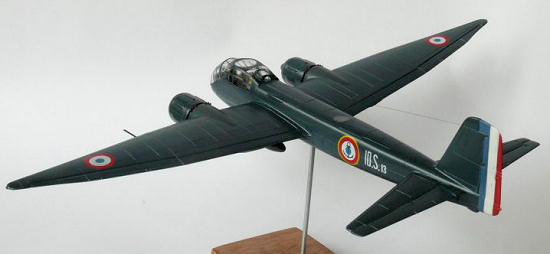 rear
fuselage cross section, smallish wheelbays/gondola's, too-tapered Jumo nacelles
and BMW nacelles without the cooling fan and too-large front opening, I'm not
too concerned with these kind of things... What I can fix, I fix, what I can't,
I leave alone. The clear parts, while thick, look good and clear. The framing is
a bit on the heavy side, though. Bomb racks and bombs, as well as both Jumo 213
(for the A/D series) and BMW 801 nacelles (for the E/F series) are included.
rear
fuselage cross section, smallish wheelbays/gondola's, too-tapered Jumo nacelles
and BMW nacelles without the cooling fan and too-large front opening, I'm not
too concerned with these kind of things... What I can fix, I fix, what I can't,
I leave alone. The clear parts, while thick, look good and clear. The framing is
a bit on the heavy side, though. Bomb racks and bombs, as well as both Jumo 213
(for the A/D series) and BMW 801 nacelles (for the E/F series) are included.
A rather small and plain black and white decal sheet is included for 2 versions, one is the box art E-1 version in RLM76 over black, with RLM75 squiggles (apparently this one is KG66, though no mention made in the instructions), the other a KG200 (unit code A3) Jumo213 equipped A-1. The latter is given as green over grey, although I'd bet it was in standard RLM70/71/65 splinter camouflage? No stencilling is provided, just 6 German crosses and a few unit codes for the KG200 option. No swastika, either.
[edit] 9-5-2010: at the time I'm finalizing this review, Hasegawa is about to release their 1/72 Ju188A/E. I've pre-ordered it already!
| CONSTRUCTION |
My attention was drawn to this kit because of the box art scheme. I'd really
wanted to try that squiggle pattern on a cheap kit, and this seemed to fit the
bill. However, the more I looked at it, the more I thought, hmmm... hmmmm...
Taping the main parts together I was struck by how elegant the 188 looks in
flight, compared to sitting on the ground, with it's stalky main gear. So in
flight it 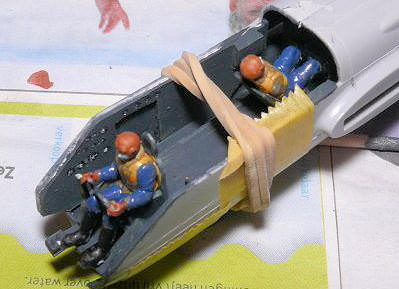 would
be. The cockpit looks like no 188 ever did, so I searched the internet and found
a few good pictures of Dragons 1/48th kit; as well as the instructions for
Eduards PE-set for the Italeri kit. Using scrap plastic I attempted to scratch a
cockpit, using a few spares box items. I also dressed up the guns, which
themselves look pretty good, actually! As the figures that came with the kit are
the pretty sad looking, protecting their goods, types, I robbed an
Italeri Do217K of them, these have separate poseable arms and look a lot better.
A brush painted coat of Humbrol Panzergrau (to go for RLM66), a bit of dry-brush
and washing with black, and I was sort of satisfied. Cockpits aren't really my
thing, I guess, but after adding the crew it looked a lot more lively. As I did
not know what version to make, I left the weapon stations alone for now.
would
be. The cockpit looks like no 188 ever did, so I searched the internet and found
a few good pictures of Dragons 1/48th kit; as well as the instructions for
Eduards PE-set for the Italeri kit. Using scrap plastic I attempted to scratch a
cockpit, using a few spares box items. I also dressed up the guns, which
themselves look pretty good, actually! As the figures that came with the kit are
the pretty sad looking, protecting their goods, types, I robbed an
Italeri Do217K of them, these have separate poseable arms and look a lot better.
A brush painted coat of Humbrol Panzergrau (to go for RLM66), a bit of dry-brush
and washing with black, and I was sort of satisfied. Cockpits aren't really my
thing, I guess, but after adding the crew it looked a lot more lively. As I did
not know what version to make, I left the weapon stations alone for now.
Raised panel lines, as on this kit, are really OK for me. However, there were
so few of them, ma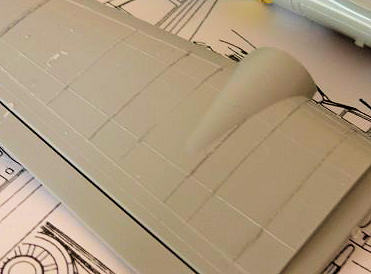 king
it look very bland and slick, I took the plunge and did the re-scribe thing.
Spread over a few evenings, I used dymo tape as a guide, and used a needle in a
pin vise to scribe all the panels. Not sure if I ever do that again, as the
results look acceptable, every single badly corrected slip-up will show later!
king
it look very bland and slick, I took the plunge and did the re-scribe thing.
Spread over a few evenings, I used dymo tape as a guide, and used a needle in a
pin vise to scribe all the panels. Not sure if I ever do that again, as the
results look acceptable, every single badly corrected slip-up will show later!
I then shoved the cockpit in, assembled the wings and nacelles, and glued the fuselage halves together. After that, I attached the wings and tail, using a jig of tins and scrap plastic. The separate rudder and elevators were glued in a slightly deflected position.
After the Italeri A-6 I was rather surprised, the parts fit very well and seams only needed a light and a very small amount of filler and sanding, mostly on the nacelles, and a bit of re-scribing lost panel lines, of course.
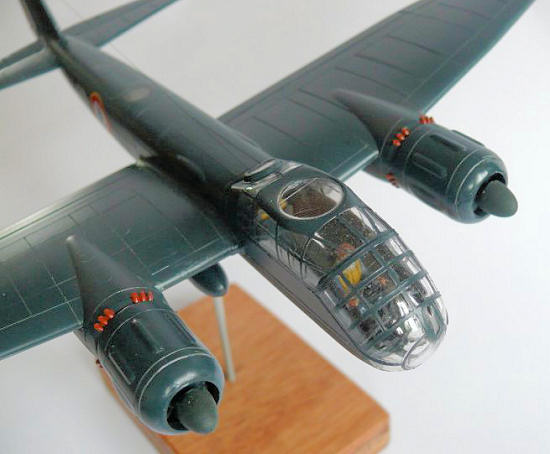
Then I realized I wanted to make the prominent star-shaped Peilgerät antenna on the top of the fuselage, aft of the cockpit. This looks like a spoked bicycle-wheel under a plexiglass cover. So I cut a square out, drew that over the cover of a CD-case, and used plastic rod and copper wire to make the antenna. The clear plastic was then sanded into the shape to blend in the fuselage contours.
Three times.
Because of dust getting under.
Because I sanded too far.
Because the glue let loose.
After that ordeal and subsequent polishing was over, I went to the next. I cut a circle mask (quick to write, but have you ever tried cutting a decent circle without a circle cutter...? ) and masked the appropriate area off. I still wasn't sure on what version to do, but as there are a few differences in armament, I had to choose first before closing up the cockpit.
Not ready to choose yet, I turned my attention to the nacelles. I'd first wanted to make a Jumo engined version, but the more I looked at the nacelles, the more I found they looked too tapered. The propeller blades also looked too skinny.
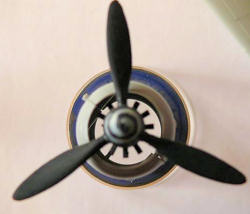 So I
turned my attention to the BMW radial nacelles, which aren't without problems
themselves, but these are fixable using some basic skills and some scrap parts.
Basically they're the same as the front end of an Fw190, so the propeller,
spinner and fan blades should look a bit like that. The fan blades are missing,
the spinners are
So I
turned my attention to the BMW radial nacelles, which aren't without problems
themselves, but these are fixable using some basic skills and some scrap parts.
Basically they're the same as the front end of an Fw190, so the propeller,
spinner and fan blades should look a bit like that. The fan blades are missing,
the spinners are
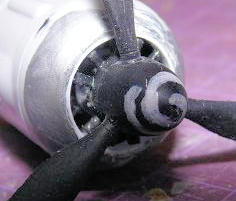 too
bulbous and the propeller blades too skinny. Fortunately I have a few crashed
1/72 Fw190s so I robbed a Revell and Hasegawa 190 of their propellers, spinners
and cooling fans. Curiously, the fan of both Hasegawa and Revell 190s is much
smaller than the opening on the Italeri nacelles. After a bit of measuring I
added layers of narrow plastic card in the opening until they were about Ø10,5mm
(give or take a bit...) A ball-point wrapped in sandpaper turned out to be about
that, so they were then sanded round on the inside, and the outsides filled and
sanded in shape. A small fix with quite a visual impact, when coupled to the
Revell spinners and propellers. I'm not sure if the propellers are the same on a
Focke Wulf and Junkers, but they quite look like the part when comparing with a
few pictures. Of course you can also buy the AIMS corrected BMW engine fronts +
fan blades if you don't fancy doing this yourself, or rob an Italeri Do217K of
them, which does mean you'll have to make up something for that kit, later...
Finally, I drilled out the exhausts peeking out of the nacelle.
too
bulbous and the propeller blades too skinny. Fortunately I have a few crashed
1/72 Fw190s so I robbed a Revell and Hasegawa 190 of their propellers, spinners
and cooling fans. Curiously, the fan of both Hasegawa and Revell 190s is much
smaller than the opening on the Italeri nacelles. After a bit of measuring I
added layers of narrow plastic card in the opening until they were about Ø10,5mm
(give or take a bit...) A ball-point wrapped in sandpaper turned out to be about
that, so they were then sanded round on the inside, and the outsides filled and
sanded in shape. A small fix with quite a visual impact, when coupled to the
Revell spinners and propellers. I'm not sure if the propellers are the same on a
Focke Wulf and Junkers, but they quite look like the part when comparing with a
few pictures. Of course you can also buy the AIMS corrected BMW engine fronts +
fan blades if you don't fancy doing this yourself, or rob an Italeri Do217K of
them, which does mean you'll have to make up something for that kit, later...
Finally, I drilled out the exhausts peeking out of the nacelle.
Being in-flight, I didn't bother with the landing gear, though a dry-fit showed a decent fit. At one point I'd thought about doing the model in take-off while the gear is retracting. This was made easier by the fact that the rear gear doors, normally closed on the ground, are separate also. Unfortunately the gear wells are both too narrow and not deep enough to even fit the wheel, so I left that idea alone. As usual with gear up models, the door shapes hardly look like the openings they're supposed to fit in, so out came the card, filler and heavy-duty sanding.
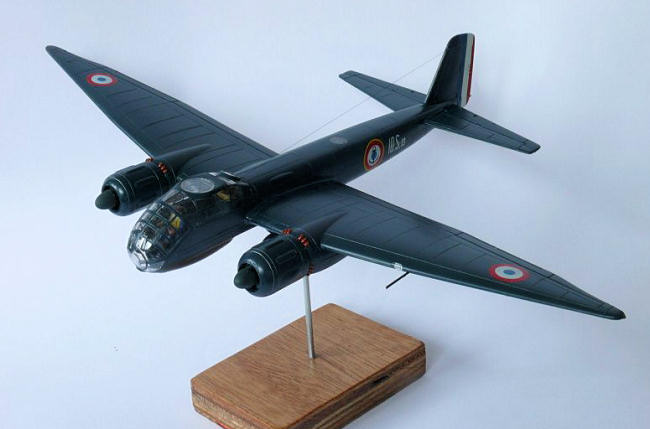
By this time I had somehow cheaply E-bayed a Bilek boxing of this kit from the UK. Bilek boxed this particular one as an F-2 or E-1, thus both are BMW engined versions. The plastic still is the same as Italeri, so you get Jumo's, too, though no decals for that are included. I particularly liked the French Aéronavale option in overall blue. Being an F-2 reconnaissance-version, Bilek instructs you to how to make the camera openings and make your own drop tanks from the SC250 bombs. It also turned out this version was unarmed, allowing me to close up the cockpit, and saving a lot of scratch building on the turret and gun stations in the process. Due to poor packaging, the turret was quite broken. Even better, no guns to knock off during further handling, too, with me being my usual clumsy self! I also removed the bottom gunner (no more guns to operate), and the bombardier, making it just a crew of two.
The clear parts fit quite well, only needing a tiny amount of filler on the
bottom. As the Aéronavale-version also did not have the top turret, I cleaned up
the cover for that. Bilek doesn't tell you if that was clear, or pa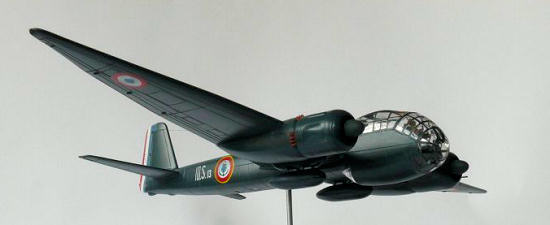 inted
blue... Figuring that painting a clear cover blue later would be easier than
making a blue one clear, I left the cover off until after painting. It's easier
to simply stuff the opening, than to mask the circle. Unfortunately, I didn't
realize at this time the D and F reconnaissance versions had extra glazing under
the nose, and also did not have the protrusion for the bomb sight. I found out
too late for my build, but don't tell me you didn't know, now!
inted
blue... Figuring that painting a clear cover blue later would be easier than
making a blue one clear, I left the cover off until after painting. It's easier
to simply stuff the opening, than to mask the circle. Unfortunately, I didn't
realize at this time the D and F reconnaissance versions had extra glazing under
the nose, and also did not have the protrusion for the bomb sight. I found out
too late for my build, but don't tell me you didn't know, now!
I cut out the camera openings in the rear fuselage as per dimensions from the Bilek instructions and went looking for pictures of French post WWII 188s to see how the gun openings looked. I could not find any showing these, so made an educated guess. I stuffed the openings with foam, and decided I'd fill the openings where the guns normally protrude with Clearfix after painting to simulate clear perspex covers. I can't imagine they were flown with all these holes in the cockpit!
Then I sanded off the bomb bay lines and re-scribed 2 squares with a few circles, as happened mostly on reconnaissance versions, the Rustsätze to use these as fuel tanks were fitted, so I assumed they were on this one, too. Sometimes external tanks were fitted too, for even more range.
I then turned to making these fuel tanks, because I found my Junkers needed a bit of loadout. It's not likely the French needed that much range, in addition to the extra internal fuselage tanks, and they would probably not have been used. Bilek instructs you to assemble 2 250kg bombs provided with the kit, and remove the fins. I did that, but they looked too skinny compared to pictures. In my spares box I found a pair of Heller P-51 paper drop tanks which I sanded smooth and made the ends more pointed, and the tips more blunt. These were then set aside, while I concentrated over a few evenings on that most relaxing of jobs: masking the greenhouse with individual strips and pieces of Tamiya tape.
Then it was off to the paint shop!
| COLORS & MARKINGS |
As I'd checked the seams for warts already (and corrected any found), I went straight for the final colour. I had an old tin of Humbrol Authentic Gloss Sea Blue for that. The colour is really a guess as well, Bilek tells you to use French Blue .... their colour side illustration shows it to be the same colour as the fin tricolour. The few pictures I had indicated a darker shade than that, and since the Aéronavale operated F6F, F4U and F8Fs that were all GSB, I guessed they would have a few cans on hand? The Humbol paint, old as it was, went on very smooth. As I went for a nice, clean post-war aircraft I didn't pre-shade. Well, nice, clean and shiny it was... and big, and blue, and boring! Hoping the decals would change that, I applied those. Usually Italeri decals are of good quality, so I hoped the Bilek ones, printed by MPD, would be, too! After taking ages to come off the backing, they handled pretty well, however, as I feared, the white is not opaque enough. They're also very thin and tear easily -if you handle them like your standard Eastern European decals, you'll be OK. I've used worse! I used Daco Medium decal setting on them and to my surprise they settled down very well in my scribed trenches, errr, panel lines.
 My only
complaint on the decals is their accuracy, when looking at the pictures of the
French machines in the AJ press book (page 32) the style of lettering is
different, and there appears to be white(?) text on the tail too, that's not
present on the sheet. As I got mine cheaply off E bay it's not really a problem
for me, but if you fancy a blue 188 yourself you might check it first?
My only
complaint on the decals is their accuracy, when looking at the pictures of the
French machines in the AJ press book (page 32) the style of lettering is
different, and there appears to be white(?) text on the tail too, that's not
present on the sheet. As I got mine cheaply off E bay it's not really a problem
for me, but if you fancy a blue 188 yourself you might check it first?
As usual the rudder tricolour would not cooperate. Why I even bother to try these, I don't know, since every single one I've used so far I ended up either needing touch-ups, or discard the decals entirely, and painting them on. I ended up doing the latter. FYI, Humbrol 96 Blue is a good match for the blue of these decals. The red is Xtracolor Insignia Red. After painting the tricolour was done, I repaired some areas where the tape had peeled some paint and fixed some white overspray.
It still looked big, blue and boring... while I normally don't post-shade on an already decalled model due to my clumsy skills (my Badger 150 isn't really the problem!) I had to do something. The Humbrol GSB also looked much more greenish than the Xtracolor GSB I had on my French F4U7 Corsair. Unfortunately the Xtracolor was out of stock or I would have used that in the first place.
I found a very old bottle of Polly S Non-specular Sea Blue, that is a bit lighter and more blue. Carefully working the panels and mostly around the decals, I post-shaded the Humbrol. That turned out to be quite subtle and changed the overall impression more towards blue -I liked the result, even though I spent quite a few hours doing it, but hey, isn't that what modelling is about?
When I was satisfied I glossed the model (the Humbrol is gloss already, but the Polly S is matt) and applied a stone grey panel line wash, my usual Revell Aqua mix with water and dishwasher liquid. When satisfied I satin coated the model, as the gloss was too much for even my eyes.
That was when I kind of lost interest in the kit. The satin completely obliterated my post-shading, turning everything blue -even though you can still see a bit of colour difference, it's too subtle for even my taste! With all the time and effort expended already I'd figured I'd just go ahead and finish it. Final airbrushing was the exhaust stains, which I kept subtle and used highly diluted Humbrol Panzergrau with a bit of brown mixed in for these. It's a post war machine, so I didn't weather it further.
| FINAL CONSTRUCTION |
Not much left to do after that, really: attached the engine nacelles,
repaired a broken off sway brace from one of the bomb racks, attached the tanks
to these, eagerly removed all that greenhouse masking (Yes! Succes!), put in the
clear top and filled the
 openings
that were supposed to be glass with Humbrol Clearfix. I then attached the pitot
tube, landing light, removed the cooling fans and filled the propeller holes in
the Revell and Hasegawa spinners (I only had one usable of each, see if you can
spot which is which!) , and painted these RLM70 and attached them with
superglue.
openings
that were supposed to be glass with Humbrol Clearfix. I then attached the pitot
tube, landing light, removed the cooling fans and filled the propeller holes in
the Revell and Hasegawa spinners (I only had one usable of each, see if you can
spot which is which!) , and painted these RLM70 and attached them with
superglue.
I'm just not really a fan of either blades standing still, or clear disks, and prefer to simply cut the blades off and fill the holes in the spinner. The RLM70 is just a guess, they could have been blue too, but I liked the difference in colour.
As usual, I took a beer, made some photo's and called her done.
Well...almost.
Being in-flight she needed a stand, too! I used thick wire from a metal coat hanger, drilled a hole in the bottom near the centre of gravity and also drilled a hole in a small block of multiplex. I then glued the stand in both Junkers and wood. Finally I stained the wood with a natural colour, both for looks and a bit of protection. There, all done! Well, almost, as I'm not really happy with the sides of the multiplex and will probably replace it with a nicer piece of wood in the future. Perhaps. Hopefully. More likely not.
So, for now, cheers!
| CONCLUSIONS |
What started as an out of the box build to practice the squiggly paint scheme on, turned out a lot more involving, with the scratch build cockpit and rescribing, and, on top of that, I even skipped the squiggles! I'm not sure if I would do the rescribing again, though, as it's very hard to do right, especially to correct slip-ups. Both out of the box, and with a few modifications, Italeri's Ju188 still makes into a decent model. Of course there are the mentioned accuracy issues that may prevent you from building one, on the other hand, the soon-to-be Hasegawa will probably resolve that, but likely at a cost. If you like options and fancy paint schemes (there are a lot of cool German ones out there, too, with sheets from e.g. Begemot and AIMS) you can always build more out of the box -they're getting cheap on E-bay with the announcement of the new Hasegawa kit. I know I will!
| REFERENCES |
AJ press Monografie Lotnicze no 34: Ju188/388 by Robert Michulec
A few photo's turned up thanks to Google images search.
Eduard PE instructions downloaded from their website.
May 2010
Copyright ModelingMadness.com. All rights reserved. No reproduction in part or in whole without express permission from the editor
If you would like your product reviewed fairly and quickly, please contact the editor or see other details in the Note to Contributors.