Revell 1/32 Ju-88A-1
| KIT #: | 4728 |
| PRICE: | @$61.00 |
| DECALS: | Three options |
| REVIEWER: | Francisco Santoro |
| NOTES: | Throttle quadrant doesn't fit on its intended place. Rudder pedals interfere with the placement of the nose transparency. |
| HISTORY |
"The Ju 88's career began with an invitation
to Tender from the RLM for a fast bomber. After the first prototype many
modifications were made including more powerful engines and a stretched fuselage
with a newly designed nose area. This, the second prototype, took to the air on
2nd February 1938. In March 1939 the 5th prototype Ju 88V-5 had already achieved
the first international FIA World Speed Record for a 1000km closed circuit flown
between Dessau and the Zugspitze, Germany's highest mountain with a 2000kg
payload. 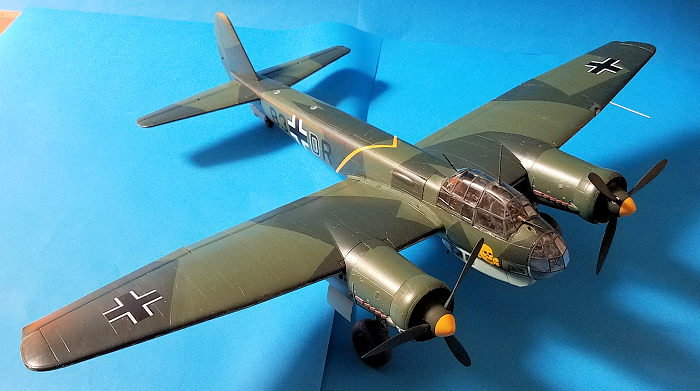 The
Ju 88 achieved an average speed of 517km/h, a speed most fighters of the time
couldn´t achieve! Series production started with the Ju 88A-1. In order to
comply with the requirements of the RLM, which requiered the Ju 88 to be used
also as a dive bomber, the production aircraft was equipped with dive brakes
under the wings. In service these quickly turned out to be the Achilles Heel of
the Ju 88. After dive bombing attacks it soon became apparent that the wings had
warped under the load of deployed dive brakes. As a result, dive bombing attacks
at an angle greater than 50° were forbidden. At the same time, Junkers began
work on a new wing which as well as a greater wingspan also received curved
wingtips. Until now, the wing and ailerons lay completely open at the tips. This
new wing was soon introduced onto the production lines and the remaining
aircraft were fitted retrospectively. Together with some smaller modifications
the model was continued as the Ju 88A-5. It was in effect an interim measure
prior to the already planned Ju 88A-4.
The
Ju 88 achieved an average speed of 517km/h, a speed most fighters of the time
couldn´t achieve! Series production started with the Ju 88A-1. In order to
comply with the requirements of the RLM, which requiered the Ju 88 to be used
also as a dive bomber, the production aircraft was equipped with dive brakes
under the wings. In service these quickly turned out to be the Achilles Heel of
the Ju 88. After dive bombing attacks it soon became apparent that the wings had
warped under the load of deployed dive brakes. As a result, dive bombing attacks
at an angle greater than 50° were forbidden. At the same time, Junkers began
work on a new wing which as well as a greater wingspan also received curved
wingtips. Until now, the wing and ailerons lay completely open at the tips. This
new wing was soon introduced onto the production lines and the remaining
aircraft were fitted retrospectively. Together with some smaller modifications
the model was continued as the Ju 88A-5. It was in effect an interim measure
prior to the already planned Ju 88A-4.
The first real test of the Ju 88 was the Battle of Britain, which began on the "Eagle Day" on August 8th 1940. As well as KG 30, only part of KG 51 was equipped with the Ju 88. After initial successes of units operating from airfields in France, the shortcomings of the Ju 88 against British fighters led to such heavy losses that missions were transferred into the night The experiences hereby gained flowed immediately into production and turned the Ju 88 into one of the most successful German aircraft."
| THE KIT |
11 sprues of light grey plastic and one in clear come inside a big top opening box which Revell uses for its heaviest models. Instructions are of the old Revell style of cheap paper with sometimes vague placement indications.
The huge decal sheet has markings for three aircraft:
Junkers Ju 88A-1 B3+DR of 7th Staffel/KG54, France, September 1940, Ju 88A-1 4D+FL of 3rd Staffel/KG30, France, 1940, and Ju 88A-1 U4+TK used for testing the navigation system "Knickbein" in Norway, April 1940. All the options are painted in RLM 70/71/65.
| CONSTRUCTION |
 I began by
painting all the cockpit pieces on their sprues with Revell 78 Tank Grey (RLM
66). This took me a lot of time since the parts were scattered between the 12
sprues, so by the end of the day I had painted most of the cockpit parts, but
glued none. The next day, I began building the kit by glueing multiple little
pieces to the cockpit's sidewalls. I then glued the ammo holder to one of the
wingspars, and built the radio equipment. Then, I tried building the
bombardier's seat, and after doing so, I attempted to glue it in place, but the
instructions were vague at best regarding its placement, so I left it off. I
then built the pilot's seat and the control column, which were glued to the
floor of the cockpit. After that, I built the rudder pedals, but these don't
have a positive attachment point to the cockpit floor.
I began by
painting all the cockpit pieces on their sprues with Revell 78 Tank Grey (RLM
66). This took me a lot of time since the parts were scattered between the 12
sprues, so by the end of the day I had painted most of the cockpit parts, but
glued none. The next day, I began building the kit by glueing multiple little
pieces to the cockpit's sidewalls. I then glued the ammo holder to one of the
wingspars, and built the radio equipment. Then, I tried building the
bombardier's seat, and after doing so, I attempted to glue it in place, but the
instructions were vague at best regarding its placement, so I left it off. I
then built the pilot's seat and the control column, which were glued to the
floor of the cockpit. After that, I built the rudder pedals, but these don't
have a positive attachment point to the cockpit floor.
I then built the left cockpit sidewall. From my experience with my first 32nd Ju 88 of Revell, I knew the throttle control piece wouldn't let me attach the left sidewall into its proper place, so it was left off. I then glued this cockpit sidewall to the left fuselage half, and went to work on the tailwheel well and tail wheel assemblies.
The tailwheel well is made up of three
bulkheads, all painted in RLM 02 (Revell 45 Olive Green), which were glued to
the right fuselage half. The tailwheel was then built up and glued to the first
bulkhead. I also built the
 retraction
mechanism (also painted in RLM 02) and glued it in place. I then ended this area
by glueing the horizontal stabilizers's wingspars.
retraction
mechanism (also painted in RLM 02) and glued it in place. I then ended this area
by glueing the horizontal stabilizers's wingspars.
After that, I glued a clear part to the left fuselage side (part I39), and after that, the fuselage halves were glued together. I also added the roof of the fuselage, and left that to dry. While that was driyng, I began building the wings.
The wings are a top and bottom assembly. Before glueing them, you have to open the holes for the dive brakes. After glueing the wings, I began building the wheel wells of the main landing gear. These are painted in RLM 02 (Revell 45). I then glued the landing gear wells, and left them to dry while I worked on the ailerons and flaps. It's at this stage (step 59), that you're told to install the dive brakes. Don't do that, since you have to install first the underwings Iron Crosses. I glued the ailerons and flaps to the wings, built up the vertical and horizontal stabilizer and glued them in place. I then glued together the engine cowlings and glued the radiator faces to them, and then glued them into the wings.
| COLORS & MARKINGS |
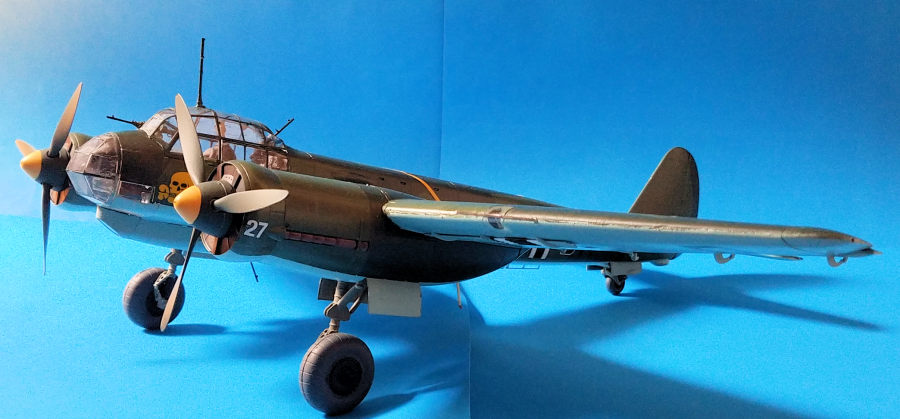
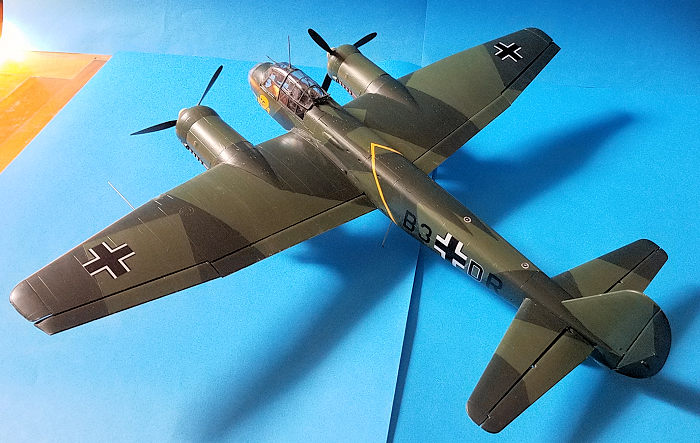
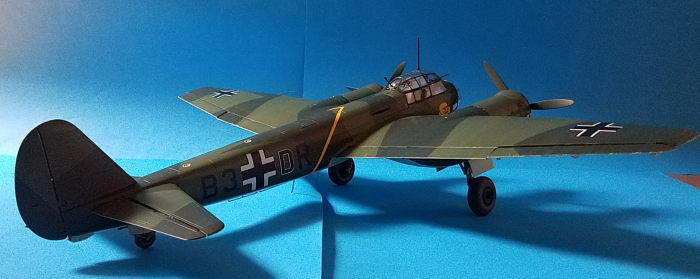
I had decided to paint my model as the Ju
88A-1 B3+D3 of the Battle of Britain. I painted first the RLM 70 (Revell Black
Green 40) and then the RLM 71 (Revell Dark Green 39), while the undersides were
painted with RLM 65 (Revell 49 Light Blue). I then coated the aircraft with
Revell's gloss varnish. For the first time, I had is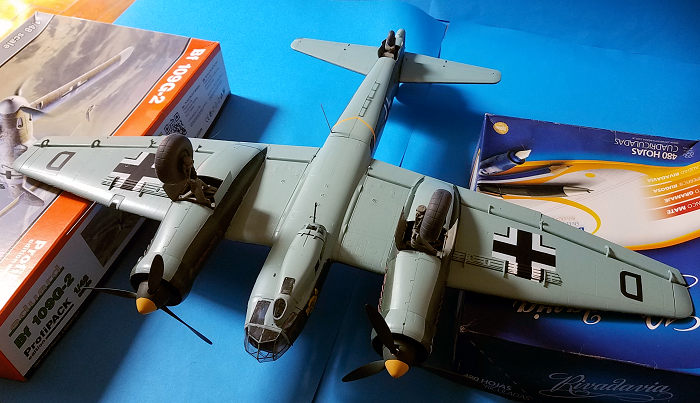 sues
with Revell's decals. They took a long time to move from the backing paper, but
they settled down nicely on the panel lines after brusing over them Vallejo
decal softer. After that, I brushed the entire model with Revell's matt varnish
and left the plane to fully cure.
sues
with Revell's decals. They took a long time to move from the backing paper, but
they settled down nicely on the panel lines after brusing over them Vallejo
decal softer. After that, I brushed the entire model with Revell's matt varnish
and left the plane to fully cure.
While the model was drying, I began painting the dive brakes with part of the Iron Crosses's colours. They were then installed and left to dry.
Meanwhile, I worked on the main landing gear. The shafts for the wheels of the kit's landing gear are weak, so the plastic parts were replaced with a set of Scale Aircraft Conversions white metal landing gear. I glued with epoxi glue several small pieces into the landing gear, and then glued the landing gear to the holes of the landing gear wells.
I painted the clear parts and added the machineguns, painted the landing gear wheel doors and glued them in place. Before installing the clear parts in position, I test fitted the nose transparency, and discovered the rudder pedals weren't letting it sit flush with the nose, so off they went! After that, I built up the propeller assembly and glued it into the radiator. With that final step, the kit was (finally) complete.
| CONCLUSIONS |
An imposing model once finished, but very difficult. Most of the errors noted were of my own making (except the areas where the Revell instructions were vague). Since most of my builds were small 1:48 fighters, I blame myself by being impatient and not letting things set before going to the next step. However, I don´t remember having so many issues with Revell's huge He 111P-2.
Francisco Santoro 8 February 2021 Copyright ModelingMadness.com. All rights reserved.
If you would like your product reviewed fairly and fairly quickly, please contact the editor or see other details in the
Note to
Contributors. Back to the Main Page
Back to the Review
Index Page
Back to the Previews Index Page