ICM 1/48 Ju-88C-6b
| KIT #: | 48239 |
| PRICE: | $110.00 |
| DECALS: | Four options |
| REVIEWER: | Francisco Santoro |
| NOTES: | Overall fit is great except engine nacelles. |
| HISTORY |
 During the
Second World War, the Junkers Ju 88 embodied what the Eurofighter, the Rafale
and the F-22 represent in our day. The MRCA, Multi Role Combat Aircraft. It
served as a conventional high altitude bomber, a dive bomber, and was just as
effective as a night fighter or even a torpedo bomber engaging surface vessels.
It could also be used as a tank killer and against railway targets, or even as a
mine layer or reconnaissance aircraft. During its final days it was used as a
bomb carrier in a composite unit under a Bf 109 or Fw 190. The Ju 88 was still
in full production at the end of the Second World War and up to this point in
time more Ju 88s had been built than all other Luftwaffe bombers put together,
over 15000 aircraft.
During the
Second World War, the Junkers Ju 88 embodied what the Eurofighter, the Rafale
and the F-22 represent in our day. The MRCA, Multi Role Combat Aircraft. It
served as a conventional high altitude bomber, a dive bomber, and was just as
effective as a night fighter or even a torpedo bomber engaging surface vessels.
It could also be used as a tank killer and against railway targets, or even as a
mine layer or reconnaissance aircraft. During its final days it was used as a
bomb carrier in a composite unit under a Bf 109 or Fw 190. The Ju 88 was still
in full production at the end of the Second World War and up to this point in
time more Ju 88s had been built than all other Luftwaffe bombers put together,
over 15000 aircraft.
| THE KIT |
 The kit
comes inside two boxes. The first one showing the aircraft in flight, and the
other one is the true box, which is top opening and quite sturdy. In the box,
the parts come packed together pretty tightly, so there shouldn't be any
problems with parts breaking or getting separated off their sprue. Clear parts
come inside their own bag.
The kit
comes inside two boxes. The first one showing the aircraft in flight, and the
other one is the true box, which is top opening and quite sturdy. In the box,
the parts come packed together pretty tightly, so there shouldn't be any
problems with parts breaking or getting separated off their sprue. Clear parts
come inside their own bag.
Instructions have 24 pages with 101 building steps. This is done to avoid cluttering the building pictograms (unlike Revell, who cram lots of steps inside a single build square).
Decals provide four options, and have good colour density and are on register.
| CONSTRUCTION |
Instead of starting with the cockpit, one
starts by building the fuselage sidewalls. These were painted in RLM 66 (Revell
78) with black instruments. The instrument panel and radio sections were painted
the same as the sidewalls, but were given a drybrush with a metallic colour.
 This pretty
much sums up the construction of the fuselage, but before closing it up you need
to add the tail strut (which comes with the tail wheel already included). Once
that's done, you NOW start building the cockpit.
This pretty
much sums up the construction of the fuselage, but before closing it up you need
to add the tail strut (which comes with the tail wheel already included). Once
that's done, you NOW start building the cockpit.
The cockpit assembly, especially the seats, is quite fiddly. Seat parts D41 and D38 need to be glued the other way around, or else the seat won't fit. The other seat proved to be easier in construction. Before gluing the seats into place, one has to glue the cockpit floor to the forward fuselage section. This part needs to have three inserts glued before adding the floor. Then the rudder pedal were glued to the floor, together with the control column. All these parts were painted in RLM 66, with the rudder pedals being painted in steel (Revell 91). The seats, rudder pedals and control column were then glued to the cockpit floor and left to dry. Once the parts were fully dried, I glued the forward fuselage section to the fuselage halves.
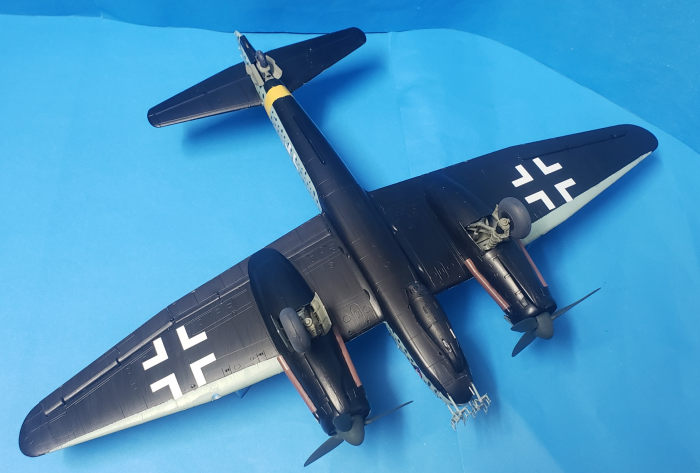
Next step in the aircraft's construction is the assembly of the horizontal stabilizers, rudder and wings. All these parts come in halves. You can get the elevators to move if you apply glue carefully, but I didn't, so they were glued in the neutral position. The wings also come as separate halves. The next step (31), is where everything comes together. The installation of the empennage is easy, but the wings are a bit of a struggle: You either get the top of the wings to sit flush with the roots and have gaps under the wings, or you get a perfect fit on the lower part of the wings and have trenches on the wing root area. I decided for the former, so I applied glue to the area, one at a time, glued the wings, and then taped and left them to harden overnight. While that was happening, I realised the horizontal stabilizers weren´t levelled, so I removed them and reglued them, now in their correct position.
 Next come
the flaps, ailerons and rudder. These are all glued in the neutral position, so
don't bother trying to fit them in any other position.
Next come
the flaps, ailerons and rudder. These are all glued in the neutral position, so
don't bother trying to fit them in any other position.
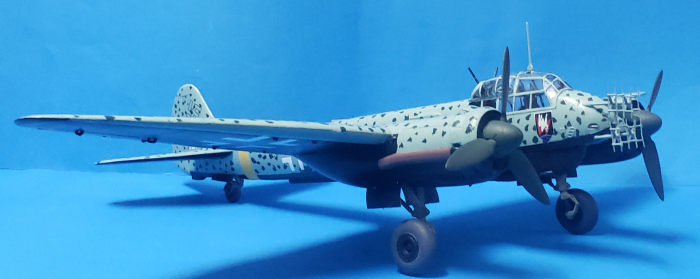
I then stumbled upon the contruction of the lower gondola. This is formed of 5 pieces: The two windows, the gondola halves themselves, and the gondola guns. These were all glued together and left aside, to be glued after decalling. The gondola was painted in matt black (Revell 08).
Coming back to the airframe, you MUST install the landing gear to their bases before gluing the nacelles, or else they won't fit. Unlike the Revell instructions for their 1:32 Ju 88, this stage is perfectly clear, and is repeated for the left and right sides, confusion between the parts being non-existent. The landing gear struts were painted in RLM 02 (Revell 45), with the main struts having their oleos painted in matt black. These two sets were then glued into the big depression on the lower part of the wings, and left to harden.
Next step is the installation of the engines. ICM gives you two complete engines, but the firewall of both of them won't allow you to install them into the nacelles without having huge gaps. What I did was, since this is the nightfighter version with flame dampers, left them out. So I glued the radiator faces of both nacelles and glued them. The nacelles were then glued to the wings. Now, and here comes my first big error with this kit, I glued the radiator of one nacelle upside down, so I had to break open the nacelle, almost breaking the entire piece, and reglued the radiator face in its correct position. Once the engine nacelles were added, I glued the engine doors and flaps and left those pieces to dry. I also glued (to my poor judgement) the flame dampers. This would prove to be a painting complication, but nothing that some masking tape couldn't solve. Speaking of masking, here comes the Colour and Markings section.
| COLORS & MARKINGS |
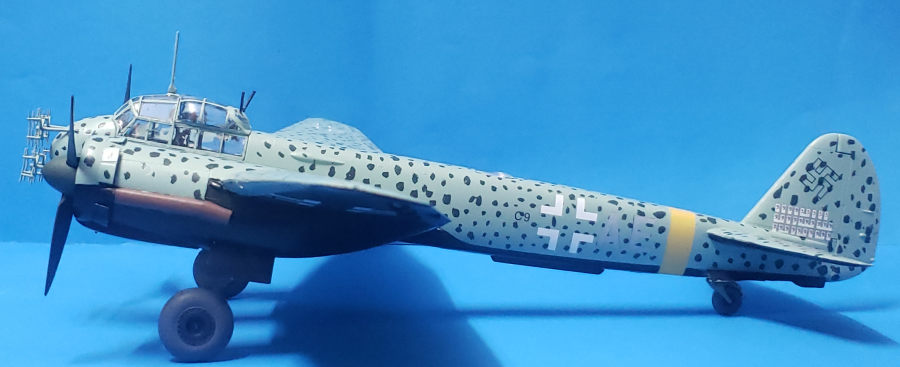
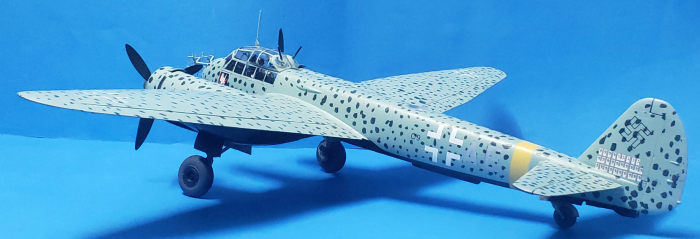
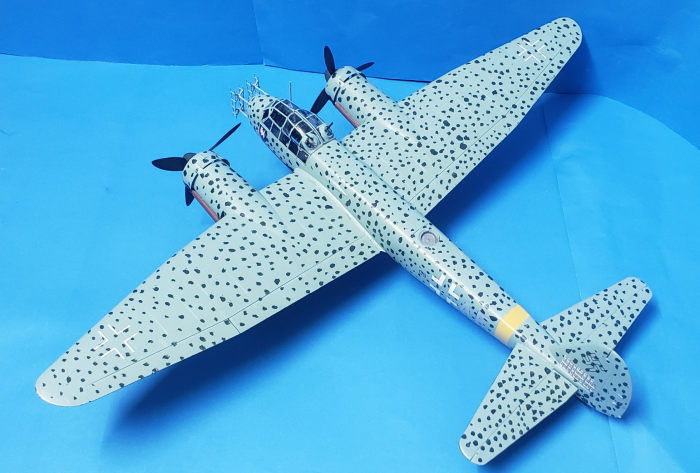
The scheme I chose for this plane was that of Prinz Heinrich su Zayn Wittgenstein, one of the many nightfighter aces of the Luftwaffe (option 2).
Wittgenstein's machine is painted in RLM 76
with a mottling of RLM 75 uppers, and RLM 22 lower surfaces. Since I had already
built the same aircraft, but in 72nd and from Revell, I decided to follow their
painting instructions. I first painted the upper surfaces with Revell's 49 Light
Blue, followed by applying the mottling in RLM 74 (Revell 69 Granite Grey). I
then masked and painted the lower surfaces with Revell's 08 Matt
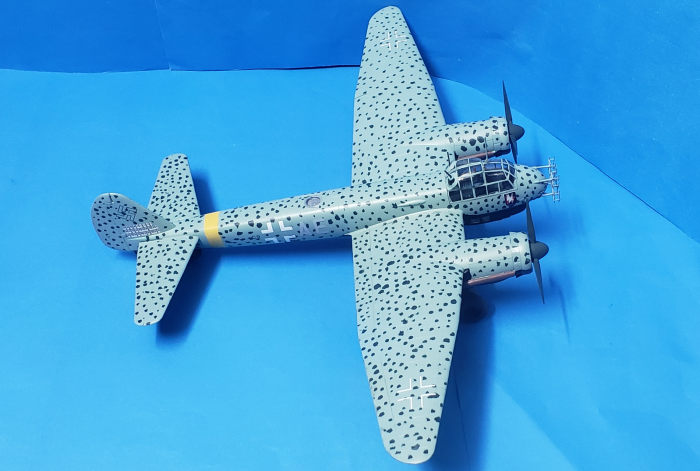 Black. Once I
had achieved full opacity with that paint, I removed the masking tape, along
with some patches of light blue with it. Once the damaged areas were repainted,
I glossed the entire model to prepare it for the decals.
Black. Once I
had achieved full opacity with that paint, I removed the masking tape, along
with some patches of light blue with it. Once the damaged areas were repainted,
I glossed the entire model to prepare it for the decals.
ICM decals, together with those from Eduard, only give you one chance of placing them in their correct position. Once on, you can't move them freely. I used a set of Balkenkreuzes from an Xtradecal German 1:48 Cross insignia. The kit decals (letters) were applied with great care in order to get them in their correct position the first time. Apart from the Xtradecal set, I used a pair of black-outlined Swastikas from a Dukel Hobbies sheet. I then brushed two coats of Microsol to all the decals to help them sink into the panel lines, and left the Microsol dry thoroghly overnight. Once everything was dried, I matt coated the entire aircraft.
I glued the wheels, lower gondola, and canopy to their positions. The latter was glued with white glue, much more effective than the Revell clear glue I used to use. The last parts I added to the model were the antennas. These were carefully glued, and left to dry.
With that, the model was finished.
| CONCLUSIONS |
ICM has come full steam ahead by releasing several kits of the Junkers family of aircraft. The fit on all the parts is very good, except on the engines (whose bad fit may have been entirely on my own). With several aftermarket decals, one can build several Ju 88s in different guises.
Francisco Santoro
23 January 2022 Copyright ModelingMadness.com. All rights reserved. No
reproduction in part or in whole without express permission. If you would like your product reviewed fairly and fairly quickly, please contact the editor
or see other details in the
Note to
Contributors.