Hasegawa 1/32 Ju-87G 'Stuka'
| KIT #: | St 25 |
| PRICE: | $91.00 |
| DECALS: | Two Options |
| REVIEWER: | Francisco Santoro |
| NOTES: | Piece J4 may need to be forced to fit the fuselage. |
| HISTORY |
From the kit's instructions: "Development work on the Ju 87 Stuka "D" series began in 1940. Major disign improvements included installation of the oil cooler under the nose and radiators under each wing, giving the nose area of the aircraft a much sleeker appearance in comparison with the "B" series. With further streamlining of the windscreen and landing gear wheel covers, the aerodynamic performance of the design was greatly improved. Other significant improvement to the Stuka design were an increased onboard fuel capacity giving the aircraft a greater operational range, and an increase in protective armour around the crew compartment.
While "D" series aircraft saw action
in all theatres of the conflict, it soon became apparent that the design's
low top speed of 400km/h made it easy prey for most Allied fighter planes.
However, the design was able to m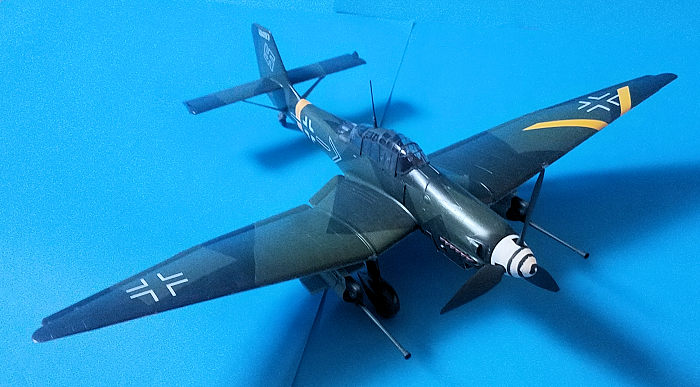 ake somewhat more of a contribution to the
German war effort on the Eastern Front, where the Allied edge in fighter
aircraft was not so pronounced as it was in Western Europe.
ake somewhat more of a contribution to the
German war effort on the Eastern Front, where the Allied edge in fighter
aircraft was not so pronounced as it was in Western Europe.
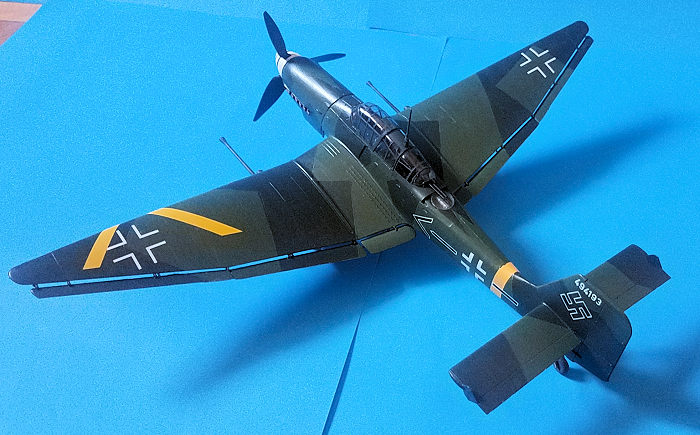
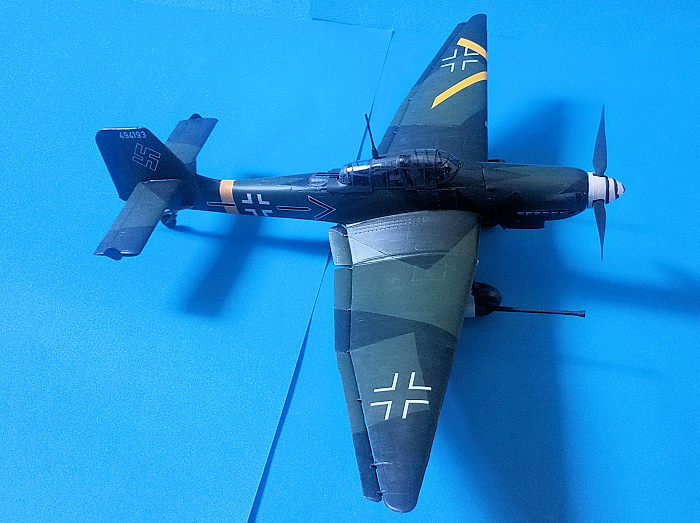
Constant effort to upgrade the ordnance-carrying capabilities of the Stuka put severe stress on the wingload of the design, and the D-5 model was given larger wings in an attempt to overcome this problem. In addition, the D-5 was fitted with releasable landing gear, and the dive brake flaps were removed from later models.
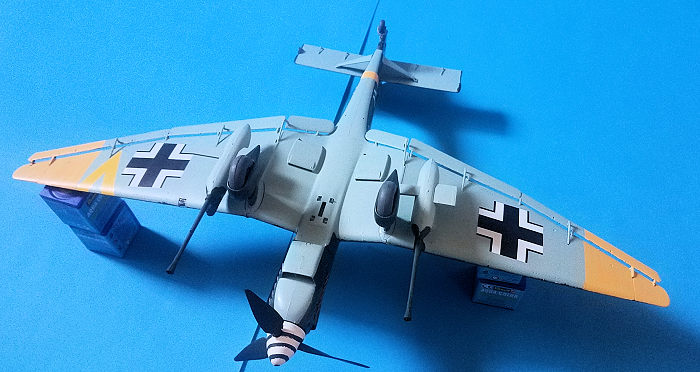
The Ju 87G-2 type was a modified D-5 model, with cupola housed 37mm cannons slung under the wings in place of the usual wing-mounted 20mm cannon. This type saw most of its action on the Eastern Front, where it was used as a highly effective tank buster against Soviet armed forces.
The G-1 was a Stuka model specifically designed to combat Soviet armour, equipped for the job with two flak 18 37mm cannon housed in pods installed under the wings of the aircraft. Plans to develop a Stuka variant to deal with Soviet armour began to take shape during 1942, with test carried out in December of that year using a Stuka D-1 specially outiftted with the experimental cannon ordnance arrangement. The tests were spectacularly successful, showing that even a single 37mm round through the top of a tank´s engine deck was enough to stop the vehicle dead in its tracks. The G-1 was was developed for mass production based on the Stuka D-3, with the first aircraft rolling off the assembly line in March 1943. The new G-1s were sent post-haste to the Russian Front, where they immediately established a reputation as fearsome Soviet tank killers."
| THE KIT |
 The model comes
in a top opening box with two tank killers Ju 87G flying next to each other.
There're a total of 17 sprues, 16 in light grey hard plastic and one in
clear. There's also a single sprue which constains four rubber polly caps
with which to trap the propeller.
The model comes
in a top opening box with two tank killers Ju 87G flying next to each other.
There're a total of 17 sprues, 16 in light grey hard plastic and one in
clear. There's also a single sprue which constains four rubber polly caps
with which to trap the propeller.
The instructions are of the foldable type with 16 easy-to-follow construction steps.
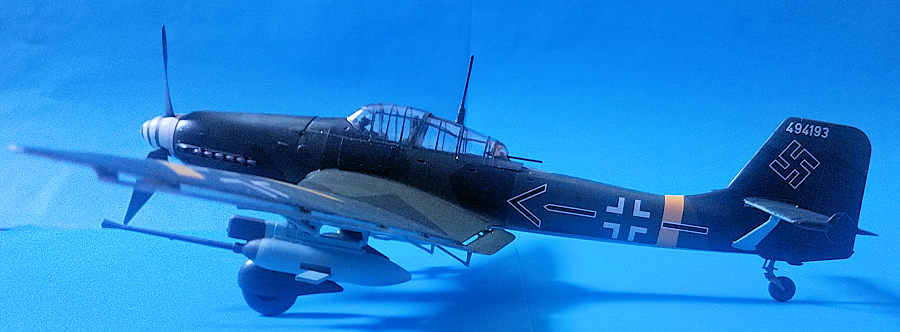
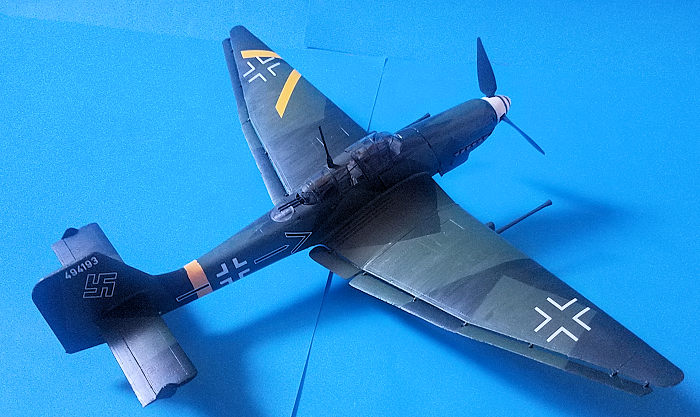
There're a two decal options included, one is for Hans Ulric Rudel's 494193 Ju 87G, and the other is for an aircraft coded GS+MD from the Versuchverband für Panzerkämpfung.
| CONSTRUCTION |
I began by painting all the cockpit pieces on their sprues with Revell Aqua 78 (tank grey), and glued them together once they were dry. The cockpit sidewalls come separate, and you have to glued them to both fuselage halves. These are held by two small pins, which don´t help for aligning them. Once the cockpit was built, I glued it to the fuselage. Before glueing both fuselage halves together, you will have to open two rectangular shaped flashed areas on the forward part of the cockpit sill in order to make the front canopy fit. After doing that, I glued both fuselage halves and left them aside to dry.
 The wings are a really sturdy construct,
you first glue a hefty wingspar to the bottom wing, and then glue both wings to
it. However, this way of assembling the wings leaves you with two big gaps that
run along the join lineof the wings. I filled them with superglue and sanded
smooth. I also glued the underwing radiators to the bottom wing at this time.
The wings are a really sturdy construct,
you first glue a hefty wingspar to the bottom wing, and then glue both wings to
it. However, this way of assembling the wings leaves you with two big gaps that
run along the join lineof the wings. I filled them with superglue and sanded
smooth. I also glued the underwing radiators to the bottom wing at this time.
Back to the fuselage, and before gluing the wings to it, I tried fitting part J4 to the rear of the fuselage, and I discovered it didn´t want to fit. The cockpit sidewalls weren´t letting the piece to fit properly. A bit of pressure managed to see that piece glued to its spot. After that, the wings were glued to the fuselage. Against my better judgement, I decided to glue the flaps and ailerons and its actuator arms to ease painting. I would later manage to break on of the flaps three times while I was handling the model.
The wheel spats were glued to the wings, sans the wheels, which can be addded after painting the aircraft. With this done, I headed to the painting stage.
| COLORS & MARKINGS |
 The Ju 87G I wanted to represent was one
I had already built from Hasegawa but in 1:48, Hans Ulric Rudel's Ju 87G 494193.
It is painted in the traditional RLM 70/71 splintern camouflage with RLM 65
undersides, and with yellow wing tips and rear fuselage band. I masked first the
areas that were to go in RLM 71 and painted them, and I did the same with the
RLM 70. Once the surface was dry, the paint ridges were sanded away with a 1000
grit sandpaper. I painted next the RLM 65, and after the underside was dry, I
masked and painted the fuselage band and wintips in yellow.
The Ju 87G I wanted to represent was one
I had already built from Hasegawa but in 1:48, Hans Ulric Rudel's Ju 87G 494193.
It is painted in the traditional RLM 70/71 splintern camouflage with RLM 65
undersides, and with yellow wing tips and rear fuselage band. I masked first the
areas that were to go in RLM 71 and painted them, and I did the same with the
RLM 70. Once the surface was dry, the paint ridges were sanded away with a 1000
grit sandpaper. I painted next the RLM 65, and after the underside was dry, I
masked and painted the fuselage band and wintips in yellow.
With the painting done, I brushed two coats of Revell's gloss coat, and began the decalling job.
The decals behaved perfectly after being put inside a cup full of hot water. I began by the rear and finished with the underwing Iron Crosses. The decals sunk into the panel lines after being brused with some Microsol, then I left the model drying overnight before brushing the matt coat the next day.
| FINAL CONSTRUCTION |
 I built up the 37mm cannons in their
sprues and painted them in RLM 65 and RLM 71. The wheels were also painted with
Revell 78 tank grey tyres and black wheel hubs. The propeller consists of three
blades thah have to be glued separately to a hub. They were painted in RLM 70
and then glued to the propeller hub. The spinner was then painted white, masked
the spiral and repainted in RLM 70. I then glued all these pieces to the
aircraft.
I built up the 37mm cannons in their
sprues and painted them in RLM 65 and RLM 71. The wheels were also painted with
Revell 78 tank grey tyres and black wheel hubs. The propeller consists of three
blades thah have to be glued separately to a hub. They were painted in RLM 70
and then glued to the propeller hub. The spinner was then painted white, masked
the spiral and repainted in RLM 70. I then glued all these pieces to the
aircraft.
The last parts to add were the clear parts. Hasegawa includes decals for the canopy frames, but I preferred to paint them. These were glued with Revell's Contacta Clear and left to dry throughly. The last part I added to the model was the antenna.
| CONCLUSIONS |
This is a big aircraft, and you'll need a bit of space in your cabinet in order to expose it properly. The model looks nice sitting next to my Ju 88A-1 and Fw 190A-8/R11 in 1:32 from Revell. The only issue I had was with part J4 and with the underside gaps. Aside from those issues, I had a trouble free build. Recommended.
Back to the Main Page Back to the Previews Index Page
Back to the Previews Index Page