Airfix 1/72 Ju-87B-1 Stuka
| KIT #: | A03087 |
| PRICE: | 50$ |
| DECALS: | Two Options |
| REVIEWER: | Francisco Santoro |
| NOTES: | Great little kit. |
| HISTORY |
 Taken from the kit's instructions: "The
Junkers Ju 87 Stuka became one of the most infamous, and feared weapons of the
Second World War. The two-man dive bomber first saw action in the skies over
Spain during the Spanish Civil War. Here the early A and B models proved
themselves to be a very accurate tactical weapon and the screaming noise made by
special trumpets added to the machine's distinctive undercarriage spats created
fear in the hearts of enemy civilians. While outdated in appearance, the Stuka
did contain some modern features such as automatic dive brakes but overall, the
design was outdated. Over the skies of Poland, France and the Low Countries in
1940 the Stuka was able to operate in clear skies and did so effectively, but
over the South of England during the Battle of Britain, the Stuka came up
against staunch RAF opposition, and suffered as a result. After being withdrawn
from this front the Stuka was used in the Balkans and the Western Desert, and
continued to serve in Russia, as a tank destroyer, until the end of the Second
World War."
Taken from the kit's instructions: "The
Junkers Ju 87 Stuka became one of the most infamous, and feared weapons of the
Second World War. The two-man dive bomber first saw action in the skies over
Spain during the Spanish Civil War. Here the early A and B models proved
themselves to be a very accurate tactical weapon and the screaming noise made by
special trumpets added to the machine's distinctive undercarriage spats created
fear in the hearts of enemy civilians. While outdated in appearance, the Stuka
did contain some modern features such as automatic dive brakes but overall, the
design was outdated. Over the skies of Poland, France and the Low Countries in
1940 the Stuka was able to operate in clear skies and did so effectively, but
over the South of England during the Battle of Britain, the Stuka came up
against staunch RAF opposition, and suffered as a result. After being withdrawn
from this front the Stuka was used in the Balkans and the Western Desert, and
continued to serve in Russia, as a tank destroyer, until the end of the Second
World War."
| THE KIT |
 This is one of the many newly tooled Airfix
kits. It comes in their distinctive and colourful red top opening box. Inside,
there´s a single bag full of light blue plastic. The clear parts come in their
own bag, which at the same time, comes in the bag with all the sprues.
This is one of the many newly tooled Airfix
kits. It comes in their distinctive and colourful red top opening box. Inside,
there´s a single bag full of light blue plastic. The clear parts come in their
own bag, which at the same time, comes in the bag with all the sprues.
Instructions consist of a thick booklet with 40 construction steps (I´m counting the painting guide). Airfix provides a really helpful indication of which pieces have already been glued in place by highlighting them in red.
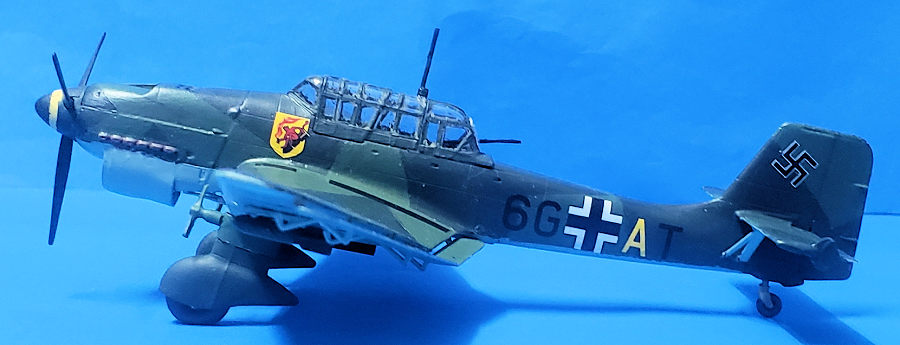
Decals are printed by Cartograf and are of excellent quality. There're two options included, one for the Condor Legion, and another one for the Battle of France (6G+AT).
| CONSTRUCTION |
I began by building the propeller. This is something I'm doing more and more frequently since it's one of those stages that take a lot of time. The nose cone was first painted yellow, then I cut a thin strip of masking tape and placed it on the nose cone. Then I painted the propeller and the rest of the spinner in RLM 70 (Revell 40). When dry, the propeller was glued and left aside for later assembly.
After finishing the propeller, I started work
on several parts at the same time. Cockpit parts were painted in RLM 02 (Revell
45), with several boxes and machinegun ammo containers painted in black. Airfix
provides two types of seats, one with belts if you aren't using the pilot, and
one without belts when using the pilot. I used the one without belts, since I'm
lazy and don't have a fine enough paintbrush to paint the belts. Once the
cockpit parts were painted, I glued them to their respective places, either on
the fuselage sidewalls or to the hefty wingspar provided by Airfix (the seats,
control 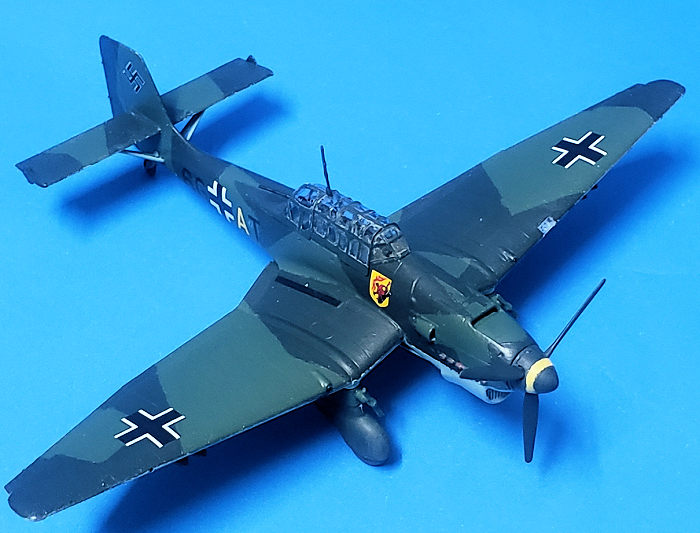 sticks and ammo chute are glued to this piece). Before closing the
fuselage halves, you must add the instrument panel. Airfix provides a blank
slate where you place a decal. I painted the instrument panel in RLM 02, glossed
it, and applied the decal. Once it was dry, I brushed some Microsol over it.
sticks and ammo chute are glued to this piece). Before closing the
fuselage halves, you must add the instrument panel. Airfix provides a blank
slate where you place a decal. I painted the instrument panel in RLM 02, glossed
it, and applied the decal. Once it was dry, I brushed some Microsol over it.
While the fuselage was drying, I tackled the landing gear. I painted on the sprues the wheels and the gear trousers. The wheels were painted in RLM 66 tyres with black hubs. The trousers of the landing gear were painted in RLM 71 (Revell 39) tops and RLM 70 (Revell 40) bottoms. Something Airfix doesn't tell the modeller on the instructions is to add the sirens. These are included, but aren't shown.
With the fuselage dry, it was time to add the nose of the Stuka. This step was a bit fiddly. You must add the bomb aimer's window to the fuselage, add the exhaust stubs to both sides of the nose halves. After letting the parts cure for some minutes, I glued them to the rest of the fuselage.
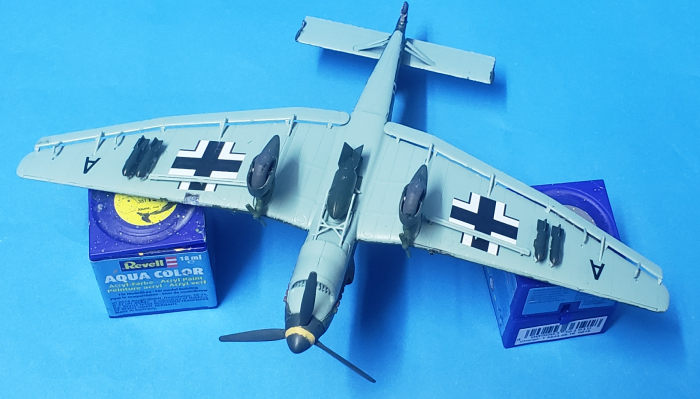
Wings came next. You are tasked to add to the upper wing halves the machineguns, and then glue the upper wing halves to the wingspar. Before gluing the lower halves to the upper halves, you must not forget to open the holes for the SC50 bombs and dive brakes. Why didn't Airfix molded them open in the first place is something I don't know. After opening the holes, the lower wing halves were glued to the upper wings. It was at this stage that I added the horizontal stabilizers and rudder in place.
| COLORS & MARKINGS |
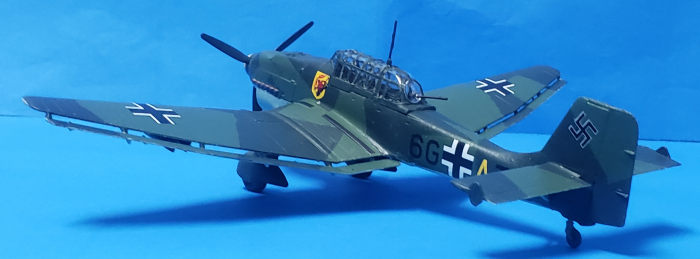 The early Stukas (all of them actually), were
painted in a splintern camouflage of RLM 70/71 uppers with 65 lower. I first
traced a rough outline of the camouflage with a pencil, and filled them with RLM
71. I then masked the borders of the areas painted in 71, and applied the 70.
After that, I painted the underside in RLM 65. Once the paint had cured, I
glossed the aircraft with Revell's gloss varnish and applied the decals. These
were printed by Cartograf, and are thin enough to be softened by Microsol, but
tough enough to handle the movement during their application. Once the decals
were dry, I matt coated the model with Revell's matt varnish.
The early Stukas (all of them actually), were
painted in a splintern camouflage of RLM 70/71 uppers with 65 lower. I first
traced a rough outline of the camouflage with a pencil, and filled them with RLM
71. I then masked the borders of the areas painted in 71, and applied the 70.
After that, I painted the underside in RLM 65. Once the paint had cured, I
glossed the aircraft with Revell's gloss varnish and applied the decals. These
were printed by Cartograf, and are thin enough to be softened by Microsol, but
tough enough to handle the movement during their application. Once the decals
were dry, I matt coated the model with Revell's matt varnish.
I glued the landing gear trousers to the holes on the lower part of the wings, glued the bombs and added the speed brakes. The canopy, which was a chore (as always) to paint, were added at the end.
| CONCLUSIONS |
Airfix's 1:72 B-1 Stuka is the first time this variant is kitted by a mainstream manufacturer. It's very well molded, and it'll look nice alongside other 1:72 kits.
Francisco
Santoro Copyright ModelingMadness.com. All rights reserved. No
reproduction in part or in whole without express permission. If you would like your product reviewed fairly and fairly quickly, please contact the editor or see other details in the
Note to
Contributors.