Revell 1/144 Junkers G.38
|
KIT #: |
04021 |
|
PRICE: |
€10 in 2005 |
|
DECALS: |
One option |
|
REVIEWER: |
Spiros Pendedekas |
|
NOTES: |
|
 The Junkers G.38 was a large German four-engine transport aircraft which
first flew in 1929. Two examples were constructed in Germany. Both aircraft
flew as a commercial transport within Europe in the years leading up to
World War II. It carried a crew of seven, with onboard mechanics being able
to service the engines in flight, due to the G.38's blended wing design,
which provided access to all four power plants.
The Junkers G.38 was a large German four-engine transport aircraft which
first flew in 1929. Two examples were constructed in Germany. Both aircraft
flew as a commercial transport within Europe in the years leading up to
World War II. It carried a crew of seven, with onboard mechanics being able
to service the engines in flight, due to the G.38's blended wing design,
which provided access to all four power plants.
During its early life, it was the largest land plane in the world. Passenger
accommodation was sumptuous by today's standards and was meant to rival that
found on the competing Zeppelin service offered by the "German Airship
Travel Corporation" (DELAG). The plane was unique in that passengers were
seated in the wings, which were as thick as 5 ft. 7 in at the root. There
were also two seats in the extreme nose. There were three 11-seater cabins,
plus smoking cabins and wash rooms.
The second G.38, named General Feldmarschall von Hindenburg, was built with
a double deck fuselage and capacity for 34 passengers and was initially used
on a scheduled service covering the cities Berlin, Hanover, Amsterdam, and
London.
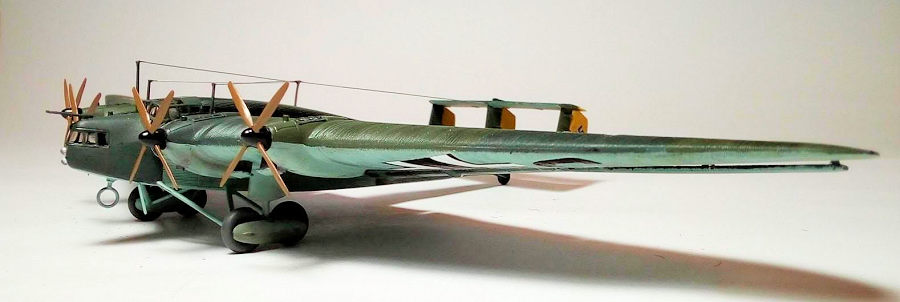
With the outbreak of World War II it was pressed into military service as a
transport craft by the Luftwaffe. It was initially left in aluminum color,
later painted in the typical splinter camo. It was destroyed on the ground
during an RAF air raid on Athens on 17 May 1944.
Interestingly, during the 1930s, the design was licensed to Mitsubishi,
which constructed and flew a total of 6 aircraft, in a military
bomber/transport configuration, designated Ki-20.
This kit was first released in 1996, as the civilian version and in 1998, as
the military version). It was one of the great and brave Revell modern
releases back then, that included (among others) ”obscure” or Luft ’46
subjects, perfectly molded and presented.
 The kit comes at the typical side opening Revell box, featuring a nice
boxart of the splinter camoed G.38, performing a lazy turn. Upon opening the
box, the big size of the parts is evident (after all the G.38 was a big
plane). The dark green sprues are flash free and look very impressive, with
the distinctive corrugating texture being fantastically reproduced
(horrifying as to how those decals will settle down, though…..).
The kit comes at the typical side opening Revell box, featuring a nice
boxart of the splinter camoed G.38, performing a lazy turn. Upon opening the
box, the big size of the parts is evident (after all the G.38 was a big
plane). The dark green sprues are flash free and look very impressive, with
the distinctive corrugating texture being fantastically reproduced
(horrifying as to how those decals will settle down, though…..).
A very comprehensive interior is supplied with a one piece central floor
that contains dashboard/instrument panel, crew and passengers seats and
tables, and some other internal details. This piece is supposed to be
trapped inside the four piece (left/right and top/bottom) fuselage. Two nice
control yokes are separately provided.
The two wings are very well represented, with the characteristic 3-seat
passenger sofas at each wing root, separate flaps/ailerons and oil/coolant
retractable radiators. The 4 top and 4 bottom exhausts are molded-in and I
plan to drill them out for realistic looks. Each wing is comprised of no
less than 11 pieces, props excluded!
 The boxed-looks tail is made out of three fins, trapped between the top and
bottom stabilizer. The characteristic semi-spatted main landing gear is a
12-piece affair in all. Four props, a “normal” and a loop antenna and a
simplified pitot tube are provided.
The boxed-looks tail is made out of three fins, trapped between the top and
bottom stabilizer. The characteristic semi-spatted main landing gear is a
12-piece affair in all. Four props, a “normal” and a loop antenna and a
simplified pitot tube are provided.
All (!) transparent parts of the real plane are represented with clear
parts: apart from the cockpit glazing, you get the front end and wing roots
passengers glazings, 11 pairs of cabin windows, 3 top mounted portholes and
4 engine cowling top mounted engineer’s glazings! All very well molded and
the glazings being super clear; and we are talking for 1/144 scale! Kudos to
Revell!
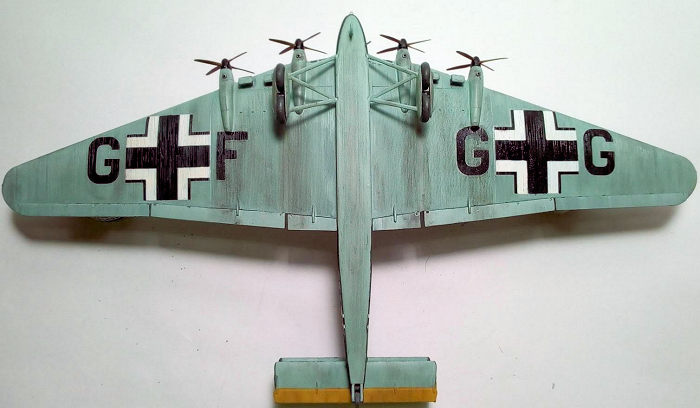
Instructions are the typical old style b/w multi page Revell ones, nice and
clear. Three color schemes are provided, spanning this plane’s military
career: The first one represents how this plane looked in April 1940:
aluminum allover, with black top/bottom bands at the engines area. Next two
are in the typical RLM70/71/65 colors that this plane was painted soon
after. The decals are 1998 release, looking hopelessly matt and inflexible.
I am afraid they will be unwilling to conform onto those beautiful
corrugated surfaces…
I started by attaching the side windows from the inside of the fuselage.
Since nothing can be seen through them, I decided not to paint the dark
green molded passenger interior, which was then trapped between the two
fuselage halves. The rear wheel is supposed to be trapped at the rear, too,
but I left the utmost rear of
 the fuselage halves unglued, in order to
install the wheel at later stages. I then attached the top and bottom of
the fuselage. I did not attach the three clear portholes from at the top
part, having decided to replicate them with Humbrol Clearfix at later stages
as well.
the fuselage halves unglued, in order to
install the wheel at later stages. I then attached the top and bottom of
the fuselage. I did not attach the three clear portholes from at the top
part, having decided to replicate them with Humbrol Clearfix at later stages
as well.
I glued the main wing halves together and then attached them at the
fuselage. The same was done with the 5-piece tail, assembled and attached.
Overall fit was good. After checking alignment, I had a complete basic G.38
shape and went on to perform the daunting task of sanding and filling those
corrugated areas that needed attention, like leading edges and fuselage
joints. I did the best I could. Of course, some detail was lost, but not
that much to offend the eye. After an overall 2000grit light sanding, I
attached the flimsy wing moving surfaces (that would frequently break until
model completion), masked the fuselage windows with Humbrol Maskol and
headed to the paint shop!
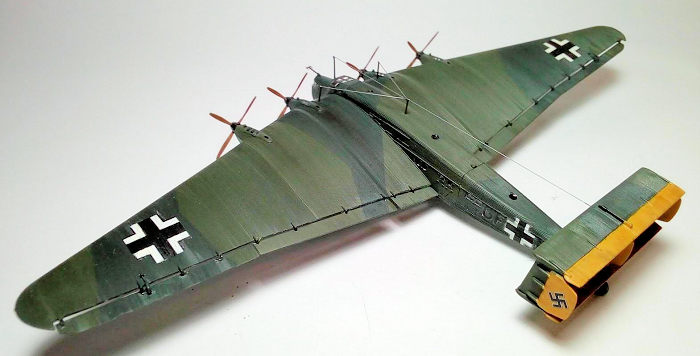
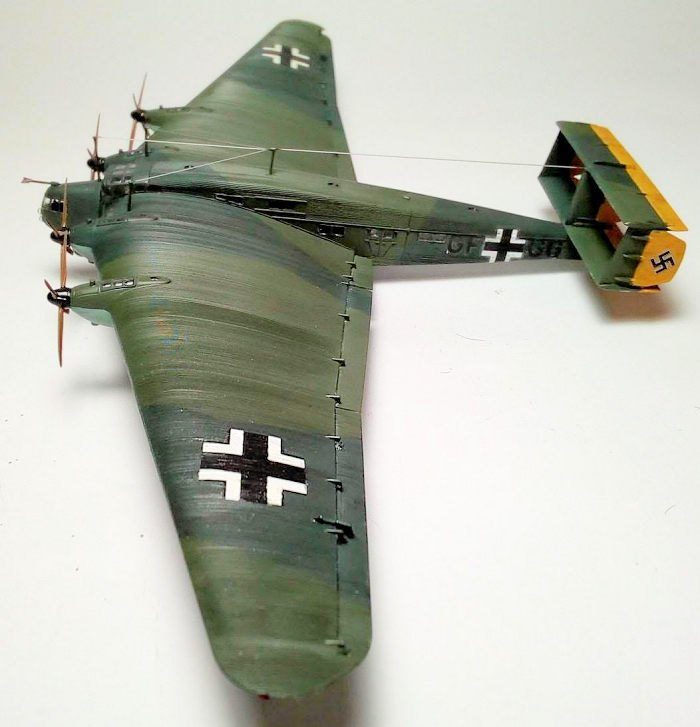
Having decided to do the splinter scheme, I first applied a top coating of
Hu117, for the RLM71, followed by a protective coat of Future. I then masked
the splinter camo and applied Hu91, for the RLM70, which was masked as well,
in order to paint the underside.
 Before painting the underside, I attached the oil/coolant radiators and the
main gear legs, with their supporting struts, leaving off the outside “semi
spats, in order to be able to attach the main wheels at later stages. I then
gave the underside a coating of Hu65, for the RLM65. Upon drying, I removed
all masks and gave the model a coat of Future, then went on and hand painted
Hu69 Yellow the moving tail surfaces. The daunting task of applying old,
stiff decals onto the corrugating surface had arrived…
Before painting the underside, I attached the oil/coolant radiators and the
main gear legs, with their supporting struts, leaving off the outside “semi
spats, in order to be able to attach the main wheels at later stages. I then
gave the underside a coating of Hu65, for the RLM65. Upon drying, I removed
all masks and gave the model a coat of Future, then went on and hand painted
Hu69 Yellow the moving tail surfaces. The daunting task of applying old,
stiff decals onto the corrugating surface had arrived…
After being immersed in hot water, the decals somehow started to detach from
their backing sheet, but with a tendency to disintegrate. So, though I was
really gentle on handling them, some of them broke into pieces. I applied
them as best as I could, then attacked them with whatever strong decal
softening solution I had (my wife’s acetone nail cleaner included), in order
to make them conform to those corrugations. Upon reasonable conforming, I
touched them up wherever needed. The nose “GENERALFELDMARSCHALL HINDENBURG”
decal logos were complete write-offs and were discarded. Let’s hope the G.38
had them painted over during its last days, as this scheme depicts…..I used
Swastikas from a generic “Icarus Decals” sheet.
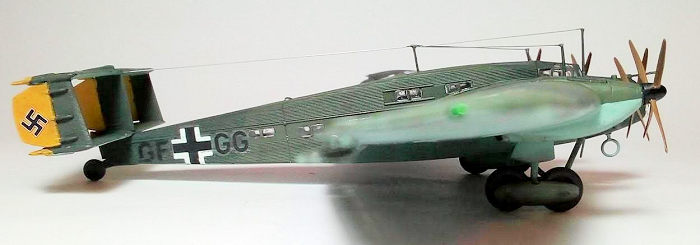
The main wheels were painted steel with dark gray tires and attached at
their bogies, with the “half spat” covering glued then. The rear wheel was
similarly painted and trapped between its two holding arms that were
immediately glued. Before glue curing, I let the model rest on its 5 wheels
and aligned them accordingly, in order for all of them to touch the ground.
The 8 molded in engine exhausts were drilled out, painted Testors Burned
Metal, and the oil/coolant radiator mesh looking faces were painted black
and dry brushed silver; those small touches added a lot in reality looks.
 I then turned my attention to the cockpit which, to my very pleasant
surprise, was highly visible through the very clear canopy. I gave it a
basic RLM02 (Hu31) color, with black instrument panel and yokes and leather
seats. I then joyfully added seat belts (from masking tape), that were
nicely visible through the canopy (I could have never imagined to be able to
see seat belts through a transparency in 1/144!).
I then turned my attention to the cockpit which, to my very pleasant
surprise, was highly visible through the very clear canopy. I gave it a
basic RLM02 (Hu31) color, with black instrument panel and yokes and leather
seats. I then joyfully added seat belts (from masking tape), that were
nicely visible through the canopy (I could have never imagined to be able to
see seat belts through a transparency in 1/144!).
The props were painted Hu110 Wood, with black hubs and were inserted in
place, as were the loop and the “straight” antennas. The kit provided pitot
was simplistic compared to the “trident” looking real one, so I went and
fabricated a trident looking one out of stretched sprue. It was attached in
place with its body painted fuselage color and its triple-tip gunmetal.
I then went on and applied some weathering, mainly engine staining and
underside dirtying, since this big plane was likely operating from
unprepared runways. A final matt coat (80/20 matt gloss) gave the G.38 its
final finish.
The 6 glazing parts had their well-defined frames hand painted (with my 10/0
brush) and were then attached in position(s). Fit was better than I had
feared, having only to deal with some minor gaps that were faired with white
glue. The two nose mounted lights had their backsides painted silver and
were affixed in position. The three top portholes transparencies were done
with Humbrol Clearfix. Two tiny blobs of red and green clear paint were
applied over two silver “pins” (done with my Pilot Silver extrafine pen) at
the wingtips, to simulate the wingtip lights.
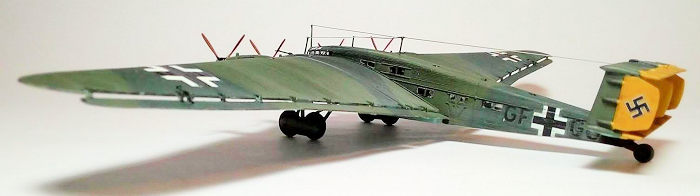
I was ready to declare the model done, when I realized that the G.38
featured a distinctive 4-piece wire antenna that run from the central fin
top towards the center of the fuselage, then split up in three, with the one
end in front of the canopy and the two other ends bilaterally, roughly at
the wing root glazing borders. Deciding that my G.38 deserved an extra
treatment, by studying drawings, I fabricated 4 antenna masts from thick
stretched sprue, inserted and painted them accordingly. I then run fine
silver stretched sprue onto them, ending at the central fin top, tightened
with my wife’s hair dryer. This proved to be a nice addition to the final
looks.
It was then that I called this beautiful giant of the sky done!
This kit was a surprise with its good molding, excellent clear parts and
unbelievable level of detail for 1/144 scale. The decals were a letdown. I
wouldn’t expect more from 23 years old “old school” Revell decals, however,
this corrugated beauty desperately needs excellent decals, in order to
conform well. There was a 2006 re-release of the civilian version,
presumably with Cartograf decals, so better chances might be there…
The finished model is quite sizable with a span of 12.2 inches (in 1/144!!!)
and an average builder, with some attention here and there, will come up
with a very imposing result of that strange sort of 30’s “flying wing” type
big bird.
Taking into account that only two were built, Revell has to be congratulated
for taking the industrial risk to produce a mainstream kit of the G.38 (the
facts that we do not see many of them built and also the kit not being
reissued since 2006, presumably due to low sale numbers, might explain that
it was, indeed, a risk). But, again, we were used to witnessing many such
amazing surprises from Revell back then, and sadly (?), not today….
As for yours truly, I had a super time building this model, so much that I
was motivated to add some scratch build improvements. If you own one, or if
you are lucky to find one at a non-astronomical price (they are not that
easy to find today, in 2021…), go and build it! You will be rewarded with an
amazing feeling of completing a rarely seen model of an iconic plane.
Happy modeling!
Wikipedia
Scalemates
Various internet sites (pics, info and models built)
Spiros
Pendedekas
6 September 2021
Copyright ModelingMadness.com. All rights reserved. No
reproduction in part or in whole without express pemission.If you would like your product reviewed fairly and fairly
quickly, please
contact
the editor or see other details in the
Note to
Contributors.
Back to the Main Page
Back to the Review Index Page
Back to the Previews Index Page