| REVIEWER: | Christopher Campbell |
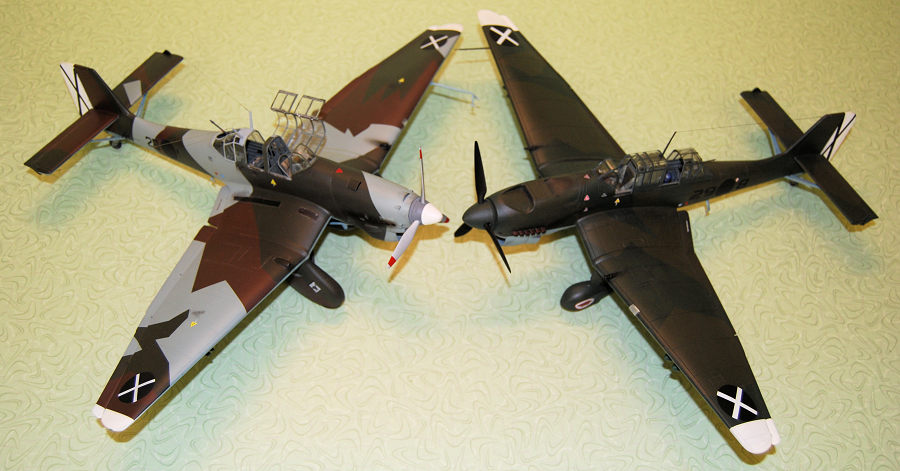
| NOTES: | Trumpeter 1/32 Ju-87A & 21st Century Toys Ju-87B |
| HISTORY |
I will dispense with an excessive and in depth history of the Stuka, as anyone reading this is doubtless somewhat familiar with this infamous aircraft. The Junkers Ju.87 Stuka design began in 1933 and first flew in 1935, powered by a Rolls Royce Kestrel engine, as was the first Bf.109 prototype, due to the lack of a suitable German powerplant being available at the time of inital testing. The initial prototype had a twin tail design that was dispensed with after a fatal test crash. Once a Jumo inverted V-12 was fitted and numerous modifications were made to the overall design, the aircraft began to show true promise as a dive bomber and tactical support aircraft and thus attracted the interest of the RLM. However, the a competing design from Heinkel, the He.118 was the preferred aircraft until it crashed while being test flown by Ernst Udet. The Stuka was then authorized for production.
The A model, or Anton, differed significantly from
later variants in its appearance and various technical features. Instead of
sliding canopies, it featured a hinged, side opening type and had wheel pants
that were some of the most exaggerated looking ever, even for their day, though
doubles as aerodynamic as they could be made, given their gargantuan size. It
was powered by Junkers Jumo
 210 inverted
V-12 and armed with twin 7.92mm machine guns in the wings and a single flexible
7.92mm gun in the after compartment for defense. Due to being somewhat
underpowered, while designed and rated for higher, it was initially limited to a
250kg. bomb load. Around 520 of these early models were produced and served with
the Luftwaffe, the Condor Legion during the Spanish Civil war, and were also
supplied to Hungary where they saw action during W.W.II
210 inverted
V-12 and armed with twin 7.92mm machine guns in the wings and a single flexible
7.92mm gun in the after compartment for defense. Due to being somewhat
underpowered, while designed and rated for higher, it was initially limited to a
250kg. bomb load. Around 520 of these early models were produced and served with
the Luftwaffe, the Condor Legion during the Spanish Civil war, and were also
supplied to Hungary where they saw action during W.W.II
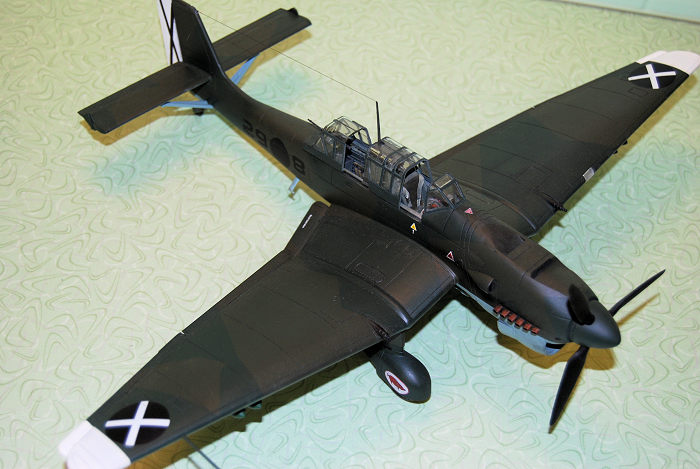
The shortcomings of this initial design led to the refinements evidence in the Ju.87B model with its more diminutive landing gear spats, an uprated Jumo 211 engine producing 1,100 horsepower, sliding canopies, and a general overall improvement of design based on the analysis of the earlier models in service, to include combat operations in Spain.
This was the version that became the infamous terror weapon of the Blitzkrieg with its Jericho Trumpets (motor driven sirens fitted to the wings) and precision dive bombing in full 90-degree dives. It saw action on every front and in every campaign where the Luftwaffe operated, and some B models and subsequent R models would soldier on to the final days of the war.
Despite being obsolescent by 1939, by some accounts, a Ju.87 scored the first air to air kill by the Luftwaffe in Poland when a PZL P.7 overshot and flew into the pilot’s sights. In addition to the Luftwaffe, Ju.87B and R models were operated by Bulgaria, Hungary, Italy, and Romania. It was replaced by an improved D and G models which pushed the very outdated but rugged design to its limits in terms of modifications and armament. It could still be effective when flown by skilled pilots under favorable conditions and remained un service until the close of W.W.II.
| THE KIT |
The Trumpeter Ju.87A:
I ordered this kit the day that I saw it listed in the Squadron Mail Order Catalog. I had long wanted to build a larger scale Ju.87A. I had, and still do have, a 1/48 Special Hobby kit, but I really wanted one in 1/32. Thus, I had to have it.
I no longer have the instructions for this kit, but as typical of most Trumpeter offerings, it has a jillion parts (well, around 350, actually), all nicely molded and attached to multiple sprues in a very sturdy box with a very detailed instruction sheet. It comes with a mostly thorough instructions sheet and markings for two early Luftwaffe aircraft. This was the second 1/32 Trumpeter kit that I had purchased, the first being a Yak-18 that I built up as a North Korean “Bedcheck Charlie.” I had found that kit to have few vices and my initial inspection of this kit showed that I could expect much the same from the Stuka, only on a somewhat grander scale, owing to a more complex aircraft.
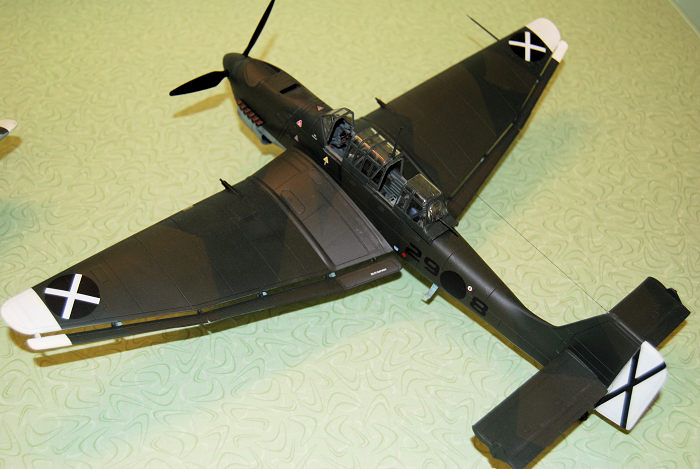
The 21St. Century Toys Ju.87B:
 The Anton
had been consigned to the stash for a while when I was building a Hasegawa
Bf.109E-3 up in Condor Legion markings when I decided that I should really get
into the build of the Ju.87A. However, I had decided that I wanted to build a B
model concurrently with the A, both in markings for Spain as well. After having
had a positive experience building a 21st. Century Toys Macchi Mc.202, I decided
to give their Stuka a whirl and found one on e-Bay for around $20.
The Anton
had been consigned to the stash for a while when I was building a Hasegawa
Bf.109E-3 up in Condor Legion markings when I decided that I should really get
into the build of the Ju.87A. However, I had decided that I wanted to build a B
model concurrently with the A, both in markings for Spain as well. After having
had a positive experience building a 21st. Century Toys Macchi Mc.202, I decided
to give their Stuka a whirl and found one on e-Bay for around $20.
In some respects, these kits are polar opposites. The 21st Century Toys kits present you with a minimum of parts, some unorthodox assembly methods, and toy like features, though the bones of a decent kit with a proper shape. I personally enjoy taking mediocre kits and adding scratchbuilt and parts box details, so I am not put off by this sort of thing.
On the plus side, it has engraved panel lines, a good shape, surprisingly smooth plastic. On the downside, the cockpit is festooned with what are in their scale dinnerplate sized mold marks and is very lacking of detail. It also has the peculiar screw attachments in the fuselage that will leave you with the same dinnerplate sized holes to fill in the fuselage.
Still, other than the aforementioned mold marks, there was only a minimum of cleanup required on most parts. Plastic is thick, but somewhat soft, so that has to be kept in mind. There are no sprues, with the parts grouped into plastic baggies. Most mold lines can be cleaned off with some simple scraping with an X-acto blade. Decals were well printed and are provided for a Luftwaffe aircraft from North Africa with the well-known snake markings.
| CONSTRUCTION |
As I mentioned, I was drawn to build my Stukas while I was finishing a Bf.09E in Condor Legion markings. I have something of a fixation with the Spanish Civil War. It’s a running joke that my parents threw a copy of For Whom the Bell Tolls into my crib for me to chew on and the rest is history. It is true that my interest in Spain began with that book when I read it in eighth or ninth grade. It also began something of fixation with Hemingway and in part, led me to write. Since I had been building models starting at the age of four, naturally, it would be manifest there as well. Now, over thirty years later, I would finally build both versions of the Stuka that served in Spain and add them to my Spanish Civil War collection.
I started work on the 21st. Century Toys kit first. Accordingly, I began with the cockpit, which was weighed in the balance and found wanting. What was there were decently molded seats, instrument and radio panels, control stick, machine gun, shell and link collection bin, and little else.
I started by painting it in Model Master RLM 02 grey and the instrument faces and radio panels in Tamiya Flat black. The instruments were dry brushed in silver and with various accents in red and yellow. I consulted several references on the Stuka and found that it was missing numerous control levers in the cockpit which were made from stretched sprue with blobs of thick CA glue for the knobs. I also added an oxygen bottle and tape seatbelts with buckles that I made from music wire that I had on hand. One item from the parts bin that came in handy was a resin gunners tool kit that I added to cove some of the mold marks. Most of these can either be hidden or are not easily seen when the kit is complete. Everything in the cockpit was given some drybrushing to enhance detail and show wear, then given an acrylic based wash to make it look a bit grimy and used, as appropriate.
With that done, I fitted it to the fuselage and turned in the screws until there was only a small gap left. I then applied gap filling CA glue and screwed it shut, filling any remaining gaps with CA glue applied with a toothpick. Before setting this aside to dry, I filled the screw “pits” with Squadron Green putty and turned my attention to the wings.
These required only a minimum of cleanup and were glued together with the same gap filling glue. The fit was quite good and only a minimum of sanding was required to clean them up once the glue had dried. This was much the same as my previous experience with the Macchi kit.
I was still waiting for putty to dry, so I now turned to the wheel pants, which again went together with no problems. There is a plug if one wishes to build one without the siren, as I did. However, it is an optional part for the kit. As with most spatted gear aircraft, the wheels have to be fitted when they are assembled. This presents its own problems.
 I first
painted the inside of the spats with the same RLM 02 grey. The wheels were glued
up, sanded, and painted in Testors Rubber with the wheel itself being painted in
Model Master Anodonic Grey. Once this was dry, I assembled the landing gear,
sanded the seams and set it aside.
I first
painted the inside of the spats with the same RLM 02 grey. The wheels were glued
up, sanded, and painted in Testors Rubber with the wheel itself being painted in
Model Master Anodonic Grey. Once this was dry, I assembled the landing gear,
sanded the seams and set it aside.
At this point, I did a basic sanding on the fuselage seams and the putty fills over the screws. I then came back and sealed the fills in thin CA glue applied with a toothpick. This dried quickly and was also sanded smooth and left no trace that could be seen once it was painted. The horizontal stabilizers went together with no trouble and after some sanding, I was ready to mate all of the major parts together.
The fit of the wings was fairly good and a little filling with thick CA glue to care of any gaps. The same held true for the stabilizers and before I new it, I had a Ju.87B that was getting very close to being ready to paint. Finish sanding on the seams with 0000 steel wool got everything ship shape and I was now ready to install the cowl and radiator.
The radiator grille was painted in Tamiya Semi Gloss black and accented with a dry brushing of Model Master Burnt Iron. There were some minor fit issues here, but very minor, mainly requiring the same filling techniques. The stabilizer braces, bomb racks and displacement trapeze, brakes and flaps would be fitted after painting. However, I did fit the landing gear and took care of any minor fit issues there, though this would require some tricky masking. Now I was ready to paint a Stuka.
Before I painted the aircraft, I cleaned up the flaps, dive brakes, and stabilizer braces and set them aside to be painted as well. The cockpit and any other openings, including radiator were plugged with damp paper towels. The wheels were covered in Tamiya tape and any gaps in the spats plugged with damp paper towel bits as well.
The panel lines were preshaded and accented with Tamiya Flat Black, as well as the entire rudder. This dried quickly and I masked off the Cross of St. Andrew marking on the tail with Tamiya tape. (I have done this on all 1/32 Condor Legion aircraft, as I find it preferable to using a decal.) Then I sprayed the wingtips and rudder with Tamiya Flat White and when dry, these along with the rudder were masked off.
This was followed by painting the underside in Tamiya XF-23 Light Blue, a well as the underside of the flaps and both sides of the braces, the dive brakes, and the bomb displacement trapeze. This was put on in a couple of light coats which allowed the shading to remain in evidence.
Once this was dry, I began masking it off in preparation for an overall coat of Tamiya XF-61 Dark Green on the upper surfaces as well as the upper surface of the flaps. I went with the Dark Green first in order to minimize overwhelming the preshading of the panels with the Black Green that would follow. Masking fixed landing gear pants on any aircraft can be a bit tricky, though. The basic mask was no problem. Executing the splinter pattern on these complex curves took some patience, but it came off right the first time.
Splinter camo, being very angular, is in many ways easier to mask than a “conventional” camo scheme. It took less time than I had expected overall, though the landing gear, as mentioned was a bit tedious. In order to get the pattern right on the flaps, I taped them in place at the edge of the wings, masked the underside and then simply continued my splinter masking from the trailing edge. Then it was sprayed it in Tamiya XF-27 Black Green.
I was very pleased with everything and overall had found it a trouble-free build. The masks were removed, and everything looked about as perfect as I could have hoped for. I was now getting ready to attach the flaps, brakes and all the “fiddly bits” and get ready to decal it when I noticed a major problem.
 As the 21st.
Century Models kit is molded, there is a small aerodynamic bulge just in front
of where the engine exhausts protrude from the cowl. This is common to almost
all B and subsequent model Stukas. However, it, and the kit style exhausts were
not in use on the B models that served in Spain. These were the Ju.87B-0 version
and they did not have this bulge and featured Ju.87A type exhaust stubs, on
protruding from the cowl rather than flush. Now I had a problem.
As the 21st.
Century Models kit is molded, there is a small aerodynamic bulge just in front
of where the engine exhausts protrude from the cowl. This is common to almost
all B and subsequent model Stukas. However, it, and the kit style exhausts were
not in use on the B models that served in Spain. These were the Ju.87B-0 version
and they did not have this bulge and featured Ju.87A type exhaust stubs, on
protruding from the cowl rather than flush. Now I had a problem.
I did not want to scratchbuild the exhaust stubs, but short scavenging some from another Trumpeter kit, I had few options. I did an exhaustive search for aftermarket exhausts and after about two days, I managed to find a resin set from a e-Bay seller in Russia, of all places. I bought them immediately, and to my surprise, I had them in a mere ten days or so. Meanwhile, I had to address that bulge.
It was a solid piece of plastic. I remembered this from the fuselage assembly as there had been no cavity there. This would simply things, since not fill would be required. Still, I did not want to try taking it off with simple sanding or a knife. I finally attacked with a Dremel tool on low power with small wood cutting bit. Holding a very steady hand, it came off quickly. I did not try to take it all the way down and came back with careful sanding with 220 grit sandpaper, gradually removing it and finally polishing it out with finer grits.
Once I was satisfied that it was smooth, I gave it a final light polish with 0000 steel wool. Then I remasked the area and sprayed it again with the appropriate colors. The results were quite pleasing. There was no evidence that it had ever been there, or that it had been repainted.
While I waited on my exhaust to arrive, I panted the propeller blades in Tamiya Flat Black and all of the spinner parts in Tamiya Dark Green. The canopy was masked off and the splinter pattern was painted there in the appropriate colors. I then painted the interior framing by brush in Model Master RLM 02, though it would be left off until final assembly.
About the time that this was dry, I received my little bag of resin exhausts. It actually had three sets in it, though I will likely never need the rest. It was a very pleasant surprise to find that these fit absolutely perfectly in the slots provided by the kit.
After a successful test fit, I painted them in Testors Rust. Then I dry brushed them extensively in Model Master Burnt Iron, gave them a wash, and glued them in place with CA glue.
Trumpeter JU.87A:
The Stuka is no beauty queen by anyone’s standards.
However, the A model looks like it fell out of the Ugly Tree and hit every
branch on the way down. One of my two best best friends, Lee Stanford and I both
read Harry Tutledove’s World War: In the Balance series where Earth is invaded
by reptilian aliens that look rather like stumpy-tailed, upright walking
chameleons in the middle of
 W.W.II. They
refer to humans, being larger than themselves, as Big Uglies. At one point their
tanks are being attacked by Stukas at which point one of the calls out “Big Ugly
Aircraft! Big Ugly Aircraft!” This caused both of us to laugh as much as any
book ever has, as there has never been a more apt description.
W.W.II. They
refer to humans, being larger than themselves, as Big Uglies. At one point their
tanks are being attacked by Stukas at which point one of the calls out “Big Ugly
Aircraft! Big Ugly Aircraft!” This caused both of us to laugh as much as any
book ever has, as there has never been a more apt description.
Still, this is the beginning of the Stuka and the early version that I wanted to build in Condor Legion markings. Thus, it began, musing over the book read over a decade earlier as I began with the engine.
Unlike some kits, my experience with Trumpeter models is to follow the instructions in order of construction exactly. In many cases, if you do not, you may find that some parts unable to be fitted into places that they should and are supposed to go. Thus, I began with the engine, and I kept to the order of assembly in the instruction sheet for most of the build.
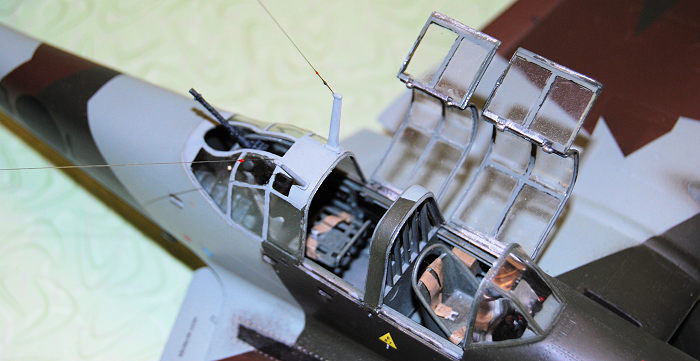
The kit provides a finely detailed engine, as most Trumpeter kits do. Still, unless you wish to display this, it will remain largely unseen. I put mine together, sprayed it in Tamiya Gloss black, and set it aside until needed. Then I turned my attention to the cockpit. The radiator was also prepared and painted much as the one from the B model had been.
This kit has plenty of cockpit detail, so pretty much everything in the kit was built straight from the box. The only thing that I added to the cockpit were my tape seat belts and metal fittings made from music wire once again. The cockpit was painted in RLM 02 again, the instrument and radio panels and various boxes in black and then the usual picking out of details with red and yellow and the usual dry brushing and used the same wash for a weathered look.
I then followed the instructions for assembling the fuselage, installing the fuselage, engine, radiator, cowl, and so on, gluing it together with gap filling CA glue and securing it with heavy rubber bands. The fit was very tight and only required a minim of seam cleanup and sanding. I had been concerned that the exhausts might not line up with the slots in the cowl, but that was never an issue. From there, work began on the wings.
Like everything in the kit, the wings are well molded and fit well. I had a little trouble with the fit of the access panels for the wing guns, as I did not want to display them open. This required some careful filling and sanding, as I did not want to obliterate detail and one of them did not fit as neatly as the other.
With the wings completed, I was ready to fit them to the fuselage and this was where I ran into one of the only real problems in the kit. I may have made a mistake and not closed the fuselage up tightly enough, or it may simply be par for the course with this kit. In any case, the fuselage would not fit into slot in the wings where it was supposed to. It seemed to be about a full millimeter or more too wide. This was solved with a great deal of scraping with a #11 X-acto blade on all of the mating surfaces until it would finally fit. Once it did fit into place, there was a small gap that I had to fill. This was first filled with a careful application of Squadron White Putty with the excess wiped clean with a Q-tip dipped in nail polish remover. After this had dried it was sealed with CA glue applied with a toothpick and sanded smooth.
Before I had reached this point, I had examined the kit and the instructions and found that the wheels are tires were a multipiece affair that really seemed rather pointless since very little would actualy be seen. This is an unfortunate trend in model molding for manufacturers to break things down into gratuitous parts and extra steps. (An excellent example of this that my uncle noted to me was that Eduard 1/72 Spitfire wheels are each composed of seven parts! So, fourteen pieces to assemble to get two 1/72 wheels. Why?) I opted for a set of one piece cast resin tires and wheels that I found on e-Bay.
The same colors were used inside the wheel wells and on the tires as the other Stuka and I soon had the basic sub-assemblies of each of the massive, spatted landing gear completed and ready to be installed. These were glued in place to the underside of the wings, though the huge support struts were left off until painting was completed, lest a masking nightmare ensue. With these and the horizontal stabilizers installed, I sanded out any imperfections and was getting close to replicating the same process of painting, more or less.
 Like the
other kit, it was preshaded in the same manner and the same procedure as before
was followed for painting the rudder and the wingtips. Then the same color of
blue was used for the underside, however the upper surfaces were in a three-tone
splinter pattern of the very irregular style used by many prewar Luftwaffe
aircraft.
Like the
other kit, it was preshaded in the same manner and the same procedure as before
was followed for painting the rudder and the wingtips. Then the same color of
blue was used for the underside, however the upper surfaces were in a three-tone
splinter pattern of the very irregular style used by many prewar Luftwaffe
aircraft.
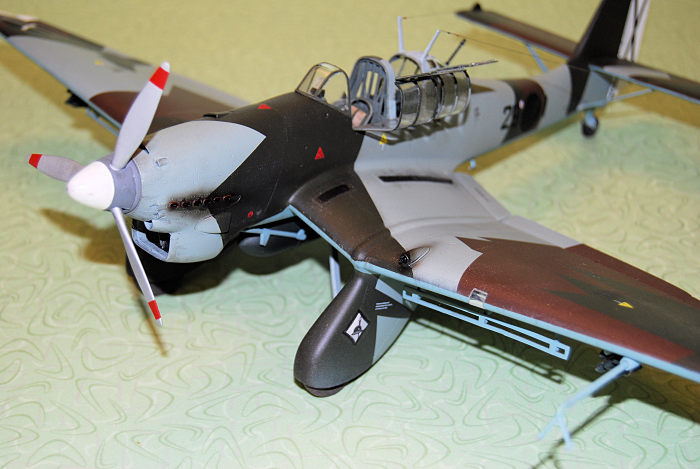
With the underside masked off, I applied an overall coat of Tamiya XF-66 Light Grey. Once dry, this was masked off and the Tamiya Black Green was applied. I was out of any Luftwaffe brown colors at the time, so I mixed my own from Tamiya NATO Brown and judiciously applied splashes of Tamiya Flat black until the color looked right to me when a test sample dried. I then masked of the remaining areas to be covered and sprayed this as well.
This was one of the most challenging and arduous masking jobs that I have ever done. I also did the canopy as the same time, also brush painting the interior framing in RLM 02, though did not install it yet. The same technique had used on the flaps on the Ju.87B was also used on this kit and it worked very well.
After the general painting was done and the masking removed, everything looked good. I was very pleased with how the complicated paint scheme came out right the first time around. This was only my second or third attempt at such a scheme and I had not been so successful in previous attempts.
| FINAL CONSTRUCTION |
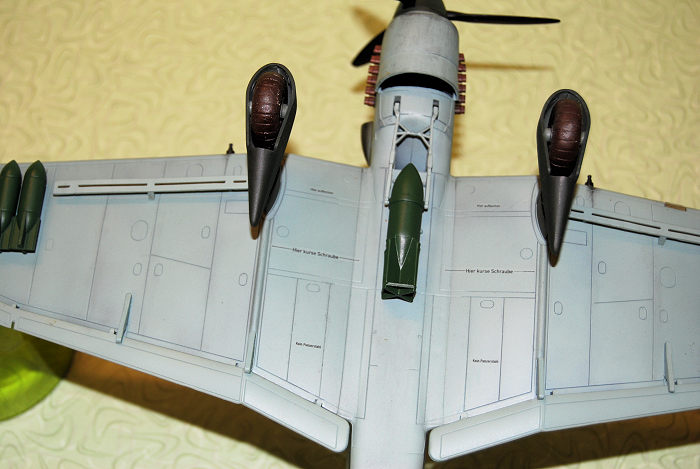
Finishing up the 21st. Century Toys kits was simple, with attaching the flaps, dive brakes, tail wheel, and miscellaneous bits. I also assembled the bombs, which went together well and required only some minor filling with CA glue and sanding. They were painted them in Tamiya NATO Green with a splash of black added to darken the shade some. Once they were dry, they were fitted to the wings and the bomb displacement gear at the centerline. The propeller assembly was installed, and the only thing left was the decaling, weather, canopy, and radio mast.
The Trumpter A model still had quite a bit of work to be done. First the landing gear support struts were test fitted, then painted and carefully glued in place, taking care not to get glue on the finish that I was so happy with. Each of the flap extenders had to be glued on individually after they were painted in the same blue as the underside.
 This part
went well. The flaps themselves proved a bit fiddly. It proved somewhat
difficult to all the attachment points to line up exactly as they were supposed
to on the flaps and get them glued in place. Additionally, there are the main
flaps as well two separate inboard flaps on the inner, upswept portion of the
wing nearest the fuselage. Once attached, these proved more fragile than I had
initially expected, and I popped one or more loose several times before I was
finished.
This part
went well. The flaps themselves proved a bit fiddly. It proved somewhat
difficult to all the attachment points to line up exactly as they were supposed
to on the flaps and get them glued in place. Additionally, there are the main
flaps as well two separate inboard flaps on the inner, upswept portion of the
wing nearest the fuselage. Once attached, these proved more fragile than I had
initially expected, and I popped one or more loose several times before I was
finished.
The dive flaps went on without trouble, as well as the stabilizer supports and tail wheel. The 250 kg bomb was assembled along with the two clusters of smaller bombs for the outboard wing weapons rack, painted in the same color as the those on the other Stuka. The bomb displacement swing for this kit was a bit more complicated and its parts somewhat delicate, so care should be taken with it. I had no troubles but could see that it could easily have been broken or damaged.
The propeller was painted in Tetors Aluminum with Flat Red warning stripes and the spinner in Tamiya Flat White. The assembly was easy and set aside to be installed after decaling was finished.
Once this was done, all that was left was to fit a few other small bits. Then, like the other kit, it was decal time.
| COLORS & MARKINGS |
Both models were sprayed with a coat of Testors rattle can Gloss in preparation for decals. For the basic data stencils, fuel markings, and other general decals, the kit provided markings were used on both aircraft. In both cases these were quite easy to use, A little Micro Set was used to settle them, but there were no problems.
The national insignia were gleaned from Rising Decals Unusual Emils Sheet #RD32004, which I bought three more of after using the same sheet with great satisfaction on my Bf.109E a month or so earlier. I used a small amount of Solvaset with these and they conformed very nicely. The fuselage numbers were gleaned from a couple of different sheets in my rather thick Spanish Civil War decal file. Finally, in both cases, the squadron markings on the wheel pants were made using the Testors Decal Maker program and printed on my inkjet printer. (Ironically, a few weeks or maybe a month after I finished these models, I saw that there was now a decal sheet that offered these markings. Isn’t that the way that it often goes with scratchbuilds, conversions, or in this case, roll your own decals.)
 I waited a
full day for the decals to dry, then sprayed both models with Testors rattle can
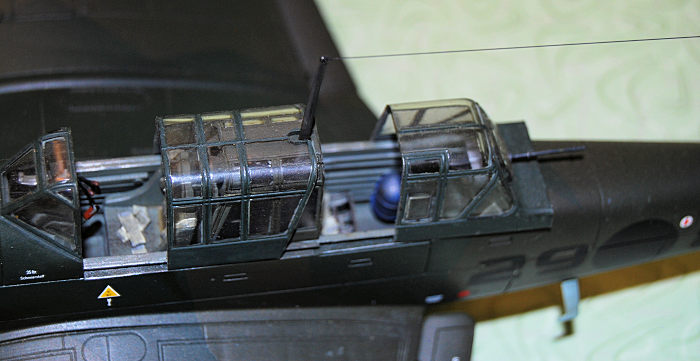
Dullcote. While this was drying, I began preparing the rear gun assembly to
mount in the aft portion of the Anton’s cockpit. I have to say that at this
point, the instructions let me down. I found the instructions and discernible
attachment points quite vague, and it was finally glued up largely by guesswork,
trial, and error. Fortunately, there was very little of the latter.
I waited a
full day for the decals to dry, then sprayed both models with Testors rattle can
Dullcote. While this was drying, I began preparing the rear gun assembly to
mount in the aft portion of the Anton’s cockpit. I have to say that at this
point, the instructions let me down. I found the instructions and discernible
attachment points quite vague, and it was finally glued up largely by guesswork,
trial, and error. Fortunately, there was very little of the latter.
Before installing this or the canopies, I drybrushed both aircraft in the usual various areas to indicate wear. Some light was used in places on the underside and around the scoops and radiator areas. Exhaust stains and gun blast were added with some heavier drybrushing with Model Master Flat Black.
The rear guns were fitted to both aircraft and canopies were glued in place and were relatively simple installs. All were posed in the open positions. The Ju.87A, with its multipiece, side-swing canopy was naturally a little more work to get all four pieces to sit just so, but no real problems.
Finally, the radio masts were fitted, and the radio aerials rigged. The Ju.87B was rigged with stretched sprue. While I was rigging this, my first roll of E-Z line was delivered in the mail and I tried it out on the Ju.87A. I was most pleased with the results. It is now my preferred rigging line for pretty much anything that I have yet encountered. (I liked it so much that I went and rerigged my Hasegawa P-26 in Chinese markings originally done with music wire in E-Z line and was done in less than a third of the time that it had originally taken.) Lastly, the completed propeller assemblies were installed on each model.
| CONCLUSIONS |
These are both very nice kits in their own way. A lot of people will turn their nose up at the 21st. Century Toys kit. However, with my penchant for scratchbuilt and parts box detail add-ons, it came out very nicely and has placed 1st in two model shows that I have entered it in against some very stiff competition. I spent about twenty hours building it and could not be more pleased with the results. I would recommend it to anyone who can find one and wants a Ju.87 B/R model that can be built quickly and easily with a minimum of fuss and a little parts box and scratcbuilding for details.
Unfortunately, the company no longer exists and the molds have shown no signs of resurfacing in the hands of another manufacturer. According to some stories that I have heard, there was an issue over monies owed when the company folded and the molds were seized and destroyed by being left outside in scrap pile in the weather. So, sadly, there may be no more. I have three or four more kits, most notably their A6M3 Zero that I plan to convert to clipped wings and complete as a Hamp.
The Trumpeter Ju.87A took me closer to sixty hours to build, mostly due to assembling such a plethora of parts. I had no real problems that were not mostly easy to deal with, as noted. Like most Trumpeter kits in this scale, it is unnecessarily complicated in some areas, which mainly serves to draw out the length of the build unless one wants to display the engine and other internal components. I was equally pleased with the results and it has also been a 1st place show winner. I would recommend it to modelers with a little more experience and the patience for dealing with so many parts. Still, it is a fine model kit of a type that I never expected to be kitted by a major manufacturer.
| REFERENCES |
Warplanes of the Third Reich, by William Green, Galahad Books, 1990
Warplanes of the Luftwaffe, Editor David Donald, Aerospace Publishing, 1994
Hitler’s Luftwaffe, by Tony Wood & Bill Gunston, Salamander Books, 1977
Junkers Ju.87 Stuka, by Bily Androvic-Bernad, Sagitta, 1992
Ju.87 Stuka in Action, by Brian Filley, Squadron-Signal Publications, 1986
German War Birds, by Kenneth Munson, Robert Rogers House, 1986
Aircraft of the Spanish Civil War:1936-1939, By Gerald Howson, Putnam Books, 1990
The Great Book of World War II Airplanes, Wing & Anchor Press 1988
Condor: The Luftwaffe in Spain: 1936-1939, by Patrick Laureau, Hikoki Publications, Ltd., 2000
The Legion Condor, by Karl Ries & Hans Ring, Schiffer Publishing, 1992
Christopher
Campbell 16 May
2022 Copyright ModelingMadness.com. All rights reserved. No
reproduction in part or in whole without express permission. If you would like your product reviewed fairly and fairly quickly, please
contact
the editor or see other details in the
Note to
Contributors.