| KIT #: | 8M-3302H |
| PRICE: | $10.00 or so |
| DECALS: | One option |
| REVIEWER: | Juan C. Corea |
| NOTES: | Copy of Hobbycraft kit |
| HISTORY |
Undoubtedly one of the most versatile aircraft to enter service with the
Luftwaffe, the Junkers 88 was to serve in an incredible variety of roles: level
bomber, dive bomber, torpedo bomber, night fighter, reconnaissance, pilotless
guided missile…in fact everything except dogfighter and floatplane. Originating
from a 1935 requirement for a fast bomber, the Ju-88V1 prototype first
 took to the
air on
took to the
air on
By early 1940, it was clear that the short-span A-1 variant could be
improved by enlarging the wing and fitting more powerful engines, so work was
started on the A-4, with wingspan increased to 20 meters and metal skinned
ailerons, powered by 1340hp Jumo 211J engines, with forced induction cooling
ducts that added a bulge to the underside of the nacelle. However, the engines
themselves were in short supply, so the A-5 interim variant with the longer span
wing but retaining the A-1’s Jumo 211B engines was put into service, reaching
units by September 1940.
Production of the 211J engines finally got underway in early 1941, and the A-4 variant would become the most numerous of the A series. Several changes were introduced during production, including the change from metal to wooden propellers with wider blades, changing the rudder leading edge from straight to one with an upper balance horn, and incremental additions to the defensive armament. Most of the aircraft would be expended in the Eastern front, but some war-weary examples would survive to become the lower component for the Mistel composite.
| THE KIT |
 Kitech
is known for ripping off other manufacturer’s molds, mostly Academy and
Hobbycraft, and this is no exception, being a copy of the Hobbycraft kit, which
itself was inspired by the
Kitech
is known for ripping off other manufacturer’s molds, mostly Academy and
Hobbycraft, and this is no exception, being a copy of the Hobbycraft kit, which
itself was inspired by the
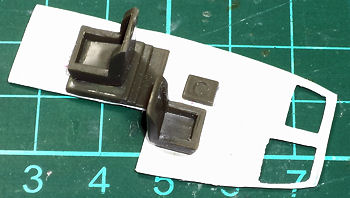
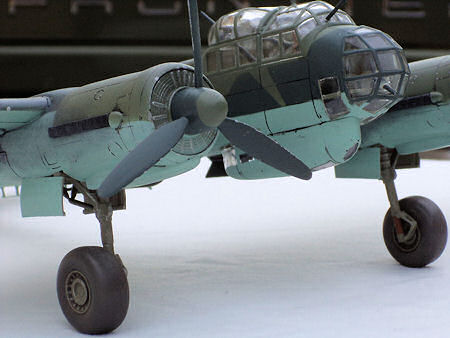
Now, the kit itself is a mixture of A-4 and A-5 features, with A-4 nacelles and mid-late A-4 rudder, but with the thin blade props of an A-5 and the armament as depicted in the instructions does not correspond to any specific variant, but is closer to a late A-5, and the Peil-Gerät window is missing, which would be more consistent with an A-5. The wheels also are odd, looking like B-26 wheels and the oleos are molded fully extended, so the aircraft will sit tall.
| CONSTRUCTION |
First thing in the order of battle was to look for a suitable scheme
that could be built from the kit, which meant a very early A-4 with metal props
and straight rudder. A quick Google search brought up a profile, and in I went.
After the requisite parts cleanup, some of the shallower panel lines were
rescribed to make them more consistent with the rest. I then proceeded to build
 subassemblies:
the wings, adding the dive brakes, bomb racks and a flat panel that forms the
nacelle top. I also opened the holes for landing lights. Yes, I said holes, on
both sides, the product of taking tools to plastic before checking references
and finding that 88’s only had one light on the port wing. D’oh! Realizing that
the cockpit could be added after closing up the fuselage, I did just that. Fit
was pretty good so far. After that, I saw that the wing attaches to the fuselage
by a rather small tab, so a couple of pins were fashioned from sections of paper
clips and used to reinforce the joint. The rudder leading edge was filled and
rescribed straight, so by now the basic airframe took shape.
subassemblies:
the wings, adding the dive brakes, bomb racks and a flat panel that forms the
nacelle top. I also opened the holes for landing lights. Yes, I said holes, on
both sides, the product of taking tools to plastic before checking references
and finding that 88’s only had one light on the port wing. D’oh! Realizing that
the cockpit could be added after closing up the fuselage, I did just that. Fit
was pretty good so far. After that, I saw that the wing attaches to the fuselage
by a rather small tab, so a couple of pins were fashioned from sections of paper
clips and used to reinforce the joint. The rudder leading edge was filled and
rescribed straight, so by now the basic airframe took shape.
At this point, the build was going smoothly…famous last words. I test
fitted the gondola, which was a case of “fits where it touches”, and marked its
position so I could open a hole in the fuselage bottom, which was molded solid.
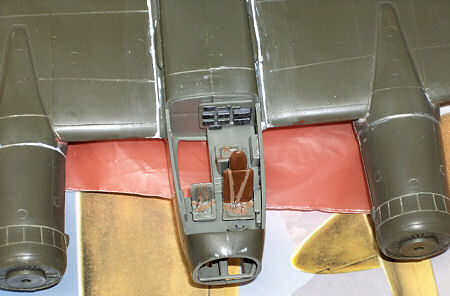
I then proceeded to test fit the cockpit floor, and discovered that the opening
in it didn’t match, in fact it was on the opposite side! D’oh again! The mold
maker had made the cockpit floor a mirror image of the real thing, plus, the
hole for the control column was at the midline and the instructions would have
you placing the rudder pedals on the right side of the floor, making for very
interesting cockpit ergonomics. So, using the original floor for a pattern, a
new one was made from sheet stock, and the seat pedestals cut off from
 the kit part
and grafted into the replacement. The new cockpit floor was glued to the
fuselage and two blanking plates were fashioned from sheet stock to close off
the space between the cockpit floor and the entrance to the gondola. Getting out
the airbrush, I sprayed the whole interior with Model Master RLM 02. Now this
particular bottle of paint was bad, or MM changed the formula, as it was nearly
translucent even when sprayed straight off the bottle, and would not cover at
all. At this point I got bored of fighting the kit, and it went into the long
term project holding area, better known as the Shelf of Doom.
the kit part
and grafted into the replacement. The new cockpit floor was glued to the
fuselage and two blanking plates were fashioned from sheet stock to close off
the space between the cockpit floor and the entrance to the gondola. Getting out
the airbrush, I sprayed the whole interior with Model Master RLM 02. Now this
particular bottle of paint was bad, or MM changed the formula, as it was nearly
translucent even when sprayed straight off the bottle, and would not cover at
all. At this point I got bored of fighting the kit, and it went into the long
term project holding area, better known as the Shelf of Doom.
Fast forward about six months, and with the shelf of doom threatening
collapse under the weight of the kits on it, I decided to give the thing another
shot. Looking for a substitute for the MM paint, I found a forgotten tinlet of
Revell 45 light olive, a little greener but close enough. The interior got
painted and assembled, seat cushions were painted MM Leather, and seatbelts
added from tape. On to the nacelles, which fit dreadfully, the rear part was
fitted to the wing and faired in with Bondo glazing putty and CA, fairly
standard work. Now, the front part of the nacelles was even worse fitting, with
the alignment pins doing just the opposite of their intended purpose, they were
cut off and the nacelle halves sanded to fit. The kit parts had a strange series
of lines that were meant to be cowl flaps, but they were incomplete, so those
got scribed as well. The open back end of the engine nacelles received a
blanking plate to prevent seeing through the wheel wells all the way to the
engine fronts and to provide a gluing surface, as they were basically a butt
joint to the wing and sure to get knocked off. Par for the course, they fitted
with a large step, meaning more putty and CA work. The
 radiator
fronts were installed and some styrene strip glued to the inside of the wells to
provide some structural detail, with another strip added to the tail wheel well
to hide a large seam there. The aft wheel doors were added to the nacelle in the
closed position, which needed more sanding, filling and rescribing, as they were
inexplicably meant to be glued open, which would only happen during the gear
retraction cycle.
radiator
fronts were installed and some styrene strip glued to the inside of the wells to
provide some structural detail, with another strip added to the tail wheel well
to hide a large seam there. The aft wheel doors were added to the nacelle in the
closed position, which needed more sanding, filling and rescribing, as they were
inexplicably meant to be glued open, which would only happen during the gear
retraction cycle.
By now I had a complete airframe so all the scratches and seams got corrected with Liquid paper correction fluid (if you haven’t tried it for scratch filling, give it a go, it dries in seconds and sands like a charm, just remember to get the solvent-based type, the water soluble stuff is useless in this regard).The clear parts got a dip in Future, holes drilled for the guns and masked off with magic type tape, which was fairly easy but tedious with the 88’s greenhouse canopy. Much to my surprise, they fit perfectly, and were glued on with watchmaker’s cement. The top greenhouse got tacked on with clear parts glue, since it would get taken off after painting to fit the guns. After that, it’s off to the paint shop, but not before scratchbuilding the underside towel rack antenna with some strip styrene and wire.
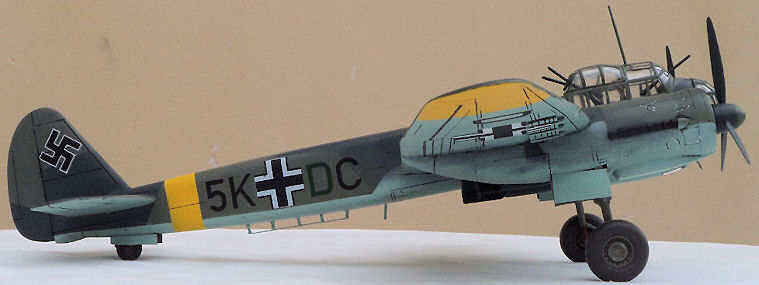
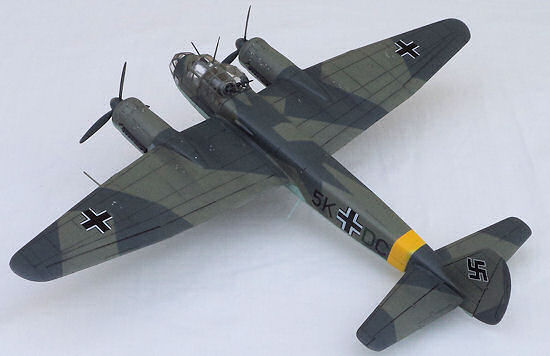
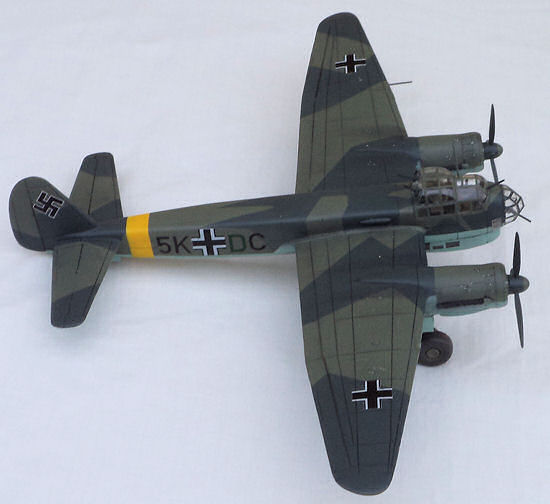
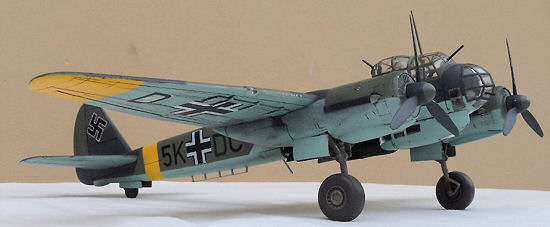
| COLORS & MARKINGS |
The now complete airframe got a primer coat with some generic hardware
store enamel, and panel lines preshaded with Model Master RLM 61Dunkelbraun,
which gives a less stark result than straight black. The theater band was first
undercoated with RLM 21 white then painted with gloss yellow enamel I found
lying about the garage. That got masked off and the underside got sprayed with
RLM 65 from a Monogram-Humbrol tinlet that must be old enough to vote, the
topside received a standard RLM 70/71 splinter scheme with MM enamels, and then
gloss coated with Future in preparation for decals.
 Since
the kit decals were basically useless and I was doing another scheme anyway,
that meant I’d have to print my own, leading to another six months of
procrastination. Then, disaster struck. Before wasting a sheet of decal paper, I
decided to do a trial run on plain paper on my desktop printer. The odd size
paper jammed behind the printer rollers and somehow broke a paper feed sensor
inside the thing, at 2 AM, no less. Cue in a lot of unprintable language and a
two hour disassembly and repair job. Since I still had to do the decals, I
borrowed my wife’s printer, one of those cheap-butt jobs, but with a straight
paper path, which did the job. Moral #1, the KISS principle is alive and well.
Moral #2, if you’re going to use stinky stuff like decal bonder, do it outside
the house or when the lady of the house is away, or risk taking flak from her
about it.
Since
the kit decals were basically useless and I was doing another scheme anyway,
that meant I’d have to print my own, leading to another six months of
procrastination. Then, disaster struck. Before wasting a sheet of decal paper, I
decided to do a trial run on plain paper on my desktop printer. The odd size
paper jammed behind the printer rollers and somehow broke a paper feed sensor
inside the thing, at 2 AM, no less. Cue in a lot of unprintable language and a
two hour disassembly and repair job. Since I still had to do the decals, I
borrowed my wife’s printer, one of those cheap-butt jobs, but with a straight
paper path, which did the job. Moral #1, the KISS principle is alive and well.
Moral #2, if you’re going to use stinky stuff like decal bonder, do it outside
the house or when the lady of the house is away, or risk taking flak from her
about it.
By now I had the decals ready, time to put them on the model. The
underside crosses I made shattered upon hitting the water, so I decided to give
the kit crosses a try. They survived but refused to conform to the dive brakes,
even with setting solution. After much prodding, they sort of settled, but tore
along the edges of the cross. Since all the tears were along the black part of
the cross, I corrected them with a fine marker, not perfect, but not too bad,
either. I recoated the homebrew decals and applied them, the crosses went along
all right but the call letters silvered badly. More prodding and poking ensued,
with Future as a setting solution. They still silvered, so out with the decal
solvent again, to no avail. Finally, in desperation I tried some toluene, which
helped. Still some silvering remained, but by now I´d had enough of this decal
business, so I sealed them with more Future and gave the model a black
watercolor wash.
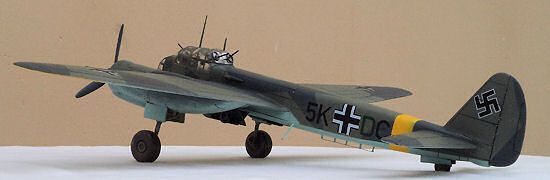
| FINAL CONSTRUCTION |
After cleaning up, assembling and painting assorted parts like the guns,
propellers and antennas it was time to tackle the landing gear. The main landing
gear struts sit on two small ledges on the edge of the nacelle and are supposed
to be butt glued to them, not a very sound idea in terms of strength so again I
fashioned some pins from paper clip wire to reinforce the joint and fastened
them with some 10-minute epoxy, as well as the tail gear strut and the wheels
which fit very loosely on their axles. The retraction struts were added, again
there’s no positive locators, so it was again a case of fiddling for the best
fit. The kit gear doors were
 useless, so
out came the sheet stock to scratchbuild replacements. The kit came without
bombs, so I added some from the spares box. The exhausts would not fit and
needed a lot of sanding to make them enter their recesses, after which they were
brush painted MM Burnt Iron metalizer, which I’ve found can be brush applied in
thin coats without damaging the plastic. The landing lights were made from a
piece of clear toothbrush handle, painted and installed, the greenhouse came off
again to install the guns and reglued in place, and the last fiddly bits added.
Pastels were used for exhaust staining, some minimal chipping given with silver
paint and some mud added to the wheels from some powdered mud pack I found in my
wife’s cosmetic cabinet (further confirming my view that: a) it’s a great source
for modeling materials and b) women will put anything in their faces if it’s
sold as a cosmetic!). A flat coat was applied and the masking removed from the
clear parts.
useless, so
out came the sheet stock to scratchbuild replacements. The kit came without
bombs, so I added some from the spares box. The exhausts would not fit and
needed a lot of sanding to make them enter their recesses, after which they were
brush painted MM Burnt Iron metalizer, which I’ve found can be brush applied in
thin coats without damaging the plastic. The landing lights were made from a
piece of clear toothbrush handle, painted and installed, the greenhouse came off
again to install the guns and reglued in place, and the last fiddly bits added.
Pastels were used for exhaust staining, some minimal chipping given with silver
paint and some mud added to the wheels from some powdered mud pack I found in my
wife’s cosmetic cabinet (further confirming my view that: a) it’s a great source
for modeling materials and b) women will put anything in their faces if it’s
sold as a cosmetic!). A flat coat was applied and the masking removed from the
clear parts.
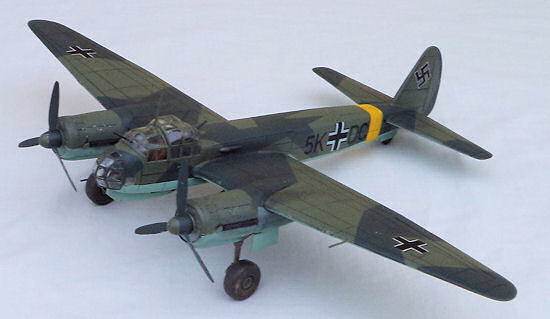
But this kit was to bite me one last time. Leaving the masking on for
six months meant that there was a lot of tape residue on the greenhouse, so I
tried to take it off with a Q-tip dipped in alcohol, which attacked the Future
and fogged the clear parts. After the expected round of curses, I let the thing
dry and carefully brushed on some Future on the glass, restoring them to their
transparent state, at which point I decided to call it done before some other
disaster ensued.
| CONCLUSIONS |
While I was looking for a markings scheme for this kit, I did a search
for built examples and found nothing, zip, zero. Now I know why. It doesn’t look
too shabby on the shelf sitting next to the other Luftwaffe aircraft, but it’s
really more of a show of my stubbornness than of skill and patience.
Now, if you happen to have this kit in your stash, what can you do with
it?
I’d say the least painful thing to do would be to disregard its issues
and use it as a cheap canvas for that markings scheme you always wanted to try,
or for a ceiling hanger for the kids’ room, or on a more evil bent, turn it into
the styrene version of a Christmas fruitcake and foist it off on an unsuspecting
friend (or better yet, enemy!). But if you’re looking for an accurate
representation of a Ju-88, save yourself the headaches, the therapy, and the
medication and get the Dragon kit.
| REFERENCES |
Ju-88 in Action Part 1.
Squadron-Signal Publications, 1988
Aero Detail No.20 Junkers Ju88.
Aerodata International No.9 Junkers Ju88A. 1979.
Juan C. Corea
November 2012 Thanks to If you would like your product reviewed fairly and
fairly quickly, please
contact
the editor
or see other details in the
Note to
Contributors.