|
KIT: |
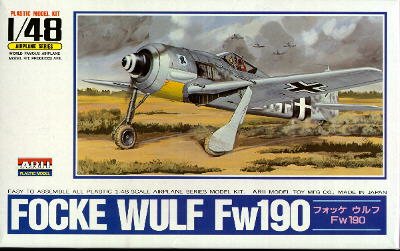
ARII 1/48 FW-190A-8 |
|
KIT # |
A335 |
|
PRICE: |
@$40 |
|
DECALS: |
See Review |
|
REVIEWER: |
Kelly Jamison |
|
NOTES: |
Otaki mold, Aeromaster 48-006 decals |
|
HISTORY |
As the war wound down, the FW 190A-8 maintained its importance to the Third Reich as their most important fighter. Its sheer astounding production numbers, even during the largest bombing campaign ever, ensured that pilots would have plenty of aircraft to fly. Many were found derelict by the victorious allies on almost every airfield they encountered. There are many books that speak of the virtues of this aircraft so I will not go into it here.
|
THE KIT |
 This kit is from
the old Otaki molds and is now produced by Airfix. It shows it’s age against the
new Hasegawa and Tamiya products. Although the kit does scale out and all the
major panel lines are mostly correct, there is no rivet detail on the external
skin and the cockpit detail is poor to non-existent. There are many good Fw190
cockpits out there that can fix up this area in no time flat. I started out with
the usual construction of the cockpit first. I airbrushed Testors Acryl RLM 02
Gray for the interior. The instrument panel is a small trapezoid piece of
plastic. I painted it Aircraft Interior Black and put Model Master Instrument
gauges in their proper positions. I then robbed my parts box for a new seat. I
settled on the DML Dragon Fw190A8/R11 seat. I used an off gray mix for the
straps and silver to highlight the buckles. I did not pay too much attention to
this area since I planed to display the kit with the canopy closed. The I
thought the kit just isn’t worth $20.00 in aftermarket photo-etched and resin
parts.
This kit is from
the old Otaki molds and is now produced by Airfix. It shows it’s age against the
new Hasegawa and Tamiya products. Although the kit does scale out and all the
major panel lines are mostly correct, there is no rivet detail on the external
skin and the cockpit detail is poor to non-existent. There are many good Fw190
cockpits out there that can fix up this area in no time flat. I started out with
the usual construction of the cockpit first. I airbrushed Testors Acryl RLM 02
Gray for the interior. The instrument panel is a small trapezoid piece of
plastic. I painted it Aircraft Interior Black and put Model Master Instrument
gauges in their proper positions. I then robbed my parts box for a new seat. I
settled on the DML Dragon Fw190A8/R11 seat. I used an off gray mix for the
straps and silver to highlight the buckles. I did not pay too much attention to
this area since I planed to display the kit with the canopy closed. The I
thought the kit just isn’t worth $20.00 in aftermarket photo-etched and resin
parts.
|
CONSTRUCTION |
After cutting the
fuselage halves off the tree, I airbrushed the side walls the same as the
cockpit interior, RLM 02 Gray. The tail wheel fits onto two small alignment
tabs. It seems weak in the detail department and you might want to go to the
spare parts bin to get one with a little more detail to it. A quick cleanup on
the edges of the 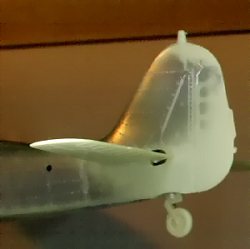 two fuselage halves and they were glued together. I used Ambroid Pro Weld on all the seams letting the capillary action draw the glue
into the seams and giving just a minute to soften up the glue before pressing
the two halves together. Then I set the completed fuselage off to the side for
drying. The wings were the next step to tackle. The wheel well has detail but
lacks accuracy or depth compared to the newer kits. Some detailing in this area
is forthcoming. I snipped the wings off the tree and they sandwiched together
just fine so again I took Ambroid Pro Weld and ran it down the seam lines. Using
my trusty and ever present cloths pens I clamped the wing halves together.
Turing my attention back to the fuselage I notice there is no connecting rod
running through the tail hooking up the two elevator surfaces. I took my pin
vise and drilled a small hole through the tail right at the termination point of
the main tail plane. It is not an exact circle but a “D” shaped opening, with the
back of the “D” facing the front of the plane. Then using some Evergreen stock
round plastic rod I cut a small piece to represent the connecting shaft. Then I
used my pin vise and drilled out the holes for raising the tail to sight in the
guns, the lox vent and oil drain lines. This is a simple modification that adds
a lot to the detail in this area.
two fuselage halves and they were glued together. I used Ambroid Pro Weld on all the seams letting the capillary action draw the glue
into the seams and giving just a minute to soften up the glue before pressing
the two halves together. Then I set the completed fuselage off to the side for
drying. The wings were the next step to tackle. The wheel well has detail but
lacks accuracy or depth compared to the newer kits. Some detailing in this area
is forthcoming. I snipped the wings off the tree and they sandwiched together
just fine so again I took Ambroid Pro Weld and ran it down the seam lines. Using
my trusty and ever present cloths pens I clamped the wing halves together.
Turing my attention back to the fuselage I notice there is no connecting rod
running through the tail hooking up the two elevator surfaces. I took my pin
vise and drilled a small hole through the tail right at the termination point of
the main tail plane. It is not an exact circle but a “D” shaped opening, with the
back of the “D” facing the front of the plane. Then using some Evergreen stock
round plastic rod I cut a small piece to represent the connecting shaft. Then I
used my pin vise and drilled out the holes for raising the tail to sight in the
guns, the lox vent and oil drain lines. This is a simple modification that adds
a lot to the detail in this area.
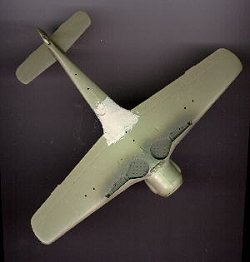 Once the wings and
fuselage were dry I ran a bead of superglue down each wing root and glued the
wings on. Pay careful attention to the dihedral of the wings. It is one of those
things that if done right you don’t even notice it. But if it is wrong, it
stands out like a sore thumb. The wings fit poorly on the bottom. It took
considerable amount of Squadron White Putty to fill in the difference between
the level of the bottom wing to the fuselage. The sun visor that extends over
the instrument panel was way out of alignment. A healthy dose of putty was used
there, then sanded flat. The small antenna mount on the top of the tail went the
way of so many other Fw190 construction projects. Getting battered by repeated
blows until it breaks off or just bends over like Kiko the Killer Whale’s dorsal
fin. It will be replaced by card stock later in the construction. Once I put the
wings and fuselage into my makeshift jig, I trimmed up the forward gun covers. I
would not worry too much about the fit of the cowling. If you look close at a
reference picture you will notice the poor fit on the real thing. This is
probably Otaki’s crowning achievement on this kit. It will need some filling and
sanding on the seams on the forward gun cover.
Once the wings and
fuselage were dry I ran a bead of superglue down each wing root and glued the
wings on. Pay careful attention to the dihedral of the wings. It is one of those
things that if done right you don’t even notice it. But if it is wrong, it
stands out like a sore thumb. The wings fit poorly on the bottom. It took
considerable amount of Squadron White Putty to fill in the difference between
the level of the bottom wing to the fuselage. The sun visor that extends over
the instrument panel was way out of alignment. A healthy dose of putty was used
there, then sanded flat. The small antenna mount on the top of the tail went the
way of so many other Fw190 construction projects. Getting battered by repeated
blows until it breaks off or just bends over like Kiko the Killer Whale’s dorsal
fin. It will be replaced by card stock later in the construction. Once I put the
wings and fuselage into my makeshift jig, I trimmed up the forward gun covers. I
would not worry too much about the fit of the cowling. If you look close at a
reference picture you will notice the poor fit on the real thing. This is
probably Otaki’s crowning achievement on this kit. It will need some filling and
sanding on the seams on the forward gun cover.
 The flight
controls have some kind of raised lines that represent the under skeleton of
ribs and stiffeners under fabric. I always thought this gave the kit a cheap toy
look to it. Scrape them off until they are barely noticeable. Ailerons on the
real thing are doped covered fabric panels that are smooth to the touch. I took
the flat edge of my #11 Exacto blade and scraped each flight control allowing
the blade to ride over the detail lines until there was a slight scalloped look
to the aileron. This technique also allows you to thin out the ailerons and trim
tabs a bit on the trailing edge. I used Rub-N- Buff Silver to show off any seams
that I missed sanding or that needed a little more attention. I put it on the
leading edges and around heavy traffic areas right before painting, then use my
# 11 Exacto knife to chip the paint away. After the final dull coat it turns to
a perfect weathered aluminum.
The flight
controls have some kind of raised lines that represent the under skeleton of
ribs and stiffeners under fabric. I always thought this gave the kit a cheap toy
look to it. Scrape them off until they are barely noticeable. Ailerons on the
real thing are doped covered fabric panels that are smooth to the touch. I took
the flat edge of my #11 Exacto blade and scraped each flight control allowing
the blade to ride over the detail lines until there was a slight scalloped look
to the aileron. This technique also allows you to thin out the ailerons and trim
tabs a bit on the trailing edge. I used Rub-N- Buff Silver to show off any seams
that I missed sanding or that needed a little more attention. I put it on the
leading edges and around heavy traffic areas right before painting, then use my
# 11 Exacto knife to chip the paint away. After the final dull coat it turns to
a perfect weathered aluminum.
Next came the armor plated ring that goes inside of the nose of the engine cowl. It cleaned up nicely and fit snugly into the engine cowling. This area will be airbrushed flat black before the cooling fan is placed on the engine.
|
PAINT & DECALS |
 Once this
was done I pre-shaded along all panel lines flight control lines with my
airbrush and flat black paint. This is an old trick for bringing out more detail
than is there. It also works for giving a darker dirty look to those areas.
Once this
was done I pre-shaded along all panel lines flight control lines with my
airbrush and flat black paint. This is an old trick for bringing out more detail
than is there. It also works for giving a darker dirty look to those areas.
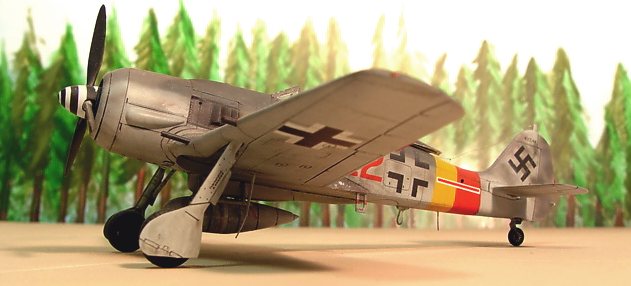
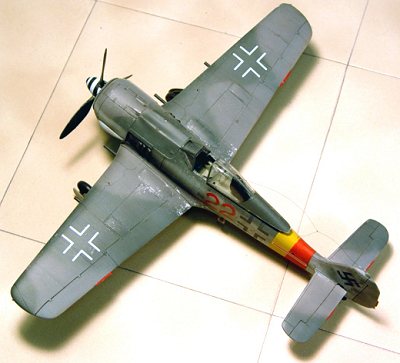
Then following the paint instructions I sprayed the camouflage onto the model. I painted the entire aircraft Testors Acryl RLM 76. Then the other two colors of Testors Acryl RLM 74 and RLM 75 were sprayed in the standard factory paint scheme of that time. Post-It Notes were used for frisking of areas that needed cover. I like the low adhesive properties of the Post-It Notes but paper can be hard to work with. Some of the more complex curves of the wing root had to be hand cut. I added a small amount of white to the base color and painted the ailerons to give them a lighter, faded look. After the paint dried, I gave it a coat of Future Floor Wax cut 50/50 with rubbing alcohol. This gave the model a nice gloss coat for the decals to adhere to.
This is my
favorite part of model building. The Decals! It brings the plane to life and
gives it some personality. Throw away the stock decals. There are so many
aftermarket decals that it can be overwhelming deciding which one to model. I
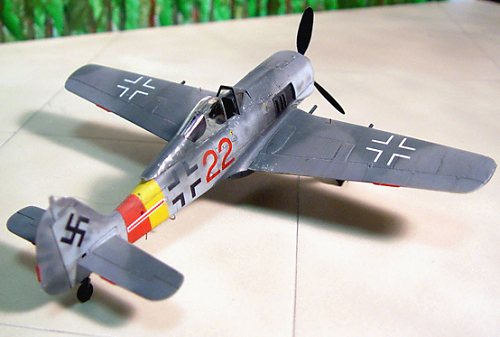
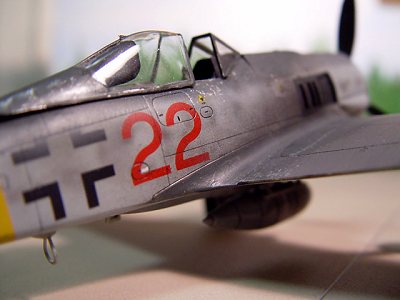
am using AeroMaster Decals Fw-190A Butcher Birds 48-006. I chose Fw-190A-8 w.nr.
490044, II./JG 301, Germany, 1945. The red and yellow Home Defense band along
with the red 22 looks like it would make a very colorful example of the Butcher
Bird. The Squadron Fw-190 In Action #19 and the AeroMasters decals differ just a
bit. The book states the w. nu. as being 490644 but AeroMasters says that it is
49044. (I'd go with the book as most Luftwaffe serials by this time were six
digits. Other sources also state that this particular plane is an A-9 variant.
The easiest way to tell between the A-8 and A-9 is that the latter has 14 blades
in the engine fan for the more powerful engine vice the normal 12. Your anal
Editor) The bar that is on the tail band is black in the book but red with a
white border on the decals. The spinner in the book is black with a yellow
stripe, while the AeroMasters folks say it is the traditional black with white
stripes. Finally the book has a very light gray over medium gray camouflage
pattern. Knowing AeroMasters attention to detail verses the 1975 copyright of
the Squadron book, I am leaning to the AeroMasters camp as to who is right.
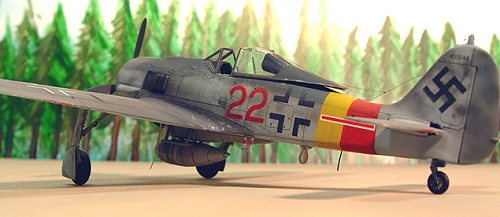 Researchers have learned a lot about Luftwaffe paint schemes in the intervening
years. I have bought the new Squadron Fw-190 "In Action" book #170. I also used
the Schiffer Military History Vol 46 FW 190 by Heinz J Nowarra to aide my
research.
Researchers have learned a lot about Luftwaffe paint schemes in the intervening
years. I have bought the new Squadron Fw-190 "In Action" book #170. I also used
the Schiffer Military History Vol 46 FW 190 by Heinz J Nowarra to aide my
research.
The tail band went on smoothly but it was hard to work out all the wrinkles. I did have an alignment problem at the bottom that was difficult to correct. A light coat of SolvaSet and the decal snuggled down just right. The decals are good but they demand attention. You can’t just slap them on and go. Leave plenty of water to allow them to slide into place. On the plus side they are opaque but thin. The crosses continued to fold over on themselves driving me crazy. SolvaSet cured any problems I had with compound curves or panel lines. Don’t worry if the Future Floor Wax turns milky white. It will dry clear after a few minutes. I let the decals dry over night then another coat of Future. This seals down the decals and gives them a painted on look. I then used a ZIG Millennium .005 Graphics Pen and went through all the panel lines and hinge lines. I don’t usually do this but I am trying to milk every drop of detail out of this plane possible. The final coat of Testors Dull Coat adds the finishing touches to the paint. Now on to the little bits and pieces.
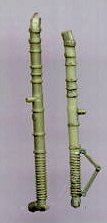 The landing
gear was the next subject to tackle. Measurements for all the molds came from a
Fw 190A-8 hanging in a Munich museum. The landing gear was set in the down
position. So the struts are extended out due to the weight of the wheels and
tires. This error in measurements made its way to the molds! The landing gear
should be exactly 1 5/16” long. I made the corrections by razor-sawing off some
of the strut cover and re-attaching it with super glue. Oddly enough the
scissor-jacks fit correctly after the shorting modifications are made! The
longer side of the scissor-jacks should be towards the ground. The two mold
halves were out of alignment causing the gear to have an oval shape when all the
flash was removed. Getting the landing gear to sit right is another chore. The
ends of the struts fit into holes in the wheel well area without much regard to
the amount of forward rake or inward sweep. The outward locking mechanisms were
installed last to set the struts at the proper angle.
The landing
gear was the next subject to tackle. Measurements for all the molds came from a
Fw 190A-8 hanging in a Munich museum. The landing gear was set in the down
position. So the struts are extended out due to the weight of the wheels and
tires. This error in measurements made its way to the molds! The landing gear
should be exactly 1 5/16” long. I made the corrections by razor-sawing off some
of the strut cover and re-attaching it with super glue. Oddly enough the
scissor-jacks fit correctly after the shorting modifications are made! The
longer side of the scissor-jacks should be towards the ground. The two mold
halves were out of alignment causing the gear to have an oval shape when all the
flash was removed. Getting the landing gear to sit right is another chore. The
ends of the struts fit into holes in the wheel well area without much regard to
the amount of forward rake or inward sweep. The outward locking mechanisms were
installed last to set the struts at the proper angle.
I turned my attention to the propeller and intercooler fan. Due to the molding process of the fan, there are seam lines between each of the intercooler fan blades. Each one of these was scraped smooth and the intercooler was airbrushed Testors Acryl Aircraft Interior Black then place inside the cowling and glued down. The propeller isn’t that bad. It needs a little shaping on the back side but is the right length and shape. The blades are painted black-green with the hub and prop retainers painted silver. The prop glues on easily to a shaft that comes out of the intercooler. Make sure to line up the segmented spinner retaining ring on the intercooler with the prop blades so that the spinner will fit correctly. The spinner got painted flat black and then a coat of Future was used to prepare it for the white spiral decal. Once it was dry the AeroMaster decal was applied. Take your time and trim off the excess at the bottom. I let the plane dry for 24 hours and applied another coat of Future. Once it was dry, I sprayed the model with Testors Acryl Dullcoat.
|
MORE CONSTRUCTION |
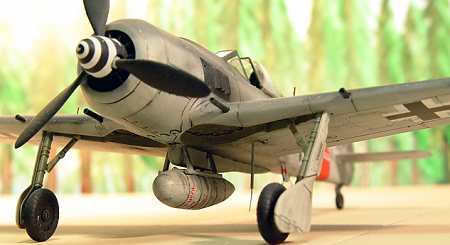
Next came the centerline bomb/fuel tank rack. It had some indentations in the sides that had to be filled. The stabilizing racks are too thick for this scale and round stock rod should be used in its place. When you set the centerline rack down on the bottom of the plane, it rocked back and forth. I glued the front end down and let it dry then tacked down the back of the rack.
I took one look at the drop tank and it was off to the parts bin. I used an extra one from the Trimasters Fw-190A-8/R-11 kit. It looks much better and fits great. I used a bit of leftover pitot tube to be the fuel line and some foil from a wine bottle (I’ve taken up drinking since building this kit) to act as the steel band used to hold the tank to the mounting rack. I used stenciling from the ProModeler Fw 190G-2/G-3 decal set to finish out the external stores.
 Now on to
the next problem: the wheels. I tried different rational to explain the terrible
wheels that came with the kit. Maybe they were for winter use only? No. Maybe
for rough fields in Russia? No. Maybe they are just wrong. Yea! As I was doing
my research, A friend of mine in Germany said that when the plane that the
measurements were taken from was restored, they used a hub set from a
Messerschmitt and then just came up with a close match for the tires. The tires
were too fat and the wheel too thin. This explains everything. I robbed a set of
wheels from the Trimaster's Fw190D-9 Dora kit. These wheels were going to be
replaced with True Detail ones anyway. After painting the hubs flat black and
the wheels a very dark grey, I drilled out the hub hole for the landing gear
axle They will get a coat of pastels to dirty them up with brake dust and
runway dirt when the plane is finished.
Now on to
the next problem: the wheels. I tried different rational to explain the terrible
wheels that came with the kit. Maybe they were for winter use only? No. Maybe
for rough fields in Russia? No. Maybe they are just wrong. Yea! As I was doing
my research, A friend of mine in Germany said that when the plane that the
measurements were taken from was restored, they used a hub set from a
Messerschmitt and then just came up with a close match for the tires. The tires
were too fat and the wheel too thin. This explains everything. I robbed a set of
wheels from the Trimaster's Fw190D-9 Dora kit. These wheels were going to be
replaced with True Detail ones anyway. After painting the hubs flat black and
the wheels a very dark grey, I drilled out the hub hole for the landing gear
axle They will get a coat of pastels to dirty them up with brake dust and
runway dirt when the plane is finished.
 The canopy
supplied in the kit is wrong for Red 22. It should have a late war blown canopy.
The only picture I could find shows no canopy at all. Squadron and AeroMasters
both show a blown canopy in their depiction of Red 22. I will do the same. I
pilfered a canopy out of my Tamiya Fw 190D-9. I will replace it with the more
accurate blown canopy that Squadron makes. I used a True Details Fast Frames
Canopy Set on the clear parts. I can’t tell you how much I love these Fast
Frames. Just airbrush your interior color first then paint the frame adhesive
the color of the plane and apply with a little soap and water. You will need the
soapy water to move the frisk paper around. It washes off with no problem. I
dipped the whole thing into a small tin of Future three times and set it on wax
paper after dabbing off the excess runoff with a paper towel. Put a cup over the
canopy to protect it from dust and let it dry over night. Canopies have always
been my weak point. All of your work can be destroyed with a poor fitting or bad
paint job. The headrest/armor plating is fashioned using Milliput. I took the
measurements from the Tamiya Fw-190D-9 to replicate it. Once I let it dry
overnight, I shaped it to the proper dimensions with a file and painted it
black. A bit of epoxy glue to hold it in place and the canopy was finished.
The canopy
supplied in the kit is wrong for Red 22. It should have a late war blown canopy.
The only picture I could find shows no canopy at all. Squadron and AeroMasters
both show a blown canopy in their depiction of Red 22. I will do the same. I
pilfered a canopy out of my Tamiya Fw 190D-9. I will replace it with the more
accurate blown canopy that Squadron makes. I used a True Details Fast Frames
Canopy Set on the clear parts. I can’t tell you how much I love these Fast
Frames. Just airbrush your interior color first then paint the frame adhesive
the color of the plane and apply with a little soap and water. You will need the
soapy water to move the frisk paper around. It washes off with no problem. I
dipped the whole thing into a small tin of Future three times and set it on wax
paper after dabbing off the excess runoff with a paper towel. Put a cup over the
canopy to protect it from dust and let it dry over night. Canopies have always
been my weak point. All of your work can be destroyed with a poor fitting or bad
paint job. The headrest/armor plating is fashioned using Milliput. I took the
measurements from the Tamiya Fw-190D-9 to replicate it. Once I let it dry
overnight, I shaped it to the proper dimensions with a file and painted it
black. A bit of epoxy glue to hold it in place and the canopy was finished.
 I used a
set of Minimeca Ref.105 Micro tubes to fashion a new pitot tube and underwing
antenna. A small piece of wire is inserted into the end of the tube and cut to
length. A dab of superglue and the pitot tube and underwing antenna are
complete. The small foot ladder was painted RLM 76 with red bands painted
horizonal half way down the ladder. I used the mount for the under fuselage loop
antenna but bent wire into the proper shape and glued to the mount. It is now
the right shape. Another small piece of wire for a lower antenna is inserted
about ½” back and painted black. Stretched spruce is used for the antenna. A
small amount glued to the anchor of the canopy started the process of hanging
the antenna. Then I let it droop and glued the back end to the antenna mount on
the tail. The late war blown canopy did not have the antenna tension device in
the canopy so when you opened it, the antenna would just go limp. This explains
the worn off the paint usually on the right side of the canopy. There is a small
vertical antenna that goes into the fuselage just off center on the right side
of the spine of the airplane. This is why the antenna favors the right side when
the canopy is opened. I got the proper slack bent into the antenna and used
MicroScale Krystal Clear to glue it down. A small dab near the tail and again at
the tail mount replicated the resistors. I then did a final coat of pastels with
black and brown simulating daily wear and tear on these war weary machines.
I used a
set of Minimeca Ref.105 Micro tubes to fashion a new pitot tube and underwing
antenna. A small piece of wire is inserted into the end of the tube and cut to
length. A dab of superglue and the pitot tube and underwing antenna are
complete. The small foot ladder was painted RLM 76 with red bands painted
horizonal half way down the ladder. I used the mount for the under fuselage loop
antenna but bent wire into the proper shape and glued to the mount. It is now
the right shape. Another small piece of wire for a lower antenna is inserted
about ½” back and painted black. Stretched spruce is used for the antenna. A
small amount glued to the anchor of the canopy started the process of hanging
the antenna. Then I let it droop and glued the back end to the antenna mount on
the tail. The late war blown canopy did not have the antenna tension device in
the canopy so when you opened it, the antenna would just go limp. This explains
the worn off the paint usually on the right side of the canopy. There is a small
vertical antenna that goes into the fuselage just off center on the right side
of the spine of the airplane. This is why the antenna favors the right side when
the canopy is opened. I got the proper slack bent into the antenna and used
MicroScale Krystal Clear to glue it down. A small dab near the tail and again at
the tail mount replicated the resistors. I then did a final coat of pastels with
black and brown simulating daily wear and tear on these war weary machines.
|
CONCLUSIONS |
It is truly hard to recommend this kit to anyone but a beginner who doesn’t mind all the errors and poor quality casting. Or an Expert that wants a challenge. If you just have to have a Butcher Bird hanging from the ceiling this is the kit for you but if you are looking for an accurate depiction of the 190 or want to hit the contest circuit, look elsewhere. The results do look good sitting on the shelf.
July 2002
If you would like your product reviewed fairly and quickly where it will be seen by well over 150,000 visitors a month, please contact me or see other details in the Note to Contributors.