ProModeler 1/48 He-111H-22
| KIT #: | 5926 |
| PRICE: | $35.00 when new |
| DECALS: | Two options |
| REVIEWER: | Spiros Pendedekas |
| NOTES: |
| HISTORY |
Due to the restrictions
placed on Germany after WWI, which prohibited, among others, the maintaining of
an air force, Siegfried and Walter Günter at Heinkel Flugzeugwerke designed the
He 111 in 1934, essentially a bomber presented solely as a civil airliner.
An iconic sight, easily recognizable, especially due to the distinctive,
extensively glazed front greenhouse of the later versions, the type was the most
numerous Luftwaffe bomber during the early stages of the war. Initially faring
well, it quickly found itself in trouble from the Battle of Britain and onwards,
when its defensive armament proved inadequate.
 The plane
was used in a wide variety of roles on many fronts: as a strategic bomber during
the Battle of Britain, a torpedo bomber in the Atlantic and Arctic and a medium
bomber and transport aircraft on the Western, Eastern, Mediterranean, Middle
East, and North African Front theaters.
The plane
was used in a wide variety of roles on many fronts: as a strategic bomber during
the Battle of Britain, a torpedo bomber in the Atlantic and Arctic and a medium
bomber and transport aircraft on the Western, Eastern, Mediterranean, Middle
East, and North African Front theaters.
Constantly upgraded and modified, it nonetheless became obsolete by the latter
part of the war, continuing to operate until the end of it solely due to the
failure of the “B Bomber” second-generation high-speed bomber project and by
September 1944, with the German bomber force virtually defunct, all flying
examples were used for logistics.
Production continued after the war as the Spanish-built CASA 2.111. The design
differed significantly only in the powerplant used, eventually being equipped
with Rolls-Royce Merlin engines, remaining in service until 1973.
The H-variant was the most widely produced and the one seeing more action during
World War II among the series. Basically featuring Jumo 211 engines in place of
the DB 601 which were becoming less and less available, the H-version was
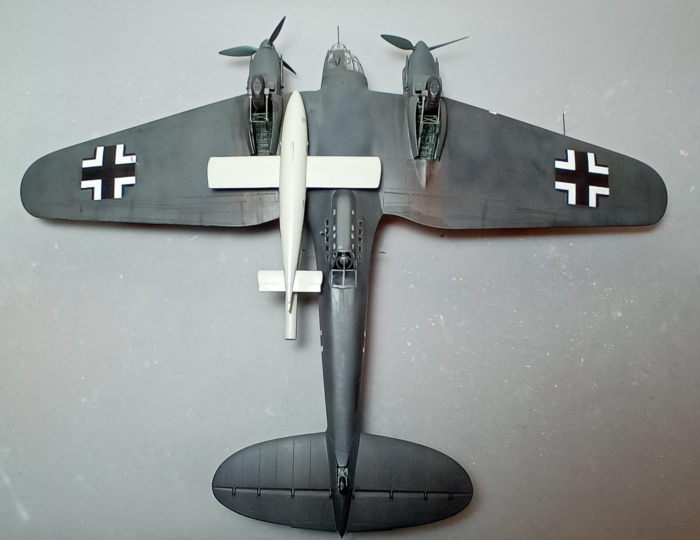
evolved in many sub-variants through upgrades and/or change of roles. The H-22
was one of the most interesting ones, emerging from modified H-6, H-16, and
H-21's, essentially a missile carrier used to air-launch V-1 flying bombs
attached to a specially designed pylon fitted under the starboard wing root.
| THE KIT |
 Monogram
came with their 1/48 He 111H family in 1994, reboxing and occasionally updating
them with new parts till 2010. Considering their old origins, the series are by
all means good, solid kits with nice engraved panel lines, sufficient overall
detailing and are mainly accurate (being sort of a collage of subtypes, the kits
might not be 100% accurate and I will leave the rest to the Experten). Apart
from Revell-Monogram (and Pro Modeler) these kits have even been twice reboxed
by Hasegawa and, as a note, the kit must not be confused with the 2019 H-6
edition of the “New Revell - black box” era, which is a rebox of the ICM
offering.
Monogram
came with their 1/48 He 111H family in 1994, reboxing and occasionally updating
them with new parts till 2010. Considering their old origins, the series are by
all means good, solid kits with nice engraved panel lines, sufficient overall
detailing and are mainly accurate (being sort of a collage of subtypes, the kits
might not be 100% accurate and I will leave the rest to the Experten). Apart
from Revell-Monogram (and Pro Modeler) these kits have even been twice reboxed
by Hasegawa and, as a note, the kit must not be confused with the 2019 H-6
edition of the “New Revell - black box” era, which is a rebox of the ICM
offering.
The specific kit is the 1995 Pro Modeler H-22 version that contained some extra
parts, mainly for the V-1 flying bomb and its pylon (but also some nice figures,
among others) and for an in depth look at its contents, you may read its preview found
at the ever growing MM archives.
| CONSTRUCTION |
 I started
by attaching the side, ventral and gondola windows from the fuselage innards,
followed by the two waist guns which were carefully inserted through their rear
window holes and secured with white glue. After painting all innards Hu31 (for
the RLM02), with some inner “detailing” picked up in black (and I doubt anything
will be visible once the model is assembled), the fuselage halves were joined,
trapping the two impressive bulkheads that double as wing strengthening spars.
As a note, deviating from instructions (why change the habits of a lifetime?), I
decided to leave off both the upper turret and the rear wheel, as their chances
to survive my less than delicate handling during the build were thin (of course,
I would have to find a way to attach them at end stages…).
I started
by attaching the side, ventral and gondola windows from the fuselage innards,
followed by the two waist guns which were carefully inserted through their rear
window holes and secured with white glue. After painting all innards Hu31 (for
the RLM02), with some inner “detailing” picked up in black (and I doubt anything
will be visible once the model is assembled), the fuselage halves were joined,
trapping the two impressive bulkheads that double as wing strengthening spars.
As a note, deviating from instructions (why change the habits of a lifetime?), I
decided to leave off both the upper turret and the rear wheel, as their chances
to survive my less than delicate handling during the build were thin (of course,
I would have to find a way to attach them at end stages…).
The wings were next assembled (having drilled the corresponding holes on the
starboard one for the V-1 pylon) , followed by the nacelles which were attached
onto them, with the completed subassemblies attached to the fuselage. The
positioning/strengthening spars proved very useful there. I neither attached the
main gear sidewalls (which have the doors attached), nor the landing gear
itself, in order to save them from mishandlings, planning to affix them after
painting, something that looked plausible.
The 2-piece tail planes were assembled and attached, followed by the bomb bay
doors (which, helpfully, are molded as a single piece), the gondola solid nose
and the V-1 dedicated pylon, thus concluding basic assembly, which was
pleasantly uncomplicated. Fit, though not perfect, was certainly unproblematic,
only needing some filling and sanding here and there, after which the bird had
its openings blanked with wet tissue, its fitted transparencies masked with
liquid mask and headed to the paint shop!
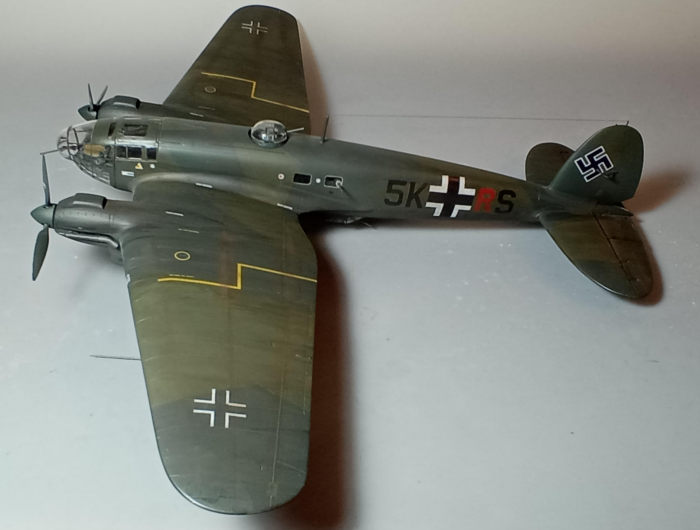
| COLORS & MARKINGS |
I started by giving all
topsides a coat of RLM71 (for which I used Hu116 Dark Green), then masked the
splinter camo and gave the remaining topsides a coat of Hu91 Black Green (for
the RLM70). After also masking it, I gave all undersides and the main doors
outer faces a coat of Hu32 Dark Gray, being not too cautious regarding evenness
of application, as those undersides were actually brush or groom painted in the
field. Upon removing the masks, a coat of Future prepared the bird for decaling.
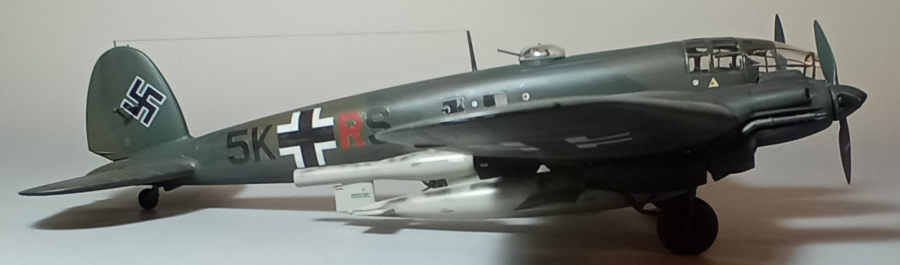
 I used the
kit decals, in order to represent the 3./KG 3 “Blitz Geschwader” 5K+RS machine.
The decal sheet, almost 30 years old, looked shiny and usable, with the decals
easily detaching and more or less successfully adhering to the model surfaces.
However, a milky residue seemed to be present (possibly the decal glue that had
aged), which was carefully wiped away. After drying the decals presented a
degree of silvering, especially notable at their transparent sections. Having
already applied decal softener (meaning the decals could not be uneventfully
removed, as they had bonded to the painted surfaces), I resorted to carefully
trim away the transparent sections by using my hobby knife, something that
compromised the final looks, followed by the inevitable (and, in my case, not
particularly successful) touch ups. Since the decal sheet was politically
correct, I used swastikas from a generic (and very nice - sadly OOP) Afterburner
decal sheet. A coat of Future sealed all decals.
I used the
kit decals, in order to represent the 3./KG 3 “Blitz Geschwader” 5K+RS machine.
The decal sheet, almost 30 years old, looked shiny and usable, with the decals
easily detaching and more or less successfully adhering to the model surfaces.
However, a milky residue seemed to be present (possibly the decal glue that had
aged), which was carefully wiped away. After drying the decals presented a
degree of silvering, especially notable at their transparent sections. Having
already applied decal softener (meaning the decals could not be uneventfully
removed, as they had bonded to the painted surfaces), I resorted to carefully
trim away the transparent sections by using my hobby knife, something that
compromised the final looks, followed by the inevitable (and, in my case, not
particularly successful) touch ups. Since the decal sheet was politically
correct, I used swastikas from a generic (and very nice - sadly OOP) Afterburner
decal sheet. A coat of Future sealed all decals.
| FINAL BITS |
The quite comprehensive
cockpit/bombardier section was assembled and affixed in position. Basic color
was Hu31 (for the RLM02), with the yoke and various consoles depicted in black
(the latter dry brushed with sliver, to pick up their raised instrumentation).
The seats had “leather” cushions and “linen” seat belts, with the same color
used for the bombardier’s mat.
Time for the landing gear, where the sidewalls (which contain the main doors)
could easily be slipped in and glued into place, followed by the detailed
landing gear legs which were assembled and easily attached as well. The tail
wheel strut was assembled and, after reducing the length of its mounting lugs
(so it would fit into the fuselage opening), was tweaked-in and glued in
position, with its joint maybe not as strong as it would have been if attached
prior to joining the fuselage halves, but, still, adequate in strength.
The main wheels were next assembled and all three wheels were carefully affixed
in place. Since all three were “weighted”, they were rotated till their flat
surface was one with the ground and then secured in position with glue. Wheel
bays, door innards and landing gear struts were painted RLM02, whereas the wheel
rims and the distinctive main gear boots were painted black. Tires were painted
with a home brewed “off dark” shade.
 The good
looking props were assembled and, after painted Hu91 Black Green, were
press-fitted in place via the nicely designed propeller shafts. The four
exhausts were assembled and attached in position by this time, as well, painted
Testors Burned Metal.
The good
looking props were assembled and, after painted Hu91 Black Green, were
press-fitted in place via the nicely designed propeller shafts. The four
exhausts were assembled and attached in position by this time, as well, painted
Testors Burned Metal.
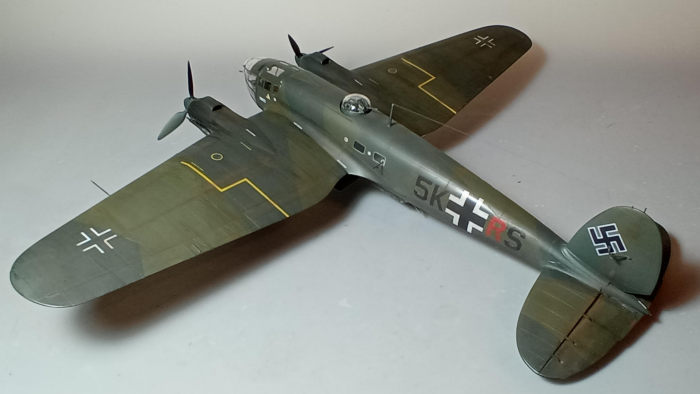
I decided to give this work horse some weathering, starting with a black wash
(heftier at places suspect to “oiling” - like the landing gear area and
aerodynamic surfaces hinge lines). An application of dark brown and black dry
pastels simulated dirt, grime, or even engine staining at all suspect areas,
with an almost matt cote giving the bird its final finish.
Time to move to the front glazing, starting with the overhead canopy, which,
after having its top mounted console and external rear view mirror attached, was
affixed into place. The distinctive off-set front glazing had its instrument
panel, front gun and bombsight attached, then also affixed, followed by the
bombsight housing which was externally attached underneath. Fit of the above was
very good, only slightly compromised where the overhead canopy met the fuselage,
likely an operator error. All canopy frames were hand painted (they were well
defined, something that helped a lot), with the instrument panel, overhead
console and bombsight painted black, then dry brushed with silver, whereas the
gun was painted gunmetal with brass cartridges.
The gondola aft canopy had its frames hand painted and, after having its MG-131
gun attached, was also glued into place, followed by the port wing landing light
transparency (which had its lens painted “silver”). The top turret was assembled
and accordingly painted. After having its locating base lugs cut-off, it was
inserted through its opening and practically rested on two styrene rods of
suitable length that were glued underneath, being invisible from the outside.
A pitot probe was fabricated from two pieces of stretched sprue and attached in
position (typically, I lost the kit one, it was somehow thick anyway). The
antenna mast was attached and thin stretched sprue was run from it towards the
fin, to represent the aerial wire. The distinctive rudder mass balances and the
equally distinctive underside AIT probe were attached at this time, as well,
with all above tiny bits painted per the surrounding color and the pitot nose
painted gunmetal. Tiny blobs of red and green clear paint represented the
wingtip lights, before calling this special Missile Carrier done!
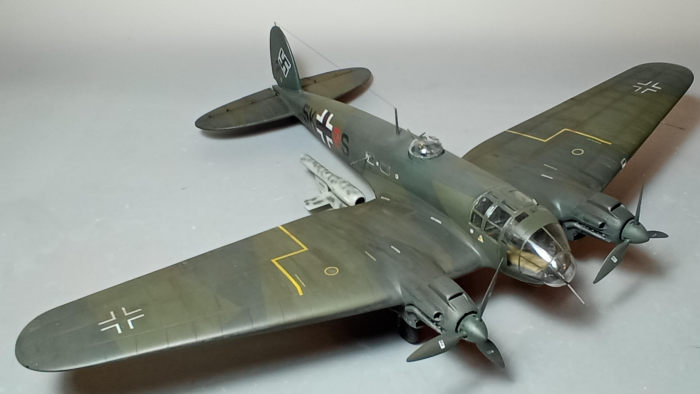
Time to move to the V-1, which is a nice small model by itself: first I joined
the fuselage halves, then attached the main wings, the horizontal stabilizers
and finally the main inlet. After some filling and sanding, I painted it Hu196
(for an approximation of the RLM76), followed by rough application of black
green mottling. After a coat of Future, I applied all the nice provided
stenciling and sealed everything with a final satin coat. I decided not to apply
any means of weathering at all: it would have been a brand new shiny V-1 loaded
on the well used He 111 mothership. So after attaching the V-1 to its pylon it
was about time to call this interesting missile carrier done!
| CONCLUSIONS |
Though superseded by the
latest and greatest ICM offering, this is still a fine kit of the iconic bomber.
Overall shape looks more or less correct (the V-1 included), molding is great,
panel lines are nicely engraved, detail at all key areas is great, fit is good,
transparencies are nice and clear and instructions are second to none. Decals,
though well printed, are past their useful life and either an aftermarket sheet
is strongly recommended, or going altogether for the 2010 Revell reboxing which
is the exact same kit with different markings.
Out of the box, a nice representation of the iconic bomber can emerge, let alone
the fact that, as of 2023, it is the sole option for an out of the box build of
the H-22 V-1 carrier variant (though a safe bet can be placed on ICM offering
this variant sometime in the future). The build itself is not very complex and
can easily be tackled by an intermediate modeler.
True, the ICM offerings from 2017 onwards have superseded this kit in
practically all areas and the fact that Revell itself has reboxed the ICM kit in
2017 has possibly sealed the fate of this old toling, but the fact is that this
elderly fellow is still not out of place today, especially if found at a
fraction of the ICM price, representing a cheaper and, possibly, less complex
alternative.
Happy Modeling!
20 November 2023
Copyright ModelingMadness.com. All rights reserved. No reproduction in part or in whole without express permission.
If you would like your product reviewed fairly and fairly quickly, please contact the editor or see other details in the Note to Contributors.