| KIT #: | 31002 |
| PRICE: | 15 € for the kit (second hand market) + 21 € for the Eduard detailing set + 12 € for the decal sheet = 48 € (70 USD) |
| DECALS: | Two options |
| REVIEWER: | Patrick Grué |
| NOTES: |
ILIAD
DESIGN decal sheet # 48016 |

| HISTORY |
Obviously the Bf-110 was one of these aircraft which
had a controversial operational life. Often
been criticized for its failure during the Battle of Britain, its
operational life could have stopped in 1941 if it was not given a new task
as a night fighter – role in which it was not originally supposed to play –
but carried out this task with success until the end of the war.
Its original development started in 1934 from a RLM (*) requirement for a
new concept of combat aircraft called "zerstörer” (destroyer). This concept,
firmly pleaded by Air Marshall Göring, consisted in a multi-purpose heavy
fighter with specifications such as ground attacks deep into enemy
territory, long-range escort/ defense of friend bombers, interception/
destruction of foe bombers.
Such specifications
called
for a twin-engine, three-seat design aircraft with a heavy armament.
Three manufacturers went in for competition: Henschel, Focke-Wulf and
Messerschmitt (BFW at this time *). BFW focused mainly on performances
(speed, range) and fire power by omitting the bomb bay required by the RLM
for ground attack purpose. Finally BFW won the contract with the help of
former WWI Ace General Ernst Udet who did not feign his favor for the Willy
Messerschmitt design, and therefore put pressure on RLM to accept the Bf-110
concept.
Production began with Bf-110B series in March 1938 fitted with 700-hp Jumo
210 engines. When the 1050-hp DB601 engines were certified in late 1938,
then production of the C-series started in January 1939. This important
series gave many sub-versions (C-0 to C-7) used as destroyer, reconnaissance
or fighter-bomber. The aerodynamic refinements gave the C version the top
speed of
When WWII broke out in September 1939 with invasion of
 s
(my model kit). D-3 version could carry either two
Offensive against
BoB proved in fact that a twin-engine aircraft could not face a modern
single-engine fighter in close combat. However some sporadic strikes against
targets in
The Bf-110 crews were more confident during the invasion of
Meanwhile, the night bombing raids carried out by the RAF over
From 1936 to 1945,
more than
6000 Bf-110 all versions were built.
Only 3 intact aircraft survived the war and are now displayed in
museums.
Key word:
(*) RLM:
Reichsluftfahrtministerium (Aviation Ministry of the Reich)
BFW:
Bayerische Flugzeugwerke (the Bayern Aircraft Factory)
E.Gr: Erprobungsgruppe
(Experimental Group)
SKG: Schnellkampfgeschwader (Fast Bombing Wing)
| THE KIT |
 In
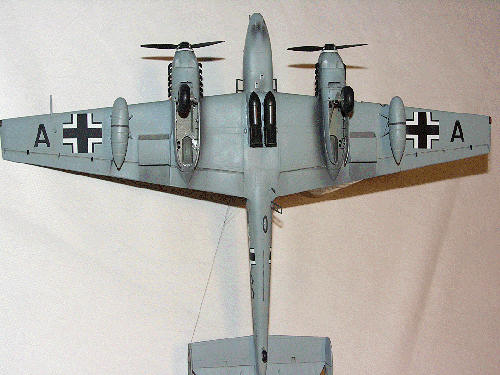
spite of its 30 years old this kit features finely recessed panel lines and
thin trailing edges. There are 120 parts in grey plastic including 7
transparent parts for the canopy (open or closed position for the pilot
only). There are two decal sheets which are completely outclassed by recent
releases. It is necessary to have a new one if you want to have a nice
model. There are many drawbacks, as regard of actual standards, which must
be corrected: the cockpit and wheel well details are poor, the rear fuselage
section and drop tanks are undersized, the tail wheel is inaccurate and the
ETC rack is simplified. The Fujimi kit offers options to make C-3/ -4
versions, or D-1/ -2/ -3 versions. Fortunately the main dimensions are
accurate despite its many drawbacks!
When I decided to start the construction,
proud to have the gorgeous Eduard photo-etched set and the new decal sheet,
Eduard factory announced the release of its very expected Bf-110E kit at the
same scale. Hmm well... should I start building my old Fujimi kit or should
I resign and wait a couple of weeks to buy the Eduard one?
Answer: the money invested in my project
shortened any frenzy to acquire the new Eduard kit!
And so I engaged into a three-month modeling work, not really aware of the expected load…
| CONSTRUCTION |
 Cockpit:
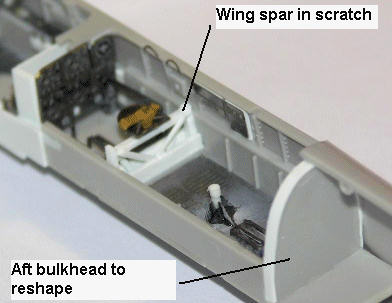
The huge modifications suggested by the Eduard PE set affects 90% of the cockpit layout. I will not detail all the modifications to avoid boring you with, but in addition of these, I removed the very simplified wing main spar which crosses the cockpit by a new one in scratch build. I modified also the pilot and radio consoles, and I reshaped the aft bulkhead because of the fuselage enlargement.
Fuselage:
This is the personal modification of that kit. The fuselage section at the stabilizer root is too thin. So to make it as accurate as possible, I used the 3-view drawing to measure the fuselage cross-sections. Then I cut out two long “triangular” fillers in sheet styrene and glued them onto the joint lines of one fuselage half.
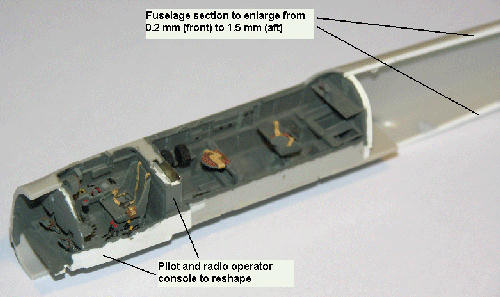 The
two original parts used to end the fuselage tail were also reworked due to
this enlargement.
Horizontal stabilizer:
Because of the fuselage enlargement, I removed some plastic with a drill from the lower contact surface of the H stabilizer to able the stabilizer fit onto the fuselage. Then, to be more realistic, I chose to cut out the elevators to show them in down position.
Wings:
The wing profile is good and fit well to
the fuselage. The only flaw is located on the intrados: the recessed line
which represents the flap hinge must be seriously deepened from
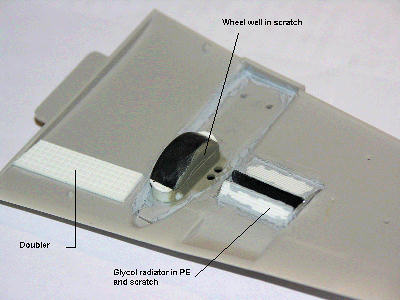 the
wing root to the aileron.
Glycol radiator:
I reworked some internal details such as the air ducts in addition of the PE parts. The radiator flaps are shown open.
Wheel well:
This original part is very poorly detailed and needs also a lot of rework. In addition of the PE parts, I used half a tire of a bomb trailer taken from my spare parts to make it.
Landing Gear:
Some missing parts
(not provided by Eduard set) are added such as the closing device (rods) of
the doors and the brake wire.
I replaced
the inaccurate tail wheel (too thin) by a larger one taken in my German
spare parts.”
Engines:
The original shape of the exhaust pipes is
good but must be drilled to be more realistic.
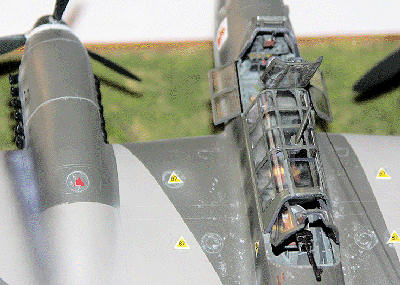 Canopy:
The original parts do not allow showing the
rear gunner canopy in open position. So to give this model something more, I
cut out the canopy rear part with a small circular saw. A very risky
operation since it should not forgive any mistake: only one canopy is given
in the Fujimi kit!
On the other hand, adjustment of this tilting canopy is difficult as a part of it goes inside the main canopy. It needs a reshape.
Armament and drop tanks:
All the machine guns are replaced by more realistic ones taken from spare parts. The very simplified ETC 500 rack must be reworked to show all the bomb locking devices.
The
| COLORS & MARKINGS |
Cockpit interior is in RLM 66 cockpit grey
with a final dry-brush of silver powder to give a metallic aspect. All belts
are beige.
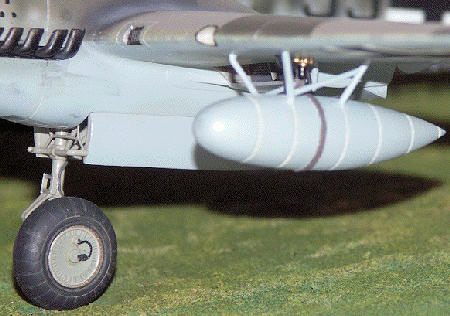 The
wheel wells and gear legs are in RLM 02 grey-beige.
The
Among the four marking options suggested by
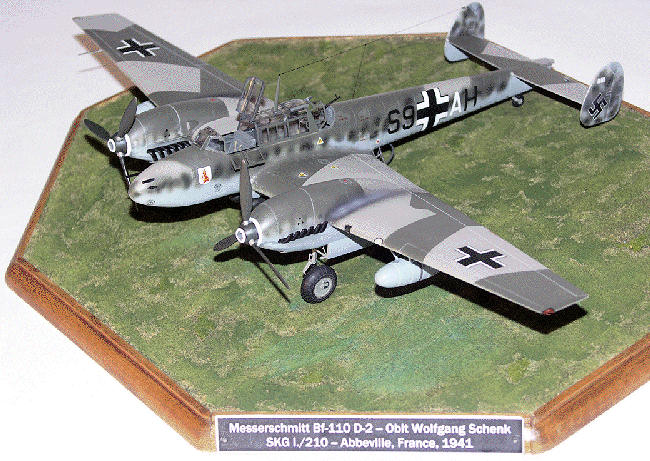
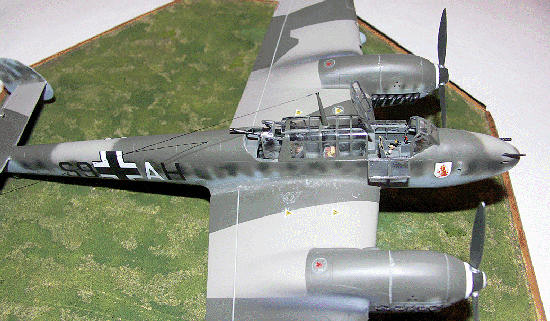
the decal sheet, I chose the one flown by flight lieutenant Wolfgang Schenk
who led the first group of SKG 210. This unit stayed on Abbeville airfield
near the Channel coast in early 1941, before being re-affected to the
Eastern front.
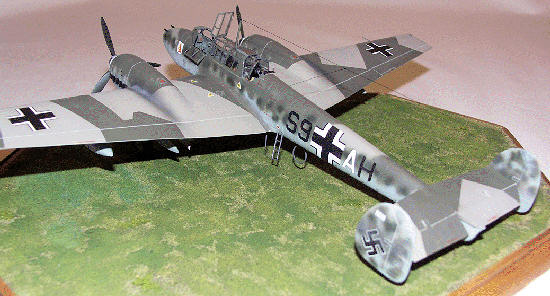
The camouflage scheme is typical of this series of
Bf-110 at this time of the war, i.e. RLM 02 grey-beige/ RLM 71dark green
over RLM 65
light blue.
I started to airbrush the lower surfaces in RLM 65 using Gunze acrylic paints. Then all the upper surfaces were airbrushed in RLM 02, and the splinter patterns on the wings and stabilizer in RLM 71 using masks. The fuselage and rudders were airbrushed free hand with some mottling in RLM 02/70/71.
| CONCLUSIONS |
Well, if I had known before… I would have bought the Eduard kit!
| REFERENCES |
 Messerschmitt
Bf-110 “Zerstörer” in action, Squadron Signal publications #30 (1977)
Fujimi 1/48 scale Messerschmitt Bf-110C-1 by Charles Whall (2007)
Koku Fan #38 (1973) for the 1/60 scale 3-view drawing
December 2009
Copyright ModelingMadness.com
If you would like your product reviewed fairly and quickly, please contact the editor or see other details in the Note to Contributors.