Special Hobby 1/72 Blohm und Voss P.194
| KIT: | Special Hobby 1/72 Blohm und Voss P.194 |
| KIT #: | 72008 |
| PRICE: | $12.00 |
| DECALS: | One option |
| REVIEWER: | Dana Griffith |
| NOTES: |
| HISTORY |
What history? The P.194 was a low wing asymmetrically configured aircraft project developed by the Blohm und Voss Company during the latter stages of WWII. Development was halted by the occupation of Germany by Allied Forces and the collapse and subsequent surrender of the Nazi Regime.
This aircraft falls into that well known category of the Luft46 aircraft. It also affords the big what if questions, like what if these craft had gone into production because the National Socialists had not made the massive and gruesome strategic blunders that mandated their defeat? Then you may have seen odd looking planes like the P.194 take to the air in numbers.
| THE KIT |
 Upon removing the wrapping and opening the box, it opened on the end. I found
the kit composed of two sprue's molded in a light gray plastic and one clear
sprue sealed in a polypropylene bag. There was one small sheet of Photo Etched
(PE) parts. There was a single instruction sheet folded in half and a decal
sheet that was loose underneath the bag of sprues. The decal sheet looked
decent and just had the basic items that went on German WWII era aircraft.
There were two hollow squares on the decal sheet that were intended to replicate
the Swastikas that were painted on the tail of German airplanes of the era. The
decals were a satin finish and the carrier film seemed adequate. I did a quick
read of the instructions, all seven steps and it seemed to be a straight forward
build.
Upon removing the wrapping and opening the box, it opened on the end. I found
the kit composed of two sprue's molded in a light gray plastic and one clear
sprue sealed in a polypropylene bag. There was one small sheet of Photo Etched
(PE) parts. There was a single instruction sheet folded in half and a decal
sheet that was loose underneath the bag of sprues. The decal sheet looked
decent and just had the basic items that went on German WWII era aircraft.
There were two hollow squares on the decal sheet that were intended to replicate
the Swastikas that were painted on the tail of German airplanes of the era. The
decals were a satin finish and the carrier film seemed adequate. I did a quick
read of the instructions, all seven steps and it seemed to be a straight forward
build.
This looked like it was going to be a easy and quick build considering my current military obligations. Anyway upon closer assessment, once the sprue trees came out of the bags, the parts had lightly engraved panel lines. A few parts had a little flash or small mold seams that were easy to clean up. Mold release points would all be hidden after construction.
| CONSTRUCTION |
I
often work up a kit sometimes out of sequence so as to facilitate the build. As
in most aircraft models, Step 1 is to assemble and finish the cockpit. I
usually try to paint smaller parts on the sprue so I don't wind up with multi
hued fingers and nails. The cockpit area and seat was painted in shades of
medium gray colors and then weathered by replicating silver paint chips and worn
 areas. Once that dried, the cockpit area was stained with a mix of dark brown
and charcoal acrylic washes. The seat and joystick were installed. Then the
Photo etch Seat Belts were added. Till recently, I've had this big aversion to
photo-etched items. Pat of that was the concern about super glued body parts.
I've worked with photo-etch enough now to deal with it. The Belts were picked
out in light tan and detail painted. PE Rudder Pedals were added to the cockpit
floor. The handle of the Joystick was painted black. The Instrument panel was
painted black with the gages picked out in white. The cockpit walls were
painted in grey and then given a stain wash.
areas. Once that dried, the cockpit area was stained with a mix of dark brown
and charcoal acrylic washes. The seat and joystick were installed. Then the
Photo etch Seat Belts were added. Till recently, I've had this big aversion to
photo-etched items. Pat of that was the concern about super glued body parts.
I've worked with photo-etch enough now to deal with it. The Belts were picked
out in light tan and detail painted. PE Rudder Pedals were added to the cockpit
floor. The handle of the Joystick was painted black. The Instrument panel was
painted black with the gages picked out in white. The cockpit walls were
painted in grey and then given a stain wash.
Step 2 entailed adding the cockpit tub and Instrument Panel to the left half of the fuselage. Once it is aligned then the fuselage halves are joined. Item 23, the jet engine intake baffle was then inserted and glued in place. So far this was too easy, this was going to be fun. I let everything cure and got ready to work on step 3 in a couple of days.
Step 3 consisted of first going back to step 2 and splitting the fuselage again so that part 22 the jet exhaust nozzle could be set in place. Reassembling the fuselage and giving it a serious look showed that it needed some filling and sanding to get rid of seam lines.
 With that taken care of onto Step 3. this step entailed gluing the other two
fuselage halves and the rear motor mount. This would need minor filling and
sanding as well. I chose to hold off on that till more of the model was
assembled.
With that taken care of onto Step 3. this step entailed gluing the other two
fuselage halves and the rear motor mount. This would need minor filling and
sanding as well. I chose to hold off on that till more of the model was
assembled.
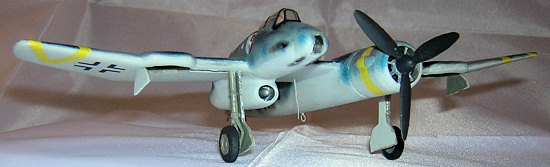
Step 4 consisted of assembling the engine cowling, insert and a cooling fan. The parts 10 and 11 were the rear halves of the cowling and were glued to part 13b. The fan, part 16 was painted on the sprue and then plopped in place. Then part 12, the forward cowling ring was attached.
I am figuring that this must be one of Special Hobby's earlier kits as some of the sprues had really thick runners to the parts. I had to do some serious and careful cleanup of the cooling fan as the blades are pretty fragile. The attachment point was quite thick and required some effort to clean up.
Step 5 consisted of assembling the wings and fuselage parts together.
There are no tabs to use as guides so care is needed to properly align the
horizontal stabilizers and the wings to the fuselage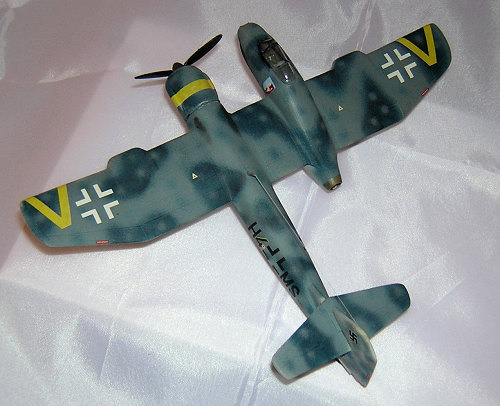 parts. There were noticeable gaps where parts 7 and 9 join the fuselage.
That required filling and sanding. The tail planes aligned with no
problem.
parts. There were noticeable gaps where parts 7 and 9 join the fuselage.
That required filling and sanding. The tail planes aligned with no
problem.
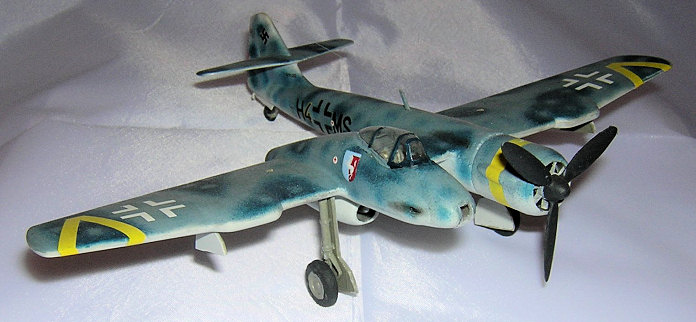
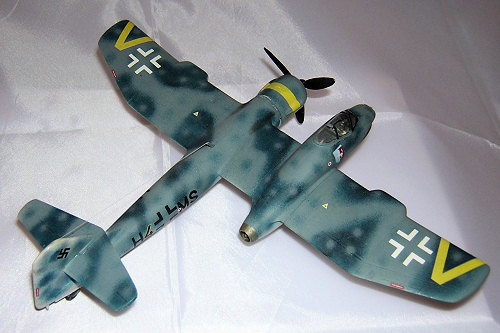
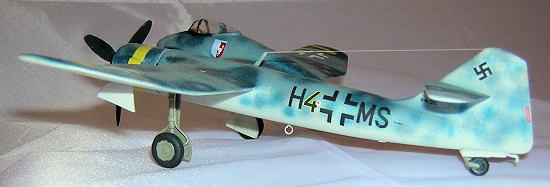
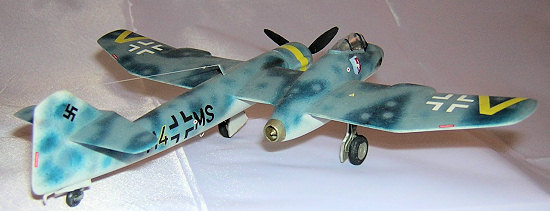
It was now time to assemble the landing gear and glue the photo etch antennas to the underside of the 194 in Step 6. The main wheels come in two halves and do not align well requiring a careful eye and sanding to get it to look right. The main gear struts do not have any guide tabs to glue into so though they take glue well, I decided to use super glue to ensure they stay in place. The main gear wheels have no mounting tab to use as a guide, so I used super glue to secure them as well. The gear and tail wheel doors had to be cut apart and filed so the model could be displayed wheels down. The gear wells and struts were painted in shades of gray and silver.
So far so good. The final assembly Step 7 attached the engine nacelle and prop to the fuselage. The head rest armored shield and canopy were attached. The canopy and the curved clear view plate in the front of the cockpit are vacu-formed and required careful cutting and trimming so as to fit correctly. The last item was the upper fuselage antenna mast and a stretched sprue aerial. I've come around to preferring stretched sprue to mono-filament line. The sprue can be heated and stretched gossamer thin and is easier to work with as far as gluing goes.
| COLORS & MARKINGS |
Looking at the nearly completed model sitting on its rather stout landing gear
and pronounced angle of attack stance, I started thinking that it sat like a
carrier based aircraft. The way it sat made it look like a machine easily
capable of launching into the wind
 off a lurching carrier deck. Gazing at the
cover art, got me to thinking more about naval air in western Europe. What
would a German Kriegs Marine Aircraft look like say in 1947 if the war
continued. As a result I added a stretched sprue arresting hook behind the
tail wheel That actually looked pretty decent.
off a lurching carrier deck. Gazing at the
cover art, got me to thinking more about naval air in western Europe. What
would a German Kriegs Marine Aircraft look like say in 1947 if the war
continued. As a result I added a stretched sprue arresting hook behind the
tail wheel That actually looked pretty decent.
I diverged from what the kit instructions called for in painting and went with the naval motif. I painted the undersides a light off white shade of light gray. I then base painted the upper surfaces with a sea blue almost intermediate blue. I then added irregular patches of dark maritime blue. Once that dried, I went and added irregular dots of the lighter blue over the dark blue. When I decided to lay the airbrush down, I figured adding more paint would muck the overall work up. Taking a second look at the paint work a little later I was rather pleased with the result.
The decals went on over a coat of Future with out a problem, though they were a tad fragile. The Swastikas and emblem badges came from the spares box.
I then applied a light weathering and accented the panel lines so that the model further stood out.
| CONCLUSIONS |
For having so few parts this was not the easiest kit to build. It did build into a decent finished product. There is a better kit of the BV 194 out there if you can find an example of the Revell BV 194. How ever that has been out of production for so long it has become rather rare.
I have not built very many mixed media kits and I found this to be a pleasant challenge and when finished it provided to me a very satisfying result. I'll never understand how BV figured out how to synchronize a propeller engine and a jet engine. Though it has been done. The B-36 looked odd enough but it worked. I can see a multi hued blue German fighter aircraft launching off a Aircraft Carrier deck to engage foes across the ocean. Thank Heavens that Germany did not pattern projective power as the Allies and Japan did.
February 2008
If you would like your product reviewed fairly and quickly, please contact me or see other details in the Note to Contributors.