Academy 1/48 Ta-183
| KIT #: | 12327 |
| PRICE: | $24.00 |
| DECALS: | Six options |
| REVIEWER: | Francisco Santoro |
| NOTES: | Ex-AMtech kit |
| HISTORY |
 From Wikipedia: "The Focke Wulf Ta 183 Huckebein was a design for a
jet-powered fighter aircraft intended as the successor to the Messerschmitt Me
262 and other day fighters in Luftwaffe service during World War II. It was
developed only to the extent of wind tunnel models when the war ended, but the
basic design was further developed postwar in Argentina as the FMA IAe 33 Pulqui
II. In early 1944, the Reich Air Ministry became aware of Allied jet
developments, and were particularly concerned that they might have to face the
Gloster Meteor over the continent. In response, they instituted the Emergency
Fighter Program which took effect on July 3, 1944, ending production of most
bomber and multi-role aircraft in favour of fighters, especially jet fighters.
Additionally, they accelerated the development of experimental designs that
would guarantee a performance edge over the Allied designs, designs that would
replace the first German jet fighters, the Messerschmitt Me 262 Schwalbe and
Heinkel He 162 Spatz."
From Wikipedia: "The Focke Wulf Ta 183 Huckebein was a design for a
jet-powered fighter aircraft intended as the successor to the Messerschmitt Me
262 and other day fighters in Luftwaffe service during World War II. It was
developed only to the extent of wind tunnel models when the war ended, but the
basic design was further developed postwar in Argentina as the FMA IAe 33 Pulqui
II. In early 1944, the Reich Air Ministry became aware of Allied jet
developments, and were particularly concerned that they might have to face the
Gloster Meteor over the continent. In response, they instituted the Emergency
Fighter Program which took effect on July 3, 1944, ending production of most
bomber and multi-role aircraft in favour of fighters, especially jet fighters.
Additionally, they accelerated the development of experimental designs that
would guarantee a performance edge over the Allied designs, designs that would
replace the first German jet fighters, the Messerschmitt Me 262 Schwalbe and
Heinkel He 162 Spatz."
| THE KIT |
 Inside a top opening box with the boxart of Erich Hartmann's Ta 183
attacking a formation of B-17s over Europe, there're a total of seven sprues
bagged in three independent bags. Six of the sprues are mouded in dark grey, and
one in clear plastic. Also included are a fret of photoetch pieces and masks for
the canopy.
Inside a top opening box with the boxart of Erich Hartmann's Ta 183
attacking a formation of B-17s over Europe, there're a total of seven sprues
bagged in three independent bags. Six of the sprues are mouded in dark grey, and
one in clear plastic. Also included are a fret of photoetch pieces and masks for
the canopy.
There're a total of six decal options on the sheet printed by Cartograf:
1) Erich Hartmann's Ta 183 Black Chrevrons. Painted in RLM 76/75/74.
2) Heinz Bär's Ta 183 "Red 13." Painted in RLM 81/82/76.
3) Ta 183 "White 3," Unknown Unit in 1946. Painted in RLM 81/82/76.
4) Ta 183 "Red 1," JG 1, early 1946. Painted one half in RLM 81 and the other half in RLM 82 over RLM 76.
5) Ta 183 "Green 3," Stab of JG7, early 1946. Painted in RLM 81/82/76.
6) Ta 183 "Red 2," captured example by the Russians. Finished in silver.
| CONSTRUCTION |
 I began by painting on the sprues all the cockpit pieces in RLM 66 (Revell
78). The seat's cushion was painted in brown. The control stick was painted in
RLM 66 with black for the base and the grip. Next, I glued all the cockpit
pieces to the cockpit tub, and set it aside to dry.
I began by painting on the sprues all the cockpit pieces in RLM 66 (Revell
78). The seat's cushion was painted in brown. The control stick was painted in
RLM 66 with black for the base and the grip. Next, I glued all the cockpit
pieces to the cockpit tub, and set it aside to dry.
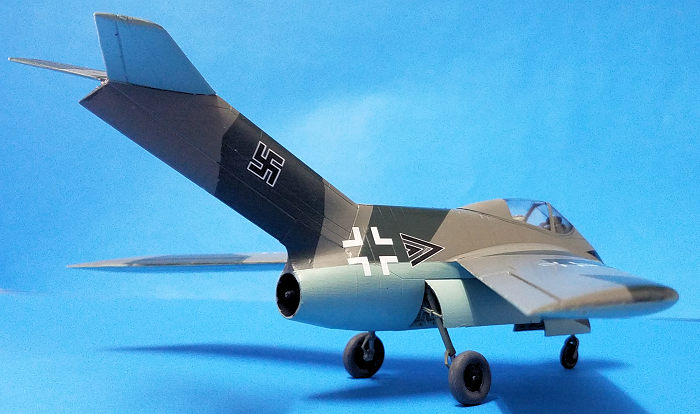
Next came the fuselage halves. These need to have the wheel wells glued before closing them. I glued piece B2 to the right fuselage half, and piece B1 to the left fuselage half. Academy tells you on the instructions to glue the fuselage halves first, and then add the cockpit and nose gear well, but I decided to glue the cockpit first to one fuselage half, and then glue to its back a weight, since I was afraid the kit would be a tail sitter. The nose gear well was then glued to one side of the fuselage. It was at this time that I also glued the cover that goes in the belly of the aircraft. You have the option to attach a drop tank instead of the flat blanking plate. I also glued the intake and the exhaust.
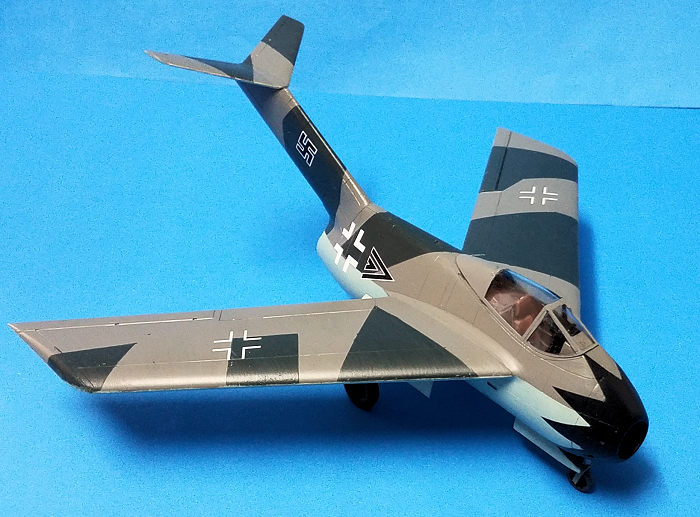
Then, I began working on the wings. These are a top and bottom thing. At this stage, you have the opportunity to open holes for the underwing armament, which consist of four air-to-air X-4 rockets. I chose not to open the holes for them. When I test fitted the wings into the fuselage sockets, I discovered their tabs were a tad wider than what they should be, so I filed them a bit and then glued them to the fuselage halves.
| COLORS & MARKINGS |
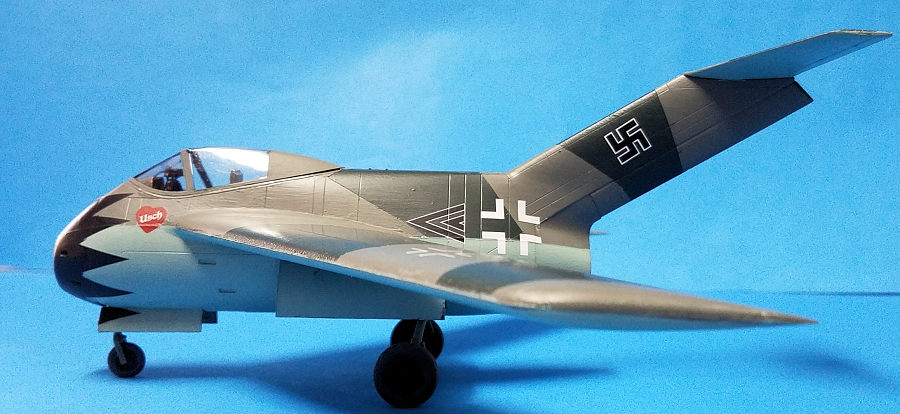
 I had decided to paint this model as Erich Hartmann's aircraft, with
the black tulips. The camouflage of several splotched of RLM 74 and 75 over an
overall coat of RLM 76 didn´t rock my boat, so I went and chose the camouflage
style of options 2 and 3, a splintern camouflage. To avoid leaving paint ridges
(I brushpaint), I first painted the entire fuselage in RLM 75 (Revell 47 Mouse
Grey), then masked and painted the RLM 74 (Revell 69). Once the upper sides were
done, I painted the undersides in RLM 76 (Revell 49). I also painted the wheel
wells in RLM 02 (Revell 45). Once all the colours were thoroughly dry, I brushed
two coats of Revell's gloss varnish, to prepare the surface of the model for the
decals.
I had decided to paint this model as Erich Hartmann's aircraft, with
the black tulips. The camouflage of several splotched of RLM 74 and 75 over an
overall coat of RLM 76 didn´t rock my boat, so I went and chose the camouflage
style of options 2 and 3, a splintern camouflage. To avoid leaving paint ridges
(I brushpaint), I first painted the entire fuselage in RLM 75 (Revell 47 Mouse
Grey), then masked and painted the RLM 74 (Revell 69). Once the upper sides were
done, I painted the undersides in RLM 76 (Revell 49). I also painted the wheel
wells in RLM 02 (Revell 45). Once all the colours were thoroughly dry, I brushed
two coats of Revell's gloss varnish, to prepare the surface of the model for the
decals.
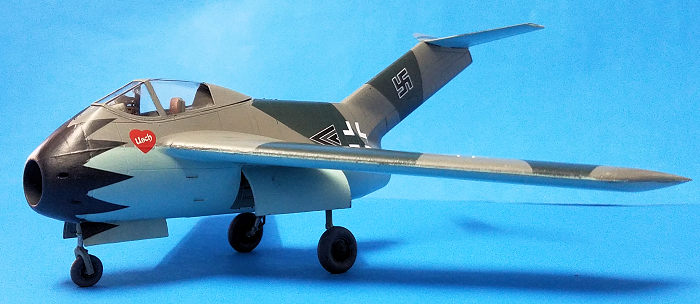
The decals are from Cartograf, so quality is assured from the start. I began decalling by applying the tulips for Hartmann's machine. I put first the the petals 41 and 42 to have a good guide for placing the other tulips, but sadly, one of the tulips was off-centre after I finished the nose. After applying the tulips, I applied the other decals, which behaved perfectly and posed no issues whatsoever. Two tulips have to go above the nose landing gear doors, so I recommend other modellers doing this scheme that they tape the doors to the fuselage, apply the door's tulips, cut them with a fresh hobby knife, apply Microsol to make the decals conform to the imperfections, and left them to dry thoroughly.
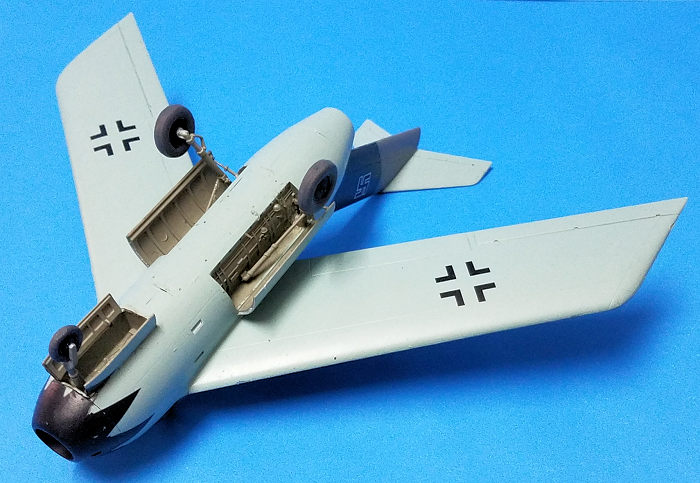
I painted the landing gear struts in RLM 02 (Revell 45), the wheels were painted with black hubs and panzer grey tyres, and the landing gear doors were painted in RLM 76 (Revell 49). All these parts were glued together and left to harden. The last part to be glued was the canopy, which was previously masked and painted in RLM 66 and then RLM 75.
| CONCLUSIONS |
This is a welcome addition to the Luft 46 scene. There aren´t many kits of this subject in 1:48. The plane isn´t that big, and you can make many of them and form your own Gruppe with them.
| REFERENCES |
https://en.wikipedia.org/wiki/Focke-Wulf_Ta_183
September 2020
Copyright ModelingMadness.com
If you would like your product reviewed fairly and fairly quickly, please contact the editor or see other details in the Note to Contributors.
Back to the Main Page Back to the Review Index Page Back to the Previews Index Page