Revell 1/48 Ta-154
| KIT #: | 4535 |
| PRICE: | 66$ |
| DECALS: | One option |
| REVIEWER: | Francisco Santoro |
| NOTES: | Lots of nose weight needed to get a nose sitter. |
| HISTORY |
From the kit's instructions: "During World War Two the shortage of raw materials in particular caused great problems for the German aircraft industry. They were constantly looking for alternative materials that were available in greater quantities, like wood.
A development that had led to some outstanding solutions in other countries too, taking the De Havilland Mosquito as the yardstick. It was against this background that the Focke Wulf, under the leadership of Kurt Tank, came to develop a similar aircraft made of wood.
 Originally planned as a high speed bomber, in
1943 it was agreed to pursue the development of a night fighter designated the
Ta 154 "Wespe (Wasp)". However this name was quickly replaced by Moskito - an
ironic allusion to its British counterpart.
Originally planned as a high speed bomber, in
1943 it was agreed to pursue the development of a night fighter designated the
Ta 154 "Wespe (Wasp)". However this name was quickly replaced by Moskito - an
ironic allusion to its British counterpart.
The design and production of this nightfighter built almost entirely of wood and driven by twin Jumo 211F engines giving 1340hp each, caused no significant problems, apart from a minor detail which ultimately called the whole project in question: The acidity of the adhesive available corroded the material next to the joint. Dispite all the difficulties, on July 1st 1943 the Ta 154 made its maiden flight, after which a further 9 prototypes were built, which were equipped with larger vertical and horizontal tail units.
Production had started a year earlier on the main Ta 154A-0 series, which were equipped with twin Jumo 211N engines, developing 1500hp each. Some of the aircraft built were converted and tested for different projected applications, provided the new Ta 154 hadn't been already destroyed by the Allied bombing raids on completion.
The Ta 154A-2/U4 series, equipped with the vertical radar antennae of the FuG 218 Neptun, went into service on 22nd February 1945 with the Stab III/NJG 3 night fighter squadron in Agathenburg near Stade. By the end of the war, only about 30 Ta 154s had been built, too little too late."
| THE KIT |
 I´m usually not very interested in
nightfighters, I have four. However, the Ta 154 looked really nice on the box,
so I bought it after seeing it on the internet page of Hobbies Morón in Buenos
Aires.
I´m usually not very interested in
nightfighters, I have four. However, the Ta 154 looked really nice on the box,
so I bought it after seeing it on the internet page of Hobbies Morón in Buenos
Aires.
The kit doesn't have many pieces, I'd say it has less than 150 parts, so I thought it'd be a quick build once I placed it on the bench.
The model came in the now discontinued Revell blue box, with the classic style instructions in black and white. Each sprue came independently bagged, with a total of 9 sprues, 8 in grey and a single clear one.
Decals had been printed in 1999, making them 23 years old. I was a bit worried about them breaking, so I though I could do a what if machine if the decals broke while being dipped in the water. I tested a small one, and it didn't break, so I decided to paint the kit with the markings from the box.
| CONSTRUCTION |
I read on Tom Cleaver's article of this same kit, that the model needed quite a bit of weight to get it to sit on its nose. I also read the wings were warped, but I'm getting too ahead of myself. I began the model by building up the engine cowlings and filling them in with lead weight, which were subsequently glued to the insides with lots of white glue. After that, I left the glue to dry overnight.
With the glue drying, I moved on to paint the cockpit. The parts were painted in RLM 66 (Revell 78) mostly, with the instruments being painted in black. The rudder pedals were painted in a metallic colour. The seats were also painted in RLM 66 with white seat belts. Once the cockpit was entirely painted, I moved on to the fuselage halves. I then glued the cannon inserts to both halves. After that, I glued the cockpit to the right fuselage half. To ensure I had a nose sitter, I glued with epoxy glue three 30 gram lead weights and left them overnight to dry. Once the glue was dry, I glued the left half.
 While the fuselage was drying, I worked on
the smaller parts in order to speed up the building process, such as the
propellers (painted in Revell 40/RLM 70), horizontal stabilizers, engine
nacelles and cowlings, and the landing gear (painted in RLM 02/Revell 45). I
also opened up the holes for the lower wing antennaes, and then glued the wings
together.
While the fuselage was drying, I worked on
the smaller parts in order to speed up the building process, such as the
propellers (painted in Revell 40/RLM 70), horizontal stabilizers, engine
nacelles and cowlings, and the landing gear (painted in RLM 02/Revell 45). I
also opened up the holes for the lower wing antennaes, and then glued the wings
together.
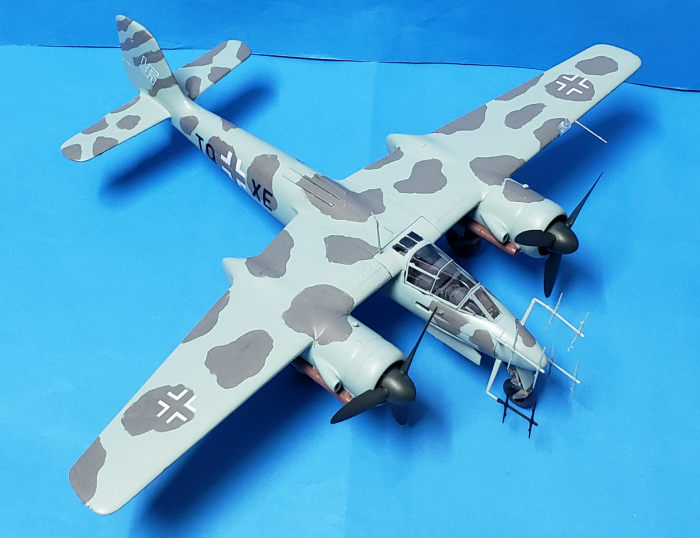
The main landing gear was then glued to the engine nacelles, and the nose gear to the nose of the aircraft. These were left to dry, and when so, I glued the nacelles to the wings. The wings were then glued to the fuselage halves and left them to dry. I discovered that, with the wings glued to the fuselage, I was able to counter the warping of the wings by making the weight of the model to push the wings upwards.
I wanted to see if my model was a nose sitter, so I turned it over and placed it on its gear. The nose gear broke, and I had to reglue it with Revell Contacta, CA and epoxy. The aircraft was also still tailheavy, so I added more weight inside the cockpit, which did the trick. After that, I glued the nosecone with the nose gear door.
| COLORS & MARKINGS |
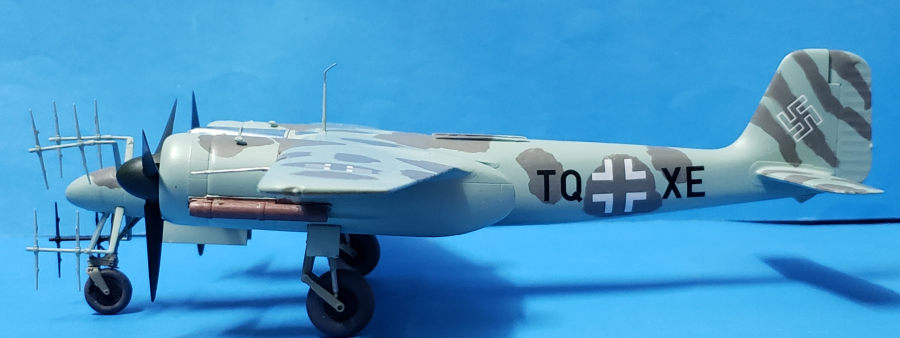
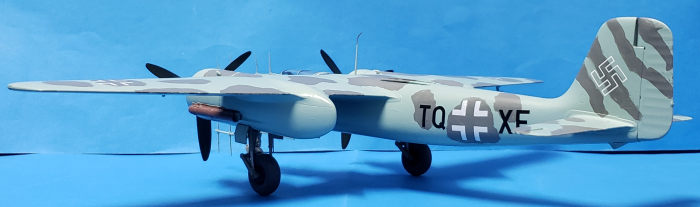 The entire model was painted with Revell's 49
Light Blue, and then traced the RLM 75 clouds with a pencil. The clouds were
painted with Revell's 47 Mouse Grey/RLM 75. I then glossed the entire model and
placed the decals. Since the plane was mostly built out of wood, it didn't have
many panel lines, so I had to guess where to place the crosses and the letters.
Once all the decals were added, I brushed some Microsol over them to make them
melt into the surface, and then I left them overnight to fully cure. The next
day, I brushed two coats of matt varnish.
The entire model was painted with Revell's 49
Light Blue, and then traced the RLM 75 clouds with a pencil. The clouds were
painted with Revell's 47 Mouse Grey/RLM 75. I then glossed the entire model and
placed the decals. Since the plane was mostly built out of wood, it didn't have
many panel lines, so I had to guess where to place the crosses and the letters.
Once all the decals were added, I brushed some Microsol over them to make them
melt into the surface, and then I left them overnight to fully cure. The next
day, I brushed two coats of matt varnish.
I added the nose radar antennaes, the wing antennaes, and the clear parts. The propellers were then glued to the engine nacelles and,if you're careful with the glue, you can make the props spin. I also painted the clear parts and glued them with white glue to the cockpit opening.
| CONCLUSIONS |
Although not a kit that interested me that much, I'm still glad I picked it up, because once built, it makes into a very nice looking, what could have been, nightfighter.
| REFERENCES |
Kit instructions.
Francisco Santoro
21 July 2022 Copyright ModelingMadness.com. All rights reserved. No
reproduction in part or in whole without express permission. If you would like your product reviewed fairly and fairly quickly, please
contact
the editor or see other details in the
Note to
Contributors.