Zoukei-Mura 1/48 Ta-152H-1
| KIT #: | 48-02 |
| PRICE: | $ |
| DECALS: | Multiple options |
| REVIEWER: | Francisco Santoro |
| NOTES: | Kit comes with interior, don’t bother adding it, you’ll save yourself fit issues. |
| HISTORY |
The Ta 152H was the final development of the legendary Fw 190, which appeared on the Channel front with JG2 and 26 in 1941. Even though it came from the Focke Wulf design, the aircraft was a whole different beast compared to the 190. The Ta 152H was designed from the outset as a high altitude fighter, leaving low and medium combat to the Ta 152C. Equipped with a Junkers Jumo 213E engine, the aircraft was capable of reaching a maximum service ceiling of 49500ft, ideal had the B-29 been introduced over the skies of Europe if WW2 had gone into 1946. Armament consisted of a single MK108 30mm cannon firing through the nose cone and 2×MG151/20 20mm heavy machinguns on the wingroots. Only 69 Ta 152Hs were built, and a single example remains, awaiting restoration at the at the National Air and Space Museum in Washington, USA.
| THE KIT |
 Before
the release of this kit, the only 1:48 Ta 152H was produced by Dragon, and
then reboxed by Italeri. The plane is molded in a light grey hard plastic,
with some hints of flash present on some parts. The highlights of this kit
is the amount of detail present: A full engine, full cockpit, fuel tanks and
several radio equipment installed behind the pilot. The nose panels come as
separate parts, meaning you can show the engine if you wish. Wings are also
very detailed, with riving, complete 20mm machineguns and flaps either
extended or retracted. Another option included, and this one is present on
other kits, is the possibility of adding the cowl flaps in the open or
closed position.
Before
the release of this kit, the only 1:48 Ta 152H was produced by Dragon, and
then reboxed by Italeri. The plane is molded in a light grey hard plastic,
with some hints of flash present on some parts. The highlights of this kit
is the amount of detail present: A full engine, full cockpit, fuel tanks and
several radio equipment installed behind the pilot. The nose panels come as
separate parts, meaning you can show the engine if you wish. Wings are also
very detailed, with riving, complete 20mm machineguns and flaps either
extended or retracted. Another option included, and this one is present on
other kits, is the possibility of adding the cowl flaps in the open or
closed position.
Instructions are a real work of art, with a front cover simulating the Pilot Manual for the aircraft. They’re a bit fussy on some assembly details, but the manual also has written notes that shed light on the confusing steps.
Decals are really complete. They offer numbers from 1 to 9 in both yellow and green, so you can represent every Ta 152H numeral in JG301’s flightline. Crosses and stenciling are provided for a single aircraft, so the numbers can be stored for further use in other projects.
| CONSTRUCTION |
 I
prepainted most of the parts before I began gluing. Prop in RLM 70, cockpit
in 66, engine in black with silver details, and inner components in RLM 02.
Landing gear struts were painted RLM 02 and the wheels RLM 66 tyres with
black hubs.
I
prepainted most of the parts before I began gluing. Prop in RLM 70, cockpit
in 66, engine in black with silver details, and inner components in RLM 02.
Landing gear struts were painted RLM 02 and the wheels RLM 66 tyres with
black hubs.
Propeller: This is a simple three part assembly. Here’s where I stumbled upon a confusing moment. The base of the prop has a flat side and a lip on the other side. The image on the instructions don’t show this detail, and there aren’t any notes that tell you which side gets glued to the nosecone. In the end, I glued the side with the lip to the nosecone.
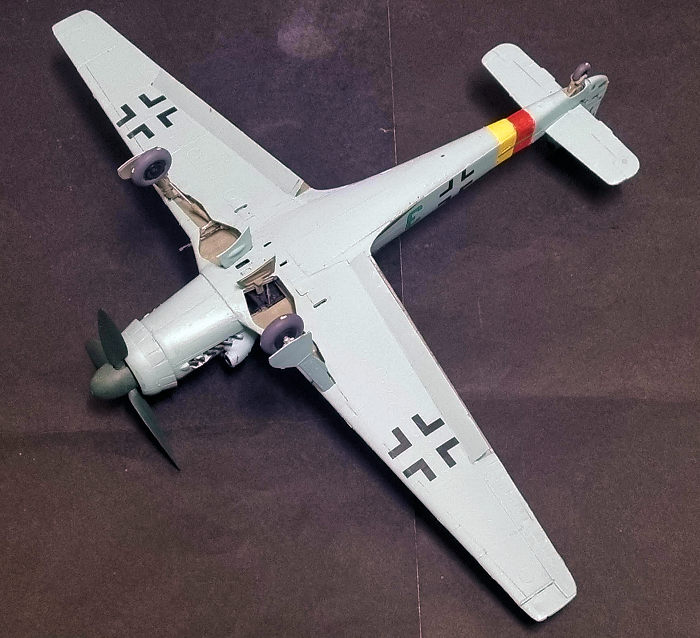
Wings: Unlike other kits that provide you with a single full span lower wing and two upper wings, ZM gives you 2 upper parts and 2 lower parts. These are connected via a full length wingspar, to which the landing gear, flaps and machineguns are glued. ZM provides a simple but complete machinegun structure, and you can show it by leaving the covers off. I dryfitted the wingspar (A2) to the front section of the wing (part A5), and found out they clashed together and didn’t fit, so I just removed some plastic off the braces of A5. That way the parts fitted. I then glued all the wing parts together, making sure to put the flaps in the extended position. Once you assemble the wings, you can add the separate leading edges. Once the whole wing had dried, I dryfitted the landing gear struts. ZM provides a very sturdy assembly by providing the struts with thick pegs, which are glued inside the wingspar. The dry fit showed I’d need to remove plastic where the gear has contact with the leading edge. Eventually, I got that sorted, being able to place the landing gear legs easily.
Cockpit: Everything here was painted RLM 66 with some black details. The cockpit is very complete, providing a throttle lever, separate rudder pedals, fuel tanks, control stick and front bulkhead. Part A7, which I don’t know its name, attaches in between the two fuel tanks (if you allow me some advice, leave this part on the sprue, it’ll give you fit issues when trying to glue the bottom fuselage piece). Speaking of the fuel tanks, I painted them black with silver straps. The entire cockpit was left aside and began work on the engine.
 Engine:
Another complete, but fiddly, assembly. Unlike Hobby Boss on their Doras and
Ta 152s, this kit comes with a full engine. Everything was painted black and
silver before gluing the parts. One thing you can also leave off is the
MK108 shell ejection chute, because it won’t let you glue flush the front
lower section of the wing. Once this was done, I left it and went to sleep.
Engine:
Another complete, but fiddly, assembly. Unlike Hobby Boss on their Doras and
Ta 152s, this kit comes with a full engine. Everything was painted black and
silver before gluing the parts. One thing you can also leave off is the
MK108 shell ejection chute, because it won’t let you glue flush the front
lower section of the wing. Once this was done, I left it and went to sleep.
Empennage: Another very detailed assembly. It comes in two halves with a separare door to check on the tailwheel strut. I left the tailwheel off, and glued the tail together.
Putting everything together: First thing I did was to glue the fuselage halves, and this presented no issues. I then glued the engine to the front firewall, which again, presented no problems. Problems did start when I tried to glue the wings. I had to fight a bit, and ended with one side flush, and the other with a step. I suspect it was part A7 and, if I ever build another 152H from ZM in this scale, I’ll leave it off. The lower fuselage was then glued. Some hours later, I was ready to glue the engine panels. This was the ugliest part of the kit, because I wasn’t able to get a flush fit on the assembly. Once I had a decent fit, I decided to glue the front section of the engine. The poor fit didn’t let me attach it properly, so I removed the engine panels, removed the engine, and put everthing back together. With a much better fit, I went on and completed the airframe. The empennage was glued to the rear part of the fuselage. Filling and sanding ensued, especially on the wing unions and empennage.
| COLORS & MARKINGS |
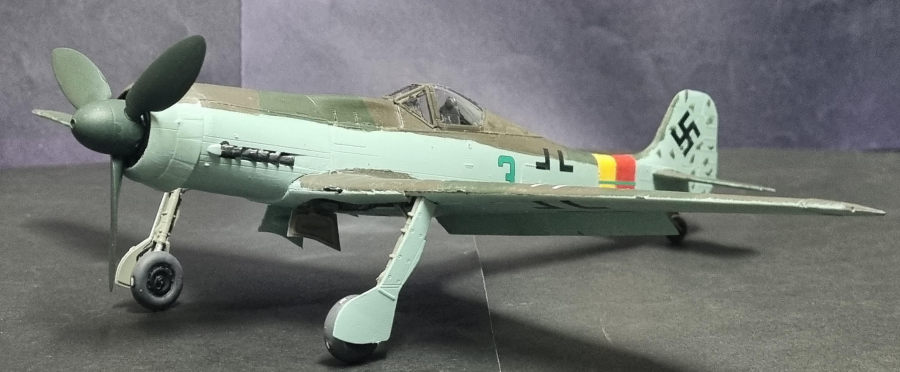
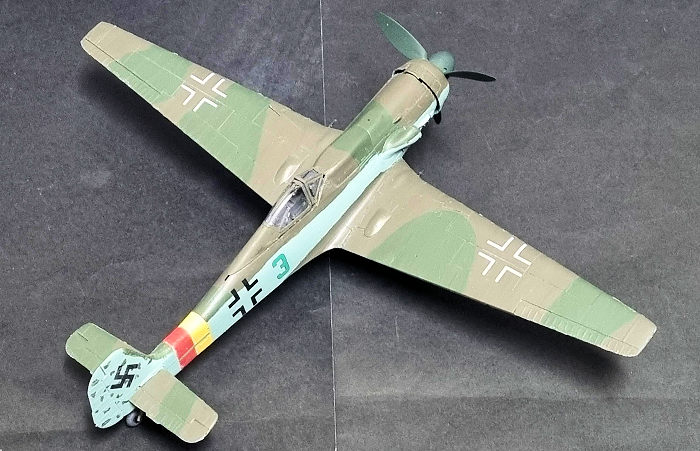
Scheme chosen was that of the single Ta 152H ace, Josef Keil. His aircraft was Green 3. I painted the plane in RLM 81/82/76, glossed it up and decalled the model using Eagle Cals’s set 48-034. These decals went on beautifully, and sank into the panel lines with some Microsol. The model was subsequently matt coated. The RVD band was painted first white and the yellow and red.
I added the smaller and more delicate parts, such as landing gear, wheels, gear doors and clear parts. Before gluing the canopy, I added the gunsight.
| CONCLUSIONS |
This kit is definitely not targeted to a beginner. The amount of detail that has to be prefectly aligned to avoid fit issues makes the kit suitable for more experienced builders. I particularly didn’t like the engine, which I had to remove to close the cowlings (I know this aircraft’s engine can be seen from below the wheel wells, but I prioritised fit over accuracy).
Revell Aqua Colours used: 78 (RLM 66), 45 (RLM02), 46 (RLM81), 65 (RLM 82), 15 (Yellow), 36 (Red), 08 (Black), 49 (RLM76).
16 April 2024
Copyright ModelingMadness.com. All rights reserved. No reproduction in part or in whole without express permission from the editor.
If you would like your product reviewed fairly and fairly quickly, please contact the editor or see other details in the Note to Contributors.