| KIT #: | 02814 |
| PRICE: | $80.00 |
| DECALS: | Two options |
| REVIEWER: | Mike Kleber |
| NOTES: |
| HISTORY |
 The
Focke-Wulf FW-200 Condor was
designed for Deutsche Luft
Hansa airlines with a capacity of 26 passengers. Its maiden flight was in 1937.
Seven aircraft were delivered to DLH, two to Danish carrier DDL and two to
Brazil. Two aircraft were used by Hitler and his staff. Japan ordered five
aircraft but they were never delivered due to the outbreak of war in Europe.
The Condor served in the roles of
transport and maritime patrol / attack with a crew of six. The C-1 and C-2
version were prone to structural failure requiring the aircraft to be
strengthened in the C-3 variant.
The
Focke-Wulf FW-200 Condor was
designed for Deutsche Luft
Hansa airlines with a capacity of 26 passengers. Its maiden flight was in 1937.
Seven aircraft were delivered to DLH, two to Danish carrier DDL and two to
Brazil. Two aircraft were used by Hitler and his staff. Japan ordered five
aircraft but they were never delivered due to the outbreak of war in Europe.
The Condor served in the roles of
transport and maritime patrol / attack with a crew of six. The C-1 and C-2
version were prone to structural failure requiring the aircraft to be
strengthened in the C-3 variant.
The total bomb load was 4,600 pounds carried in the ventral gondola and under each outboard engine nacelle and wing mounting point. Two HS293 guided missiles could be carried under the outboard engine nacelles in the C6 & C8 variants. The aircraft was armed with three machine guns and a 20mm cannon in the ventral gondola. A total of 278 were built with production in ending 1944.
| THE KIT |
 The kit
consists of 282
light grey parts, 22 clear
parts and 1 plastic ‘film’ piece for the instrument panel. There are a total of
124 discrete part numbers plus the 2 un-numbered fuselage halves). The surfaces
have fine recessed panel lines and recessed rivets. The parts are free of
flashing. There are 6 runners with the parts numbered. The fuselage halves are
not attached to runners, but are packaged in cardboard. The instructions have a
diagram of each runner indicating the number for each part.
The kit
consists of 282
light grey parts, 22 clear
parts and 1 plastic ‘film’ piece for the instrument panel. There are a total of
124 discrete part numbers plus the 2 un-numbered fuselage halves). The surfaces
have fine recessed panel lines and recessed rivets. The parts are free of
flashing. There are 6 runners with the parts numbered. The fuselage halves are
not attached to runners, but are packaged in cardboard. The instructions have a
diagram of each runner indicating the number for each part.
A detailed 8 page instruction booklet accompanies the kit along with a three
view 11x17 color sheet. A painting of the subject is shown on the box cover.
Decals for 2 aircraft of Kampfgeschwader (Bomber wing) KG-40
are provided.
The final dimensions are approximately 27-1/2” W x 19” L x 4-3/4”
tall at the mast.
| CONSTRUCTION |
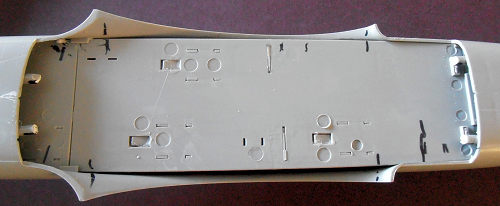
Build it strong; there will be a lot of handling by the time the project is complete! If the fuselage door is going to be staged in the open position, build only the 2 rear cabin auxiliary fuel tanks and seat. If the fuselage door will be closed, only build the rear most tank for the port side. Part of this tank shows in the fuselage window.
Build and paint the ‘battery unit’ on the starboard side. This is just visible in the fuselage window. Install the first two bulkheads behind the cockpit and the bulkhead behind the side door if you are displaying with the door open. No others will show.
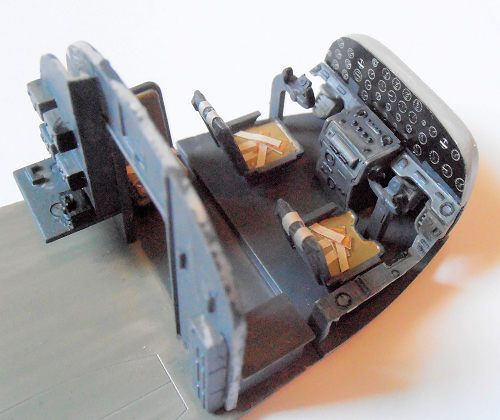 For
assembly of the flight deck, there are several ejection pin marks on the
fuselage that need to be sanded down. They will be visible after assembly. The
instrument panel needs to be sanded so it doesn’t hold the fuselage halves
apart. Don’t be too concerned about the instrument panel detail. It is barely
visible with a flashlight.
The instrument panel has two
additional pieces that would be installed over the instrument film. They will
totally block out the view of the instruments. I did not use either piece.
For
assembly of the flight deck, there are several ejection pin marks on the
fuselage that need to be sanded down. They will be visible after assembly. The
instrument panel needs to be sanded so it doesn’t hold the fuselage halves
apart. Don’t be too concerned about the instrument panel detail. It is barely
visible with a flashlight.
The instrument panel has two
additional pieces that would be installed over the instrument film. They will
totally block out the view of the instruments. I did not use either piece.
As I mentioned above, most everything in the fuselage won’t be seen. I built all of the auxiliary tanks, painting only the portions I thought might show in a window. Once the fuselage is closed up, only the last port side tank is visible. It is very dark in there.
The shape of the bulkhead immediately aft of the fuselage door doesn’t match the shape of the fuselage resulting in a gap between the fuselage side and bulkhead. With the door open it is barely noticeable. The tail wheel well piece needs to have the corners clipped so it will not hold the fuselage halves apart. I added a shim in the tail wheel well so the front angled strut is securely attached to the fuselage.
The gondola is comprised of
3 pieces, 1 grey and 2 clear. The grey plastic runs most of the length of the
gondola with the clear pieces attaching to the front and back. The clear pieces
have the frame work mold ed
on them. Check the alignment at the mating surface of the front clear and grey
piece prior to gluing anything. I found that I had to push the grey piece open
to get the surfaces to match each other when gluing. The plastic is flexible
enough to do this safely.
ed
on them. Check the alignment at the mating surface of the front clear and grey
piece prior to gluing anything. I found that I had to push the grey piece open
to get the surfaces to match each other when gluing. The plastic is flexible
enough to do this safely.
In order to display the door open, I glued a small piece of plastic to the existing hinges to extend them enough so they engage the slots in the fuselage.
The windows are installed from inside of the fuselage. There is a tab on each window with a corresponding recess in the fuselage so you can secure them with plastic cement. I applied white glue around the remaining sides of the windows so they are well sealed. There is a slight recess looking from the exterior once they are installed. The canopy needed to be sanded down in several locations to ensure a good fit with the fuselage.
 Test fit
every step before you apply glue when building up the wings. The wing’s
underside consists of a single piece that spans the outboard engines and an
additional piece for each outboard side. The upper surface is one piece for each
side. The amount of contact surface between the center section and the fuselage
is minimal. I clipped four short lengths of sprue and glued them to the bottom
inside of the fuselage (2 front and 2 back) with enough length protruding so
that with tube glue applied they would contact the inside of the wing and
provide extra support when the wing was assembled to the fuselage.
Test fit
every step before you apply glue when building up the wings. The wing’s
underside consists of a single piece that spans the outboard engines and an
additional piece for each outboard side. The upper surface is one piece for each
side. The amount of contact surface between the center section and the fuselage
is minimal. I clipped four short lengths of sprue and glued them to the bottom
inside of the fuselage (2 front and 2 back) with enough length protruding so
that with tube glue applied they would contact the inside of the wing and
provide extra support when the wing was assembled to the fuselage.
I found that several wing panel locator pins had to be clipped off as they did not line up with the corresponding holes in the mating piece. I glued a short piece of sprue inside the inboard leading edge of each wing to provide extra strength to that joint.
There was a gap of
about 1/8” and a mismatch in height between the port wing to fuselage joint. I
glued multiple shims in place to secure the wing to the fuselage.
Ample amounts of filler
putty, sanding and patience were required to produce a d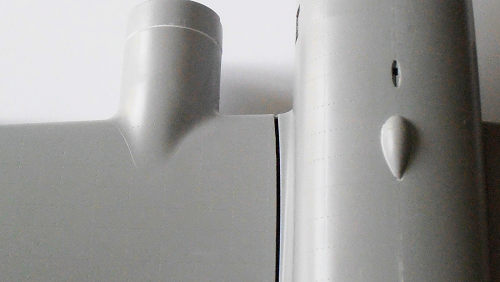 ecent
looking wing root joint. The starboard wing was not as bad, but did require some
extra work as well.
ecent
looking wing root joint. The starboard wing was not as bad, but did require some
extra work as well.
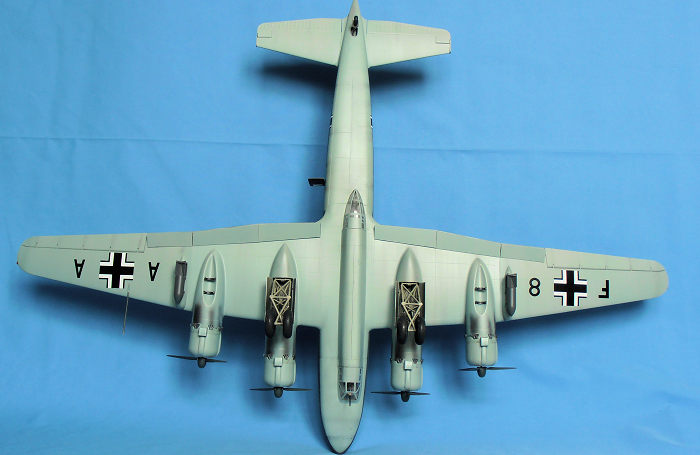
The flaps can be displayed in the down position but there is no clocking to set them to any particular angle. I cut a 30 degree angle out of thin card stock and used that as a template to set the flap angle. There are 3 sections of flaps on each wing.
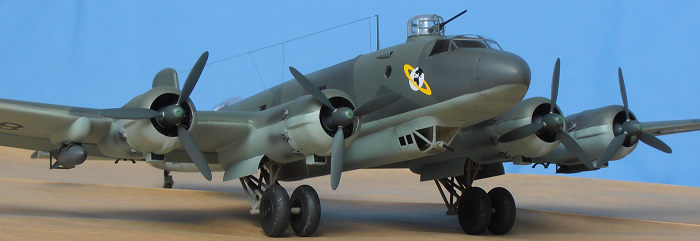
The engine assembly is comprised of a fully detailed front and back half. Nothing will show on the back half. Don’t bother to paint it. Check to make sure the propeller shafts fit into the engine bore. I had to drill them open a small amount. Unfortunately, I found this issue after the model was fully built. It will be much easier to do this work before they are mounted. I also drilled open the tips of the spinners.
Prior to starting the landing gear build, I measured the height of each wingtip. One side was higher by about a quarter of an inch. I wanted to level the wings and the best remedy I could think of was to shim the landing gear. To be able to do this I built each landing gear as one assembly rather than two subassemblies mounted separately as directed by the instructions. This allowed me to install shims incrementally until the tips evened up prior to permanent gear installation. Two small shims at the front and rear mounting points were sufficient. Each landing gear consists of 11 pieces excluding the wheels. They are very strong and carry the weight of the model with no problem.
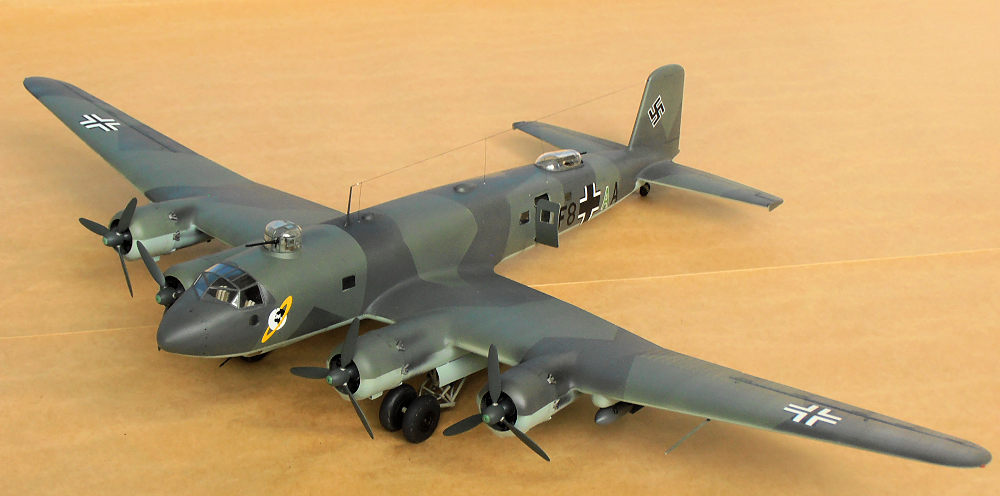
| COLORS & MARKINGS |
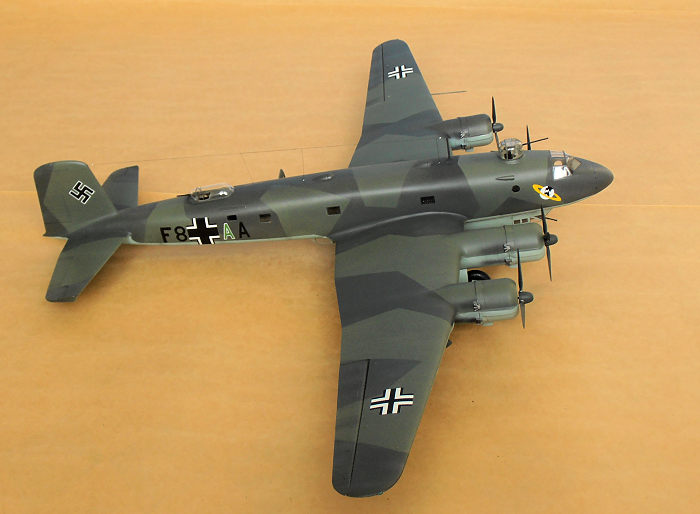 After
reviewing many photos, some in color, I found the demarcation line between the
two upper surface colors was clearly visible in some photos and hardly
noticeable in others. I built the 1/72 Revell condor about 15 years ago using
Model Master RLM 72 & RLM 73 and can barely see the demarcation lines. I didn’t
want to do all of the work masking the splinter pattern on this kit and then
ending up not being able to see it, so for this model I opted to use Model
Master enamel RLM 72 dark grey and for the green shade a 1:1 ratio mix of Model
Master RLM 71 & 74. I sprayed some light grey streaks to give a bit of a
weathering affect. The underside is RLM 65.
After
reviewing many photos, some in color, I found the demarcation line between the
two upper surface colors was clearly visible in some photos and hardly
noticeable in others. I built the 1/72 Revell condor about 15 years ago using
Model Master RLM 72 & RLM 73 and can barely see the demarcation lines. I didn’t
want to do all of the work masking the splinter pattern on this kit and then
ending up not being able to see it, so for this model I opted to use Model
Master enamel RLM 72 dark grey and for the green shade a 1:1 ratio mix of Model
Master RLM 71 & 74. I sprayed some light grey streaks to give a bit of a
weathering affect. The underside is RLM 65.
The 3 view color sheet with this kit references Gunze Sanyo paint numbers. It calls for the darker shade to be a mix of RLM 70 (90%) and white (10%). For the lighter shade to be a mix RLM 70 (90%), Red (5%) and blue (5%). The instructions from the 1/72 Revell kit called for RLM 72 and RLM 71 for the top colors. I compared the colors on the Humbrol paint can lids of RLM 72 & 73 and found them to be hard to tell apart. I’m not sure if there is a right or a wrong combination or look, so pick out whatever colors you think best.
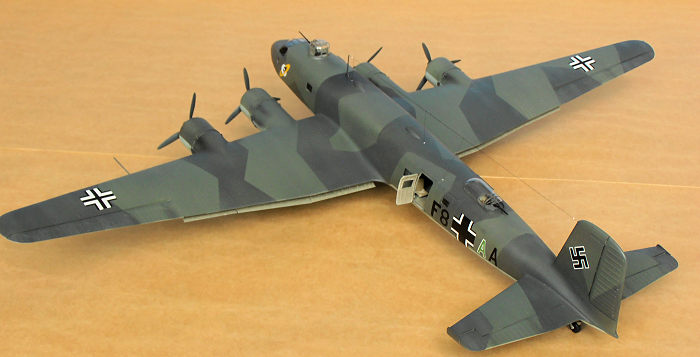
 There is
little to no carrier film protruding past the color on the decals. I airbrushed
a light coat of gloss clear lacquer to the areas where the decals were to be
applied. The decals went on without any problem. One light application of
Walthers solvaset worked well to set them into the panel lines. I airbrushed a
coat of flat clear lacquer over the model after the decals had set.
There is
little to no carrier film protruding past the color on the decals. I airbrushed
a light coat of gloss clear lacquer to the areas where the decals were to be
applied. The decals went on without any problem. One light application of
Walthers solvaset worked well to set them into the panel lines. I airbrushed a
coat of flat clear lacquer over the model after the decals had set.
I used an aftermarket decal sheet for the swastikas (Hakenkreuze). The kit decal swastika comes in 5 pieces that need to be ‘assembled’ on the model. It appears that they will produce an accurate looking swastika when completed.
The last thing I did was to attach the aerials. These are made of stretched sprue painted with enamel paint. I used a hot pin to open small holes in the fuselage and vertical stabilizer and secured the horizontal aerial with cyanoacrylate. A hot hair dryer took the slack out of this line after which, the vertical aerials were glued in place. I placed a drop of thick white paint at each end of the line to simulate the isolators.
| CONCLUSIONS |
The end result is a nice looking model. This is a kit best suited for an experienced modeler. The effort was considerable. If you are a fan of the Condor and can clear some room for display, I highly recommend it.
| REFERENCES |
- Hitler’s Luftwaffe: Wood/Gunston
- Luftwaffe Camouflage & Markings: Wrobel
- “World War 2 Photos” (Internet)
- Rod’s WarBirds (Internet)
26 October 2018
Copyright ModelingMadness.com
If you would like your product reviewed fairly and
fairly quickly, please
contact
the editor
or see other details in the
Note to
Contributors. Back to the Main Page
Back to the Review
Index Page
Back to the Previews Index Page