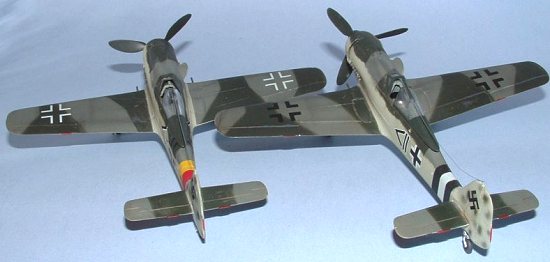
Airfix and Tamiya FW-190D-9
| KIT #: | See Review |
| PRICE: | See review |
| DECALS: | See review |
| REVIEWER: | Mark Fordham |
| NOTES: | Airfix kit has been 'warmed over' |
| HISTORY |
Much has been written about the D-9 and I’m not going to reveal my ignorance by trying to write a piece on an aircraft that I know just enough about to be dangerous. I will refer you to MM full kit reviews and call up some of Scott VA's, or TC’s stuff instead.
| THE KIT |
 On receiving the
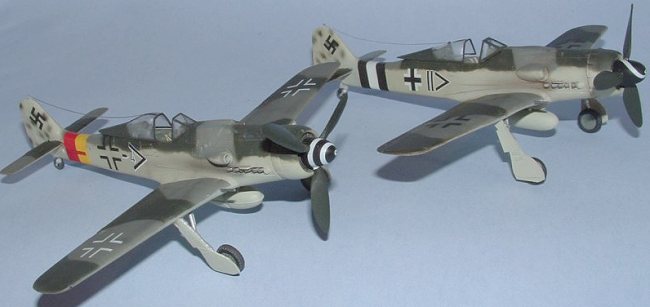
Heller/Airfix D-9 from Tel “The Axe man” Mcgrady and the Tamiya D-9 from
“Crazy” Don Fynn I though it would be an ideal opportunity to build both at
the same time and see if I could get the Airfix D-9 to look like the Tamiya
offering!
On receiving the
Heller/Airfix D-9 from Tel “The Axe man” Mcgrady and the Tamiya D-9 from
“Crazy” Don Fynn I though it would be an ideal opportunity to build both at
the same time and see if I could get the Airfix D-9 to look like the Tamiya
offering!
As we all know I don’t “do” Tamiya kits very often so when I received this one from CD I thought to myself what am I going to do to make this more interesting, as the kit just falls together without needing to resort to filler, sanding and all the other fun things that I enjoy.
| CONSTRUCTION |
 First thing was to
assemble the Tamiya cockpit and fuselage, no great strain there, once I had
the fuselage complete I assembled the Airfix offering, scratch built a
floor and some side wall details added a control panel and seatbelts THEN
assembled the fuselage, after filling and sanding the join line I sanded
off the raised panel lines and re-scribed new ones using the Tamiya one as
a guide.
First thing was to
assemble the Tamiya cockpit and fuselage, no great strain there, once I had
the fuselage complete I assembled the Airfix offering, scratch built a
floor and some side wall details added a control panel and seatbelts THEN
assembled the fuselage, after filling and sanding the join line I sanded
off the raised panel lines and re-scribed new ones using the Tamiya one as
a guide.
Having decided to use the spare canopy out of the Tamiya kit and the alternative set of markings to do the Airfix kit in I needed to cut off the canopy and scratch build a rear deck for the Airfix D-9 in preparation for the spare Tamiya canopy.
Moving onto the wings,
the Tamiya ones went together with a dab of MEK and then they were ready to
fit to the fuselage, the Airfix ones needed a dab of filler and ½ a liter
of MEK to weld the three pieces together as they were slightly warped, I
thinned the trailing edges as much as I dared and the raised panel lines
where sanded off and then re-scribed. Fitting of both
 wings presented no
problems although a touch of filler was used on the Airfix wing on the
underside, curiously though one of the shell ejector ports is missing off
the Tamiya wing, were as Airfix has all four.
wings presented no
problems although a touch of filler was used on the Airfix wing on the
underside, curiously though one of the shell ejector ports is missing off
the Tamiya wing, were as Airfix has all four.
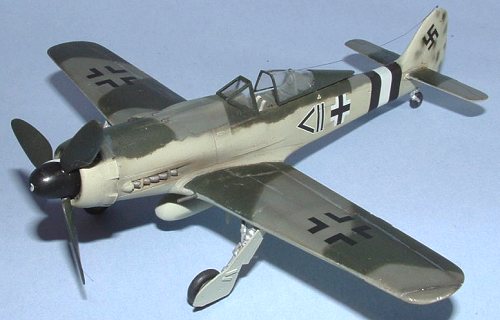
Moving onto the cowlings showed just how crude the Airfix one is compared to the Tamiya version, I cleaned up the Airfix offering as best I could and added the rather prominent “stitching” seen running along the nose with stretched sprue softened by MEK and then the back of a scalpel blade pushed against it.
Apart from the crisper panel lines on the Tamiya D-9 it was starting to get hard to tell the two kits apart now, it was amazing how a few small additions to the Airfix kit could make it look a million times better. All that was required now was to trick up the Airfix undercarriage with the addition of some tape and sprue, once done I assembled the Tamiya undercarriage with it’s idiot proof hole and tab arrangement that made getting the undercarriage to sit right a lot easier than the Airfix one which basically sat in a slight depression in the wing and floated in the breeze.
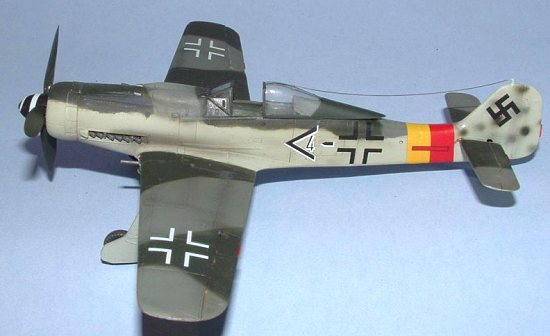
| COLORS & MARKINGS |
With the addition of the undercarriage it was time to send both airframes to the panel and paint shop, both got a heavy coat of gray primer before a quick rub down with worn 1200 wet-n-dry, both were painted with my precious supplies of Aeromaster RLM acrylics using a Paasche VSR-90 with the soft edges done with a modification of Tom Cleavers thread trick to give that soft “hard” edge effect, the small amount of mottle was done freehand.
I found that painting two aircraft at the same time easier than just doing the one, I had psyched myself up to do a marathon spray session and because of that I think I did a better than (my) average job on the camo this time, maybe I should to this more often, save up 3 or 4 kits with similar colour schemes and spray them all in one sitting.
 With the painting out the
way and nice and hard the obligatory coat of Future was brushed on and left
a day or two to harden.
With the painting out the
way and nice and hard the obligatory coat of Future was brushed on and left
a day or two to harden.
The Airfix/Heller decals were just the generic crosses and a white number 1, rather boring so I decided to use both Tamiya versions on the builds. Making sure that I had the right markings for the right canopy (one was blown the other flat) I separated the two sets and sat down for a marathon decaling session, it took about an hour and a half to do both planes but the Tamiya decals loved my homemade decal solution and soon snuggled down onto the paintwork without too much silvering.
Another coat of Future was slopped on and once dry Humbrol Mate coat was sprayed over both to seal in the cat hairs and dandruff, now I know German aircraft from WWII were semi-gloss but for some reason semi-gloss (or gloss) in 1/72nd scale makes the planes look like toys, the larger 1/48th scale models look fine in semi-gloss but I guess it must be a scale thing so I generally finish all but my civil aircraft in a matt finish.
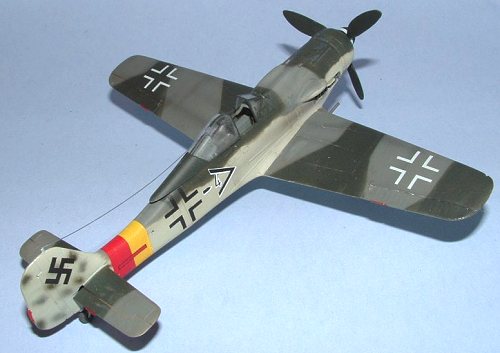
Once the first coat of matt was dry the weathering was applied using a mixture of water colours and pastels, the exhaust stains done with thinned Tamiya smoke and a final light coat of matt sprayed on to seal the pastel weathering.
Final assembly of the finicky bits that I normally break off could be done at this stage, the canopies on both where posed open and the drooped aerials made from stretched sprue. Gun barrels were added using the last of my thin brass tubing and finally the wheels were painted up and added and that, they say, is that, Two more D-9’s to add to the shelf to go with the other two Airfix ones.
| CONCLUSIONS |
 The main object of this
build was to see if the Airfix offering could be made to stack up against
the Tamiya ‘wunderkit” , did I succeed?, the answer is yes and no, even
warming it over the best of my limited ability doesn’t bring it close to
the finish and quality of the Tamiya one, but at a quick glance the Airfix
kit now at least holds it own, I took both along to a local club meet and
plonked them down on the table, I didn’t tell anyone which kit brands they
were but most picked the Tamiya version straight away, the Airfix one
however had them stumped, a few muttered “well it’s not the Airfix dog or
the Tamiya kit but blowed if I know who did it” is it Italeri?. Well
that’s good enough for me. I’ve managed to turn the plain Jane Airfix D-9
into a model that okay doesn’t outclass the Tamiya one but isn’t over
shadowed by it either.
The main object of this
build was to see if the Airfix offering could be made to stack up against
the Tamiya ‘wunderkit” , did I succeed?, the answer is yes and no, even
warming it over the best of my limited ability doesn’t bring it close to
the finish and quality of the Tamiya one, but at a quick glance the Airfix
kit now at least holds it own, I took both along to a local club meet and
plonked them down on the table, I didn’t tell anyone which kit brands they
were but most picked the Tamiya version straight away, the Airfix one
however had them stumped, a few muttered “well it’s not the Airfix dog or
the Tamiya kit but blowed if I know who did it” is it Italeri?. Well
that’s good enough for me. I’ve managed to turn the plain Jane Airfix D-9
into a model that okay doesn’t outclass the Tamiya one but isn’t over
shadowed by it either.
My thanks (again) go to Tel “the axe man” and “Crazy Don” for feeding my styrene addition. Long live Airfix and death to the heretics
September 2004
| REFERENCES |
 Fighter Aircraft of WWII
Various D-9 Reviews right here on MM
If you would like your product reviewed fairly and quickly by a site that has over 250,000 visitors a month, please contact me or see other details in the Note to Contributors.