
| KIT: | Heller 1/72 Fi-156 Storch |
| KIT #: | 6611 |
| PRICE: | $7.98 |
| DECALS: | Two options |
| REVIEWER: | Greg Ewald |
| NOTES: | Smer boxing |
| HISTORY |
There is no such thing as an
elegant looking STOL aircraft. They are gangly, floppy looking planes that look
like, well, storks. Hence the aptly named “Storch”, designed by the imaginative
team under Gerhard Fiesler in the mid 1930’s, it took to the sky in
 ’36, and quickly proved itself
to be an indispensable forward air control and reconnaissance aircraft, able to
take off in 160 feet, and land in less than half of that ! ( The Heller
instructions have it printed at landing in “5 yards”, but I could not find any
solid verification of that, and fifteen feet does seem a little short.) The
ingenious leading edge flaps gave the wide winged beastie it’s abilities,
increasing the surface area so much so that it could float like a kestrel above
the battlefield, and the huge greenhouse of a cockpit enabling the pilot and
guest (or two) to take in the huge panorama. The Desert Fox himself preferred
this little gutsy bird for observation, as did a number of Allied commanders,
using captured 156’s frequently over the larger Lysanders and Piper
Grasshoppers.
’36, and quickly proved itself
to be an indispensable forward air control and reconnaissance aircraft, able to
take off in 160 feet, and land in less than half of that ! ( The Heller
instructions have it printed at landing in “5 yards”, but I could not find any
solid verification of that, and fifteen feet does seem a little short.) The
ingenious leading edge flaps gave the wide winged beastie it’s abilities,
increasing the surface area so much so that it could float like a kestrel above
the battlefield, and the huge greenhouse of a cockpit enabling the pilot and
guest (or two) to take in the huge panorama. The Desert Fox himself preferred
this little gutsy bird for observation, as did a number of Allied commanders,
using captured 156’s frequently over the larger Lysanders and Piper
Grasshoppers.
After the defeat of the nazi regime, the Morane-Saulnier plant of world war one fame began to churn out the MS 500 Criquet, a modified version with a tail wheel, and slightly different tail surfaces. For a bunch of fabric stretched over a tubular skeleton, the 500 proved to be a workhorse in the Indochina war, able to pick up wounded and deliver critical information in almost any condition, from rice paddy to paved runway. There are still a few of these wonderful planes flying, and if you are lucky, you might run into one at an airshow…just look for the pilot with a big grin on his face !
| THE KIT |
When you first open the box, and take a look at the instructions, it looks like a fairly simple build. This is very misleading! You do get to choose which craft you would like to reproduce, the armed German version, or the scout French version. More than 50 parts assemble into a dinky aircraft, with struts all over the place…including a mass of windows, so make sure you have clear parts cement handy !
The instructions are a one page fold out, with 7 total steps, with frequent optional choices depending on which version you build. Molded in light grey styrene, the sprues are flash free, and the plastic is easy to cut and sand, thank god.
| CONSTRUCTION |
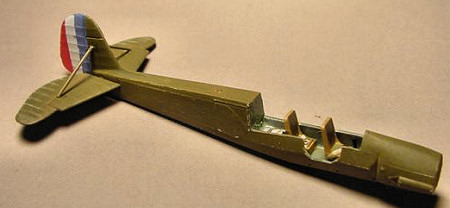 Leaving the propeller off until
the final assembly, I started in on the cockpit, made up of four pieces, the two
seats, one control stick, and the cabin floor. Masking tape seatbelts were
added to give the interior some detail, as well as some folded paper maps on the
bench behind the rear seat. In step two, you have to pick your canopy, either
with a gun mount or not, and whatever you do, remember to cement in the frame to
the clear canopy (part 12) ! I didn’t, and had a dickens of a time fitting the
thing in later. I left off the antennae’s until final assembly, in case of rough
handling and a hunger from the carpet monster. Step 3 is something of a
mystery, the tail surfaces are supposed to be different from the German to the
French version, but in my kit, they were identical. The assembly of the
fuselage is a little tricky, test fitting is a must as the cockpit section is
too wide for the halves to meet up, some sanding will be necessary. Carefully
gluing the parts together, the whole thing was mummified in rubber bands and
blue tape , to be left overnight to dry. Like it’s cousin, the Lysander, the
156’s wings attach to the canopy frame, meaning that you will want to spend some
time making sure that everything mates very well, so break out those sanding
sticks and file, file, file. It took me several hours to get a good fit between
the canopies and the main body, then using clear plastic adhesive, the
conglomeration of glass was put into place and set aside once again to dry for a
night. I did leave the door, part 45, off at this time, as I wanted it to be
displayed in the open position.
Leaving the propeller off until
the final assembly, I started in on the cockpit, made up of four pieces, the two
seats, one control stick, and the cabin floor. Masking tape seatbelts were
added to give the interior some detail, as well as some folded paper maps on the
bench behind the rear seat. In step two, you have to pick your canopy, either
with a gun mount or not, and whatever you do, remember to cement in the frame to
the clear canopy (part 12) ! I didn’t, and had a dickens of a time fitting the
thing in later. I left off the antennae’s until final assembly, in case of rough
handling and a hunger from the carpet monster. Step 3 is something of a
mystery, the tail surfaces are supposed to be different from the German to the
French version, but in my kit, they were identical. The assembly of the
fuselage is a little tricky, test fitting is a must as the cockpit section is
too wide for the halves to meet up, some sanding will be necessary. Carefully
gluing the parts together, the whole thing was mummified in rubber bands and
blue tape , to be left overnight to dry. Like it’s cousin, the Lysander, the
156’s wings attach to the canopy frame, meaning that you will want to spend some
time making sure that everything mates very well, so break out those sanding
sticks and file, file, file. It took me several hours to get a good fit between
the canopies and the main body, then using clear plastic adhesive, the
conglomeration of glass was put into place and set aside once again to dry for a
night. I did leave the door, part 45, off at this time, as I wanted it to be
displayed in the open position.
The next morning, the tail
surfaces were added one at a time using c/a glue, the struts (part 8) forcing
the correct angle…this bit was tricky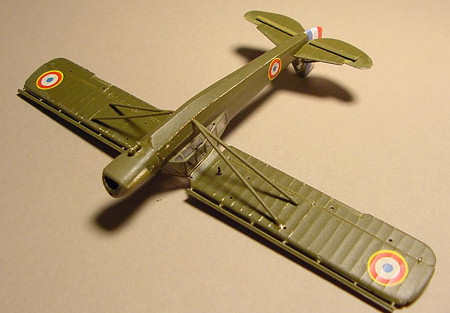 too, cool and calm wins the race here, that, and a pair of hemostats. When you
are filling and sanding the fuselage, remember that the bottom rough detail is
intentional, as this is where the fabric was stitched together…it does need to
be knocked down a bit though, as it is way to heavy handed for 1/72nd
scale. In step 5, you get to build the wings, with the clever forward slats
being rather difficult to properly locate, plan on doing some photo research
prior to gluing here, there are no angle tabs at all. The fit of the wings to
the canopy is surprisingly (after all the other misfits) good, but don’t cement
them in place just yet. Slide the wings onto the mating tabs, then glue in the
underneath strutwork, starting from the inside (parts 18), and then the longer
outside struts (parts 10 and 11). Nope, don’t glue the wings on yet ! Skip
over to step 7, and glue on the landing gear carefully, there are almost no
attachment points and everything has to line up perfectly, so test fit a couple
of times until you are comfortable with how it looks. Once you have the
spaghetti all in place, and the glue has FIRMLY set up, gently turn the plane
over, and THEN you can glue the upper wings with clear part cement, using a
capillary action. Now, without breathing too hard on to the fragile structure,
set it aside to dry. Whew! All set up? Great, now it is time to glue on all of
the do-dads, control horns, doohickies and the like, beginning with the under
surfaces, then the tender antennas on top. Pick out either your tail skid or
wheel, pop on the propeller and your plane is assembled! Now it’s time to
paint…
too, cool and calm wins the race here, that, and a pair of hemostats. When you
are filling and sanding the fuselage, remember that the bottom rough detail is
intentional, as this is where the fabric was stitched together…it does need to
be knocked down a bit though, as it is way to heavy handed for 1/72nd
scale. In step 5, you get to build the wings, with the clever forward slats
being rather difficult to properly locate, plan on doing some photo research
prior to gluing here, there are no angle tabs at all. The fit of the wings to
the canopy is surprisingly (after all the other misfits) good, but don’t cement
them in place just yet. Slide the wings onto the mating tabs, then glue in the
underneath strutwork, starting from the inside (parts 18), and then the longer
outside struts (parts 10 and 11). Nope, don’t glue the wings on yet ! Skip
over to step 7, and glue on the landing gear carefully, there are almost no
attachment points and everything has to line up perfectly, so test fit a couple
of times until you are comfortable with how it looks. Once you have the
spaghetti all in place, and the glue has FIRMLY set up, gently turn the plane
over, and THEN you can glue the upper wings with clear part cement, using a
capillary action. Now, without breathing too hard on to the fragile structure,
set it aside to dry. Whew! All set up? Great, now it is time to glue on all of
the do-dads, control horns, doohickies and the like, beginning with the under
surfaces, then the tender antennas on top. Pick out either your tail skid or
wheel, pop on the propeller and your plane is assembled! Now it’s time to
paint…
| COLORS & MARKINGS |
 The colour schemes for the
French Criquets were rather dull, unfortunately. There is one profile of a naval
plane that is stunning, and I was contemplating building that version, when a
fellow modeler, Ollie, posted some information about a friend of his who flew
Criquets in Indochina, landing them in rice paddies and rough runways…right then
and there, I knew it had to be a diorama, and the plane would have to be good
old olive drab, my least favourite colour. Ah well. The plane was sprayed with
Testor’s Model Master OD, then a thinner coat of Field Drab was applied. After
drying for a day or so, some light sanding with 200 grit paper really brought
out the fabric and control details, and lent some life to the little bird. Of
course, much of the painting was done in stages during construction, trying to
mask off the undersides of the clear canopy would have been too Orwellian for
me, so as I went along, parts were sprayed as necessary. I also painted the
interior of the cockpit glass before gluing it to the fuselage, using a light
grey to simulate the weathered steel, as the metallic paints would have been
just too bright for a combat weary FAC.
The colour schemes for the
French Criquets were rather dull, unfortunately. There is one profile of a naval
plane that is stunning, and I was contemplating building that version, when a
fellow modeler, Ollie, posted some information about a friend of his who flew
Criquets in Indochina, landing them in rice paddies and rough runways…right then
and there, I knew it had to be a diorama, and the plane would have to be good
old olive drab, my least favourite colour. Ah well. The plane was sprayed with
Testor’s Model Master OD, then a thinner coat of Field Drab was applied. After
drying for a day or so, some light sanding with 200 grit paper really brought
out the fabric and control details, and lent some life to the little bird. Of
course, much of the painting was done in stages during construction, trying to
mask off the undersides of the clear canopy would have been too Orwellian for
me, so as I went along, parts were sprayed as necessary. I also painted the
interior of the cockpit glass before gluing it to the fuselage, using a light
grey to simulate the weathered steel, as the metallic paints would have been
just too bright for a combat weary FAC.
| FINAL CONSTRUCTION |
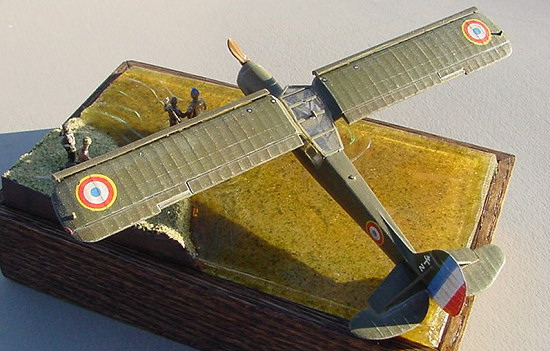
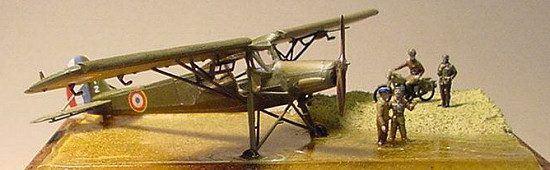
The diorama idea was conceived
right after reading a post by Ollie, I immediately saw the potential for a water
based scene, with some figures arguing about the landing. Once the plane was
placed on the base, a ridge of Bondo was made to simulate the small hillock
above the rice paddy. I like using a fast setting resin for this sort of thing,
as I don’t have to wait for it to dry. Having sanded
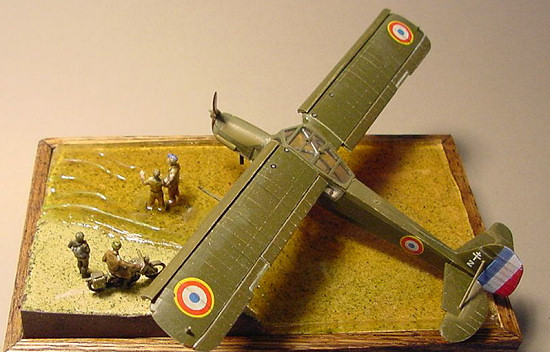 the platform down to where I
wanted it, a wash of white glue was applied, and artificial turf in three
colours were sprinkled on. After letting that dry, I wrapped the entire base
with a heavy duct tape to contain the clear resin during the pour. Now, I made
a huge mistake: I did not glue the figures in place prior to casting, thinking
that it would be thick enough to hold them upright, so I mixed up some common
fiberglass resin with the minimum amount of MEK9 (didn’t want to melt the model
or the figures!) and gently streamed it in, using a Popsicle stick to work out
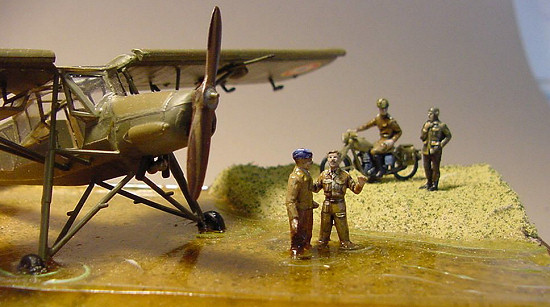
the air bubbles. Surprise, surprise…one figure after another went face first
into the quagmire, while I yelled and pulled them out time after time. One
pilot figure suffered the most, and is still adhered to my circular recycling
bin (the trash) in a rather sad upside down pose. The two others were cleaned
off, and propped up using small clamps and a series of jigs that would have made
Dr. Goldberg proud. The clear resin set up in about two hours, and the tape was
removed, with the new pilot figure relocated to the upper ridge near the
motorcycle messenger. Some sanding was necessary to get rid of the surface
tension ridges where the resin met the tape (it will tend to rise up slightly
there) and then the whole surface was covered in Future. The water wake lines
were painted in with clear gel, and the oak side panels were added, and viola!
A little story of the French war in Indochina.
the platform down to where I
wanted it, a wash of white glue was applied, and artificial turf in three
colours were sprinkled on. After letting that dry, I wrapped the entire base
with a heavy duct tape to contain the clear resin during the pour. Now, I made
a huge mistake: I did not glue the figures in place prior to casting, thinking
that it would be thick enough to hold them upright, so I mixed up some common
fiberglass resin with the minimum amount of MEK9 (didn’t want to melt the model
or the figures!) and gently streamed it in, using a Popsicle stick to work out
the air bubbles. Surprise, surprise…one figure after another went face first
into the quagmire, while I yelled and pulled them out time after time. One
pilot figure suffered the most, and is still adhered to my circular recycling
bin (the trash) in a rather sad upside down pose. The two others were cleaned
off, and propped up using small clamps and a series of jigs that would have made
Dr. Goldberg proud. The clear resin set up in about two hours, and the tape was
removed, with the new pilot figure relocated to the upper ridge near the
motorcycle messenger. Some sanding was necessary to get rid of the surface
tension ridges where the resin met the tape (it will tend to rise up slightly
there) and then the whole surface was covered in Future. The water wake lines
were painted in with clear gel, and the oak side panels were added, and viola!
A little story of the French war in Indochina.
| CONCLUSIONS |
This is not the easiest kit off the shelf, in fact, I have built many limited runs that were simpler…but, truth be told, this is a very rewarding aircraft to add to the collection, and I highly recommend it, if only for the practice for gaining patience.
2006
| REFERENCES |
 http://www.warbirdalley.com/storch.htm
http://www.kotfsc.com/aviation/fi156.htm
http://www.airbum.com/pireps/PirepStorch.html (this is a fun one !)
Review kit courtesy of: A gift from a fellow modeler.
If you would like your product reviewed fairly and quickly by a site that has over 300,000 visitors a month, please contact me or see other details in the Note to Contributors.