Italeri 1/48 FW-190D-9
|
KIT # |
856 |
|
PRICE: |
€19.00 |
|
DECALS: |
two options |
|
REVIEWER: |
Javier Elejalde |
|
NOTES: |
Ex-Dragon kit |
|
HISTORY |
 So much has been
written about this fighter. All you know the history: at the end of 1941
the Fw-190A was the best fighter in the world between 15000 and 20000
feet, but its performance decreased above that height, so it was decided
to change the engine, because it was clear that the Fw190 would never be
a winner above 30000 feet keeping the BMW801 engine.
So much has been
written about this fighter. All you know the history: at the end of 1941
the Fw-190A was the best fighter in the world between 15000 and 20000
feet, but its performance decreased above that height, so it was decided
to change the engine, because it was clear that the Fw190 would never be
a winner above 30000 feet keeping the BMW801 engine.
So some prototypes were completed as test beds for three different solutions. The Fw-190B carried the BMW801 but with a turbo-supercharger plus a pressurized cockpit; the Fw-190C equipped the DB603 engine with a giant supercharger in a belly installation. None of them reached production status. The third one, powered by the Jumo 213 however, became the best Luftwaffe piston engined fighter: the Fw-190D. The first production version was the D9, called “Langnasen Dora” because of the length added to the nose by the installation of the Jumo in-line engine.
|
THE KIT |
The kit is Italeri labeled , but it’s based on the Dragon mold. The appearance of the kit is very good, with nice rivets, small details and engraved panel lines. There is an option to display the cowling flaps open or closed. There’s also an option to attach a belly fuel tank or a bomb. The cockpit interior is well detailed, but the wheel well is “closed”, not showing the lower part of the engine, as it was in real Doras. But as I decided to build it straight from the box, I used this part as it was, knowing the imprecision I was committing...
Two schemes are offered, one belonging to 11/JG54 in Germany 1945 and the box art plane. No unit information about the last one is offered.
|
CONSTRUCTION |
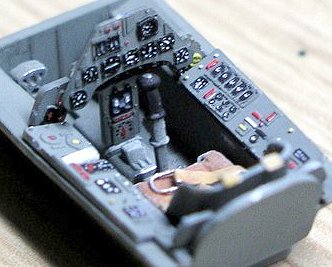 I started with the cockpit,
as always. I added simple seatbelts build from a copper plate for the
belts and a copper wire for the buckles. I built the interior and
airbrushed it using Tamiya acrylics. After that I painted the details
with acrylic paints. I have always liked painting the instrumental panel,
specially when it’s well detailed, as in this case.
I started with the cockpit,
as always. I added simple seatbelts build from a copper plate for the
belts and a copper wire for the buckles. I built the interior and
airbrushed it using Tamiya acrylics. After that I painted the details
with acrylic paints. I have always liked painting the instrumental panel,
specially when it’s well detailed, as in this case.
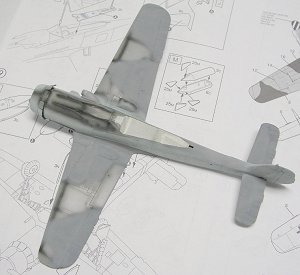
Well, I had read that
the Dragon kit had some fitting problems, especially
on the fuselage. I realized it was true when I fitted the two fuselage
halves. The port half was ok, I mean, straight, but the starboard half
seemed to be twisted. I glued the rear part of the fuselage and after
letting it dry I managed to adjust the front
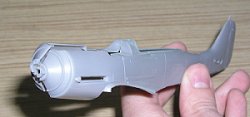 parts, always using cyanoacrylate of course. After completing
the operation, I got surprised of the easy way the two halves went
together, after seeing the terrible gap between them when I first
approached them.
parts, always using cyanoacrylate of course. After completing
the operation, I got surprised of the easy way the two halves went
together, after seeing the terrible gap between them when I first
approached them.
Something similar happened with the wings. The port wing fitted quite well, but the starboard one experienced a gap, as it was twisted, but it was solved easily letting the glue dry in the correct position.
After inserting the cockpit into the fuselage I attached the wings to it. After gluing the wings to the fuselage I saw a great gap between them. Well, I had to use more putty than what I thought before starting the construction, but that’s what I bought the putty for.
|
COLORS AND MARKINGS |
Having the fuselage completed
(with the wings, tailplanes, and cowling) I masked the cockpit, the wheel
well, the radiator and the canopy in order to start the painting phase.
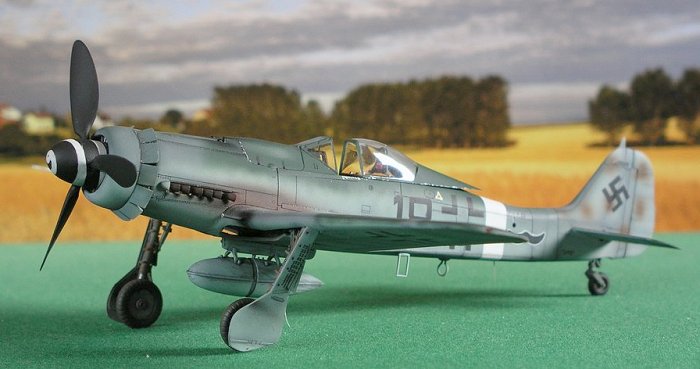
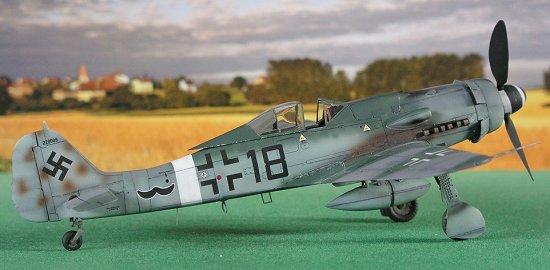
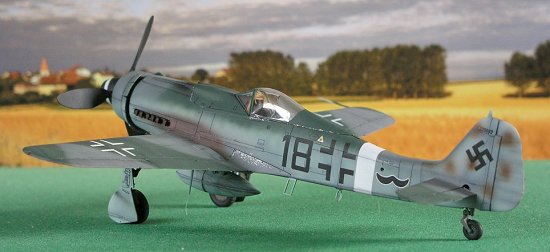
I choose the boxart plane. If I was not wrong, it’s a RLM 74/75/76 scheme, with a spotty mottle of RLM 81 on the tail (as it can be seen on the boxart) and a fuselage white band. I used Tamiya acrylics for all the painting job, and as they must be mixed to obtain the right RLM colors, they may not be very accurate, but I don’t get very preoccupied about it...
First I preshaded the panel lines with black and airbrushed the RLM 76 Light Blue on the lower surface and the sides of the fuselage. Then I sprayed the RLM 75 Grey Violet. I tried not to paint where the RLM 74 was to be painted in order to maintain the preshade visible. Then the RLM 74 Grey Green came on the upper fuselage part, the wings and tailplanes. Then I applied the RLM 81 Brown Violet mottling on the tail and masked the rear fuselage white band and painted it.
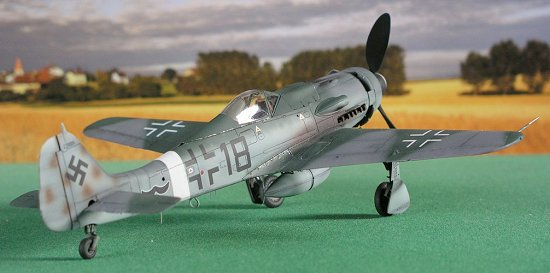
Next step was the national and unit markings. I decided to paint all crosses and use the decals offered in the box for the rest of the markings. So I masked the upper wing crosses and painted them white. Then I masked the fuselage side and lower surface crosses and the tail swastikas and painted them black.
 Then I airbrushed the exhaust
stains using a mix of brown and black and the stains around the guns
using only black.
Then I airbrushed the exhaust
stains using a mix of brown and black and the stains around the guns
using only black.
The spinner was painted white and the featured spiral was masked and then painted black. After removing the mask, however, I had to correct some border lines with a brush.
I gave the whole plane a layer of Tamiya varnish before proceeding to apply the decals. They had very little border, but after applying MicroSol solution I noticed they didn’t fit the panel lines very well, maybe because the decals were a little bit thick?
After completing the decaling phase I fixed them with another Tamiya varnish layer in preparation for the weathering. It consisted in applying artist’s oils in the panel lines and a little paint chipping on the wing roots.
Finally I glued all the parts to conform what you can see on the pictures.
|
CONCLUSIONS |
 Well,
I’m very happy with the final result. I think it’s a very good kit, with
some construction and fitting problems, but a very accurate model. For
the price I paid, I think it’s the best Fw-190 D9 kit out there.
Recommended, and I’d say even beginners would transform it into a
beautiful Dora.
Well,
I’m very happy with the final result. I think it’s a very good kit, with
some construction and fitting problems, but a very accurate model. For
the price I paid, I think it’s the best Fw-190 D9 kit out there.
Recommended, and I’d say even beginners would transform it into a
beautiful Dora.
February 2004
If you would like your product reviewed fairly and quickly, please contact me or see other details in the Note to Contributors.