Matchbox 1/72 Do-18G-1
| KIT #: | PK-409 |
| PRICE: | AUD$10.00 on sale |
| DECALS: | Three options |
| REVIEWER: | George Oh |
| NOTES: | A typical Matchbox kit - trenches and all |
| HISTORY |
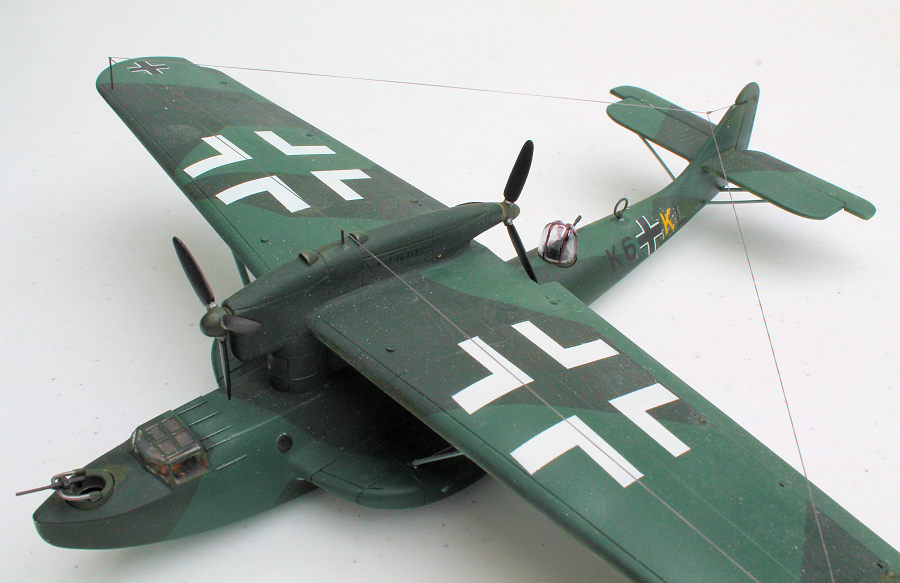
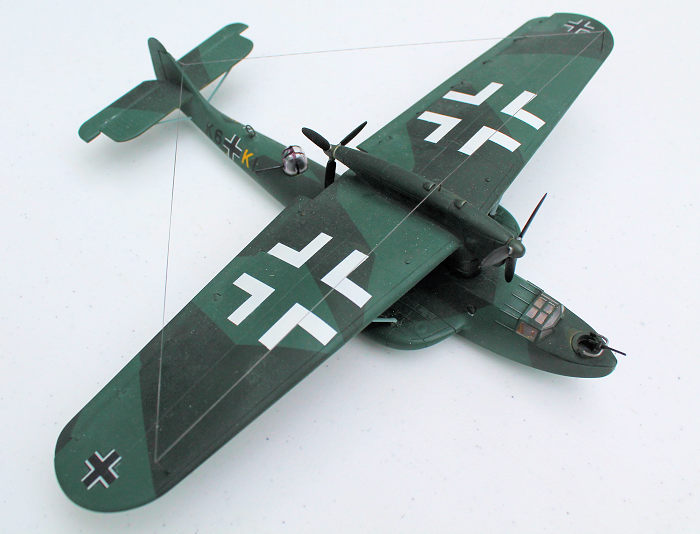
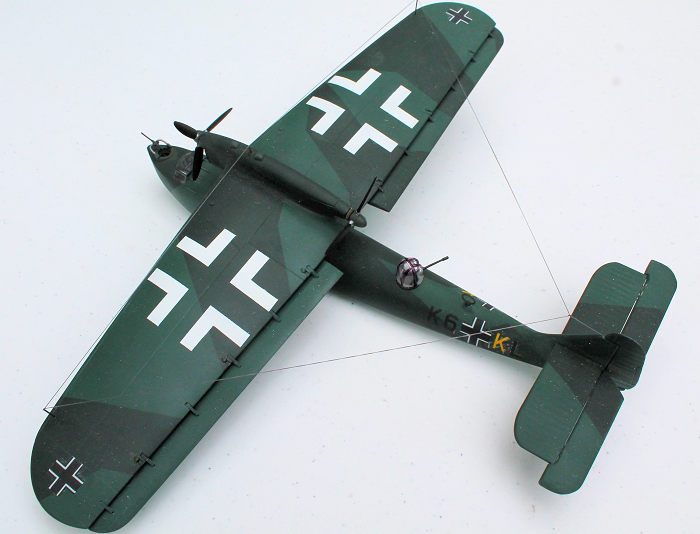
In 1935, the Dornier Flugzeugwerke released their improved Dornier Wal flyingboat in the form of the Dornier Do.18. Like the Wal, the Do.18 featured two engines - a tractor and a pusher - mounted in a common nacelle. This appears to be a favourite habit of Claudius Dornier because it gave him twice the propulsion for the same amount of drag. The nacelle was mounted atop a large thick parasol wing (to hold the engines as high above the water as possible) atop a pylon. Water wings (that resembled sub-wings) in-lieu of wingtip floats, provided the plane lateral stability when it was on the water. They also acted as built-in boarding pontoons and large fuel tanks. A brilliant innovation!!
 After successful trials, the first Do.18s went into service
with Lufthansa in 1936, and they were used to open air-routes from Europe to
destinations across the North Atlantic Ocean, thanks to its
3,500km/2,175-mile range. A large aircraft, it was additionally unusual in
that it could rendezvous with a specifically-fitted seaplane-tender ship
that could hoist it aboard, refuel it, then re-launch it from a catapult.
This was used to extend its over-water range.
After successful trials, the first Do.18s went into service
with Lufthansa in 1936, and they were used to open air-routes from Europe to
destinations across the North Atlantic Ocean, thanks to its
3,500km/2,175-mile range. A large aircraft, it was additionally unusual in
that it could rendezvous with a specifically-fitted seaplane-tender ship
that could hoist it aboard, refuel it, then re-launch it from a catapult.
This was used to extend its over-water range.
Soon after, armed Do.18s went into service with the Luftwaffe in a maritime reconnaissance role. But while its slow speed and poor armament rendered it obsolete even before the outbreak of WWII, it was still used in front-line service in Poland and Norway, because there was no other aircraft with a comparable operating range, available for the role.
In 1939, a Do.18 suffered the ignominious distinction of being the first aircraft to be shot-down by the Royal Navy's Fleet Air Arm in WWII, when a flight of nine Skua dive bombers (an aircraft with a mediocre performance envelope) encountered three and managed to shoot-down (but not destroy) one.
The Luftwaffe replaced the Do.18 with the older twin-engined He.59 biplane and the new three-engined, twin-boomed BV.138 Flying Clog. Yet the Do.18 remained in service as an air/sea rescue aircraft and as a seaplane trainer. In all, about 170 Do.18s were built.
| THE KIT |
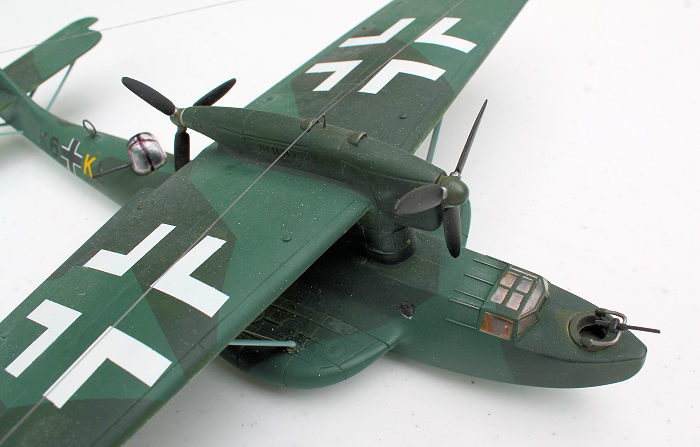
This kit hales from 1979 and is reviewed quite well here in MM. The three decal options are complimented by parts (or plugs) for optional gun positions. The only feature common to all three options, is an open or closed radiator aperture. Cockpit detail is very basic and it is the only detail inside the fuselage. The guns, too, lack detail. I might replace them, but I won't be replacing the turret gun because there doesn't appear to be room for a detailed one in there.
I bought this kit because it was cheap, and because it is an unusual-looking aircraft. I started building it for the same reasons, and because it looks like a quick build.
| CONSTRUCTION |
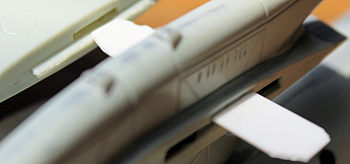
I decided to build this model because of its unusual appearance, and because there 'aint a review of it here in MM. I elected to build it OOB because little of the inside can be seen. Externally, I'd add a few minor details that are visible in Internet photos of the real aircraft. This build started when I dipped all the clear bits in Future (a sure sign that I'm gunna' finish this model), and joined the halves of the wings and tailplanes as sub-assemblies. Fit was pretty good.
 The instructions suggested that you build the engine pylon,
then to glue it into its socket on the spine of the fuselage. In a departure
from the instructions, I glued the halves of the engine pylon/nacelles to
their relevant fuselage halves. This was a better attack-plan because it
ensured that the bases of the pylon halves were level with their fuselage
attachment points, and that there were no gaps to fill. Ditto with the
water-wing halves. I glued them to the fuselage, then glued them to each
other (I often do this to wings).
The instructions suggested that you build the engine pylon,
then to glue it into its socket on the spine of the fuselage. In a departure
from the instructions, I glued the halves of the engine pylon/nacelles to
their relevant fuselage halves. This was a better attack-plan because it
ensured that the bases of the pylon halves were level with their fuselage
attachment points, and that there were no gaps to fill. Ditto with the
water-wing halves. I glued them to the fuselage, then glued them to each
other (I often do this to wings).
At the same time, I assembled more sub-assemblies - the cockpit parts, the front gun position and the rear turret. The cockpit received a few details on the instrument panel and the seats, but no crew members. While the fuselage was still in pieces, I hollowed-out the intakes atop the pylon for a more-realistic end-product. When I joined the fuselage halves together, I trapped the cockpit inside it, but not the gun positions - they will be drop-in parts so that painting will be easier. What I inadvertently left off was the sunken radiator plate - and for the next two weeks, I painted, dry-brushed and detailed that radiator face because I hadn't yet realised that I wouldn't be able to get in inside the assembled pylon (Twit!!). I also left-off the bases for the propeller shafts, because the propellers can be placed in them later, and then the bases can be glued-in later (and the propellers will still be able to spin). It also eases the masking and painting chores.
 To strengthen the attachment of the wings, I placed in the
pylon a spar of thick plastic card that attached to the inside of the lower
wings. To level them in line with the
To strengthen the attachment of the wings, I placed in the
pylon a spar of thick plastic card that attached to the inside of the lower
wings. To level them in line with the
 beaver-tail on the back-end of the
pylon (as per drawings found on the Internet), I clamped a long plastic
I-beam under the trailing edge and left it there while the wings dried
in-place. Funny, but the sweep-back of the wings, and their tapering
thickness, creates the optical illusion that the wings droop downwards. When
I glued the tailplanes on, I dry-fitted their supporting struts in position
to get them correctly level.
beaver-tail on the back-end of the
pylon (as per drawings found on the Internet), I clamped a long plastic
I-beam under the trailing edge and left it there while the wings dried
in-place. Funny, but the sweep-back of the wings, and their tapering
thickness, creates the optical illusion that the wings droop downwards. When
I glued the tailplanes on, I dry-fitted their supporting struts in position
to get them correctly level.
The detail bits I added were restricted to the rails on-which the canopy panels would have been slid back. Mask the canopy with tape, plug the gun positions with sponges and the portholes with Krystal Kleer, and she was ready for painting.
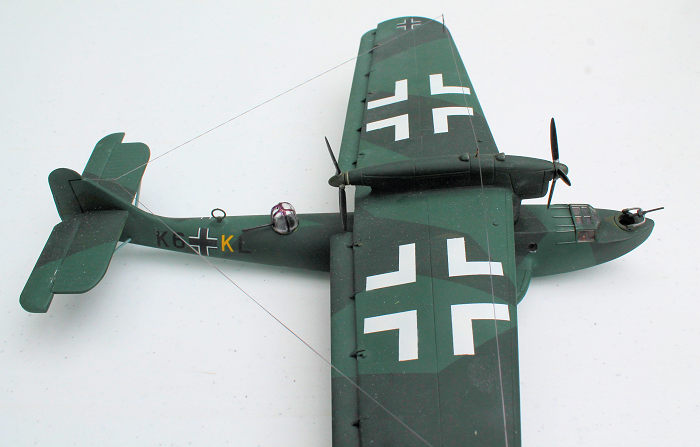
| COLORS & MARKINGS |
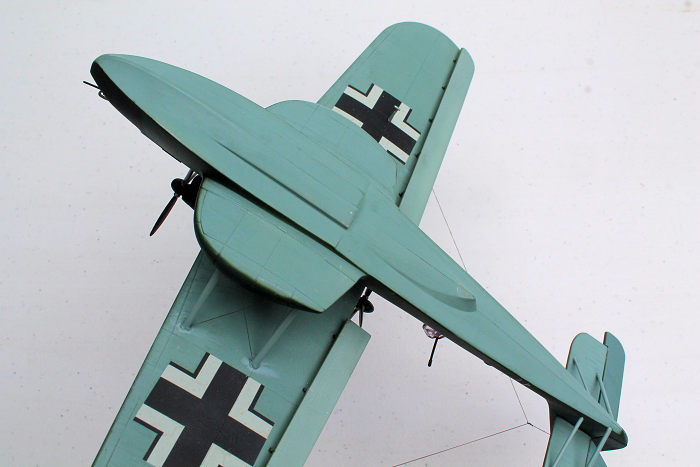
Because of the unusual shape of this aircraft, I first had to spray-paint the undersides RLM light blue (aka, Gunze H67). I even remembered to do the unattached control surface bits and struts - Yay me!! Then they were masked with LOTS of tape. The green sides and uppers followed, though the angles alongside the fuselage and the pylon, required re-painting because access to them is obstructed by the position of the wings.
Unfortunately (for it) my model was parked on the Shelf-of-Doom (unfortunately, I have a HUGE SoD - sod-it!!!) for a loooooooong time. I extracted it when I blurted-out that I would finish it for an on-line High Strutted Wing group build. Unfortunately (for it and me) I couldn't find the four painted control surfaces. Double Rats!!! Logically, I followed the only course-of-action I could think-of to locate the missing parts - I'd scratch-build replacements.
 I did this by enlarging a plan of the Do.18 in a photocopier
till it was the same size as the model. This gave me the size and shape of
the required pieces. I used these photocopies to cut blanks from a
suitably-thick sheet of plastic card, then all were laboriously carved-down
into an aerofoil shape using a Dremel cutting bit ('cos, after 10 minutes of
getting nowhere with a small sanding drum, I wised-up). I carved them from
solid card so that they'd be robust enough to anchor the risers that would
fit into slots in the wing trailing edge. See, the ailerons and flaps hang
Junkers-like, under the trailing edge.
I did this by enlarging a plan of the Do.18 in a photocopier
till it was the same size as the model. This gave me the size and shape of
the required pieces. I used these photocopies to cut blanks from a
suitably-thick sheet of plastic card, then all were laboriously carved-down
into an aerofoil shape using a Dremel cutting bit ('cos, after 10 minutes of
getting nowhere with a small sanding drum, I wised-up). I carved them from
solid card so that they'd be robust enough to anchor the risers that would
fit into slots in the wing trailing edge. See, the ailerons and flaps hang
Junkers-like, under the trailing edge.
These were spray-painted and turned-out to be a slightly-different hue of green - not that I expected any other result. I placed scraps of plastic card between the wing trailing edge and the control surfaces to ensure I had an equal stand-off distance. After gluing the risers into the slots in the trailing edge, I trimmed-off the excess elements to leave the risers correctly shaped. More masking of the whole model followed, to allow me to paint-on the light green splinter camouflage pattern. A clear gloss coat followed so that I could put the decals on.
The only real deviation from the painting guide, was with the propeller blades. The guide called for green/grey blades with a trio of light-blue, yellow and red stripes on the tips. But I stuck with the Luftwaffe's plain black blades because I couldn't come-up with any reason for their hierarchy to do or to allow, something different. I built the propeller assemblies so that they were able to spin in their collars. They were put aside to be attached later.
 A well-known wartime photo shows a Do.18 on the water with
additional huge, chord-width, white chevrons of Balkencruses on its wings. I
wanted to do this one because the large Balkencruses are unusual, but I
didn't have the rest of the decals (RO+K?). As a cop-out, I stuck with the
kit decals in-line with the OOB build, then sealed them in with a coat of
Tamiya clear flat. I tested the usual Microset/sol sandwich on the underwing
decals, but it wrinkled them, and the wrinkles couldn't be resolved. Rats!!
So I didn't use it on the other decals, and some carrier film is still
apparent. Double rats!!!.
A well-known wartime photo shows a Do.18 on the water with
additional huge, chord-width, white chevrons of Balkencruses on its wings. I
wanted to do this one because the large Balkencruses are unusual, but I
didn't have the rest of the decals (RO+K?). As a cop-out, I stuck with the
kit decals in-line with the OOB build, then sealed them in with a coat of
Tamiya clear flat. I tested the usual Microset/sol sandwich on the underwing
decals, but it wrinkled them, and the wrinkles couldn't be resolved. Rats!!
So I didn't use it on the other decals, and some carrier film is still
apparent. Double rats!!!.
If I had the requisite decals for the overly-large white crosses, I would have put them on with the others. But I didn't, so I resolved to do them with paint. My method was to mask the cores of the crosses with tape, lay-down the white chevrons with more (but narrower) tape, then to mask-off the rest. Then I stripped-off the chevron masks, and sprayed the white chevrons. In the photo, the Balkencruses extend onto the control surfaces, but I didn't do that because that drop-down distance made it too challenging.
| FINAL CONSTRUCTION |
The struts under the tailplanes easily snapped into place and
were secured with Extra-thin cement. But now the build got complicated.
Between each wing and sponson were to be positioned two struts with an X of
rigging between them. Dry-fitting told me that all four of the underwing
struts were too long, while their locator pins were almost non-existent.
Funny, but the two shorter ones were just right for the longer requirement.
This suggests that the wings should have a large dihedral, unlike the slight
one of the photos
 of the real aircraft, or the level wings of my model. I'd
be rigging with elastic EZ-Line. My attack-plan was to attach the rigging
material underneath each strut, then to glue each strut in its position on
top of the water wings. When they were solidly in-place, I'd drag the
rigging line over the top of the adjacent strut, then to glue both in-place
with superglue. All of this was easier said than done because I had to trim
the longer struts little by little till they fit, all of them leaned away
from the water-wings, and that huge wing was always be in the way because of
their positions under the wing. In the end, care and persistence won the
day. The rigging was tidied-up by trimming-off the loose bits, then the ends
of the struts were faired into their contact points by surrounding them with
a little white glue (Fail!) then superglue gel, then Perfect Plastic Putty.
A little touch-up paint and things were looking sweet.
of the real aircraft, or the level wings of my model. I'd
be rigging with elastic EZ-Line. My attack-plan was to attach the rigging
material underneath each strut, then to glue each strut in its position on
top of the water wings. When they were solidly in-place, I'd drag the
rigging line over the top of the adjacent strut, then to glue both in-place
with superglue. All of this was easier said than done because I had to trim
the longer struts little by little till they fit, all of them leaned away
from the water-wings, and that huge wing was always be in the way because of
their positions under the wing. In the end, care and persistence won the
day. The rigging was tidied-up by trimming-off the loose bits, then the ends
of the struts were faired into their contact points by surrounding them with
a little white glue (Fail!) then superglue gel, then Perfect Plastic Putty.
A little touch-up paint and things were looking sweet.
The painted turret sub-assemblies simply dropped in to their respective positions, and a few detail pieces were attached into their locating sockets. The short masts to support the antenna rigging above the wingtips were replaced by longer pieces of brass rod that passed onto the lower wings for a better, more-solid foundation. This way, the rigging of EZ-Line wouldn't bend them over time. I bettcha that the twin rudders will be soon broken-off. Strip-off the masking from the canopy, and I can declare another one completed.
| CONCLUSIONS |
I would like this kit to have better-detailed guns, and a beaching trolley (Kora makes one) so that the modeller will be able to sit it stably on a shelf. No doubt, there are modellers out there who have this model mounted on a water base, or on a catapult (or part there-of) for just that reason.
Though this is an elderly and primative kit with rudimentary detail, it does look like a Do.18. I believe that there was a Do.18 by A-Model, but then this kit is more readily available. Revell does one too, but it is a re-pop of this kit. As this is a Matchbox kit, it is a viceless build, so I can recommend it to modellers of moderate experience and up to a super-detailer level. It is a fun build because it is a model, and building models is fun.
23 March 2020
Copyright ModelingMadness.com
If you would like your product reviewed fairly and fairly quickly, please contact the editor or see other details in the Note to Contributors.
Back to the Main Page Back to the Previews Index Page Back to the Review Index Page