ICM 1/48 Do-17Z-2
| KIT #: | 48244 |
| PRICE: | $38-48.00 |
| DECALS: | Two options |
| REVIEWER: | Scott Lyle |
| NOTES: | SuperScale 48-163 F-80 shooting Stars in Korea decals |
| HISTORY |
The Dornier 17 was famous for being one of the three main bombers in the Luftwaffe inventory early in the war, the other two being the He 111 and the Ju 88. Some sources claim it was designed as a bomber from the start while others say it was initially designed for Lufthansa as a fast airliner and mail plane, but failing that, found new life as a bomber for the Luftwaffe.
What is known is that Dornier began work on the aircraft in 1933 and three prototypes were constructed during 1934, with the first flight of the first one taking place on November 23, 1934. A twin engine aircraft, the design had a very streamlined, pencil-thin fuselage that would never really be able to accommodate passengers in any comfort, making the airliner proposition very dubious.
The prototypes did demonstrate excellent handling and high speed however, and with the addition of twin tails for added stability, the Luftwaffe recognized its potential as a light bomber. Series production began in 1936 with the E-1 variant which featured a conventional “stepped” fuselage, glassed nose, and two inline BMW engines in streamlined nacelles.
 With
fighter production consuming the supply of inline engines, prototypes powered by
Bramo radial engines were tested and then put into production as the M series.
Up to that point the series had still retained the conventional “stepped”
fuselage, but experience from the Spanish Civil War showed that despite the
bomber’s high speed, there were Russian fighters that could intercept it. To
combat this more armament was needed for self-defense, resulting in a complete
redesign of the nose. A rear-facing gunner’s position was added behind the pilot
while another machine gun was added facing forward to the right of the pilot.
The cockpit floor was lowered and another rear-facing gun was added to allow
defense of the rear undersides of the aircraft. The bombardier, lying underneath
the forward gunner, was a very busy man, not only having to aim and drop the
bombs but also expected to operate the rear, lower machine gun. Later variants
added a fourth MG in the nose, also to be manned by the bombardier. I hope he
was paid more than the other guys…
With
fighter production consuming the supply of inline engines, prototypes powered by
Bramo radial engines were tested and then put into production as the M series.
Up to that point the series had still retained the conventional “stepped”
fuselage, but experience from the Spanish Civil War showed that despite the
bomber’s high speed, there were Russian fighters that could intercept it. To
combat this more armament was needed for self-defense, resulting in a complete
redesign of the nose. A rear-facing gunner’s position was added behind the pilot
while another machine gun was added facing forward to the right of the pilot.
The cockpit floor was lowered and another rear-facing gun was added to allow
defense of the rear undersides of the aircraft. The bombardier, lying underneath
the forward gunner, was a very busy man, not only having to aim and drop the
bombs but also expected to operate the rear, lower machine gun. Later variants
added a fourth MG in the nose, also to be manned by the bombardier. I hope he
was paid more than the other guys…
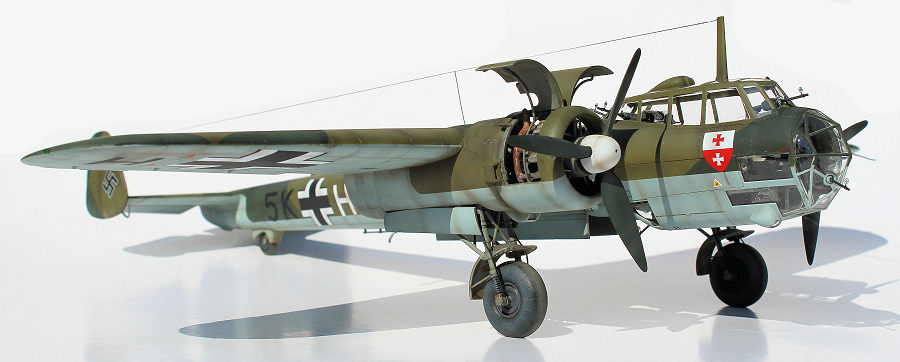
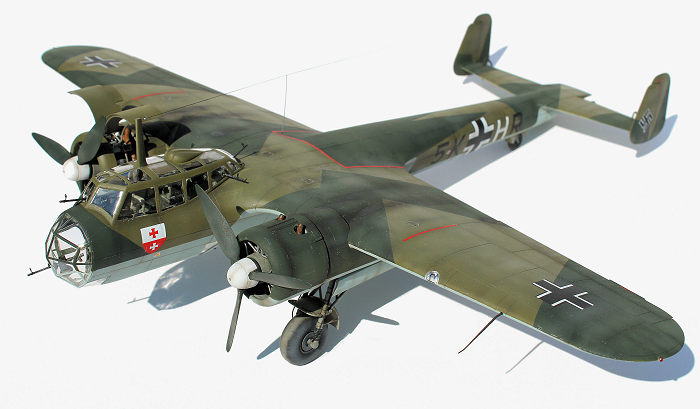
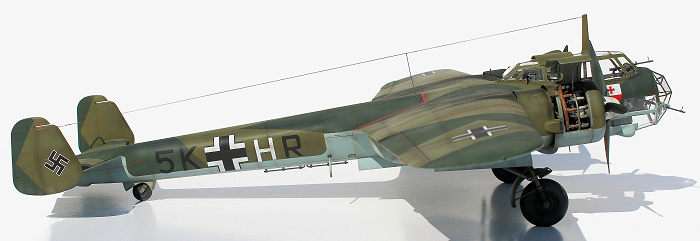
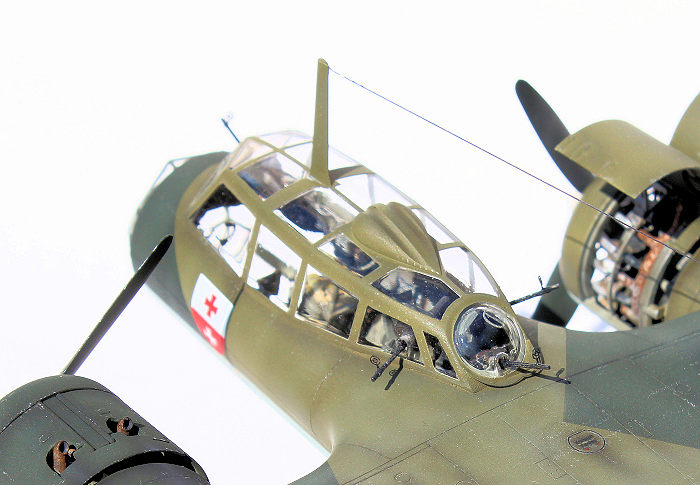
This new nose design, known to the Germans as Kampkopf (or “battle head”), was introduced with the S series. While the “battle head” proved successful, the aircraft was getting heavy – and therefore underpowered. The enlargement of the nose and the eventual addition of a fourth crewman forced a reduction in the bombload. The best solution for this came forth with the Z series. Utilizing Bramo Fafnir 323P-1 radial engines each rated at 1,000hp, the Do 17Z-2 could now carry a 1,000kg bombload, albeit for a range that was never completely satisfactory. Nonetheless the Z series would see the highest production numbers of the entire run and was built from early 1939 until mid-1940.
When war broke out with Poland the Do 17 was the second most numerous bomber in the Luftwaffe inventory next to the He 111. The type was heavily used in the Battle of France as well as the Battle of Britain. Heavy losses from that battle however, combined with the increased availability of the Ju 88, meant that by the fall of 1940 the frontline days of the Do 17 were numbered.
Interestingly enough, during the Battle of Britain the Do 17 was supposedly more feared by the British than the He 111 or the Ju 88 due to its ability to carry out low level, high speed attacks. Appearing suddenly over airfields, the Do 17 could complete its bombing run and be out of harm’s way before the RAF could respond.
| THE KIT |
Despite the innate popularity of Luftwaffe subjects, mainstream manufacturers stayed away from the Do 17 in 1/48 for quite some time. Hobbycraft and Classic Airframes issued kits back in the early 1990s, but it wasn’t until 2015 that ICM finally released a fully modern kit of the Do 17, starting with the definitive Z-2 variant and following that up with night fighter variants.
Browsing through the box and instructions, you certainly get a lot of bang for your buck including a fully detailed “battle head”, bomb bay, landing gear bays, and especially nice - two very well detailed engines.
The bomb bay is complete with racks housing twenty SC50 bombs, or you have the option of fitting a long range fuel tank instead. The ailerons on the wings and the rudders are separate, but the real magic is in those engines. Not only are the “early” and “late” exhaust options provided, but also separate cowling panels that are designed to be posed open, propped up by their own little braces. It’s as if ICM channeled Monogram from the past - this model has “maintenance” diorama written all over it.
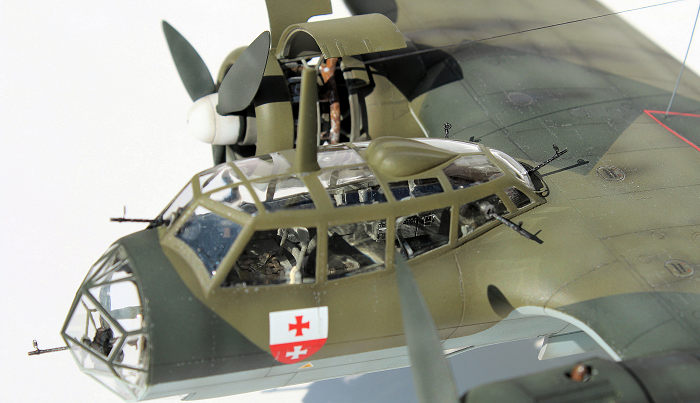
The transparent sprue is also impressive, providing two separate main glasshouses with different machine gun positions for a total of six MG 15s. No photo etch or masks are provided, but decals are provided for four different aircraft; two Battle of Britain aircraft (one from KG 3 and one from KG 76), a Balkans theater aircraft (KG 2), and the last one a winter white-washed aircraft from KG 53 on the Russian front.
On the aftermarket front Eduard provides several photo etch frets while other companies have released resin landing gear flaps and engine exhausts. I opted for Eduard’s color photo etch set because I love their color printed instrument panels, as well as their seatbelt set and their mask set.
From the beautiful box art on top of the sturdy box to the sprues of nicely detailed parts, this certainly looks like a very high quality production sold at a reasonable price. I have never built an ICM kit before, but like a kid on Christmas Eve this kit has me all excited. Let’s jump in and see how it goes.
| CONSTRUCTION |
Fighters have their cockpits and bombers have their offices, and ICM provides a highly detailed one. The first few steps have you add detail in the form of radio equipment, seats and other panels to both the left and right fuselage halves. Once that was done I sprayed both halves Testors Acrylic RLM 02, then added a Dark Brown wash to bring out the shadows. Small details were then picked out by hand before I began adding the various pieces from the Eduard color set. The printing on the various radio faceplates and instrument panels is sharp and precise. Likewise the Eduard seatbelts make a nice, detailed touch.
 To add a
little extra pizazz I drilled holes in the backs of the instrument panels and CA
glued tiny wires to simulate the instrument wiring. These were then painted
black and bundled to run along the fuselage walls for added detail. Next the two
fuselage halves were closed up, but with the large opening on top for the
glass-house and the open nose just about all of the interior detail is easily
seen.
To add a
little extra pizazz I drilled holes in the backs of the instrument panels and CA
glued tiny wires to simulate the instrument wiring. These were then painted
black and bundled to run along the fuselage walls for added detail. Next the two
fuselage halves were closed up, but with the large opening on top for the
glass-house and the open nose just about all of the interior detail is easily
seen.
The fuselage seam was fairly easy to deal with, but step #24 has you add the first piece of transparent plastic to the nose, a large panel under the chin. It was here that the first fit problem cropped up – a very noticeable step where the starboard “cheek” of the fuselage jutted out wider than the glass. If it was the other way around I could build the fuselage up with putty or scrap plastic, but alas, no dice. There’s no bending the brittle transparent plastic, so I scored the fuselage plastic and then bent the “cheek” inwards by hand to bring it into alignment.
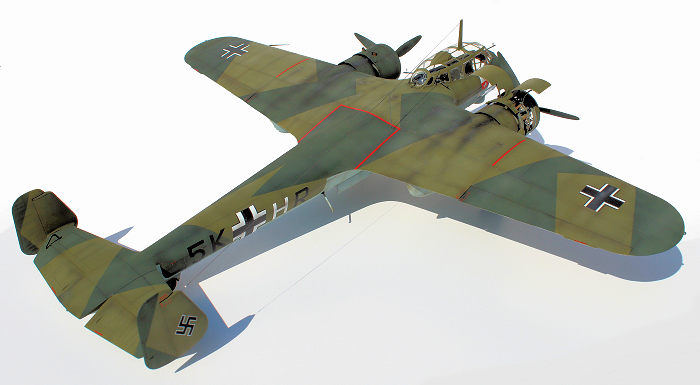
With that crisis averted it was on to the wings. The Do 17’s high wing design meant that the upper wing half is full span. Gluing the lower halves was simple with minimal seam work involved. The positionable ailerons came next, and then the wing assembly is attached to the fuselage. The fit wasn’t perfect, with some putty needed for the top seam just aft of the canopy, but it wasn’t too bad.
The twin tails, with separate rudders, were next added to the horizontal stabilizers, which also feature separate flaps. These attached to the fuselage without any problems. The four internal bomb racks were added to the bomb bays next. You have to decide if you want to add the bombs to the racks first before installing them – I decided to forego them for now.
Up next were the wheel wells, made up of sidewalls and fore and aft bulkheads. I painted all of the parts RLM 02 and weathered them with a Dark Brown wash. That was followed by the engine nacelles. First you build the engine support structures and then attach them to the port side nacelle for each engine. The instructions have you then attach each port side nacelle half to the wing, followed by the starboard side. Unfortunately I glued on the port side half, and then went to bed. The next night I tried to attach the starboard side nacelle half, only to find major fit problems. Some of it might be the kit, but if I had test-fitted both halves before committing with glue, my life might have been easier. As it was I had to add a small piece of plastic card and putty the seams to close up the gap.
It was now time to build the engines, and each one is made up of eight parts, not counting the exhausts. I carefully painted the radial cylinders Vallejo Black Gray and then dry-brushed them Testors Steel and Aluminum to bring out the details. The crank case was also painted Black Gray and then dry-brushed Vallejo Neutral Gray. Dark Brown washes were added to dirty things up.
 You have
different exhaust options, and for the KG 3 aircraft I was modeling I used the
“single exhaust” option instead of the “individual stubs” option. This was first
painted Testors Aluminum and then rusted it up by adding progressively lighter
shades of Lifecolor Rust using the sponge technique. I also hollowed out the
ends using a small drill.
You have
different exhaust options, and for the KG 3 aircraft I was modeling I used the
“single exhaust” option instead of the “individual stubs” option. This was first
painted Testors Aluminum and then rusted it up by adding progressively lighter
shades of Lifecolor Rust using the sponge technique. I also hollowed out the
ends using a small drill.
Once painted I attached both engines without a hitch but in the next step the hitching began. The main criticism of the kit I found in online reviews revolved around the front engine nacelle rings. Where the engines themselves are beautiful, the nacelle rings as molded are a sea of rods where in reality only a few really existed. These rods obscure the nice engine detail so I cut them out and replaced them Evergreen .02” rod stock using online pictures as a guide. With that done I added the rings and cowlings on the port engine, but left them off the starboard side as I intend to put this in a “maintenance” diorama – someday.
Getting towards the end of the construction phase, next up is dealing with the transparent pieces. By the Battle of Britain phase in the war there was an MG 15 pointing out of virtually every window on the Do 17, so this now called for some strategy. The guns mount from the inside, so if I were to knock them off during the painting stage (which I most assuredly would), I’d never get them back on. I decided to snip the barrels off at the ball mount, drill a tiny hole into the ball mount for the barrel, and then paint and glue the rear portion of the gun into the inside of the transparent piece. Then hopefully when the model was just about finished I could slip the gun barrels into their holes.
With that accomplished I glued the large upper greenhouse in place with CA glue. There was a large gap where the front met the fuselage that had to be filled, but after that it was time for painting.
| COLORS & MARKINGS |
 My go-to
primer these days remains Tamiya’s Liquid Surface Primer, which was airbrushed
on in light coats and then lightly sanded. For the RLM 65 under surfaces I used
a 50/50 mixture of Tamiya XF-2 Flat White and XF-23 Light Blue. Trying to find
an RLM 71 that “looks right” (yes I realize how subjective that is) has vexed me
for some time. For this project I tried Vallejo Model Color Dark Green RLM 71
lightened with a couple of drops of Vallejo Model Color UK BSC 64 Portland
Stone. It sprayed very well and looked much better than other shades of RLM 71 I
tried in the past, which always seemed too gray or too light. I added a few more
drops of Portland Stone to the mix and mottled the lighter mixture on to start
the weathering process. For RLM 70 I used Tamiya XF-27 Black Green, which I
subsequently lightened with some XF-57 Buff to create similar faded surfaces.
My go-to
primer these days remains Tamiya’s Liquid Surface Primer, which was airbrushed
on in light coats and then lightly sanded. For the RLM 65 under surfaces I used
a 50/50 mixture of Tamiya XF-2 Flat White and XF-23 Light Blue. Trying to find
an RLM 71 that “looks right” (yes I realize how subjective that is) has vexed me
for some time. For this project I tried Vallejo Model Color Dark Green RLM 71
lightened with a couple of drops of Vallejo Model Color UK BSC 64 Portland
Stone. It sprayed very well and looked much better than other shades of RLM 71 I
tried in the past, which always seemed too gray or too light. I added a few more
drops of Portland Stone to the mix and mottled the lighter mixture on to start
the weathering process. For RLM 70 I used Tamiya XF-27 Black Green, which I
subsequently lightened with some XF-57 Buff to create similar faded surfaces.
To accentuate the panel lines I traced them on the light blue undersurfaces with a sharp mechanical pencil. On the darker upper surfaces I used Mig Productions Dark Brown wash, thinned down to make it more subtle. For more weathering, I next airbrushed a very thin mix of 50/50 Tamiya XF-69 NATO Black/Tamiya XF-64 Red Brown onto the panel lines and around the engine. This is a really fun step as it brings the weathering to life. I find it has to be kept subtle however, otherwise it can begin to dominate the paint job instead of compliment it.
The areas to receive decals were coated with Future next, and after letting that dry for two nights I applied the decals. ICM’s decals worked fine with Solvaset. Don’t forget to add a Swastika decal to each tail - they’re not shown on the box art or included in the kit, but they were on the real aircraft so you’ll have to find some in your spares box.
A couple of coats of Testors Lacquer Flat coat were applied next, and then the decals were weathering a bit by applying the same washes and treatments as the rest of the model. Now on to the fiddly parts.
There were still quite a
few steps to go. First up was assembling the landing gear. ICM provides a
thorough representation of all of the struts needed to keep the bomber on its
feet. These were painted RLM 02 and weathered with dark washes. The tires had a
prominent seam that had to be filled but looked good once painted and weathered.
Trying to attach the landing gear to the fuselage was less than enjoyable
however. It turns out the main landing gear struts do not attach via the fairly
standard pin-in-hole approach, but rather the ends of the struts are just
supposed to rest on small ledges on the front bulkhead wall in the wheel well
(if you build the kit you’ll see what I mean). Making matters worse is that the
retraction struts tend to push the gear the wrong way as you’re trying to glue
them, so it becomes a “I need more hands or a jig or both” kind of affair. I
ended up drenching the ledge-to-main gear joints with CA glue and then u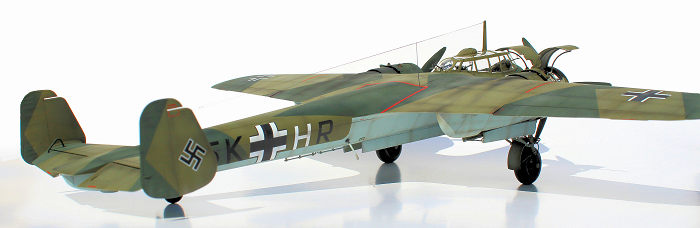 sing
CA accelerator to harden them up, and then doing the same for where the
retraction struts meet the main struts. I also swore a lot.
sing
CA accelerator to harden them up, and then doing the same for where the
retraction struts meet the main struts. I also swore a lot.
The wheel well doors went on next, which also proved fiddly. CA glue and accelerator was used again to attach them. It is in these areas that one really appreciates good model engineering.
Moving on to the props, they were glued together and the blades were painted Tamiya XF-27 Black Green. The hub was painted Flat White, per the markings scheme I was using.
A couple of more nights were needed to remove all of the window masks, run the aerial using EZ Line, attach the gun barrels, and finally paint the wingtip lights. Like all WW2 bombers, handling them at the end of the build without knocking something off becomes a challenge. But isn’t that part of their charm?
| CONCLUSIONS |
So what to make of this kit? There were some fit problems to be sure, but honestly nothing that would deter an experienced builder. Given all of the positives, it’s really hard to dwell on the negatives. When finished you end up with a highly detailed, great looking model of this important early war bomber. All sorts of different paint schemes are on the table, as are diorama opportunities with those exposed engines. I definitely recommend it.
ICM now has quite a lineup of 1/48 twin engine bombers including the Do 17, Ju 88, He 111, and the A-26/B-26. I look forward to tackling some of those in the near future.
| REFERENCES |
- Kagero Publishing, Top Drawings #30, “Dornier Do 17Z/Do 215”, Mariusz Lukasik
- Osprey Publications, Combat Aircraft #129, “Dornier Do 17 Units of World War 2”
- Schiffer Military History, “The Flying Pencil”, Heinz Nowarra
- Wikipedia, the Online Encyclopedia
26 February 2021 Copyright ModelingMadness.com.
All rights reserved. If you would like your product reviewed fairly and fairly quickly, please contact the editor or see other details in the
Note to
Contributors. Back to the Main Page
Back to the Review
Index Page
Back to the Previews Index Page