Airfix 1/72 Do-17Z
| KIT #: | A05010A |
| PRICE: | $36.00 SRP |
| DECALS: | Two options |
| REVIEWER: | Dave Cummings |
| NOTES: | Eduard canopy masks |
| HISTORY |
 The Do-17 was one of the Luftwaffe’s most important bombers
in the early years of WWII. Developed in the early 1930s while Germany was still
forbidden an air force by the Versailles Treaty, the Do-17 was ostensibly built
as a mail plane. As the new Luftwaffe emerged from the shadows the type was
designated a reconnaissance bomber. Due to its thin tapering fuselage, it was
soon dubbed “the flying pencil.” The Do-17z was the definitive model and figured
prominently in the early Blitzkrieg across Europe. During the Battle of Britain
however it proved slow and inadequately armed. Losses were high and this proved
to be the aircrafts swansong over Western Europe. It continued to serve in more
backwater areas in a limited role until replaced entirely in 1942.
The Do-17 was one of the Luftwaffe’s most important bombers
in the early years of WWII. Developed in the early 1930s while Germany was still
forbidden an air force by the Versailles Treaty, the Do-17 was ostensibly built
as a mail plane. As the new Luftwaffe emerged from the shadows the type was
designated a reconnaissance bomber. Due to its thin tapering fuselage, it was
soon dubbed “the flying pencil.” The Do-17z was the definitive model and figured
prominently in the early Blitzkrieg across Europe. During the Battle of Britain
however it proved slow and inadequately armed. Losses were high and this proved
to be the aircrafts swansong over Western Europe. It continued to serve in more
backwater areas in a limited role until replaced entirely in 1942.
| THE KIT |
 These newer generation (2015) Airfix kits seem fantastic to
me. Accurate, detailed, assembles well, good decals, all at a reasonable price.
What more could you want. Options include open or closed bomb bay and up or down
landing gear. The gear doors come as one piece for this and are easily separated
for gear down. There are several types of bombs to customize your load. The
horizontal stabilizer’s angle of attack can be posed per the real thing. Flaps
and all controls surfaces are separate. The interior and bomb bay details are
very good for this scale. It includes full sidewall detail, racks of spare
magazines, etc. You get a full set of crew figures, and they also are nicely
done. The 16-page instruction booklet is excellent. Well drawn, and parts
placement is clearly defined. 2 of the pages are nice full color 4-view drawings
with color chips labeled by RLM numbers in addition to Humbrol paint references.
Clear parts are very clear though thin and a bit delicate. This kit is labeled
as “Battle of Britain” and includes decals for a 9/KG 76 aircraft shot down near
Biggin Hill August 1940. The other decal option is for a KG 2 plane based in
Greece 1941. Decals work nicely and include stencils and instrument panel. As is
the norm for kits produced in Western Europe, no swastikas are provided. No
stand is provided for the gear up option though the instruction show where the
balancing point is to attach one.
These newer generation (2015) Airfix kits seem fantastic to
me. Accurate, detailed, assembles well, good decals, all at a reasonable price.
What more could you want. Options include open or closed bomb bay and up or down
landing gear. The gear doors come as one piece for this and are easily separated
for gear down. There are several types of bombs to customize your load. The
horizontal stabilizer’s angle of attack can be posed per the real thing. Flaps
and all controls surfaces are separate. The interior and bomb bay details are
very good for this scale. It includes full sidewall detail, racks of spare
magazines, etc. You get a full set of crew figures, and they also are nicely
done. The 16-page instruction booklet is excellent. Well drawn, and parts
placement is clearly defined. 2 of the pages are nice full color 4-view drawings
with color chips labeled by RLM numbers in addition to Humbrol paint references.
Clear parts are very clear though thin and a bit delicate. This kit is labeled
as “Battle of Britain” and includes decals for a 9/KG 76 aircraft shot down near
Biggin Hill August 1940. The other decal option is for a KG 2 plane based in
Greece 1941. Decals work nicely and include stencils and instrument panel. As is
the norm for kits produced in Western Europe, no swastikas are provided. No
stand is provided for the gear up option though the instruction show where the
balancing point is to attach one.
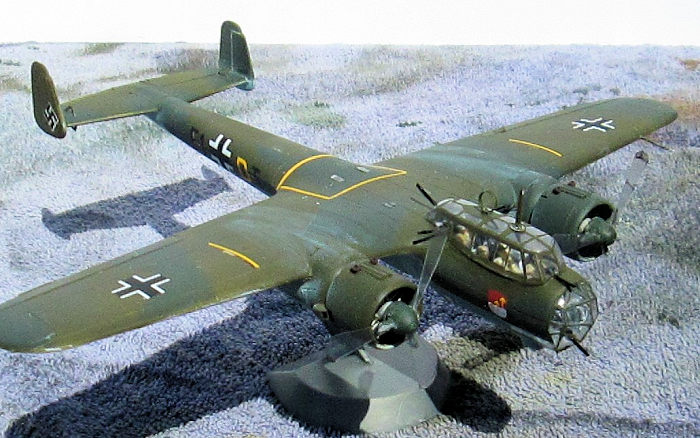
| CONSTRUCTION |
 As mentioned the cockpit builds up into a nicely detailed assembly. This however
actually worked against me for this build. I had decided to build this one as a
stand model to conserve precious shelf space. I planned to pose the model
in-flight using the crew figures and wheels up. So, to achieve that streamlined
pencil thin fuselage of the type, the four-man crew are all crammed together in
the cockpit. Airfix provides the four figures, but it seems they didn’t think
anyone would actually use them. All four are seated figures so will be in their
seats as they would be at takeoff and in-flight to target. None are depicted at
action stations lying on stomach for bombardier and ventral gunner. I had to
trim away a bit of cockpit detail and feet to get them all in there. The rear
gunner has to dodge around the receivers of his rear gun and the two side guns
all of which he operates. So, enough about my problems. Interior was painted RLM
02 with black details. Figures were painted up per those Heinkel crews you see
in the Battle of Britain movie. After some trimming and maneuvering my
figures a bit to clear, the fuselage halves went together nicely with minimal
seam clean up needed. Same with the wing assembly. Pay attention to the engine
and cowling assemblies so you don’t get anything upside down like the exhaust
collector (ahem). I came up with a display stand from the big box of stuff and
cut a hole in the bay door to fit. The instructions show the spot to do this to
achieve balance. Since half the construction steps are for the bomb bay and
intricate landing gear assemblies, I skipped those and went to attaching the
clear parts with their attendant machineguns. Fit here was also good. The Eduard
masking set is highly recommended unless you are one of those that actually
enjoys cutting tiny bits of tape to mask a myriad of clear panels. The masks
have cutouts to fit around all those machinegun barrels. The engines were masked
with wet tissue. That done she was ready for some paint.
As mentioned the cockpit builds up into a nicely detailed assembly. This however
actually worked against me for this build. I had decided to build this one as a
stand model to conserve precious shelf space. I planned to pose the model
in-flight using the crew figures and wheels up. So, to achieve that streamlined
pencil thin fuselage of the type, the four-man crew are all crammed together in
the cockpit. Airfix provides the four figures, but it seems they didn’t think
anyone would actually use them. All four are seated figures so will be in their
seats as they would be at takeoff and in-flight to target. None are depicted at
action stations lying on stomach for bombardier and ventral gunner. I had to
trim away a bit of cockpit detail and feet to get them all in there. The rear
gunner has to dodge around the receivers of his rear gun and the two side guns
all of which he operates. So, enough about my problems. Interior was painted RLM
02 with black details. Figures were painted up per those Heinkel crews you see
in the Battle of Britain movie. After some trimming and maneuvering my
figures a bit to clear, the fuselage halves went together nicely with minimal
seam clean up needed. Same with the wing assembly. Pay attention to the engine
and cowling assemblies so you don’t get anything upside down like the exhaust
collector (ahem). I came up with a display stand from the big box of stuff and
cut a hole in the bay door to fit. The instructions show the spot to do this to
achieve balance. Since half the construction steps are for the bomb bay and
intricate landing gear assemblies, I skipped those and went to attaching the
clear parts with their attendant machineguns. Fit here was also good. The Eduard
masking set is highly recommended unless you are one of those that actually
enjoys cutting tiny bits of tape to mask a myriad of clear panels. The masks
have cutouts to fit around all those machinegun barrels. The engines were masked
with wet tissue. That done she was ready for some paint.
| COLORS & MARKINGS |
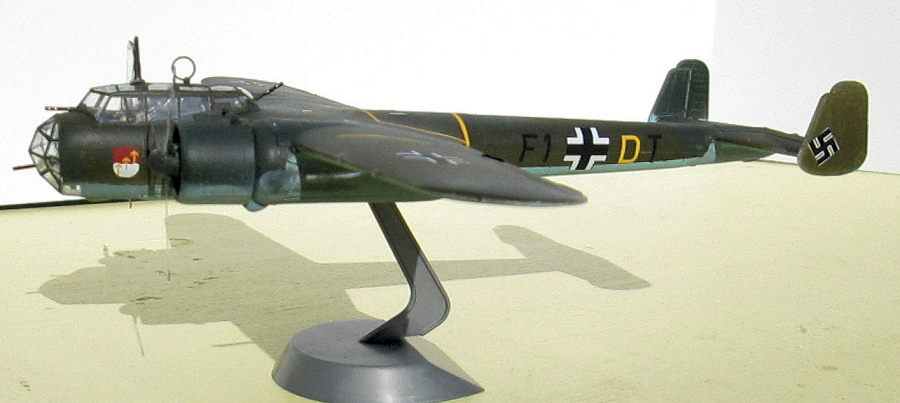
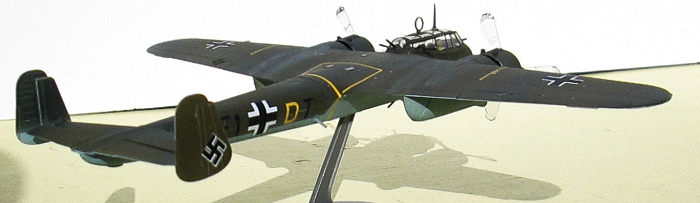
 I opted for the KG-76 Battle of Britain
bird. Undersides were sprayed with Mission Models Hellblau RLM 65. The
demarcation lines were masked with Tamiya Tape. The topside received a coat of
Vallejo Model Air RLM 71Dunkelgrun. This paint doesn’t seem quite green enough
for me, but what do I know. That’s what the bottle says. After thorough drying
the camo pattern lines were taped off with Tamiya Tape. The larger areas between
the tape lines were masked with low tack painter’s tape cut to shape. (Frogtape
Delicate Surface). Then the camo pattern sprayed with Model Air RLM 70
Schwarzgrun. Next the model was given a coat of Vallejo 701 Gloss Varnish. The
Airfix decals were a joy to use and presented no issues. I rummaged in the big
box of stuff for some suitable swastikas for the tail. I then applied a wash of
highly diluted black acrylic to panel lines and such, wiping as I go with
moistened t-shirt rags. Exhaust stains flow across the top of the wing and was
done with light gray pastels smeared with a finger. Then a final coat of Vallejo
26.702 Matt Varnish.
I opted for the KG-76 Battle of Britain
bird. Undersides were sprayed with Mission Models Hellblau RLM 65. The
demarcation lines were masked with Tamiya Tape. The topside received a coat of
Vallejo Model Air RLM 71Dunkelgrun. This paint doesn’t seem quite green enough
for me, but what do I know. That’s what the bottle says. After thorough drying
the camo pattern lines were taped off with Tamiya Tape. The larger areas between
the tape lines were masked with low tack painter’s tape cut to shape. (Frogtape
Delicate Surface). Then the camo pattern sprayed with Model Air RLM 70
Schwarzgrun. Next the model was given a coat of Vallejo 701 Gloss Varnish. The
Airfix decals were a joy to use and presented no issues. I rummaged in the big
box of stuff for some suitable swastikas for the tail. I then applied a wash of
highly diluted black acrylic to panel lines and such, wiping as I go with
moistened t-shirt rags. Exhaust stains flow across the top of the wing and was
done with light gray pastels smeared with a finger. Then a final coat of Vallejo
26.702 Matt Varnish.
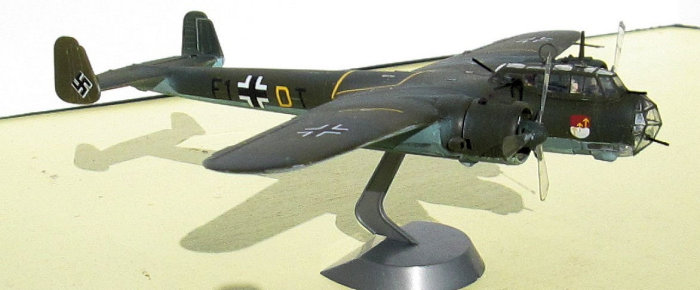
| FINAL CONSTRUCTION |
 After drying all masking was removed. I
was gratified the paints held and didn’t pull up with the tape as sometimes
happens. Protruding gun barrels were painted Gunmetal enamel. Final bits were
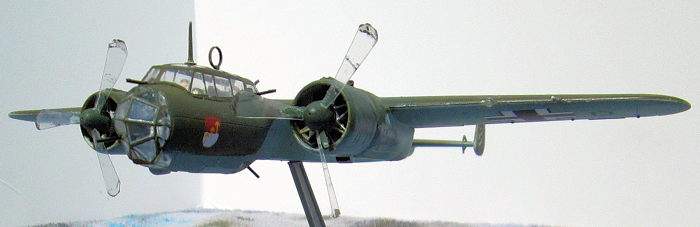
antennae and pitot tube. Since I was depicting the model in flight, I thought I
would try that prop blur thing. I cut some blades from clear blister packaging.
The kit blades were cut off leaving a point. The new blades were given some
light paint streaks for effect, then glued to the backs of those prop blade
points. I think it looks pretty cool in person, though photos don’t seem to do
it justice.
After drying all masking was removed. I
was gratified the paints held and didn’t pull up with the tape as sometimes
happens. Protruding gun barrels were painted Gunmetal enamel. Final bits were
antennae and pitot tube. Since I was depicting the model in flight, I thought I
would try that prop blur thing. I cut some blades from clear blister packaging.
The kit blades were cut off leaving a point. The new blades were given some
light paint streaks for effect, then glued to the backs of those prop blade
points. I think it looks pretty cool in person, though photos don’t seem to do
it justice.
| CONCLUSIONS |
A most enjoyable build. No real gotcha moments except for trying to cram the four-man crew into limited spaces. Highly recommended for anyone with a modicum of building experience.
| REFERENCES |
Everything came from the instruction sheet. I trusted Airfix on this one and built and painted per instructions.
Dave Cummings
16 January 2025
Copyright ModelingMadness.com. All rights reserved. No reproduction in part or in whole without express permission from the editor.
If you would like your product reviewed fairly and fairly quickly, please contact the editor or see other details in the Note to Contributors.