|
KIT # |
121 |
|
PRICE: |
£7.99 |
|
DECALS: |
Three aircraft:1/KG26 North Sea 1941-1942, 2/KG26, Mediterranean Sea 1942-1943 & 2/KG53 Russia Winter |
|
REVIEW : |
Alan Culpitt |
|
NOTES: |
Eduard Detail set 72-169 used |
|
HISTORY |
What more can I say that hasn’t already been said about the HE 111? It has quite an iconic status here in the UK because of its involvement in the Battle of Britain. I took an interest in the aircraft when I was a youngster and watched the 1970’s film about the battle; on the edge of my seat with my eyes bulging out of my head. There was also a TV programme made by the BBC called The Secret War, who’s credits involved a very grainy film of an HE111 launching an HS 293 missile accompanied by “The Hut of Baba Yaga” from Mussourgsky’s “Pictures at an Exhibition” stirring stuff to an aeroplane obsessed eleven year old.
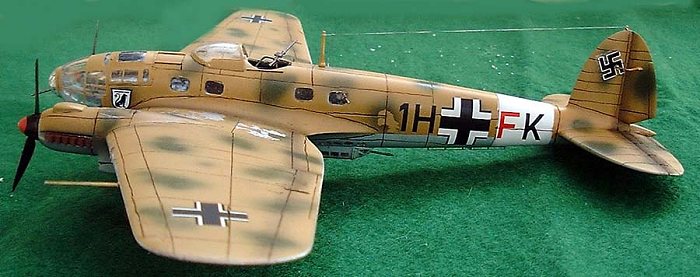
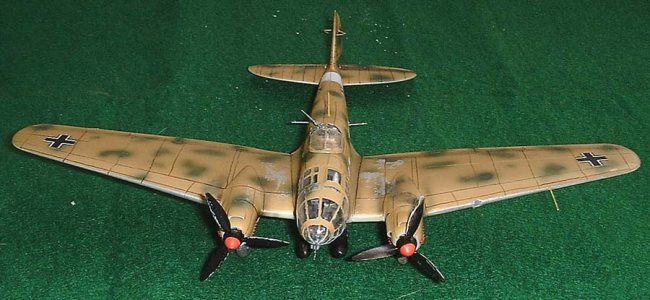
I chose to build the torpedo bomber H6 version of the HE 111 with Mediterranean camouflage from KG26. KG 26 were the anti shipping torpedo geschwader of the Luftwaffe in the Second World War. KG 26 reached the height of their effectiveness attacking convoys over the Baltic as they sailed from the UK to Murmansk in Russia. The developed a tactic they called the ‘golden comb’ This involved the torpedo carrying HE 111’s attacking all at once in line abreast formation at low altitude at dusk when visibility was at its poorest. This attack would be combined with a bombing attack from JU-88’s at the same time to draw the fire of the ships. Imagine being on the receiving end of that lot! (shudder)
|
THE KIT |
 Well I wanted a challenge!
My plan was to build the Italeri HE 111 laden with as many of the aftermarket
goodies as I could possibly lay my hand’s on. This included the Eduard
detailing set, True Details weighted tyres, and the express mask for the very
complicated transparencies. I also intended to scribe in panel lines where the
model has raised panel lines. All the bits and pieces came from Hannants in the
UK, an absolute goldmine and (apart from their slow order turnaround) the best
mail order company around.
Well I wanted a challenge!
My plan was to build the Italeri HE 111 laden with as many of the aftermarket
goodies as I could possibly lay my hand’s on. This included the Eduard
detailing set, True Details weighted tyres, and the express mask for the very
complicated transparencies. I also intended to scribe in panel lines where the
model has raised panel lines. All the bits and pieces came from Hannants in the
UK, an absolute goldmine and (apart from their slow order turnaround) the best
mail order company around.
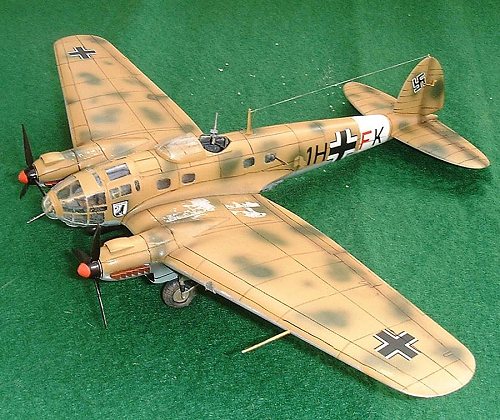
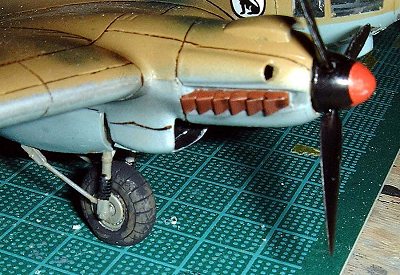
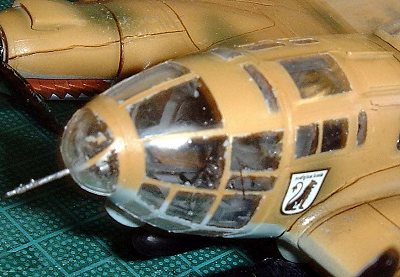
The Italeri kit is moulded in grey plastic and its definitely showing its age a bit, although considering its over twenty years old its very good. There are optional extras for flame dampened exhausts, pose able pilot and gunner figures, a mid upper turret and SC500 bombs. You can also configure the guns in different ways to suit the myriad of available types and sub types. The Eduard detailing set included an almost complete refit of the cockpit including sidewalls and the instrument panel that hung down from the windscreen. The interior cabin is well fitted out with tiny radios and mounting brackets for ammunition canisters. The mid upper gunner position is completely replaced by etched metal. Exterior details included rudder, elevator and aileron control rods, replacement radiator shutters and matrixes and new fins and propellers for the torpedoes.
|
CONSTRUCTION |
I started by re-scribing panel lines on the main parts of the kit, fuselage halves, wing and tail plane surfaces. I decided to re-scribe the panel lines Italeri put on the parts as raised, rather than trying to re-create the panel line details in the scale drawings in the Schiffer Military History book I was using for reference. This was my first major re-scribing effort. Whilst comparing lines I discovered that the fuselage is too long in the tail plane section when compared to scale drawings in the books as well. Oh good grief! I decided to leave the fuselage as was as I was in danger of getting bogged down in too much hacking about of the kit and concentrate on the panel lines. The panels came up reasonably well although all the advice I gleaned from books on how to do this did not cover adequately how to re-scribe lines on the tight compound curves of the HE 111 fuselage. How to keep a straight edge? Old credit cards aren’t bendy enough, Dymo tape doesn’t stick down very well and is very expensive, Letraline is not available in the UK. I tried that fat plastic electrical tape which worked reasonably well although I did have a few rather disastrous wobbles. Anyway an article on scribing really curvaceous surfaces from one of the experts who contribute to this site would be much appreciated by me please!
 Next to the Eduard detailing
set. Hmmmmm… I’ve not tried many of these either. Problem number one was the
detailing for the interior of the fuselage. Lots of racks for ammunition
magazines radios etc could be stuck to the inside of the model but I wondered
what was the point? I realised before I started that, once the transparencies
where in place, most of it would be invisible. I decided that, having chickened
out of shortening the fuselage, I ought to at least have a go at the interior
detailing, with hindsight I shouldn’t have bothered. It took a lot of effort
and on the finished model, its invisible. Having said that the detailing for
the upper gun position and the cockpit are excellent, especially as the cockpit
is so visible in the big glazed nose.
Next to the Eduard detailing
set. Hmmmmm… I’ve not tried many of these either. Problem number one was the
detailing for the interior of the fuselage. Lots of racks for ammunition
magazines radios etc could be stuck to the inside of the model but I wondered
what was the point? I realised before I started that, once the transparencies
where in place, most of it would be invisible. I decided that, having chickened
out of shortening the fuselage, I ought to at least have a go at the interior
detailing, with hindsight I shouldn’t have bothered. It took a lot of effort
and on the finished model, its invisible. Having said that the detailing for
the upper gun position and the cockpit are excellent, especially as the cockpit
is so visible in the big glazed nose.
Problem number two, the rudders consist of three separate parts, to be super glued together and then positioned on two struts, scratch built, and protruding from the front of the cockpit floor on another section of scratch built fairing. Challenging! Remember this is in 1/72 scale and the finished rudder is about 2mm in its biggest dimension! After much protruding of tongue and gluing the ends of my tweezers together I managed some rather wonky, but not too bad rudders. The rest of the interior detailing went fairly well and after painting the standard RLM66 I glued the two fuselage halves together. The canopy went on next, lower transparencies and then the wings and tail plane. You have to be extra careful of the transparencies as some of them have guns protruding through them which are devils for breaking off or disappearing inside the cockpit never to be seen again. I glued them in strongly with Micro Krystal Clear (don’t you just hate those spellings where a K replaces what should be a C?) Apart from a slightly bent dorsal 20mm cannon got away with no major problems. I also lost one of the tiny square windows from the dorsal gondola inside the model bit a blob of the aforementioned glue cured that problem.
 At this stage I should
have removed various control horns in order to replace them, after painting,
with the Eduard items, I didn’t and I should have. I should also have sandwiched
between the two halves of the cockpit the under fuselage aerial provided by
Eduard. The idea was to put it in later and stop it getting damaged when
sanding and painting. The problem was that it was impossible to get in once the
two halves where glued together. The seams for the fuselage developed that
really annoying habit of not quite coming smooth despite lots of sanding and
three layers of filler. I tried the method of filling the seam with super glue
and then sanding smooth after it dries and even that didn’t work all that well I
eventually gave up an made do with a visible seam if you catch it in the right
light. It looks fine from a distance although it wouldn’t win me any prizes at
the IPMS. Whilst sanding make sure the upper cavity for the gunner is well
sealed, as the cockpit transparency tends to fill with dust from the sanding. I
hadn’t glued my models nose on properly and it fell off late in the sanding
process, which was a blessing in disguise, as it allowed me to clean all the
dust out of the glazed transparency!
At this stage I should
have removed various control horns in order to replace them, after painting,
with the Eduard items, I didn’t and I should have. I should also have sandwiched
between the two halves of the cockpit the under fuselage aerial provided by
Eduard. The idea was to put it in later and stop it getting damaged when
sanding and painting. The problem was that it was impossible to get in once the
two halves where glued together. The seams for the fuselage developed that
really annoying habit of not quite coming smooth despite lots of sanding and
three layers of filler. I tried the method of filling the seam with super glue
and then sanding smooth after it dries and even that didn’t work all that well I
eventually gave up an made do with a visible seam if you catch it in the right
light. It looks fine from a distance although it wouldn’t win me any prizes at
the IPMS. Whilst sanding make sure the upper cavity for the gunner is well
sealed, as the cockpit transparency tends to fill with dust from the sanding. I
hadn’t glued my models nose on properly and it fell off late in the sanding
process, which was a blessing in disguise, as it allowed me to clean all the
dust out of the glazed transparency!
|
PAINT & DECALS |
Masking next…gulp! Oh boy is this complicated! The Eduard mask is a must have for painting an HE 111 as the nose transparency is really complicated. The instructions are clear and good. Don’t press too hard on the side windows as they could fall off and disappear inside the model. One tip; once the mask pieces are stuck in place give them a blast with a hairdryer. The materials used for the masks tend towards flatness and the curves of the HE 111 mean they tend to come unstuck. Warm them up a bit with a hairdryer and they stick down just fine. Also make sure that you put down a thick layer of liquid mask over the parts that are too curved to take a piece of masking material. It wasn’t quite thick enough on the mid upper gunners canopy and I had to spend ages chipping off the paint. Other than that, and some serious eye stain, masking worked out fine.
Painting was pretty straightforward. I plumped for a desert camouflage scheme mainly because I hadn’t tried one before! The colours were all Hannants Xtracolour which are gloss. I really like Hannants paint, particularly the way the lid fits on the tin! Humbrol tends to be a bit tight with the result that the lid gets all gummed up after a while, doesn’t seal properly, and the paint gets a skin on it. The other major advantage of Hannants is that they don’t opt for a confusing number scheme they call their colours (for Luftwaffe models at least) what they are RLM 66 or RLM 80 and it doesn’t half make life easier! The aircraft I chose was from the days when KG26 were based in Sardinia and, (from what I could work out from my history book) attacking ships involved in the Anzio landings. They were past their best in those days most of the experienced crews having been killed in previous actions.
I tried an idea I had seen from a magazine, which meant spraying the aircraft silver first, then the camouflage colour. When the paint is still soft you use masking tape to lift off the top colour leaving the silver underneath, making the model look weathered. I was quite pleased with the results even if they are a bit overdone. I shaded in the lines between control surfaces with some black pastel dust a technique I learned about from this website! I do agree with the opinion that this should not be overdone and again, having not tried this before, I was quite pleased with the results. Finally I used brown calligraphers ink and a very long thing brush, to ink in the panel lines. I really like this technique and think it really enhances the 3d illusion of the model. Its quite fun too a bit like tracing pictures when you were a kid. Decals were next (they used to call them transfers in my day) I used the ones from the Italeri kit which if a little basic were fine, in fact it was quite a relief not to have to fiddle about with all those tiny fuel signs and stencilled warnings. I used theMicroscale decal solutions and they came out just tickety boo. The swastika for the tail came out of a spares set.
Next some matt varnish and then I got on with removing the masking. I have to hold myself back from doing this too soon it as I want to do it virtually before the paint sets. It’ at this stage the model really starts to look real and really quite gets me going!
On to the twiddly bits and my personal modelling Waterloo. The undercarriage went on fine, I used the True details weighted wheels, which are a work of art and highly recommended, beautifully and realistically moulded. I had previously assembled the torpedoes and replaced the tail fins with ones from the Eduard set, n.b. put on the fins first, then the propellers, I did it the other way round and the fins don’t fit over the propellers. The E.T.C racks for the torpedoes and the extra detailing bits from the Eduard set are a nightmare of fiddling; needing folding, gluing and butt joining all on a seemingly microscopic scale.
The mid upper gunners cradle and gun are also pretty difficult to put together so by the time the model was nearing completion I was gnashing my teeth with impatience and frustration. The parts for the model include an angled pitot tube, but there is no hole in the wing underside for a pitot tube, nor could I find any reference to one in any of my pictures. So like the dedicated modeller I am and true “detail –hound”…… I left it out! Crumbs I may get drummed out of the IPMS for this! The last job was to stick on the Radio mast and glue some of the fine stretchy thread, sold in the UK by Aeromaster, as an arial. Whilst difficult to handle this stuff is brilliant and gets a good taught results every time.
|
CONCLUSIONS |
Well I’m chuffed to bits with the results even though I have got grey hairs and strained eyes as a result. Re reading my review it makes my model seem like a real botch job, but I think sometimes you can get bogged down in getting every detail perfect and lose sight of the main objective which is to improve your abilities and have a finished model to be proud of. Overall I think the result is pretty good I’ve learned and tried lots of new techniques on the model and with its complicated transparency and desert camouflage it compliments my collection very nicely.
The kit, for its age, is excellent. The panel scribing went well despite the problems and I am greatly encouraged to try it again. The Eduard detailing set is a bit over the top quite honestly and how they expect you to build some of the parts I have no idea! It certainly gives a great result in the cockpit and the mid upper gunners position however. I would not go to this much trouble again although I still like the HE 111 I really fancy converting the kit to an H22 version with a V1 under the wing.
|
REFERENCES |
Schiffer Books Luftwaffe Profile 9 Heinkel He 111 Manfred Griehl
The HE 111 at the RAF museum Hendon London
The remains of a Spanish build HE 111 I discovered tucked up a corner at the Duxford Imperial War Museum in the UK that I was allowed to walk around , touch and take pictures of.
Copyright ModelingMadness.com. All rights reserved. No reproduction in part or in whole without express permission.
If you would like your product reviewed fairly and fairly quickly, please contact the editor or see other details in the Note to Contributors.
Back to Reviews Page 2022