Planet Models 1/48 Ar-95A/W
|
KIT # |
058 |
|
PRICE: |
$54.00 |
|
DECALS: |
German, Chilean, and Condor Legion |
|
REVIEW & |
|
|
NOTES: |
No swastika |
GERMAN "SWORDFISH": Building the Planet Models 1/48 Arado
Ar-95A/W
|
HISTORY |
As late as the mid-1930s, despite the revolutionary changes taking place in aircraft development, the staffs responsible for choosing aircraft to operate at sea off aircraft carriers were very conservative, as manifested in their willingness to continue to develop biplanes even though their landbased counterparts were far more committed to the high-performance monoplane. This was even true in Germany, which was starting with "clean slate" so far as naval aviation was concerned. When approval for construction of the Graf Zeppelin was given in 1935, the Oberkommando der Marine proved to be little more imaginative than their counterparts in England. The specification released was for a torpedo-bombing-reconnaissance aircraft that could operate from wheels or floats. The Arado Flugzeugwerke was given the contract to develop what was designated the Ar-95.
The result was an aerodynamically cleaned-up Swordfish. Originally a two-seater, the Ar-95 was a staggered single-bay biplane with noticeable sweepback on both sets of wings. Powered by the BMW 132 radial, the Ar-95 V1 was soon joined by the Ar-95 V-2, which was powered by a Junkers Jumo 210 liquid-cooled engine. It did not provide the same performance as the V1 and was re-engined with the BMW 132; the V-3 and V-5, which were three-seater and the prototype of the Ar-95A floatplane, were radial-powered from the outset.
 Tests revealed that the design fell short of the specified performance, and
it was realized the Ar-95 would be - at best - obsolescent by the time Graf
Zeppelin was commissioned. A new specification, issued in 1937, would result
in the Ar-195. In the meantime, Arado was working on a pre-series of Ar-95A-0
floatplanes, and was urged by the RLM to solicit overseas orders. While this was
going on, the six Ar-95A-0 were sent to Spain, equipping Gruppo 64 in
Majorca for anti-shipping operations; the unit was disbanded in April 1939 and
the aircraft handed over to the Spanish Nationalists, who operated them in the
maritime reconnaissance role until 1948.
Tests revealed that the design fell short of the specified performance, and
it was realized the Ar-95 would be - at best - obsolescent by the time Graf
Zeppelin was commissioned. A new specification, issued in 1937, would result
in the Ar-195. In the meantime, Arado was working on a pre-series of Ar-95A-0
floatplanes, and was urged by the RLM to solicit overseas orders. While this was
going on, the six Ar-95A-0 were sent to Spain, equipping Gruppo 64 in
Majorca for anti-shipping operations; the unit was disbanded in April 1939 and
the aircraft handed over to the Spanish Nationalists, who operated them in the
maritime reconnaissance role until 1948.
The two-seat Ar-95A-1 obtained an order from Chile for three floatplanes and three land-based versions, which were delivered in 1939. An additional batch of twelve Ar-95A-1s were delivered to the Luftwaffe in 1939-40, eight of these equipping the third staffel of SeeAufklanrungsGruppe 125 (SAGr. 125) in the Baltic. With the invasion of the Soviet Union on June 22, 1941, the Ar-95A-1s were used in Latvia and Estonia, participating in the invasions of the islands of Moon and Daego off the Estonian coast in October 1941. The unit operated briefly in Finland before giving up its Ar-95A-1s for Bv-138s and transferring to the Black Sea. The Ar-95A-1s were transferred to SAGr. 127 and remained in the Baltic. None of them survived the war.
|
THE KIT |
 This full cast-resin model was originally announced as part of the Classic
Resin Airframes line, but was cancelled due to the fact that this line has not
been commercially successful, though some very interesting oddball airplanes
have been released. Classic Airframes - of which CRA was a part - works closely
with MPM in the creation of their kits. MPM, with the molds already made,
decided to release the kit as part of its Planet Models line, which is mostly
known for 1/72 resin models of "Luft '46" projects.
This full cast-resin model was originally announced as part of the Classic
Resin Airframes line, but was cancelled due to the fact that this line has not
been commercially successful, though some very interesting oddball airplanes
have been released. Classic Airframes - of which CRA was a part - works closely
with MPM in the creation of their kits. MPM, with the molds already made,
decided to release the kit as part of its Planet Models line, which is mostly
known for 1/72 resin models of "Luft '46" projects.
The model is an example of resin casting at its best, with thin shells for the main wings, fuselage and floats; if one thinks of an MPM limited-run injection-molded kit done in resin, one has a clear idea of the quality. The molds are clean with only a hint of flash, which is easily cleaned up.
|
CONSTRUCTION |
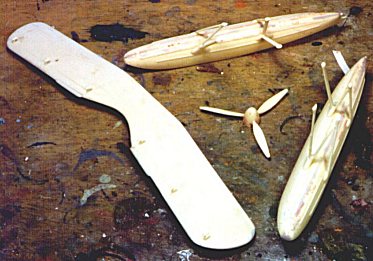 I assembled the wings and floats using epoxy, and set them aside while I went
to work on the fuselage. The interior was painted with Tamiya RLM Grey, the
various panels detailed with paint, and the cockpit assembled. Pre-fitting has
shown this would not need any trimming to fit inside the fuselage, and it was
glued in with epoxy. The fuselage halves were glued together and rubber-banded
until the epoxy set up, then the horizontal stabilizer, which had had to be
carved on a bit to make it fit to the fuselage, was attached. The engine was
painted and installed in the rear half of the cowling, and the front half glued
on. The easy part of the construction was now over.
I assembled the wings and floats using epoxy, and set them aside while I went
to work on the fuselage. The interior was painted with Tamiya RLM Grey, the
various panels detailed with paint, and the cockpit assembled. Pre-fitting has
shown this would not need any trimming to fit inside the fuselage, and it was
glued in with epoxy. The fuselage halves were glued together and rubber-banded
until the epoxy set up, then the horizontal stabilizer, which had had to be
carved on a bit to make it fit to the fuselage, was attached. The engine was
painted and installed in the rear half of the cowling, and the front half glued
on. The easy part of the construction was now over.
The next day, all the seams were sanded smooth, and puttied where necessary. The lower wing was attached to the fuselage with cyanoacrylate, and the noticeable gaps between the upper surfaces and the fuselage were filled with gap-filling CA and then puttied over.
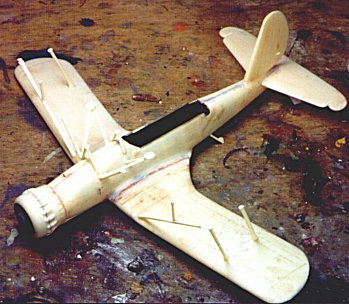 Each of the struts for the floats were cleaned up and test-fitted, since they
were to butt-join the floats and fuselage. As I checked position and got it
right, I C-Aed the struts to the floats, filling in any gaps with C-A and
hitting it all with accelerator to insure it set up correctly. When completed,
each of the floats would easily fit to their proper locations on the fuselage
and lower wing of the airplane.
Each of the struts for the floats were cleaned up and test-fitted, since they
were to butt-join the floats and fuselage. As I checked position and got it
right, I C-Aed the struts to the floats, filling in any gaps with C-A and
hitting it all with accelerator to insure it set up correctly. When completed,
each of the floats would easily fit to their proper locations on the fuselage
and lower wing of the airplane.
Next I attached the outer interplane struts. When they were dry, I fitted the upper wing to them, and tacked it in position. I then test-fit and reconfigured the cabane struts to fit; holding them in position, I glued them to the fuselage. I then glued the long interplane bracing strut, positioning it and gluing it to the lower wing.
|
PAINT & DECALS |
Once all this was set up, the next thing to do was paint it with light grey paint for primer, and to see any places that needed more putty, sanding and filing. The fuselage seams were stubborn, as were the seams along the top of the floats, but these disappeared quickly under Gunze Mr. Surfacer. Once all was done and the seams had disappeared, I shot the model with a second coat of light grey to insure I was right.
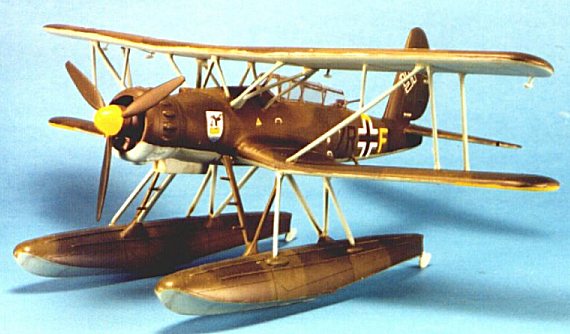
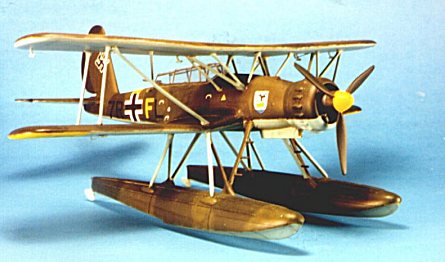
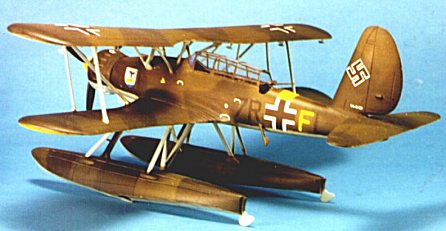 The camouflage was applied after the sub-assemblies were shadow-shaded with
flat black along the panel lines. The airplane was in maritime camouflage of
RLM72 and RLM73 upper surfaces, and RLM65 lower surfaces. Gunze-Sanyo has just
released these colors in their 400-series range - which also includes other
late-war Luftwaffe colors like RLM76 and 78 blue-greys, ROT23 Red, and RLM81,
82, and 83 greens. I made the hard-edged "splinter" camouflage with
drafting tape to which I attached thread along the edge to lift it, allowing
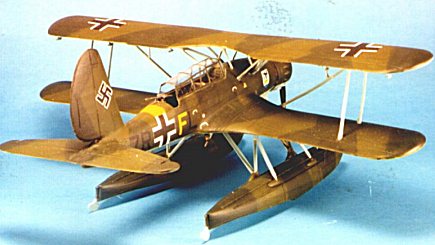
"scale" overspray. The Eastern Front theater markings of Gelb 04
yellow on the lower wingtips and the front of the propeller spinner was the only
dash of color. Once all had dried, I Futured the model and was ready for decals.
The camouflage was applied after the sub-assemblies were shadow-shaded with
flat black along the panel lines. The airplane was in maritime camouflage of
RLM72 and RLM73 upper surfaces, and RLM65 lower surfaces. Gunze-Sanyo has just
released these colors in their 400-series range - which also includes other
late-war Luftwaffe colors like RLM76 and 78 blue-greys, ROT23 Red, and RLM81,
82, and 83 greens. I made the hard-edged "splinter" camouflage with
drafting tape to which I attached thread along the edge to lift it, allowing
"scale" overspray. The Eastern Front theater markings of Gelb 04
yellow on the lower wingtips and the front of the propeller spinner was the only
dash of color. Once all had dried, I Futured the model and was ready for decals.
I used the kit decals for "Gelbe Friedrich", an Ar-95A-1 of SAGr. 125, the original Luftwaffe operator of the type. The decals were Propagteam, and went down easily. With Propagteam decals, which are less likely in their newer versions to stick like glue to the first surface they touch, I still cover the surface of the model with water where I will be putting down the decal, then float it into position. Once I am satisfied, I mop up the water with tissue paper and then cover the decal with Micro-Sol.
When the decals were set, I Futured the model a second time, and then proceeded with final assembly.
|
FINAL ASSEMBLY |
Having test-fit everything during construction, the upper wing went on easily and was CAed in position with accelerator. The same was done with each float and the engine cowling. I let everything set up, then airbrushed Flat Future (Future mixed with Tamiya Flat Base) overall. When that was dry, I glued the canopy in position with Elmer's white glue.
The final item was to give the airplane some exhaust stains, and attach the MG15 in the rear cockpit.
|
CONCLUSIONS |
While it certainly never had the impact on history that its British cousin the Swordfish did, the Ar-95A-1 is a good-looking float biplane, and the kit makes up into a first-rate model. For a modeler who has made at least one full resin kit and a limited-run biplane model before, this would be a good introduction into a more complicated resin kit.
Copyright ModelingMadness.com