Tamiya 1/48 Do-335B-2
|
KIT # |
61088 |
|
PRICE: |
3200 Yen |
|
DECALS: |
two aircraft |
|
REVIEWER: |
|
|
NOTES: |
|
HISTORY |
The Dornier
Do-335 was at its birth and has remained ever since the only twin-piston
engine fighter/bomber aircraft to utilize the centerline thrust concept.
In the Do-335, use of this power concept was revolutionary, though Dr.
Claudius Dornier had first used it on his G-1 flying boat in 1939 and had
used it frequently in other flying boat designs during the 1920s
 and 1930s. Though
only ten Do-335A-0 Pfeil (Arrow) aircraft ever reached operational test
status before the end of the Second World War, the aircraft has lived on
in the minds of aviation enthusiasts for this radical design concept,
which resulted in one of the most radical-looking airframes ever
produced.
and 1930s. Though
only ten Do-335A-0 Pfeil (Arrow) aircraft ever reached operational test
status before the end of the Second World War, the aircraft has lived on
in the minds of aviation enthusiasts for this radical design concept,
which resulted in one of the most radical-looking airframes ever
produced.
The Technische Amt issued a requirement in 1942 for a single seat unarmed intruder capable of carrying a 1,100 lb. bombload at 495 mph. Arado, Dornier and Junkers submitted responses; the Dornier Projekt 231, employing centerline thrust, became the winning contender.
The first
prototype flew on October 26, 1943, and 14 other Versuchs aircraft
entered test flight status during the winter of 1943-44, constituting the
prototypes of the A-series fighter-bomber. With the worsening of the war
situation, development emphasis switched during late 1944 from the
A-series fighter-bomber to a more heavily-armed B-series Zerstoerer,
with the first two prototypes, the V13 and V14, being completed at
Oberpfaffenhofen during the winter of
 1944-45.
The Do-335 V13 - prototype of the Do-335B-1 - had the two 15mm cannon in the nose of the A-series replaced by two MG 151 20mm weapons, while the Do-335 V14 had that armament supplemented y two 30mm MK 103 cannons in fairings ahead of the wing leading edge, just inboard of the main gear; this was to become the Do-335B-2, which would have been the main early production version of the series. Though six other B-series prototypes were under construction when further development was terminated by capture of the Oberpfaffenhofen facility by the U.S. Army in late March, 1945, the V13 and V14 were the only examples of the B-series to ever fly, demonstrating a top speed of 474 mph. Following the end of the war, the Do-335 V14 was handed over to the French, and extensively tested between August 1945 and the spring of 1947.
|
THE KIT |
 For about twenty
years, the only available 1/48 kit of the remarkable Do-335 was made by
Monogram. A modeler could create most of the single-seat A-series
prototypes, as well as the A-12 two-seat trainer and the A-6 night
fighter. While acceptable by 1970s standards, the kit was long in the
tooth and well "over the hill" by the time Tamiya brought out their
Do-335A two years ago, followed some six months later by the Do-335A-12
two-seater.
For about twenty
years, the only available 1/48 kit of the remarkable Do-335 was made by
Monogram. A modeler could create most of the single-seat A-series
prototypes, as well as the A-12 two-seat trainer and the A-6 night
fighter. While acceptable by 1970s standards, the kit was long in the
tooth and well "over the hill" by the time Tamiya brought out their
Do-335A two years ago, followed some six months later by the Do-335A-12
two-seater.
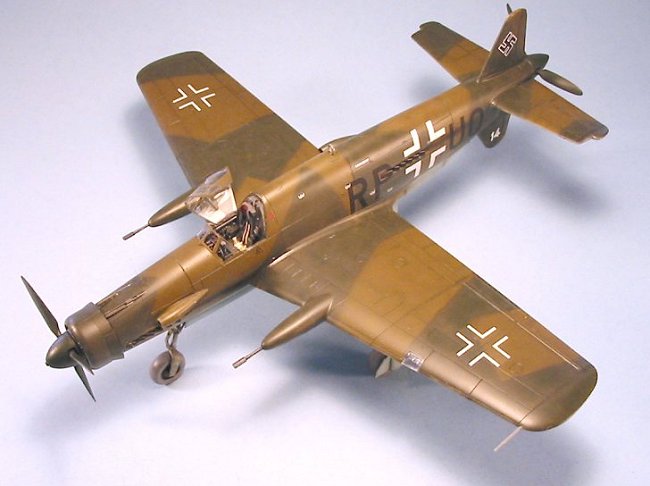
This Do-335B-2 "heavily armed version" differs from the earlier single-seat kit in having a fuel tank in the bomb bay, a larger nose wheel and main gear, with different main gear doors than the earlier kit, as well as a slightly-different armored canopy. Other than these items and the decal sheet which provides the markings for the Do-335 V14 as flown by the Luftwaffe in early 1945 and the French air force in late 1945, the kit is essentially similar to the first release.
|
CONSTRUCTION |
 Many modelers
have remarked that the Do-335 kits have some of the best kit engineering
of any Tamiya release, such that the kits bring new meaning to the term
"shake and bake." This is definitely true. A modeler just returning to
the hobby after 20 years away could pick up one of these kits and -
merely by following the instructions - come up with a well-assembled
model that would also be a goo
Many modelers
have remarked that the Do-335 kits have some of the best kit engineering
of any Tamiya release, such that the kits bring new meaning to the term
"shake and bake." This is definitely true. A modeler just returning to
the hobby after 20 years away could pick up one of these kits and -
merely by following the instructions - come up with a well-assembled
model that would also be a goo d
"first airbrushing project" with its simple painting requirements. I call
kits like these "confidence builders," since a modeler of any degree of
ability can construct them and in the process gain the confidence of
their ability to go on and tackle more difficult projects down the road.
d
"first airbrushing project" with its simple painting requirements. I call
kits like these "confidence builders," since a modeler of any degree of
ability can construct them and in the process gain the confidence of
their ability to go on and tackle more difficult projects down the road.
For this kind
of kit, construction starts with painting. One can paint all of the
cockpit parts, the gear wells and bomb bay, the landing gear and gear
doors, etc., prior to cutting any part off a sprue, and this is what I
did, following the kit painting instructions.
I next assembled the wings as sub-assemblies and set them aside. The fuselage was next, a small project that involved attaching the nose gear well, the rear engine intake interior detail, and the bomb bay detail, and the exhaust backing plates, then gluing the fuselage halves together and attaching the upper rear part of the fuselage. Even though these parts went together with great delicacy, I still used some Mr. Surfacer on the fuselage centerline to insure there would be no embarrassing seam.
I then attached the wings and the horizontal flying surfaces, and the model was ready for painting.
|
CAMOUFLAGE & MARKINGS |
After
pre-shading the model, I contemplated the painting instructions, which
call for an upper surface camouflage of RLM82 Dark Green and RLM83 Bright
Green, with RLM76 Light Blue lower surfaces. In my experience, and using
the 82-83 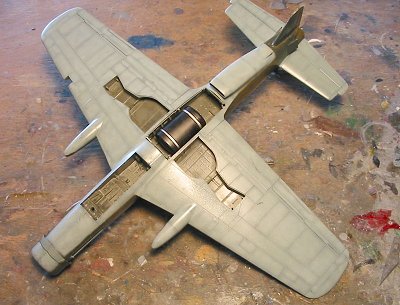 colors
results in a very high-contrast finish. However, all the photographs I
have ever seen of the Do-335s show a very low-contrast scheme. I decided
that the more likely scheme - based on the photographic evidence - would
be RLM81 Braunviolet and RLM82 Dark Green. Since these airplanes did not
see much use, and were therefore unlikely to have faded, this would be a
Dark Olive Drab and Dark Green, with a more accurate-looking low-contrast
finish.
colors
results in a very high-contrast finish. However, all the photographs I
have ever seen of the Do-335s show a very low-contrast scheme. I decided
that the more likely scheme - based on the photographic evidence - would
be RLM81 Braunviolet and RLM82 Dark Green. Since these airplanes did not
see much use, and were therefore unlikely to have faded, this would be a
Dark Olive Drab and Dark Green, with a more accurate-looking low-contrast
finish.
I therefore painted the model with Gunze-Sangyo RLM76 on the lower surfaces, and RLM81 and RLM82 on the upper surfaces, thinning the paint 50-50 with rubbing alcohol and shooting it freehand through the newly-purchased replacement #1 tip of my Paasche H. This was followed with a good coat of Future.
Decals:
I used the kit decals, which are typical of what one expects from Tamiya, i.e., thick and a bit resistant to going on without repeated applications of decal solvent and finally slicing the decals with the tip of a #11 X-acto blade along the underlying panel lines.
|
FINAL CONSTRUCTION |
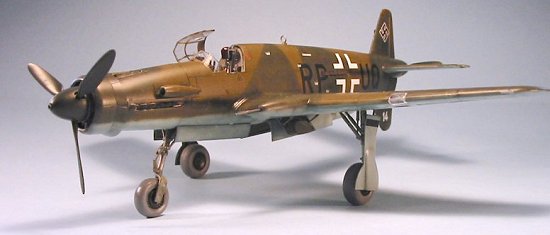
 After an
application of Future over the finished decals, I gave the model a coat
of thinned Dullcote, then applied some light exhaust staining with Tamiya
"Smoke." I then attached the landing gear, unmasked the canopy and glued
it in the open position.
After an
application of Future over the finished decals, I gave the model a coat
of thinned Dullcote, then applied some light exhaust staining with Tamiya
"Smoke." I then attached the landing gear, unmasked the canopy and glued
it in the open position.
|
CONCLUSIONS |
As noted above, this model is so well designed that it does not present any difficulty in assembly or painting. The result is a good-looking model of a distinctive-looking airplane. "Luft '46" modelers could have fun with this, finishing it in "what if" camouflage schemes.
August 2003
Thanks to HobbyLink Japan for the review kit.
If you would like your product reviewed fairly and quickly, please contact me or see other details in the Note to Contributors.