|
KIT: |
Hasegawa 1/32 FW-190D-9 |
|
KIT # |
8069 |
|
PRICE: |
$40.00 MSRP |
|
DECALS: |
Three Aircraft |
|
REVIEWER: |
|
|
NOTES: |
Cutting Edge cockpit, EagleCals decals |
|
HISTORY |
 That pretty much says it all about
the Langnasen-Dora, last of the "Butcher-Bird" line to see major
operational use in the Second World War. During the last six months of
the war in Europe, a German experte mounted in the Dora-9
knew he was again the equal of anything else he saw in the skies over
Germany.
That pretty much says it all about
the Langnasen-Dora, last of the "Butcher-Bird" line to see major
operational use in the Second World War. During the last six months of
the war in Europe, a German experte mounted in the Dora-9
knew he was again the equal of anything else he saw in the skies over
Germany.
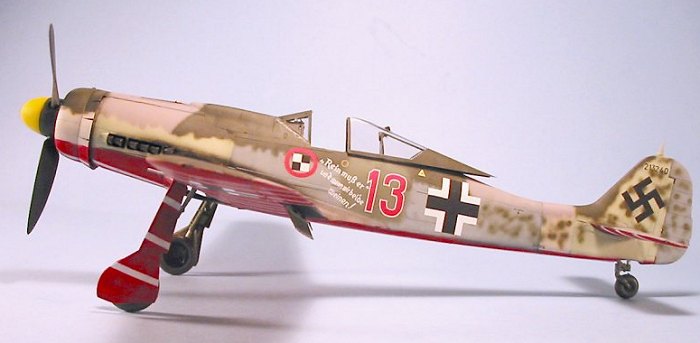
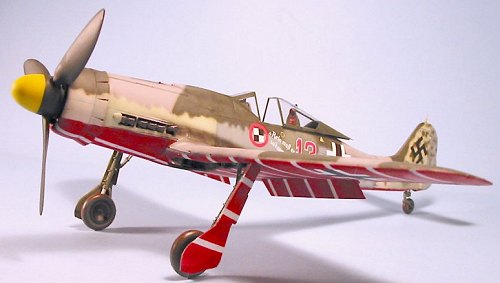
One of the more interesting units to fly this airplane was the Zirkus Platsschutzstaffel of JV-44, the so-called "Squadron of Experts". These four Fw-190s - three D-9s and a D-11 - can certainly lay claim to having the most dramatic and colorful markings of any German fighters of the entire war.
Commanded by
Leutnant Heinz Sachsenberg, they were also known as the
Sachsenberg Schwarm. While numerous Luftwaffe researchers have
studied the unit since photographs of "Red 13" were discovered in 1986
and named it the Papagei Staffel, it is highly unlikely the unit
was ever known by that name during its ex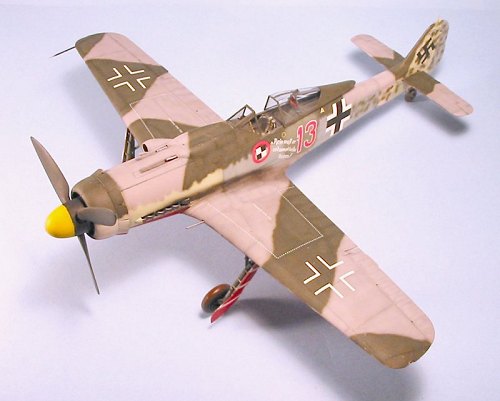 istence, though Papagei
("parrot") may have been their call sign.
istence, though Papagei
("parrot") may have been their call sign.
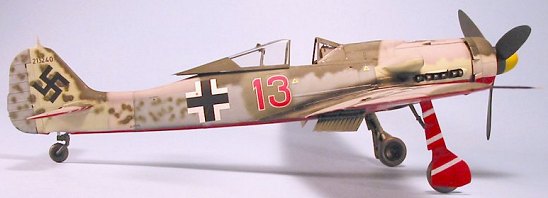
What makes the aircraft of this unit of interest to modelers is their unique markings. Once thought to be painted black with white stripes on their undersides, it's now known they were painted red with white stripes as a quick method of identifying themselves to flak gunners that they were "friendly" aircraft during any low altitude combat with Allied fighters.
While there is no record of these aircraft ever entering combat against Allied fighters, they - like everything involving JV-44 - have become the subject of enduring interest by modelers around the world. The unit had a sense of humor, since each aircraft had an amusing "dark humor" slogan on it. "Red 1," a Fw-190D-9 carried the slogan "Verkaafts mei Gwand 'I foahr in Himmel" ("Sell my clothes, I'm going to heaven") flown by Staffel Kapitaen Sachsenberg; "Red 3," a Fw-190D-9: "Im Auftrage der Reichsbahn" ("By Order of the State Railway") a reference to the fact a shot-down pilot could travel free on the state railways to rejoin his unit; Red 4, a Fw-190D-11: "Der nachste Herr,deselbe Dame!" ("The next man, the same woman"); and "Red 13," a Fw-190D-9: "Rein muss er wen wir beide weinen" ("In he goes and then we both cry").
|
THE KIT |
 There have been
other 1/32 kits of the Focke-Wulf Fw-190D-9 that were released in the
1970s. For all intents and purposes, those kits are now large "door
stops," with the release of this all-new 1/32 Dora by Hasegawa.
There have been
other 1/32 kits of the Focke-Wulf Fw-190D-9 that were released in the
1970s. For all intents and purposes, those kits are now large "door
stops," with the release of this all-new 1/32 Dora by Hasegawa.
The kit is as well-engineered as the Bf-109G released last year, which I think makes up out of the box into the most accurate Bf-109 model of any sub-type ever released. Since I am not a "109 Nut", but am a big fan of the Butcher Bird, I was very excited when this kit was released. Once I got my hands on it, I was even more excited, to see how well-designed and produced it is.
 The Dora is
crisply-molded, and engineered in such a way that it is obvious they will
continue the Hasegawa policy of milking out every sub-type of an airplane
that can be done with minimal changes to the parts selection. With a
separate tail, it came as no surprise when it was announced at the recent
Shizuoka Hobby Show in Japan that they will release a late Dora with the
Ta-152-style vertical fin this coming June. With the engineering in
place for outer wing armament, it is entirely likely they will show up
with a Fw-190D-11 at some point.
The Dora is
crisply-molded, and engineered in such a way that it is obvious they will
continue the Hasegawa policy of milking out every sub-type of an airplane
that can be done with minimal changes to the parts selection. With a
separate tail, it came as no surprise when it was announced at the recent
Shizuoka Hobby Show in Japan that they will release a late Dora with the
Ta-152-style vertical fin this coming June. With the engineering in
place for outer wing armament, it is entirely likely they will show up
with a Fw-190D-11 at some point.
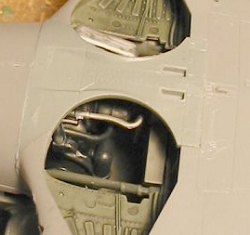
Most importantly, this is the first Dora kit that has the open wheel well and provision of the rear section of the Jumo powerplant.
The kit decals, at least as far as the two aircraft from the Papagei Staffel are concerned, are inaccurate and best replaced with the aftermarket sheet "Doras of the Galland Circus" produced by Eagle-Editions.
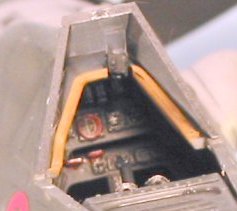
While the cockpit will be mostly acceptable to most modelers, since the real Fw-190 cockpit was quite simple, and because it's hard to see into even in 1/32 scale, the only really necessary aftermarket product (besides decals) is a good seat - that is very visible, and a good seat improves things tremendously.
|
CONSTRUCTION |
After reading Brett Green's very detailed description of building his kit, and copying his detail photos of painting various parts like the engine and cockpit for my own guidance, I decided to take the radical step of actually following the construction sequence shown in the instructions.
 This kit is
very well-designed, and goes together easily. Because I had the Cutting
Edge resin cockpit for the older Hasegawa Dora kit, I decided to use it.
I can say now that it was a waste of time, other than using the seat.
While it was not hard to dremel down the sides of the resin tub to fit in
the new kit's fuselage, the truth is that once the model is assembled,
there is not much to be seen in there, and what can be seen is not that
much superior to what was provided in the kit to begin with.
This kit is
very well-designed, and goes together easily. Because I had the Cutting
Edge resin cockpit for the older Hasegawa Dora kit, I decided to use it.
I can say now that it was a waste of time, other than using the seat.
While it was not hard to dremel down the sides of the resin tub to fit in
the new kit's fuselage, the truth is that once the model is assembled,
there is not much to be seen in there, and what can be seen is not that
much superior to what was provided in the kit to begin with.
I did use the
kit instrument panel, painting it RLM66 and then applying the instrument
decals one by one. The end result looks quite acceptable, even if I did
have to do some minor "fiddling" to fit kit panel to aftermarket tub.
Modelers can get any one of the "super kit" resin upgrades for this that
are being produced by aftermarket companies the way Herman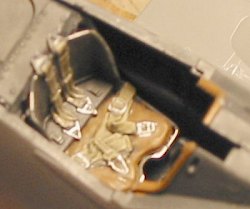 n Goering told
Kurt Tank to produce the Fw-190 ("like hot rolls"), but the problem is
that when it's assembled, there is not that much there to be seen in an
Fw-190 cockpit (as stated above). The Bf-109 cockpit - which can be seen
far more completely - does indeed benefit from all the aftermarket
razzmatazz, but this kit really doesn't need them. Save your money and
buy another one of these beauties.
n Goering told
Kurt Tank to produce the Fw-190 ("like hot rolls"), but the problem is
that when it's assembled, there is not that much there to be seen in an
Fw-190 cockpit (as stated above). The Bf-109 cockpit - which can be seen
far more completely - does indeed benefit from all the aftermarket
razzmatazz, but this kit really doesn't need them. Save your money and
buy another one of these beauties.
It does,
however, need a good seat, and the seat in the Cutting Edge set is very
good. I took a look at the seat Brett Green had done and followed suit.
One thing I have recently discovered about putting a wash on parts that
have been painted with acrylics is to use a wash made of 9 parts Future
to 1 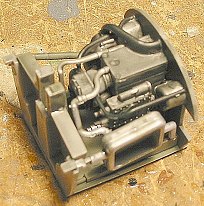 part Tamiya X-18 Semi-gloss Black, which not only doesn't harm the
acrylics I am painting over, it seals them. A light airbrushed coat of Dullcote takes care of the sheen.
part Tamiya X-18 Semi-gloss Black, which not only doesn't harm the
acrylics I am painting over, it seals them. A light airbrushed coat of Dullcote takes care of the sheen.
I then assembled the engine bay, after painting all the parts per instructions - and per the guidance of Brett's photo of his work - before assembly.
After gluing
the cockpit tub and engine bay and exhaust tubs into position, I glued
the fuselage together. I had previously glued each tail half to its
respective fuselage half at the outset. There was almost no centerline
seam. Do remember: the rear fuselage does have a centerline seam
(like the Bf-109), and it is correctly offset to the right in the
fuselage extension. You'll only need a bit of Mr. Surfacer 1000 for the
seam on the upper engine co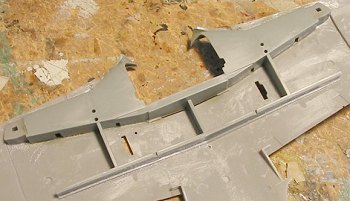 wl,
since the lower centerline seam is correct for the panels that are opened
to service the engine. I attached the horizontal stabilizers and finished
the sub assembly by attaching the radiator and cowling, opting for the
open-flaps look.
wl,
since the lower centerline seam is correct for the panels that are opened
to service the engine. I attached the horizontal stabilizers and finished
the sub assembly by attaching the radiator and cowling, opting for the
open-flaps look.
Having already
pre-painted the wheel wells when I pre-painted the other interior parts,
assembly of the wing was a breeze. The wheel well is attached to a wing
spar that absolutely guarantees the wing will have the correct dihedral.
This is as important a point as the engineering
 of the gear legs, since
incorrect dihedral and improperly-aligned landing gear are the to major
places where modelers "screw the pooch" when they build Fw-190 models
previous to this one.
of the gear legs, since
incorrect dihedral and improperly-aligned landing gear are the to major
places where modelers "screw the pooch" when they build Fw-190 models
previous to this one.
I had heard that attachment of the wing to the fuselage was a bit "fiddly, and it was. However, test-fitting a couple times to see what was what insured that when I did apply glue, I knew how to make the parts "snap together." The rear wing root joint on both wings seemed to want to pop loose. I fixed this by applying some cyanoacrlyate to the area through the flap well, and held the joint in position until the glue hardened.
It was time to head to the paint shop.
|
CAMOUFLAGE & MARKINGS |
Painting:
While
Hasegawa provides white stripes for the modeler who wants to go "the easy
route" in doing a JV-44 Dora, the truth is that this route will be
neither easy nor accurate. If you do use the decals, it is virtually
guaranteed the red undersurface
 will show through, since I have yet to
see a set of kit decals that are opaque enough to withstand red.
Additionally, nice, neat, equal-width, properly-aligned stripes would be
completely wrong! The undersides of these airplanes were painted in this
scheme with the airplane sitting on its gear, under operational
conditions; we had trouble painting the Suez stripes on the lower wing
surfaces of the F4U-7 I helped restore, with the airplane sitting in a
hangar and we had no time pressure to finish the job. If you look at the
photos in "Doras of the Galland Circus," it is clear the stripes were
not nice and straight, were not equal-width, and were not
spaced and aligned properly. Additionally, there was not a nice sharp
border between the red undersides and the rest of the camouflage. Since
both the red and white paint were applied over the already-applied
camouflage paint, these were not nice smooth applications with no
"holidays" either. You might get away with decals in 1/48, but in 1/32,
you need to paint it.
will show through, since I have yet to
see a set of kit decals that are opaque enough to withstand red.
Additionally, nice, neat, equal-width, properly-aligned stripes would be
completely wrong! The undersides of these airplanes were painted in this
scheme with the airplane sitting on its gear, under operational
conditions; we had trouble painting the Suez stripes on the lower wing
surfaces of the F4U-7 I helped restore, with the airplane sitting in a
hangar and we had no time pressure to finish the job. If you look at the
photos in "Doras of the Galland Circus," it is clear the stripes were
not nice and straight, were not equal-width, and were not
spaced and aligned properly. Additionally, there was not a nice sharp
border between the red undersides and the rest of the camouflage. Since
both the red and white paint were applied over the already-applied
camouflage paint, these were not nice smooth applications with no
"holidays" either. You might get away with decals in 1/48, but in 1/32,
you need to paint it.
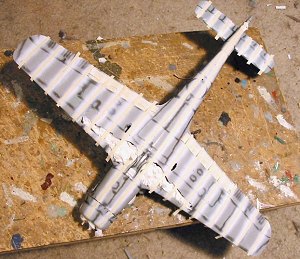 I first
"pre-shaded" the model by roughly airbrushing flat black over all panel
lines and ribs. I then applied flat white over the lower surfaces, a bit
thicker where I intended to have stripes, less-thick between, but enough
to provide an undercoat for the red so I wouldn't have to apply a ton of
paint when I shot the red. I then cut some strips of drafting tape,
eyeballing the strips rather than measuring them (so they wouldn't be
equal-width. I then applied the stripe masks, again eye-balling it rather
than marking it off, to get the "random factor" into the scheme.
I first
"pre-shaded" the model by roughly airbrushing flat black over all panel
lines and ribs. I then applied flat white over the lower surfaces, a bit
thicker where I intended to have stripes, less-thick between, but enough
to provide an undercoat for the red so I wouldn't have to apply a ton of
paint when I shot the red. I then cut some strips of drafting tape,
eyeballing the strips rather than measuring them (so they wouldn't be
equal-width. I then applied the stripe masks, again eye-balling it rather
than marking it off, to get the "random factor" into the scheme.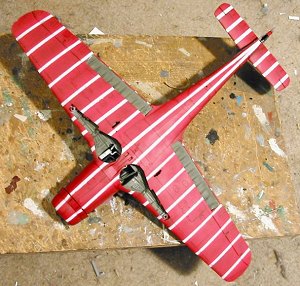
I thinned Gunze-Sangyo "Flat Red" about 60 (paint)- 40 (thinner) after mixing in a little Sky Grey to get an approximation of German Red. This was airbrushed so that it ended up with an "uneven" look in terms of uniformity of the painted surface.
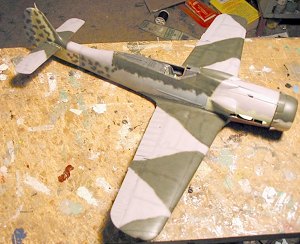
Once all this was done, I masked off the lower surfaces and went to work on the upper surface camouflage. By not making tightly-defined masks, I insured that the red border would be "ragged" when finished.
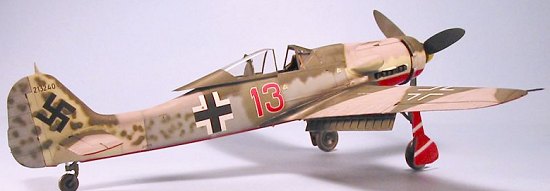
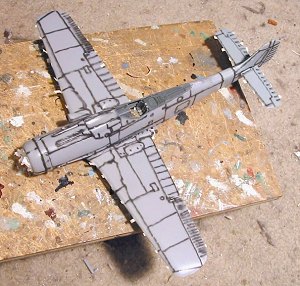
This Fw-190D-9
was an early one, by the fact of it being a "flat top" and with the early
RLM75 and RLM81 upper surface camouflage. The fact that the airplane was
overpainted where the personal number and insignia are painted leads me
to suspect this airplane was perhaps acquired by JV44 "unofficially," as
most of their airplanes were. I decided to use all three of the
underside colors: RLM76 Light Blue, and "RLM84" in both the "Sky" and
"Tan" colors. The Kolourpolitzei can't prove otherwise, and it
adds color to a colorful model. The radiator cowling was done in RLM84
Tan, as was the fuselage extension, while the engine "power egg" and the
rear fuselage/vertical fin were done in RLM84 Sky. The
 center fuselage
and rudder were done in RLM76. Inasmuch as early Fw-190D-9s were
frequently converted from already-produced Fw-190A-8 airframes, it is
entirely possible this was done. (One of the things I really like about
late-war Luftwaffe camouflage is that it leaves things open for more than
a bit of "artistic license."
center fuselage
and rudder were done in RLM76. Inasmuch as early Fw-190D-9s were
frequently converted from already-produced Fw-190A-8 airframes, it is
entirely possible this was done. (One of the things I really like about
late-war Luftwaffe camouflage is that it leaves things open for more than
a bit of "artistic license."
The upper surfaces were painted with Gunze-Sangyo paints. I use their "Medium Sea Grey," which has a distinct violet hue, as RLM75, and made my own mixture of RLM83 Dark Green, using a standard Fw-190D-9 camo pattern from the Eagle-Editions decal instruction sheet.
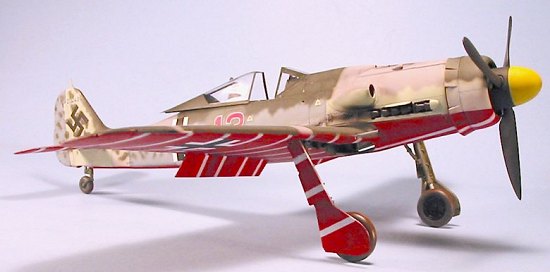
The spinner and prop blades were painted RLM70, with an RLM04 yellow forward section to the spinner.
When all was
dry, I gave the model a coat of Future.
Decals:
Fortunately, I still had the instruction sheet for the JV44 Doras from two years ago, since Eagle-Editions didn't have the new instruction sheets printed yet, though they did have the reprinted decals, which they sent off as soon as they were received from the printer. (Thanks, Jerry and Judy!)
What needs to be said about Eagle-Editions decals? They're printed by Micro-Scale, they're as accurate as can be achieved, if you follow the instructions the result will look great.
|
FINAL CONSTRUCTION |
I applied exhaust staining using my Future-with-black wash, with repeated passes to darken it.
 I then
attached the exhausts, which are a bit fiddly to do, but not impossible.
I then
attached the exhausts, which are a bit fiddly to do, but not impossible.
The landing gears were assembled, and gear doors attached. I "weathered" the tires by dry-brushing Tamiya "Red-Brown" to simulate the mud worn into the tires from operation off a dirt strip.
Assembly of the landing gear is a breeze. The only way a modeler could commit the major mistake of Fw-190 modelers - misalignment of the landing gear - would be to physically break the gear. The assembly is perfectly engineered so that all one has to do is push the landing gear leg into its attachment hole, and it is in proper position. Those of you who think the landing gear on an FW-190 sticks straight down will be surprised to find out it doesn't. Modelers can successfully use this model as a guide for correcting their 1/48 and 1/72 Butcher Birds to correct that problem.
|
CONCLUSIONS |
This is one of the best kits in any scale it has ever been my privilege to build. There's more to it than just assembly, but the physical kit is so well-designed you can concentrate on getting its look right as regards painting. At a price of US$39.95 - not that much more than many 1/48 kits these days - you can afford to build more than one, and I have seen the model priced as low as US$33.00 already. There is a plethora of interesting markings for the airplane from the aftermarket. (Personally, when it comes to Fw-190D-9s, I choose Eagle Editions decals hands-down, just because I know that Jerry "Mr. Dora-9" Crandall designed them; if there's something he doesn't know about this airplane, no one else knows it either.)
This model is fun to build. I can't recommend it more highly than that.
May 2003
Review kit courtesy of HobbyLink Japan.
If you would like your product reviewed fairly and quickly by a site that has over 200,000 visitors a month, please contact me or see other details in the Note to Contributors.