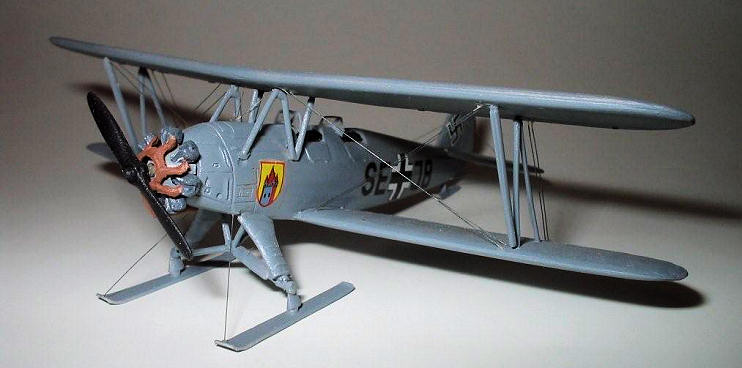
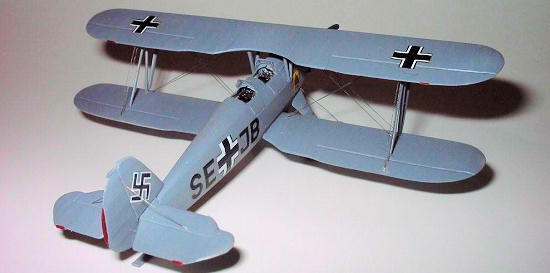
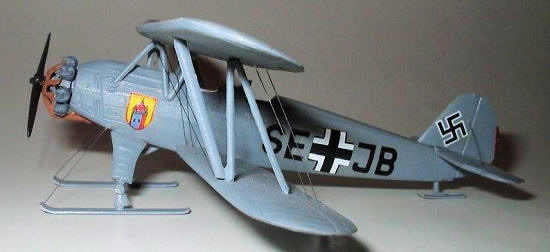
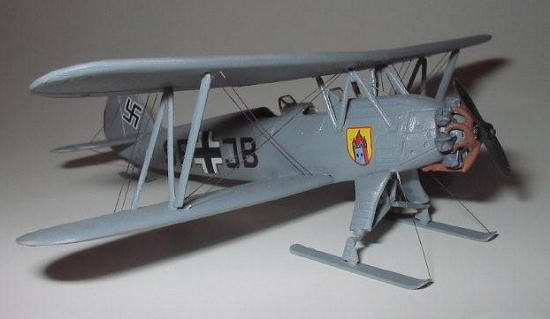
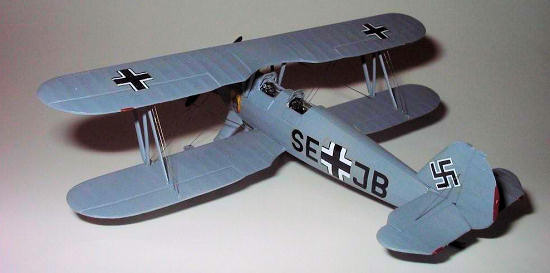
Huma 1/72 FW-44 'Stieglitz'
| KIT #: | ? |
| PRICE: | $? |
| DECALS: | Nine options |
| REVIEWER: | Brian Baker |
| NOTES: |
| HISTORY |
The Focke Wulf FW-44 “Stieglitz” was to the
Luftwaffe what the Stearman Model 75 “Kaydet” (PT-13, PT-17, PT-18, PT-27. and
N2S) were to the American armed services.
Designed in 1932 by Professor Kurt Tank, who later
became Focke Wulf’s chief designer and became famous for his classic FW-190
fighter, the FW-44 became a standard Luftwaffe primary trainer during the war
years. The FW-44 A, C, D, F, and J models were powered by a 150 hp. Seimens SH14
seven cylinder radial engine, while the FW-44B and E
versions had the
135 hp. four cylinder
Argus AS-8
powerplant The FW-44 was a two seat tandem open cockpit
 staggered
biplane, and possessed excellent flying and aerobatic characteristics. One was
used for an aerobatic display during the 1934 National Air Races in
staggered
biplane, and possessed excellent flying and aerobatic characteristics. One was
used for an aerobatic display during the 1934 National Air Races in
These aircraft were flown in aerobatic displays
throughout
Along with the Arado AR-66 and the Gotha GO-145,
the FW-44 helped to form the backbone of the Luftwaffe training schools before
and during World War II. In addition to training duties, FW-44’s were sometimes
acquired by operational units, who used them for training and communications
duties.
Many were produced in such foreign countries as
| THE KIT |
This is one of Huma’s earlier offerings, and
consists of approximately 31 parts cast in soft white styrene, along with two
clear plastic windshields.
The engine is nicely detailed, while the interior is
rather sparse, with a cockpit floor, seats, control sticks, and instrument
panels.
No sidewall detail is provided, but if you include the pilots, you won’t
need any. If you don’t, the added
 detailing
of the cockpit would certainly help the appearance of the model.
detailing
of the cockpit would certainly help the appearance of the model.
The molding appears to be generally accurate, as would be expected from Huma, and there is little flash to be trimmed off. The only options are skis to replace the wheels, although the aircraft has been operated on twin floats at various times.
INSTRUCTIONS
The earliest Huma kits provided instructions only in German, and this one is no exception.. If you read German, a lot of information is provided, although if you don’t, much information is decipherable if you have an Enigma code machine. An excellent 1/72 scale three view drawing is provided, which provides nearly all rigging information, and a sprue diagram and exploded drawing clearly describes the assembly process. Even a copy of the decal sheet is provided. Exterior color information is provided, but no interior color data is included, although there are references available for that information. Color schemes and decals for no less than nine aircraft are provided, ranging from pre-World war II German civilian versions, Luftwaffe trainers, exported aircraft, and postwar aerobatic display airplanes.
| CONSTRUCTION |
I first attached the lower wing and positioned it
properly. Then I mounted the cabane struts on the fuselage, making sure that the
 tops
measured exactly the width of the strut positions on the upper wing.
Then I placed the upper wing on the table, moved the
fuselage into place, and Tenaxed the struts in place.
I did my model in an overall color, so this was
possible.
If I had used a multi-colored scheme, I would have painted the
parts before assembly, but with the one color scheme, all gluing was done before
painting.
tops
measured exactly the width of the strut positions on the upper wing.
Then I placed the upper wing on the table, moved the
fuselage into place, and Tenaxed the struts in place.
I did my model in an overall color, so this was
possible.
If I had used a multi-colored scheme, I would have painted the
parts before assembly, but with the one color scheme, all gluing was done before
painting.
After the wings were attached and lined up properly, I popped the “N” struts into place in my pre-drilled strut location holes.
The power plant consists of an engine, front cover, exhaust manifold, propeller and crankshaft, and a retaining ring for the propeller shaft. This can be detailed and painted before installation, and is probably the last part that should be attached to the model. The landing gear, although a bit complicated, is easy to install, and you have a choice of wheels or skis.
| COLORS & MARKINGS |
No specific information on colors or unit supplied.
| FINAL CONSTRUCTION |
 This is
one biplane that doesn’t take a lot of rigging.
I used stripped electronic wire, rolled straight and cut
to the correct length.
This wire is easy to work with, and the airplane can be
completely rigged in less than half an hour.
The only three view drawing I have available, the one
from the kit instructions, only shows the landing and flying wires in the main
wing cells, but the airplane did have wires bracing the cabane struts, and also
tail bracing wires, which are alluded to in the photo on the front of the
instruction sheet.
These locations are not shown on the three-view, so you
will need an additional source for these locations.
The aileron control cables also run between the ailerons
just inside of the “N” struts, and the rudder cables are also shown in the
drawing. The elevator cables must have run inside the fuselage, as they do not
show up on any of the drawings.
The websites have photos that show how these details
should appear.
This is
one biplane that doesn’t take a lot of rigging.
I used stripped electronic wire, rolled straight and cut
to the correct length.
This wire is easy to work with, and the airplane can be
completely rigged in less than half an hour.
The only three view drawing I have available, the one
from the kit instructions, only shows the landing and flying wires in the main
wing cells, but the airplane did have wires bracing the cabane struts, and also
tail bracing wires, which are alluded to in the photo on the front of the
instruction sheet.
These locations are not shown on the three-view, so you
will need an additional source for these locations.
The aileron control cables also run between the ailerons
just inside of the “N” struts, and the rudder cables are also shown in the
drawing. The elevator cables must have run inside the fuselage, as they do not
show up on any of the drawings.
The websites have photos that show how these details
should appear.
| CONCLUSIONS |
The Huma kit is the second 1/72 scale FW-44 to appear. Years ago, I bought the Pegasus kit, which was quite crude. The Huma rectified that problem, and my response to the appearance of the Huma version was to use the fuselage of the Pegasus kit for the basis of a FW-61 conversion, the world’s first really successful helicopter, which was built by modifying an FW-44 fuselage and constructing a rotor system instead of wings.
The Huma kit takes a little bit of work, but can be made into a first class model. It certainly belongs on the shelf of any modeler who wishes to display the major types of aircraft operated by the Luftwaffe during World War II. Get at least one of these.
| REFERENCES |
Probably the best reference on the FW-44 is the site operated by IPMS Stockholm, where you can find numerous photos showing interior and exterior details of this aircraft. Other sites give marking information and other details.
Some of the more common reference books exclude the FW-44 for some reason. It does not appear in either William Green’s WARPLANES OF THE THIRD REICH or Wood and Gunston’s HITLER’S LUFTWAFFE: A PICTORIAL HISTORY AND TECHNICAL ENCYCLOPEDIA OF HITLER’S AIR POWER IN WORLD WAR II. One good photo appears in the Harleyford FW-190 book, and others are probably published in some of the Luftwaffe markings books that have appeared from time to time. The internet reference from IPMS Sweden is probably the best reference available.
October 2008
Copyright ModelingMadness.com. All rights reserved. No reproduction in part or in whole without express permission.
If you would like your product reviewed fairly and quickly, please contact me or see other details in the Note to Contributors.