| KIT #: | 72001 |
| PRICE: | $Out of production |
| DECALS: | 2 options |
| REVIEWER: | Brian Baker |
| NOTES: | Pavla's first kit. |
| HISTORY |
The German Kriegsmarine was never popular with Hitler (This was because Hitler was prone to being sea-sick, even when the ship was tied up to the pier. Ed), so that service seemed to get the short end of everything during World War II, partially because of the influence of His Imperious Rotundity, Hermann Goering, who ran the Luftwaffe as a medieval fief and severely retarded the development of German naval aviation during World War II. The developmental history of the Fieseler Fi-167 is a case in point; it was a good aircraft that exceeded its design requirements, yet never managed to get into mass production or service.
 With the
construction of Germany’s only aircraft carrier, Graf Zeppelin, in
the late thirties, aircraft were needed for shipboard operation.
Messerschmitt developed a navalized version of their standard fighter, the
Bf-109T, which featured arrestor gear and extended wings for this purpose,
and a design competition was conducted for a multi-purpose torpedo,
reconnaissance, and dive bombing aircraft capable of operating from the
deck of a carrier. Two prototypes, the Arado Ar-195 and the Fieseler
Fi-167, were tested. The Arado failed to even meet the specifications, but
Fieseler’s product, essentially a high powered “Storch” biplane which today
would be classified as an STOL aircraft, exceeded the requirements by a
considerable margin.
With the
construction of Germany’s only aircraft carrier, Graf Zeppelin, in
the late thirties, aircraft were needed for shipboard operation.
Messerschmitt developed a navalized version of their standard fighter, the
Bf-109T, which featured arrestor gear and extended wings for this purpose,
and a design competition was conducted for a multi-purpose torpedo,
reconnaissance, and dive bombing aircraft capable of operating from the
deck of a carrier. Two prototypes, the Arado Ar-195 and the Fieseler
Fi-167, were tested. The Arado failed to even meet the specifications, but
Fieseler’s product, essentially a high powered “Storch” biplane which today
would be classified as an STOL aircraft, exceeded the requirements by a
considerable margin.
Powered by a 12 cylinder Daimler Benz DB-601B liquid cooled engine rated at 1,100 hp, the Fi-167 was a large, angular two bay folding wing biplane with one fixed MG-17 machine gun and one MG-15 on a swivel mount in the rear cockpit. The plane could carry one LTF-56 torpedo in a mount below the fuselage, four 110 lb. SC50 bombs on underwing racks, or one 550 lb. SC250 bomb. The aircraft had full-span slats and a large
wing, enhancing carrier operations. The airplane had especially good low speed characteristics, and it could almost hover in a light wind, being capable of almost vertical descents with the pilot in complete control of the aircraft at all times. An additional feature of the plane was jettisonable landing gear for safer ditching at sea.
With the “on-again off-again” status of the carrier, the Luftwaffe lost interest in the Fi-167, and after only 12 were built, the aircraft were used periodically by various second line units, as the type was rejected for Luftwaffe service. Its place was taken by the folding-wing Junkers JU-87C, a navalized version of the “B” model. Surviving Fi-167 aircraft were eventually sold to Rumania, but their subsequent use is unknown.
| THE KIT |
The kit consists of 33 white injection molded plastic parts, two vacuformed canopies, and a sheet of photo-etched brass. Finish is a little rough, and requires smoothing up with fine sandpaper, but this is nothing that an experienced modeler cannot handle. Most parts require considerable trimming before they will fit, but this is rather common in epoxy molded kits. The sprue attachment points are especially thick, so these require care when removing parts for assembly. The interior injection mold points need trimming off, as they will affect the fit on some parts, and may be visible in the cockpit interior.
The interior is provided in plastic with some detail parts in photo-etch metal. Some parts are duplicated, so you have your choice. Parts include a cockpit floor, instrument panel, bulkhead, stick, seats, and even a detailed MG-15 machine gun on a metal mounting.
 The landing gear
and propeller are all accurately done, but require quite a bit of
trimming. The wings lack some surface detail, especially with the control
surface lines, but these can be scribed without difficulty, especially
before assembly. The fuselage only requires minor trimming, although the
little machine gun trough on the right side of the nose requires smoothing
out.
The landing gear
and propeller are all accurately done, but require quite a bit of
trimming. The wings lack some surface detail, especially with the control
surface lines, but these can be scribed without difficulty, especially
before assembly. The fuselage only requires minor trimming, although the
little machine gun trough on the right side of the nose requires smoothing
out.
Wings and control surfaces attach with butts against the fuselage fittings, but the positions are obvious, and this shouldn’t be a problem. Be sure, however, to mount the lower wings with the correct dihedral angle, or the upper wing will not mount properly.
The kit instructions consist of four pages. A sprue diagram is helpful, and the instructions are in English and Czech. Drawings are crude but useful, but I would suggest a complete search of the internet for drawings and photographs. Rigging information is incomplete, so this needs to be obtained elsewhere. Fortunately, the rigging of this aircraft is rather uncomplicated, so this is not a serious problem.
Several three view drawings of the two aircraft depicted are provided, although the only difference between these two aircraft is ONE of the registration letters painted on the side of the fuselage. One is TJ+AR and the other is TJ+AN. Big deal!
I have had this kit on my shelf for a number of years, so I finally decided that it was time to actually build it.
Then the fun starts.
| CONSTRUCTION |
 Paint the interior
with a basic coat of RLM 66 Grey, and then detail the cockpit to your
liking. Once the interior has been completed and all components are in
their proper positions, join the fuselage halves. Fill in the seams, and
then trim and attach the vacuform canopy using super glue. Be careful to
line it up correctly, or it will look funny. Fill the cockpit with Kleenex
and mask off the windows for painting. I drilled a hole in the spinner for
the crankshaft, and then inserted a piece of plastic rod to serve as a
crankshaft. Once the fuselage is complete, I attached the rudder in its
proper location. This will help in lining up the lower wings. I then
attached the lower wings using Tenax, allowing enough time for the wings to
set in position. Once set, I attached the horizontal tail unit, making
sure that the elevators and stabilizers lined up perfectly. Then, I
installed the landing gear on the lower wings. Be sure to drill small holes
where the strut locations are marked, as this will make wing assembly much
easier. By the way, I replaced the metal struts with plastic strip, and the
metal looked too thin for realism. At this point, the airplane is ready
for painting.
Paint the interior
with a basic coat of RLM 66 Grey, and then detail the cockpit to your
liking. Once the interior has been completed and all components are in
their proper positions, join the fuselage halves. Fill in the seams, and
then trim and attach the vacuform canopy using super glue. Be careful to
line it up correctly, or it will look funny. Fill the cockpit with Kleenex
and mask off the windows for painting. I drilled a hole in the spinner for
the crankshaft, and then inserted a piece of plastic rod to serve as a
crankshaft. Once the fuselage is complete, I attached the rudder in its
proper location. This will help in lining up the lower wings. I then
attached the lower wings using Tenax, allowing enough time for the wings to
set in position. Once set, I attached the horizontal tail unit, making
sure that the elevators and stabilizers lined up perfectly. Then, I
installed the landing gear on the lower wings. Be sure to drill small holes
where the strut locations are marked, as this will make wing assembly much
easier. By the way, I replaced the metal struts with plastic strip, and the
metal looked too thin for realism. At this point, the airplane is ready
for painting.
| COLORS & MARKINGS |
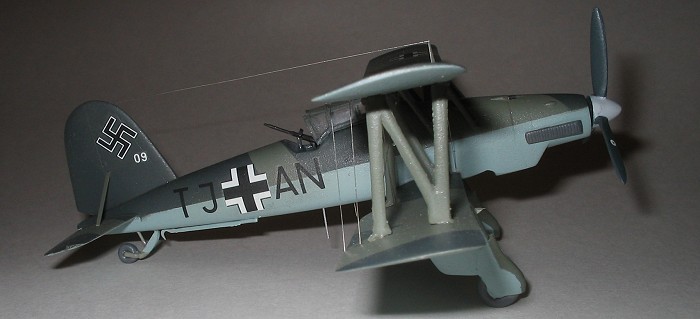
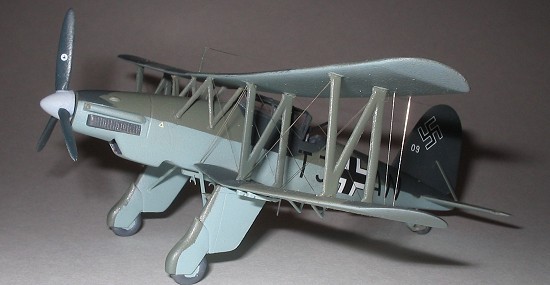
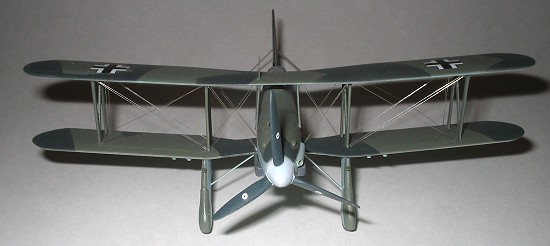
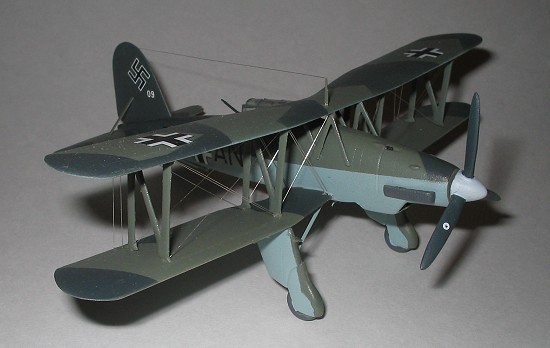
The instructions are correct in stating that the aircraft, true to Kriegsmarine fashion, should be painted a splinter pattern of 72 and 73 greens on the top surfaces, and 65 blue underneath. The problem I encountered is that I use ModelMaster paints, and either I am colorblind (I always pass my FAA eye exam, so I don’t think so) or the ModelMaster colors are so close that it is almost impossible to detect where one color ends and the other begins. Since photos show a distinct color separation pattern, I opted for a 71/73 pattern on the top, and 65 underneath. I started with the light blue, masked it off, and then painted the top in the illustrated splinter pattern. The landing gear covers are primarily light blue with a patch of 71 green on the leading edges, as shown in the available photos. The struts are all 71 or 73, and should be painted before assembly.
Also paint the tail bracing and landing gear bracing struts before assembly.
| ASSEMBLY CONTINUES |
WING ASSEMBLY
The easiest way to
assemble the top wings on this kit is to attach the four inboard wing “N”
struts to the lower wings, making sure that they are set at the right
angle. All four struts are the same, so you can’t mess this up. I used
super glue, although solvent would also work. Once the struts are in place
and set up, install the upper wing, making sure that the struts are
attached at exactly the right point. This is easier than it looks like it
will be. When the struts are dry, install the outboard “N”
 struts,
allowing them time to dry. Check the angle of the cabane struts next to
the fuselage, as they appear to be a little long. They should splay
outwards, which means that you might have to trim them a little before
assembly. When dry, the wing structure is fairly robust.
struts,
allowing them time to dry. Check the angle of the cabane struts next to
the fuselage, as they appear to be a little long. They should splay
outwards, which means that you might have to trim them a little before
assembly. When dry, the wing structure is fairly robust.
The last parts to go on will be the tail wheel, tail hook, engine exhausts, and tail and landing gear struts. I used white glue for these. The tail wheel might take some doing, as it sits at a peculiar angle. There is a very petite metal torpedo rack, which is located underneath the fuselage, and I used spare FW-190 wing racks for the underwing bomb racks. Their locations are clearly marked on the plan views. A couple of antennas are located underneath the rear fuselage. Install the metal aileron brackets under the wings. Add the radio mast above the right wing center section, and you are pretty much set. A coat of clear gloss could be sprayed on for protection, and the model is ready for decals.
DECALS
The decals in this kit are excellent, and except for the missing tail swastika, which I filched from the decal box, I used them for the entire model. There is a werke number on the fin, and other decals mark the location of fuel filler caps as well as the logos for the propeller.
RIGGING
I used my electronic wire technique to rig this biplane. I first installed the flying wires on the insides, and later the outside wing panels. These require parallel wires, The outside landing wires are single, and are the last to install. Don’t forget the aileron control cables behind the outboard wing struts. These are slightly different lengths, so install the forward wires first, following with the ones at the trailing edge of the wings.
| CONCLUSIONS |
This kit is an oldie but goodie. It isn’t as difficult as it would appear to be, and was actually a lot of fun to build. It is almost a one of a kind, and presents a unique aircraft in any Luftwaffe collection. Get at least one of these if you can find one.
| REFERENCES |
There isn’t a lot of information available on this aircraft. William Green’s Warplanes of the Third Reich has an interesting article about the airplane, including several photos of the aircraft. Other books dealing with Luftwaffe aircraft in general also have short descriptions and sometimes three views. A search of the internet brought up a few sites, including a drawing of a German aircraft with mottled fuselage sides, and another site shows an Fi-167 in what appears to be Croatian or Slovakian markings. The only photos available show Luftwaffe aircraft in the markings shown on the instructions. That is the scheme I used. Just be sure to follow the photos, as they are the best guides.
January 2006
If you would like your product reviewed fairly and fairly quickly, please contact the editor or see other details in the Note to Contributors.